


A crack in the drywall can mean almost nothing or it can signal something is actually wrong with the structure behind it. Most of the time, it’s nothing serious. But the visual difference between a settling crack and a structural one is subtle enough that it’s worth knowing what you’re looking at before reaching for the joint compound.
Drywall cracks fall into two broad categories. The first is cosmetic cracks caused by normal building movement, humidity cycling, and minor settling. These are common, manageable, and fixable with basic materials. The second is structural cracks that point to movement in the framing, foundation, or load-bearing elements. These need professional assessment before any repair work starts.
This article covers both. You’ll find a breakdown of the main crack types, how to read what each one is telling you, when to stop and call a professional, and how to repair each type correctly so the fix actually holds.
Most drywall cracks are cosmetic and fixable with patience and the right materials. A small number are not, and knowing the difference matters.
Key Takeaways:
- Most drywall cracks are caused by normal settling or seasonal wood movement, not structural problems.
- Wide cracks (over 1/4 inch), diagonal cracks that are growing, or cracks paired with sticking doors and sloping floors warrant a professional assessment before repair.
- Removing failed tape completely before re-taping is the single most important step in a lasting repair.
- Setting compound, not all-purpose, is the right material for filling deep cracks.
- Always prime repaired areas before painting, or the repair will show through the finished coat.
Why Drywall Cracks
Before you can fix a crack correctly, it helps to understand why it appeared. The repair approach changes depending on the cause, and patching over an active problem is a short-term fix at best.
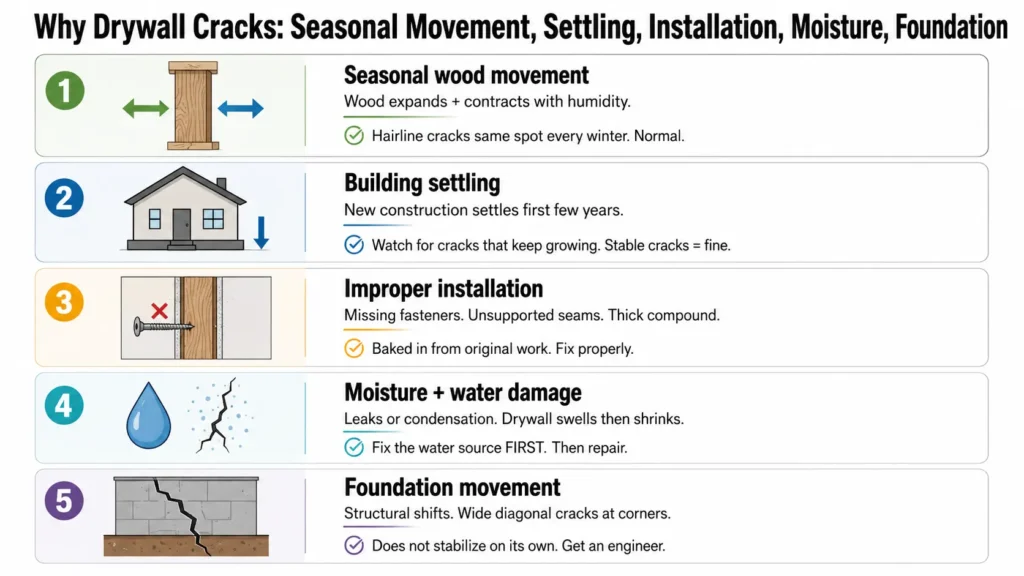
Seasonal Wood Movement
Wood framing expands and contracts throughout the year as indoor humidity and temperature shift, as explained by APA guidance on wood shrinkage and seasonal movement. This is normal and ongoing. The stress it creates shows up in the drywall, particularly at seams, corners, and places where framing members meet at different angles or thicknesses.
Hairline cracks that appear in the same spots every winter or after a long dry stretch are almost always caused by this mechanism. The wood dries out, shrinks slightly, and the drywall moves with it.
Homes in climates with significant seasonal humidity swings tend to see more of this than homes in more stable climates. Adding whole-home humidification in dry winter climates can reduce the frequency and severity of these recurring cracks, though it won’t eliminate them entirely.
Normal Building Settling
All buildings settle to some degree after construction, and new construction is especially prone to settling cracks in the first few years. The framing dries out, the structure adjusts to its loads, and cracks show up at weak points in the drywall finish.
Settling cracks typically stabilize over time. A crack that appeared once and hasn’t changed in years is generally not something to worry about. The ones worth watching are cracks that continue to grow, widen, or appear in new locations. Movement that doesn’t stop is worth investigating.
Improper Drywall Installation
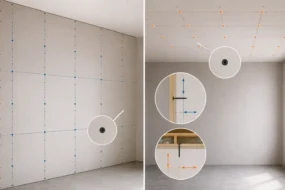
Some cracks are baked in from the original installation. Missing fasteners, incorrect fastener spacing, or sheets that weren’t properly supported at seams can all cause problems down the line during drywall installation. Butt joints that weren’t back-blocked or feathered wide enough are frequent crack locations.
Compound application matters too, especially when aiming for higher drywall finish levels. Joint compound applied too thick in a single coat shrinks more aggressively as it dries and is more prone to surface cracking than multiple thin coats. Skipping drywall primer before painting can also cause the finish paint to pull moisture unevenly from the compound, which leads to fine surface cracking that looks like a finishing defect.
Moisture and Water Damage
Water infiltration, roof leaks, plumbing leaks, and condensation issues can all cause drywall to crack as the material absorbs moisture and then dries out repeatedly. Understanding drywall moisture levels helps identify these issues early.
The critical point here: moisture-related cracks should not be repaired until the source has been identified and fixed. Patching over active moisture damage is temporary at best and can conceal conditions that eventually lead to mold growth on drywall. At worst, it conceals ongoing deterioration and potential mold growth behind a fresh coat of paint.
Foundation Movement
Significant foundation settlement, soil movement, or structural shifts produce cracks that behave differently from normal settling cracks. They tend to be wider, longer, more diagonal, and located at predictable stress points like the corners of windows and doors.
Foundation-related cracking typically does not stabilize on its own. It tends to continue over time and often appears across multiple walls or floors in a consistent pattern. This is a different situation from normal settling, and the repair approach is different too.
Types of Drywall Cracks and What They Mean
This is the diagnostic part. Most readers will spend the most time here because they’re trying to figure out whether what they’re looking at is a problem or just cosmetic.
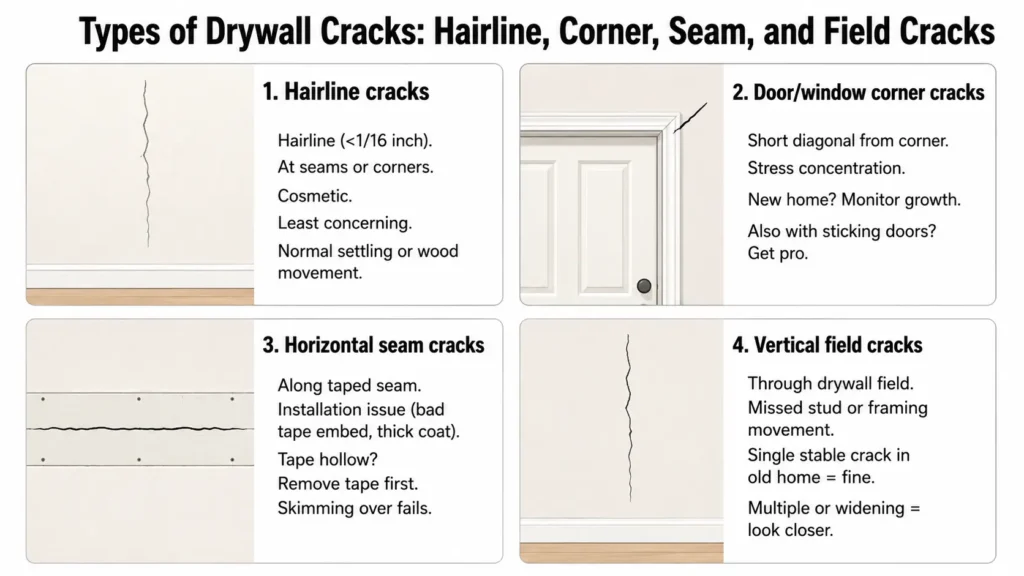
Hairline Cracks
Hairline cracks are very thin, often less than 1/16 inch wide, and typically appear at seams, corners, or across the field of the drywall. These are the most common crack type in residential buildings and the least concerning.
They show up most often along taped seams, at ceiling-wall intersections, and at the corners of door and window frames. Almost all of them are cosmetic, caused by minor settling, seasonal wood movement, or compound shrinkage during the original finish work.
Repair is straightforward and the fix holds well when the underlying cause is normal settling rather than active ongoing movement.
Stress Cracks at Door and Window Corners
Short diagonal cracks radiating from the corners of door and window openings are extremely common. Building movement concentrates stress at these points because the corners of rough openings are where framing forces tend to converge.
In homes past their initial settling period, these are usually cosmetic. Worth monitoring in newer construction, or if the crack grows noticeably over a short period.
The concern level rises when these cracks are wide, appear at multiple openings simultaneously, or are accompanied by doors and windows that stick or no longer close properly. That combination is a signal worth having a professional look at, not just patching over.
Horizontal Cracks Along Seams
A horizontal crack running along a taped drywall seam is almost always a finishing or installation issue rather than a structural one. Common causes include tape that wasn’t properly embedded during original installation, compound applied too thick in one coat, or tape that has lost adhesion in a high-humidity environment like a bathroom.
These are cosmetic but need proper repair, not just a skim coat over the existing tape. If the tape is bubbling, lifting, or sounds hollow when you tap it, the old tape has to come out before the repair will hold. Skimming over compromised tape is one of the most common reasons crack repairs fail.
Vertical Cracks in the Field of the Wall
Cracks running vertically through the drywall field, not along seams, can indicate framing movement or a missed stud during the original installation. They’re less common than seam cracks. If you see one, check whether its location corresponds to a stud line.
A single stable vertical crack in an older home is generally not a concern. Multiple vertical cracks or one that continues to widen are worth a closer look.
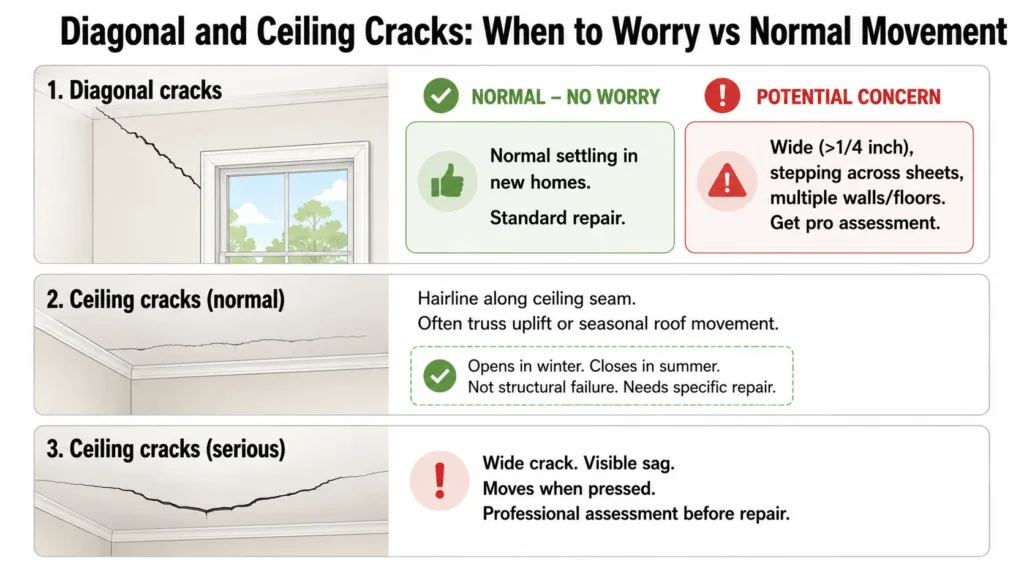
Diagonal Cracks
Diagonal cracks, particularly those running at roughly 45 degrees from window and door corners, are the most important crack type to understand correctly. They’re also the most misread.
In many cases, especially in homes under 10 years old, diagonal cracks are normal stress cracks from settling and require nothing more than standard repair. But diagonal cracks that are wide (more than 1/4 inch), that step across multiple drywall sheets, or that appear in consistent patterns across multiple walls and floors are a different matter. These can indicate foundation movement, differential settlement, or structural problems that won’t be solved by joint compound.
This is the crack type that most warrants professional assessment if it’s new, actively growing, or showing up alongside other symptoms like sticking doors, sloping floors, or gaps at baseboards.
Ceiling Cracks
Hairline cracks along ceiling seams are common and usually caused by truss uplift or normal seasonal movement in the roof framing.
Truss uplift is a phenomenon where roof trusses bow upward in winter, pulling ceiling drywall away from interior partition walls and creating cracks at the ceiling-wall intersection. The giveaway is a crack that opens in winter and closes in summer. This is not a structural failure. It’s a predictable movement pattern, and it requires a specific repair approach (more on that below).
Wide ceiling cracks, cracks with visible sag or vertical displacement between the two sides, or cracks accompanied by ceiling movement when pressed are a different situation. These should be assessed by a professional before any repair work starts.
When to Call a Professional
Most drywall cracks don’t require a professional. But some do, and patching a structural crack doesn’t fix the underlying problem. It delays it while making it harder to monitor.
Get a structural engineer or experienced contractor involved before you repair if:
- Cracks are wider than 1/4 inch
- Cracks have been visibly growing over weeks or months
- Diagonal cracks appear at multiple window and door corners simultaneously
- You’re seeing sticking doors or windows, sloping floors, or gaps at baseboards or trim alongside the cracks
- Ceiling cracks show visible sagging or displacement
- A crack has been repaired and returned quickly with no obvious explanation
- The home has a known history of foundation issues or is built on expansive clay soils
The practical point here is this: patching a structural crack is not just a waste of materials. It can mask a problem that continues to worsen while hidden. If there’s any genuine doubt about what you’re looking at, get an assessment first.
For anything suggesting foundation or load-bearing movement, a structural engineer is the right professional, not just a general contractor. Contractors can assess framing issues well, but foundation concerns require a structural engineer’s evaluation. The cost of an assessment is small compared to the cost of repairing damage that got worse because it was hidden.
How to Repair Drywall Cracks
Tools and Materials You’ll Need
- Joint compound (all-purpose works for most repairs; lightweight setting compound for deeper fills)
- Paper tape (preferred over mesh for crack repair because of better tensile strength and crack resistance)
- 6-inch and 10-inch drywall knives
- Sanding sponge or fine-grit sandpaper (120 to 150 grit)
- Drywall primer
- Utility knife
- Corner bead repair clips or metal corner bead for corner cracks
- Paintable flexible caulk for ceiling-wall intersection cracks related to truss uplift
Paper tape over mesh is worth emphasizing. Mesh tape is easier to work with, but it has lower tensile strength and is significantly more prone to cracking over flat seams unless it’s paired with setting compound rather than all-purpose. For most crack repairs, paper tape with all-purpose compound is the better combination.
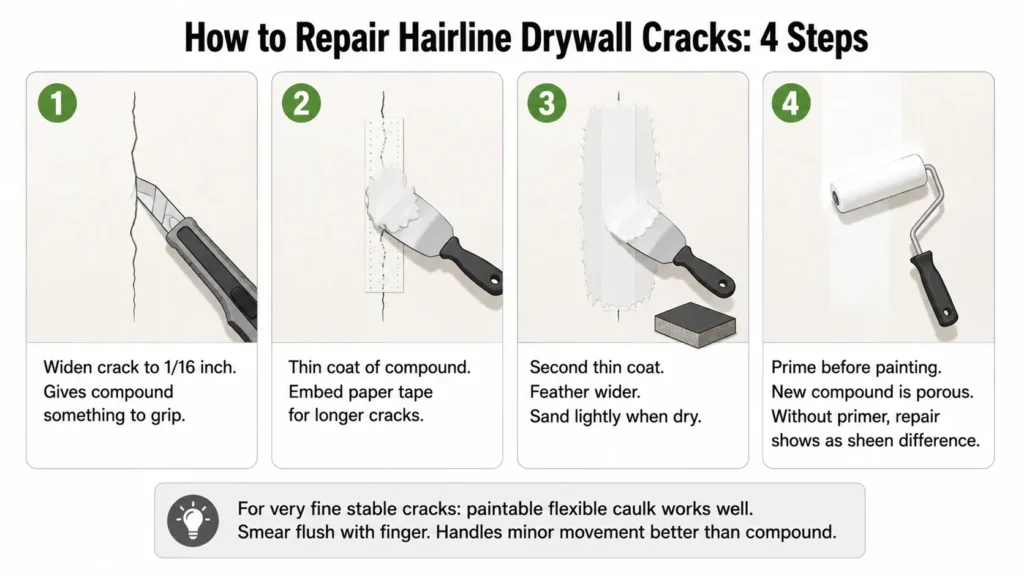
Repairing Hairline Cracks
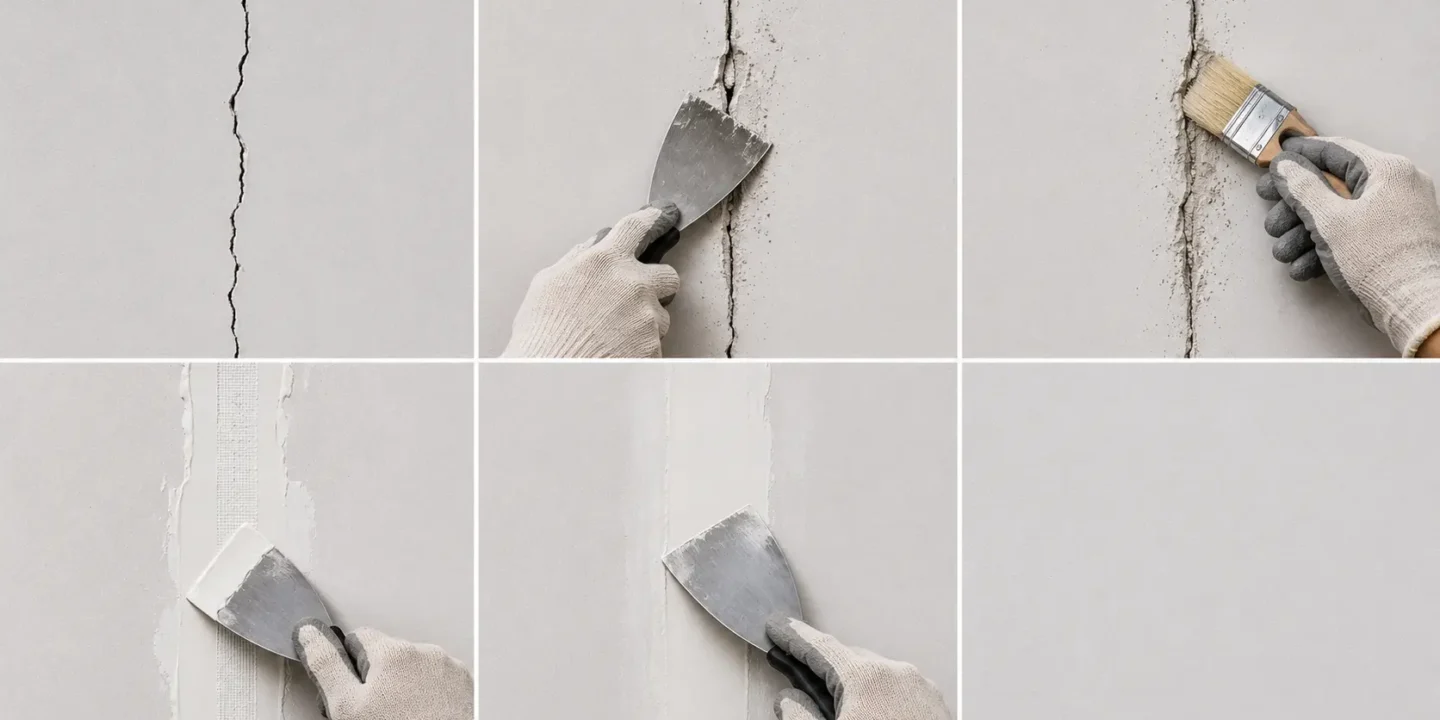
Step 1: Widen the crack slightly with a utility knife or a can opener tool. A hairline crack that’s just skimmed over will reappear. Opening it to at least 1/16 inch gives the compound something to grip.
Step 2: Apply a thin coat of joint compound, working it into the crack. For any crack longer than a few inches, embed a strip of paper tape over it.
Step 3: Once dry, apply a second thin coat and feather it wider. Sand lightly when dry.
Step 4: Prime before painting. New compound is more porous than the surrounding drywall paper. Without primer, paint absorbs unevenly and the repair shows through as a sheen difference even when the surface feels perfectly smooth.
For very fine hairline cracks in a stable wall, paintable flexible caulk applied with a finger and smoothed flush is a simpler and often more durable option. It accommodates minor movement better than rigid joint compound and holds up well in locations where the crack has been recurring.
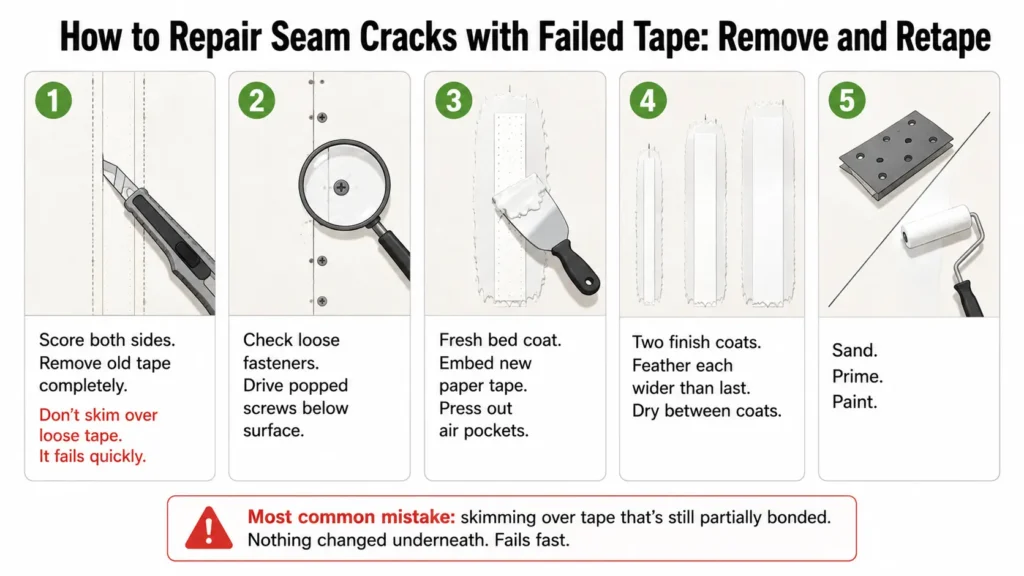
Repairing Seam Cracks with Failed Tape
Step 1: Score along both sides of the failed tape with a utility knife and remove the old tape completely. Do not skim over lifting or hollow tape. The new repair can only hold as well as what’s beneath it.
Step 2: Check the seam for loose fasteners. Drive any popped screws just below the surface and verify proper drywall screw spacing if the panel feels loose.
Step 3: Apply a fresh bed coat of joint compound and embed new paper tape, pressing firmly to eliminate air pockets.
Step 4: Apply two finish coats, feathering each one wider than the last. Allow full drying time between coats before continuing the repair.
Step 5: Sand, prime, and paint.
The most common mistake here is applying a skim coat over tape that’s still partially bonded. It looks like a repair from the outside but fails quickly because nothing has actually changed underneath.
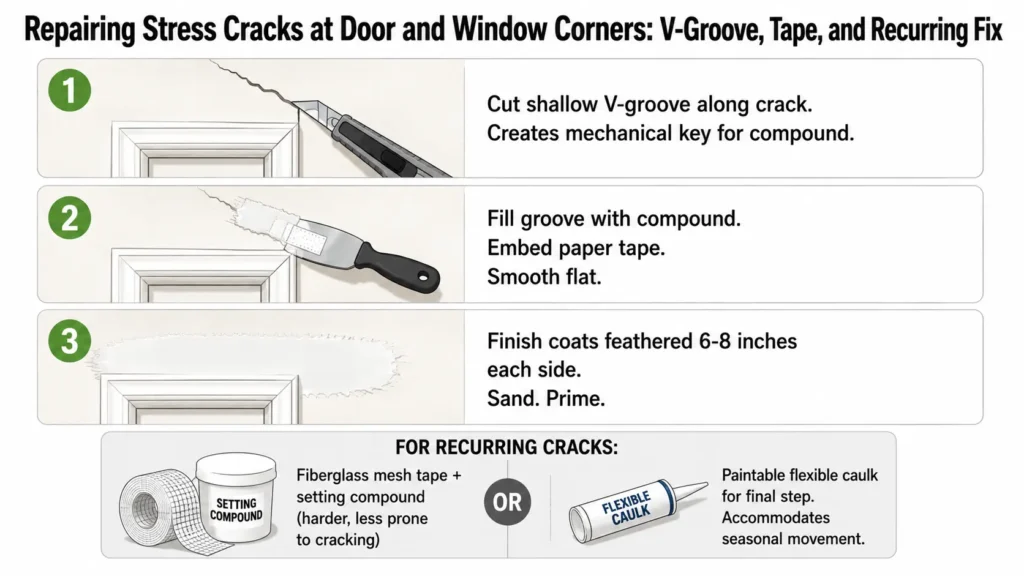
Repairing Stress Cracks at Door and Window Corners
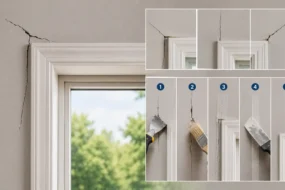
Step 1: Cut a shallow V-groove along the crack with a utility knife. This creates a mechanical key for the compound rather than leaving a tight hairline gap that compound can’t fill properly.
Step 2: Fill the groove with joint compound, embed paper tape, and smooth flat.
Step 3: Apply finish coats feathered 6 to 8 inches on each side. Sand and prime when dry.
For cracks that have come back multiple times after repair, consider using fiberglass mesh tape at this specific location followed by a setting-type compound for the base coat. Setting compound is harder and less prone to cracking than all-purpose. You can still use all-purpose for the finish coats.
If the crack has been recurring due to seasonal building movement, using paintable flexible caulk in the final step rather than rigid compound can help accommodate that movement without cracking again.
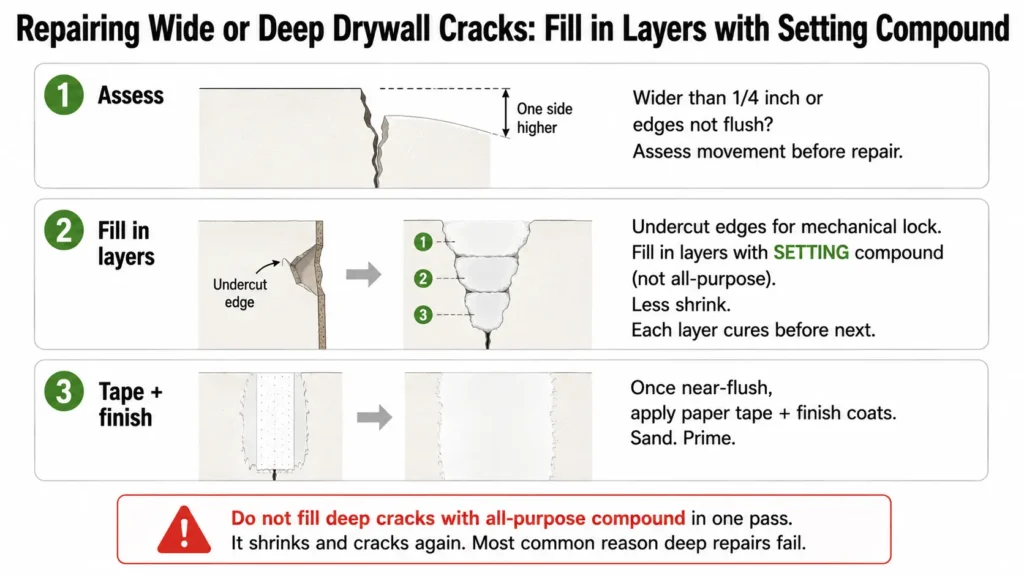
Repairing Wide or Deep Cracks
Cracks wider than 1/4 inch or with visible displacement between the two sides need more than compound and tape.
Step 1: Assess whether the edges are stable and flush. Displacement between the two sides of a crack, where one side sits higher than the other, indicates movement that should be understood before repair begins.
Step 2: For stable wide cracks, undercut the edges slightly with a utility knife to create a mechanical lock. Fill in layers using setting compound, not all-purpose. Setting compound hardens through a chemical reaction rather than drying, which means it shrinks far less and handles deep fills reliably. Allow each layer to cure before applying the next.
Step 3: Once filled to near-flush, apply paper tape and finish coats as with a standard repair.
Do not fill deep cracks with all-purpose joint compound in a single pass. It shrinks significantly as it dries and will crack again. This is one of the most common reasons deep crack repairs fail.
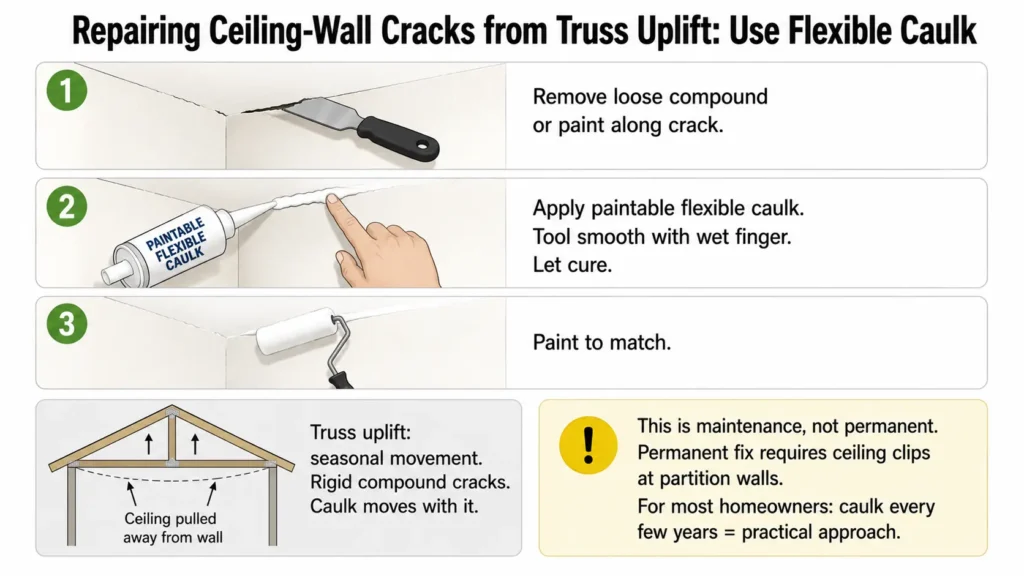
Repairing Ceiling-Wall Intersection Cracks from Truss Uplift
Standard repair with joint compound will not hold permanently at a ceiling-wall intersection where truss uplift is the cause. The movement recurs every heating season, and rigid compound cracks with it.
The right repair here uses paintable flexible caulk rather than rigid compound. It accommodates seasonal movement without breaking.
Step 1: Remove any loose compound or paint along the crack.
Step 2: Apply paintable flexible caulk, tool smooth with a wet finger, and allow to cure.
Step 3: Paint to match.
This is a maintenance repair, not a permanent solution. The underlying issue (truss uplift) is an installation detail. Resolving it properly would require re-floating the ceiling at partition wall intersections using ceiling clips rather than fastening directly to the top plate. For most homeowners, flexible caulk touched up every few years is the practical approach.
Why Crack Repairs Fail and How to Avoid It
This deserves its own section because repairs that come back are one of the most common complaints from people who’ve tried to fix drywall cracks themselves.
Skimming over failed tape without removing it. The repair can only hold as well as the layer beneath it. Tape that has lost adhesion will take the new skim coat with it. There’s no shortcut around this step.
Using all-purpose compound for deep fills. It shrinks too much as it dries. For fills deeper than about 1/4 inch, setting compound is the right material for base layers. All-purpose can handle the finish coats.
Applying compound too thick in one coat. Thick single coats shrink and crack. Multiple thin coats outperform one heavy application every time.
Not priming before painting. Compound and drywall paper absorb paint differently. Without primer, the repair shows through the finished coat as a dull spot or sheen variation, even when the surface is perfectly smooth. This step gets skipped constantly and it shows.
Repairing without fixing the source. A crack caused by an active roof leak, ongoing foundation movement, or a plumbing leak will return regardless of how well the repair is done. The source problem has to be resolved first.
Using mesh tape without setting compound. Mesh tape over a crack with all-purpose compound is a low-durability repair. If mesh tape is used, setting compound for the base coat is required to compensate for the lower tensile strength.
FAQ
Are drywall cracks a sign of foundation problems?
Sometimes, but not usually. Most drywall cracks are caused by normal settling, seasonal wood movement, or finishing issues. The cracks that warrant concern are wide (over 1/4 inch), diagonal, growing over time, or accompanied by sticking doors, sloping floors, or gaps at baseboards. If you’re seeing those signs together, get a professional assessment before repairing anything.
How do I stop drywall cracks from coming back?
Make sure you’re addressing the cause, not just the surface. Remove failed tape completely before re-taping. Use setting compound for deep fills. Apply thin coats. Prime before painting. For cracks in locations with ongoing seasonal movement, paintable flexible caulk holds up better than rigid joint compound.
What is the best product to repair drywall cracks?
For most hairline and seam cracks, all-purpose joint compound with paper tape is the right combination. For deep cracks, use a setting-type compound such as Durabond for base layers and all-purpose for the finish coats. For ceiling-wall intersection cracks from truss uplift, paintable flexible caulk is the better long-term approach.
Should I use mesh tape or paper tape for crack repair?
Paper tape for most repairs. It has better tensile strength, lies flatter, and is less prone to cracking over flat seams. Mesh tape is easier to apply but performs worse unless it’s bedded in setting compound rather than all-purpose. For standard wall and ceiling crack repair, paper tape with all-purpose compound is the right choice.
How long does drywall crack repair last?
A properly done repair on a stable crack in a fully settled building can last indefinitely. Repairs in areas with ongoing seasonal movement or in newer homes still settling may need touching up every few years. Flexible caulk in high-movement locations extends repair life significantly compared to rigid compound.
Can I paint over a drywall crack without repairing it?
Painting over an unrepaired crack doesn’t fix it, and the crack will usually show through the paint, sometimes more clearly than before. The only exception is a very fine hairline crack in a stable wall where flexible paintable caulk smoothed flush before painting can effectively conceal it without a full tape and compound repair.
Conclusion
Most drywall cracks are cosmetic and fixable with standard materials and a bit of patience. The ones that warrant professional attention share specific characteristics: wide, diagonal, growing, or showing up alongside other structural symptoms like sticking doors or sloping floors. Those should be assessed before any repair work begins.
The most common reason repairs fail isn’t poor technique. It’s skipped steps. Not removing failed tape before re-taping. Filling deep cracks with all-purpose compound instead of setting compound. Not priming before painting. Get those three things right and most repairs hold the way they’re supposed to.


Elena Hart is the founder and lead writer of Better Home Pro. She writes about drywall, home repair, and practical DIY home improvement topics, focusing on clear, useful information that helps homeowners make better decisions. Her work combines firsthand experience, manufacturer documentation, industry resources, and careful research to create content that is accurate, practical, and easy to understand. Through Better Home Pro, Elena aims to simplify complex home improvement topics and provide guidance that is genuinely helpful to homeowners and DIYers.









No Comments