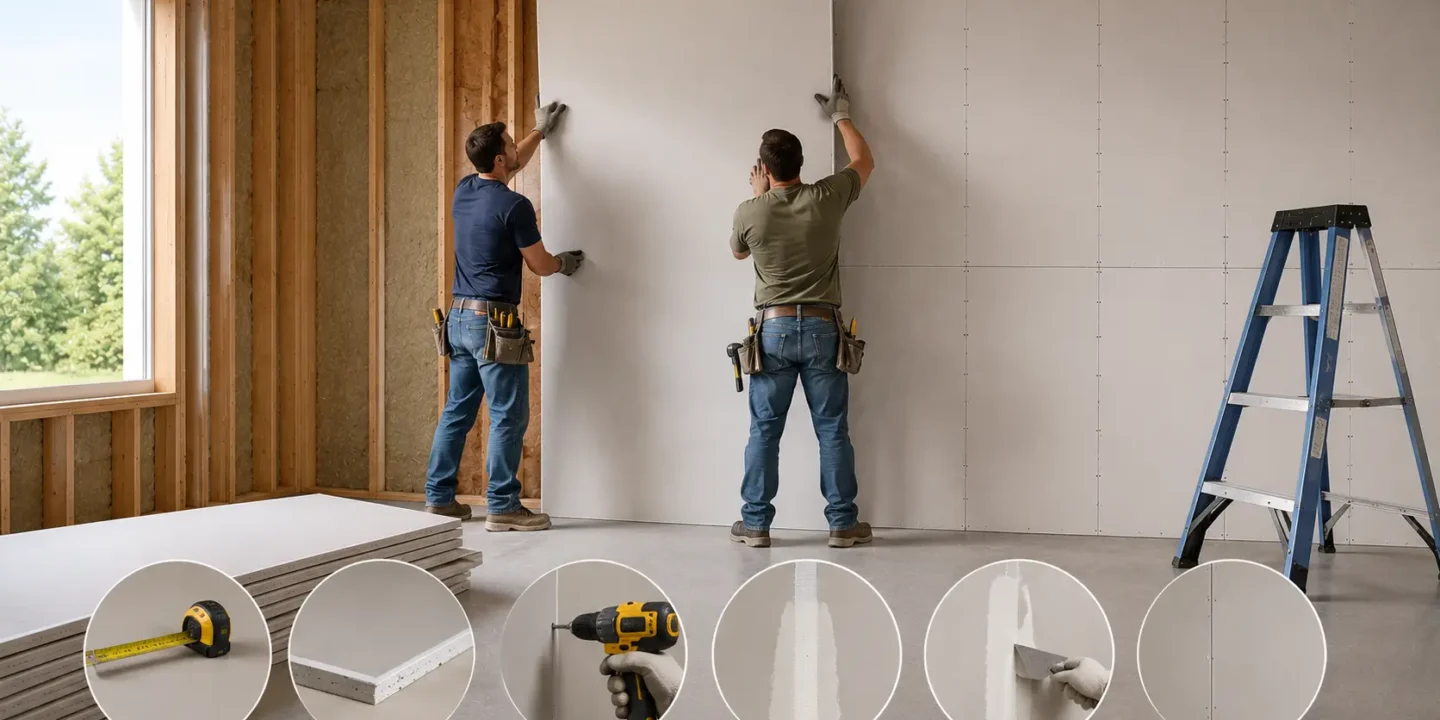

Hanging drywall is where the quality of your finish is decided. Not during taping. Not during painting. Right here, when panels go up.
Bad layout creates extra butt joints. Bad fastening creates screw pops. Bad seam placement creates cracks that show up months later and never fully go away.
This guide covers the hanging stage only: planning, cutting, placing, fastening, and seam strategy. Taping and finishing are a separate process. Get the hanging right first, and everything after becomes easier.
Key takeaways
- Hang ceilings before walls. Wall panels butt against the ceiling and support its perimeter edges. Getting the sequence wrong removes that support and complicates everything that follows.
- Every seam needs solid backing. A seam with no stud, joist, blocking, or furring behind it will flex and crack. Add blocking before panels go up.
- Never place seams at door or window corners. These are stress concentration points where load transfers through headers and king studs. Run a full sheet across the opening and cut it out after fastening.
- Screw depth matters as much as spacing. The head should dimple the paper face without tearing through it. A proud screw shows through paint and an overdriven one loses holding power. Drive a replacement two inches from any torn fastener.
- Plan layout before cutting anything. Mapping panel placement in advance eliminates butt joints, ensures backed seams, and keeps tapered edges in visible fields. No other single step saves more finishing labor.
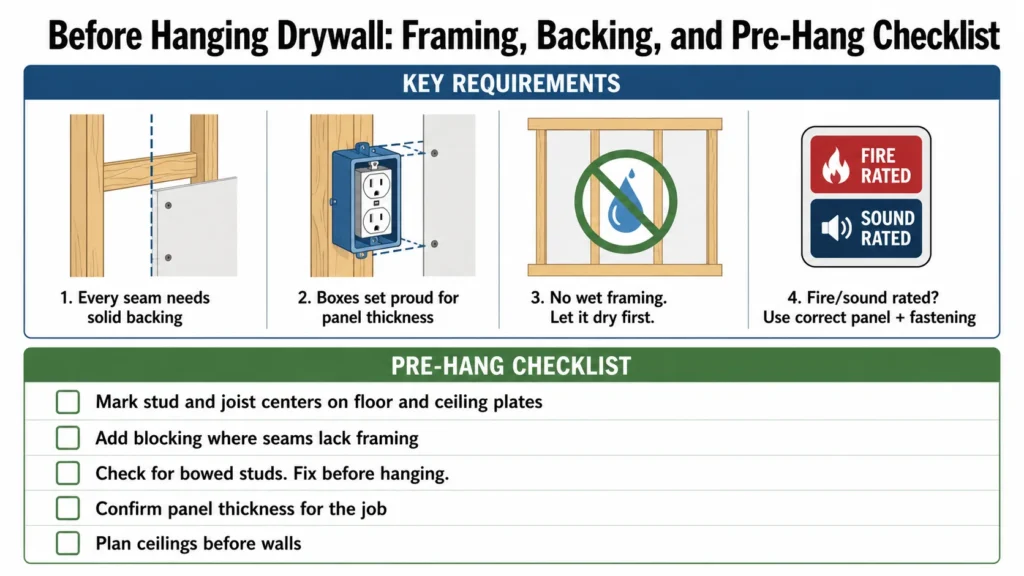
Before You Hang Drywall: What Good Installation Depends On
Drywall only performs as well as the framing behind it. Weak, bowed, or wet framing causes problems that no amount of finishing work can permanently fix.
Every seam needs solid backing from a stud, joist, blocking, or furring. If a panel edge hangs in open air, it will flex and crack.
Electrical, plumbing, insulation, and blocking all need to be finished before panels go up. Once drywall covers the wall, fixing any of that becomes a tearout job.
Check that electrical boxes are set proud enough to account for panel thickness. A box buried behind drywall creates code violations and finishing headaches.
Do not cover wet or water-damaged framing. Moisture trapped behind drywall causes mold, swelling, and panel failure. Let framing dry fully before hanging.
Fire-rated and sound-rated assemblies have specific panel types, thicknesses, and fastening patterns. Using the wrong product or skipping required steps voids the assembly rating.
Pre-hang checklist:
- Mark stud and joist centers on floor and ceiling plates
- Add blocking anywhere a seam will land without framing behind it
- Check for bowed studs and correct them before panels go up
- Confirm panel thickness for the application
- Plan ceiling sheets before wall sheets
- Verify local code and manufacturer installation requirements
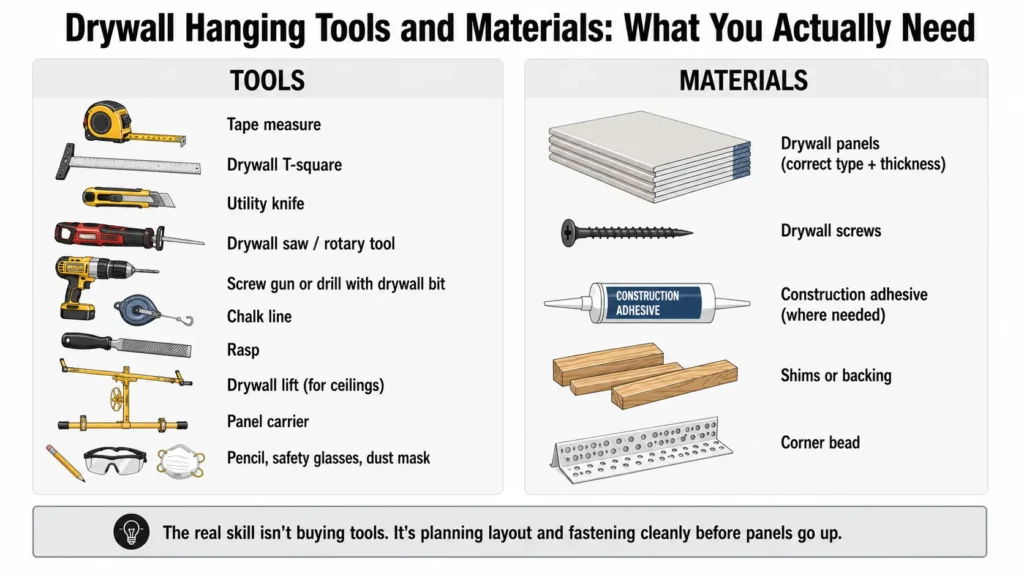
Tools and Materials Needed to Hang Drywall
Tools:
- Tape measure
- Drywall T-square
- Utility knife
- Drywall saw or rotary cutout tool
- Screw gun or drill with drywall bit
- Chalk line
- Rasp
- Drywall lift for ceilings
- Panel carrier
- Pencil, safety glasses, dust mask
Materials:
- Drywall panels in the correct type and thickness
- Drywall screws
- Construction adhesive, where appropriate for the assembly
- Shims or added backing as needed
- Corner bead for outside corners
The real skill in drywall is not buying the right tools. It is planning layout and fastening cleanly before panels go up.
Choose the Right Drywall Panels
| Panel Type | Common Use |
| 1/2-inch drywall | Most interior walls |
| 5/8-inch drywall | Ceilings, fire-rated areas, improved stiffness |
| Type X drywall | Fire-rated assemblies |
| Moisture-resistant drywall | Certain damp areas; not a substitute for cement board in wet zones |
| 10 to 16-foot sheets | Fewer seams where panels can be handled safely |
Requirements vary by code, assembly type, ceiling framing spacing, and manufacturer. Do not assume one panel works for every situation. Verify before ordering.
Plan the Drywall Layout Before Cutting
Drywall layout is the step most people skip. It is also the step that prevents the most problems.
The goal is fewer seams, fewer butt joints, and solid backing at every panel edge. Full sheets belong in visible fields. Offcuts and scraps belong in closets, utility spaces, and hidden areas only where they have proper backing.
Think through doors, windows, outlets, corners, and ceiling direction before the first cut.
Layout order:
- Plan ceiling sheets first
- Plan upper wall sheets
- Plan lower wall sheets
- Confirm no seams land at door or window corners
- Check whether longer sheets eliminate joints in high-visibility areas
- Plan offcut use so walls do not become patchwork
Using a longer sheet to eliminate two butt joints is usually worth it. The finishing labor saved on those joints exceeds the cost of the extra material length.
Should Drywall Be Hung Horizontally or Vertically?
On standard 8-foot residential walls, horizontal hanging is common. The long tapered edges run parallel to the floor, and the seam falls roughly in the middle of the wall where it is easier to finish than a series of vertical butt joints.
Horizontal layout also keeps tapered edges in the main field, which finish flatter and with less compound than butt ends.
Vertical hanging makes sense in specific conditions. Garages, commercial work, tall walls where panel height matches the wall height, and certain fire-rated assemblies may call for vertical installation.
Neither method is universally better. The right choice between vertical and horizontal drywall installation depends on wall height, framing layout, panel availability, assembly requirements, and local practice. When in doubt, check the assembly specification and manufacturer instructions.
Hang Ceilings Before Walls
Always hang ceiling panels before wall panels. Wall panels butt against the ceiling and support the perimeter edges of ceiling sheets.
Ceiling seams are more visible than wall seams under most lighting conditions. Plan them carefully before hanging begins.
Run ceiling panels perpendicular to joists in most cases. Perpendicular application spreads fastening across more framing members and reduces the effect of any single joist being slightly out of plane. Confirm this with the assembly requirements and manufacturer guidance.
A drywall lift is not optional is not optional for ceiling work. Holding panels overhead by hand while fastening is dangerous and produces poor results. Rent a lift if you do not own one.Many DIYers start by considering a Harbor Freight drywall lift.
Ceiling fastening typically requires tighter screw spacing than walls. Check the fastening schedule for the specific panel type and framing spacing before starting.
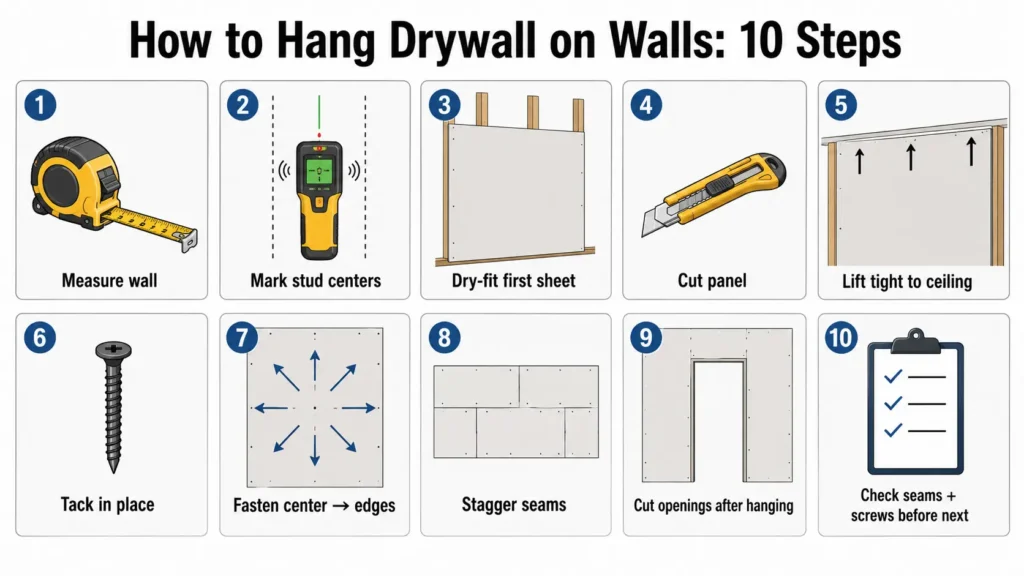
How to Hang Drywall on Walls Step by Step
1. Measure the wall. Get the full length and height. Note any obstacles, outlets, or openings.
2. Mark stud centers. Use a stud finder and mark every stud on the top and bottom plates. Transfer marks to the panel face with a chalk line after the panel is up.
3. Dry-fit the first sheet. Before fastening, confirm it sits flush against the ceiling or adjacent surface and aligns with a stud on the seam edge.
4. Cut the panel if needed. Score the face with a utility knife along a T-square, snap the panel, and cut the paper backing using proper techniques to cut drywall without breaking it. Clean the edge with a rasp.
5. Lift the panel tight. For upper horizontal panels, hold the sheet firm against the ceiling. For lower panels, use a foot lifter to hold it tight to the upper sheet.
6. Tack it in place. Drive a few screws to hold the panel while you check position, then fasten fully.
7. Fasten from the center outward. Start screws at the center of the panel and work toward the edges. This keeps the panel flat and prevents it from bowing or bubbling.
8. Continue with staggered seams. Offset seams between rows so they do not align across the wall.
9. Cut openings after hanging where practical. For doors, windows, and electrical boxes, hanging the full sheet first and cutting the opening out is often cleaner than pre-cutting.
10. Check before moving on. Confirm all seams are backed, screws are properly set, and edges are clean before hanging the next sheet.
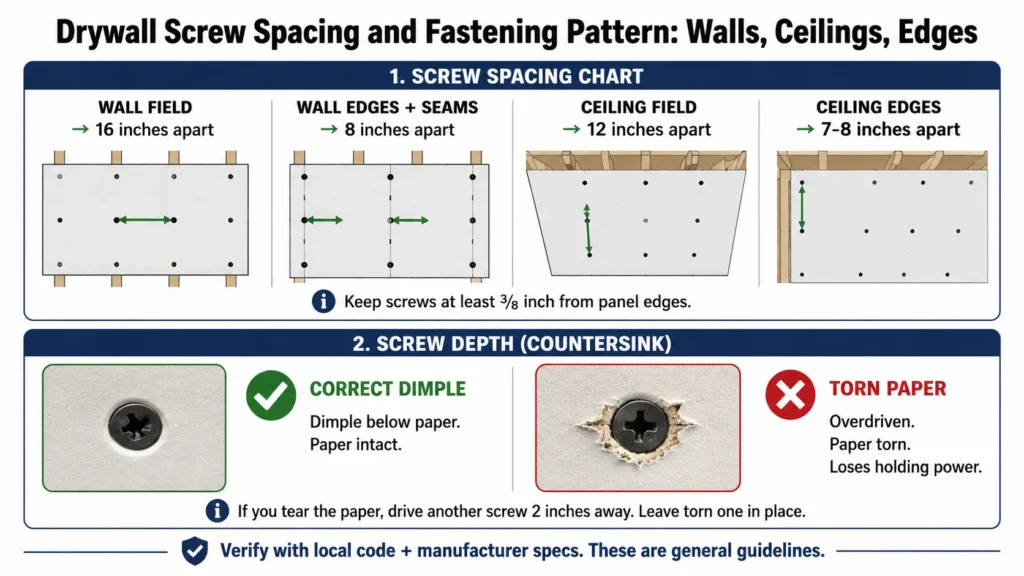
Drywall Screw Spacing and Fastening Pattern
Screw spacing affects structural performance, finish quality, and how well panels stay flat over time.
Common starting points for wood framing:
- Wall field: approximately 16 inches apart
- Wall edges and seams: approximately 8 inches apart
- Ceiling field: approximately 12 inches apart
- Ceiling edges: approximately 7 to 8 inches apart
Keep screws at least 3/8 inch from panel edges. Screws too close to the edge break the gypsum core and lose holding strength.
These are general guidelines. Actual drywall screw spacing requirements vary by code, panel type, thickness, framing spacing, adhesive use, and assembly type. Always verify with the local code and the panel manufacturer’s installation guide.
Correct screw depth matters as much as spacing.
The screw head should create a slight dimple in the paper face without breaking through it. A properly set drywall screw sits just below the surface so joint compound can fill the dimple cleanly.
A proud screw creates a bump that shows through the finish. An overdriven screw breaks the paper face and loses holding power. If a screw tears through the paper, drive another screw about two inches away and leave the torn one in place.
How to Place Drywall Seams
Seam placement determines how much finishing work you create for yourself and where future cracks are likely to appear.
Tapered-edge seams are designed to receive tape and compound. Two tapered edges placed together create a recessed channel that finishes relatively flat. These belong in all visible, high-quality areas.
Butt joints use the cut ends or factory short ends of the panel. They sit proud of the surface and require feathering compound over a wide area to flatten. Keep butt joints in low-visibility areas whenever possible.
Seam risk reference:
| Seam Location | Risk Level | Why |
| Tapered edge to tapered edge | Low | Designed to accept tape and compound |
| Butt joint in concealed or low-light area | Medium | Manageable with care |
| Butt joint in open wall field, high light | High | Difficult to hide; shows in raking light |
| Seam at door or window corner | High | Direct stress point; cracks predictably |
| Unsupported seam, no framing behind it | Very High | Will flex and crack |
| Four corners meeting at one point | High | Crack risk at intersection; offset these |
| Seam under strong side or raking light | High | Joint photographing becomes visible |
Stagger seams between rows so they do not create a continuous line of weakness across the wall. Never align four panel corners at one point.
How to Hang Drywall Around Doors and Windows
Seam placement around openings is one of the most important layout decisions and one of the most commonly done wrong.
Door and window corners are stress concentration points. Headers, king studs, jack studs, and cripple studs carry load through and around the opening. Seasonal movement and settlement add stress at these exact corners.
If a drywall seam lands at the corner of a door or window, it sits directly in that stress zone. The crack may not show for a year, but it almost always shows eventually.
The correct approach is to bridge the opening with a full or larger panel and cut the opening out after the panel is fastened. This keeps the panel continuous across the corner, and any seam falls out on the flat wall away from the stress point.
Make sure headers, trimmers, and cripples provide solid backing for every panel edge around the opening. Not all framing around a rough opening lines up conveniently for drywall edges.
Avoid narrow strips above doors or beside windows if possible. Strips under 6 to 8 inches wide have limited fastening area and are prone to cracking at their edges. Plan layout so these situations do not occur.
Plan for door and window casing to cover the rough edge zone, but do not rely on trim to hide a poorly placed seam. A seam in a stress zone will crack through the trim eventually.

Cutting Openings for Electrical Boxes, Vents, and Pipes
Measure box locations carefully before cutting. An oversized hole cannot be fixed without a patch, and a buried box creates code problems.
Mark the box location on the panel face before lifting it into position. Use the box edges to transfer dimensions directly to the panel when the panel is held in place.
Cut with a rotary cutout tool or a drywall saw. Work carefully near electrical boxes to avoid contacting wires. Turn off circuit breakers for any circuits in the area before cutting.
Common cutouts to plan for:
- Switch and outlet boxes
- Ceiling light boxes and recessed cans
- HVAC registers and duct openings
- Plumbing stub-outs
- Recessed medicine cabinets
- Access panels for shutoffs and cleanouts
Do not force drywall over a box that sits too deep. The box needs to be set correctly before hanging. Forcing a panel over a recessed box damages the panel edge and creates a finishing problem.
Inside Corners, Outside Corners, and Edges
Inside corners do not need panels forced perfectly tight against each other, but large gaps make finishing harder and weaker. Gaps over about 1/4 inch need to be addressed before taping.
Outside corners need clean, straight edges for corner bead installation. A ragged or crumbled edge on an outside corner causes corner bead to sit uneven, which shows through the finish.
Factory edges are always better than cut edges in visible locations. Plan layout so factory edges face out wherever the finish quality matters.
Clean all cut edges with a rasp before hanging. A rough cut edge creates an uneven seam and makes it harder to keep two panels flush with each other.
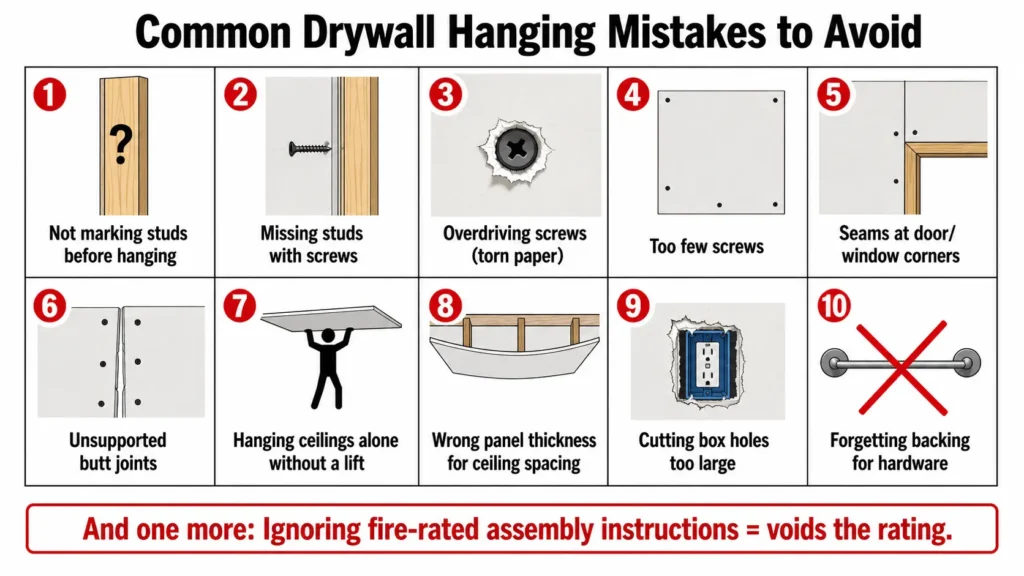
Common Drywall Hanging Mistakes
Not marking studs before panels go up. Once the panel is on the wall, you are guessing where to drive screws. Mark stud centers on the plates first and transfer them after hanging.
Missing studs with screws. A screw that misses the framing member holds nothing. Drive another screw in the correct location.
Overdriving screws. Breaking the paper face removes holding power. Dimple the surface, do not punch through it.
Too few screws. Under-fastened panels flex, creak, and create popped screws over time. Follow the fastening schedule.
Seams at door and window corners. Already covered, but worth repeating because it is so common. Bridge the opening and cut it out.
Unsupported butt joints. Any seam without backing will crack. Add blocking before hanging.
Hanging ceilings alone without a lift. Working overhead without a lift is a safety hazard and produces poor fastening quality.
Using the wrong panel thickness. A 1/2-inch panel on a ceiling with 24-inch joist spacing will sag. Verify thickness requirements before ordering.
Cutting outlet and box holes too large. An oversized hole needs a patch. Measure carefully and cut controlled.
Forgetting backing for hardware. Towel bars, grab bars, cabinets, shelves, and handrails all need solid backing in the framing. A screw into drywall alone will not hold any of these long-term.
Ignoring fire-rated assembly instructions. The assembly is rated as a system. Changing any component, including panel type, thickness, or fastening, can void the rating.
Quality Check Before Taping
Run through this before any taping begins. Problems found now take minutes to fix. Problems found during finishing cost hours.
When to Call a Professional
Some situations are better handled by an experienced installer.
Large or high ceilings without the right equipment create safety risks and quality problems. Fire-rated and sound-rated assemblies require verified products and fastening patterns that a professional will know and execute correctly.
Walls with significant framing irregularities, water damage, or complex geometry add complications that an experienced eye will catch before they become expensive problems.
Level 5 finish work, which is required under critical lighting and in spaces with strong raking light, demands a level of surface flatness and seam quality that is difficult to achieve without experience and the right tools.
If the scope is a large addition, a commercial project, or a remodel with unknown conditions behind the walls, working with a professional is a reasonable call.
Frequently Asked Questions
Is it better to hang drywall vertically or horizontally?
For most residential walls at standard 8-foot height, horizontal installation is common because it keeps tapered seams in the main field and reduces visible joint lines. Vertical works better in garages, some commercial applications, tall walls, and certain fire-rated assemblies. The right choice depends on the specific conditions.
Do drywall seams have to land on studs?
Yes. Every seam needs solid backing from a framing member, blocking, or furring. A seam with no backing will flex and crack over time. There is no workaround for this.
How far apart should drywall screws be?
A common starting point for wood framing is 16 inches in the field and 8 inches at edges on walls, and 12 inches in the field and 7 to 8 inches at edges on ceilings. These numbers can vary based on code, panel type, framing spacing, and assembly requirements. Always verify with manufacturer specs and local code.
Should drywall touch the floor?
No. Leave a gap of at least 1/2 inch between the bottom of the panel and the floor. This protects the panel from moisture wicking up from the floor and allows for slight framing movement. The gap is covered by baseboard.
Do you hang ceiling drywall before wall drywall?
Yes. Ceiling panels go up first. Wall panels butt against the ceiling and support the ceiling panel edges at the perimeter. Hanging walls first complicates ceiling installation and removes that edge support.
Can I use small pieces of drywall instead of full sheets?
Small pieces can be used in concealed, low-visibility areas like closets, utility spaces, and behind built-ins, as long as every edge has solid backing. Using scraps in the main field of finished walls creates extra butt joints that are difficult to hide and will likely show under light.
Why do drywall seams crack around doors and windows?
Because opening corners are stress concentration points. Load transfers through headers, king studs, and jack studs, and seasonal movement concentrates at those corners. A seam placed at a corner sits directly in the stress path. The fix is to bridge the opening with a full sheet and cut the opening out, keeping the seam away from the corner.
What happens if drywall screws go too deep?
An overdriven screw breaks the paper face of the panel, which removes most of the holding strength. The gypsum core alone does not grip well. Drive another screw about 2 inches away from the torn one and leave the overdriven screw in place.
Should I glue drywall to studs?
Construction adhesive used with screws can reduce the total number of screws needed and can improve panel rigidity and sound performance. It is not required for standard residential work, but it is a reasonable option in certain assemblies. Check the manufacturer instructions for the panel and verify any code requirements before using adhesive.
What is the hardest part of hanging drywall?
For most people, it is ceiling work. Holding large panels overhead, keeping them flat and tight to the framing, and fastening accurately while managing the weight is genuinely difficult without a lift. Planning the layout correctly and using a lift makes ceiling installation manageable. Without a lift, it is one of the more physically demanding tasks in a remodel.

Elena Hart is the founder and lead writer of Better Home Pro. She writes about drywall, home repair, and practical DIY home improvement topics, focusing on clear, useful information that helps homeowners make better decisions. Her work combines firsthand experience, manufacturer documentation, industry resources, and careful research to create content that is accurate, practical, and easy to understand. Through Better Home Pro, Elena aims to simplify complex home improvement topics and provide guidance that is genuinely helpful to homeowners and DIYers.


No Comments