
Getting screw spacing right is one of those things that separates a clean drywall job from one that causes headaches at the finishing stage. Use the wrong spacing and you end up with screw pops, loose panels, wavy seams, and extra compound work. Here are the standard numbers before anything else:
| Area | Common Screw Spacing |
| Wall field | About 16 inches apart |
| Wall edges | About 8 inches apart |
| Ceiling field | About 12 inches apart |
| Ceiling edges | About 7 to 8 inches apart |
| Distance from panel edge | About 3/8 inch from edge or end |
Important: These are standard guidelines, not universal rules. Local building codes, fire-rated assemblies, panel thickness, framing layout, adhesive use, and manufacturer specifications can all require different fastening schedules. Always verify requirements before starting.
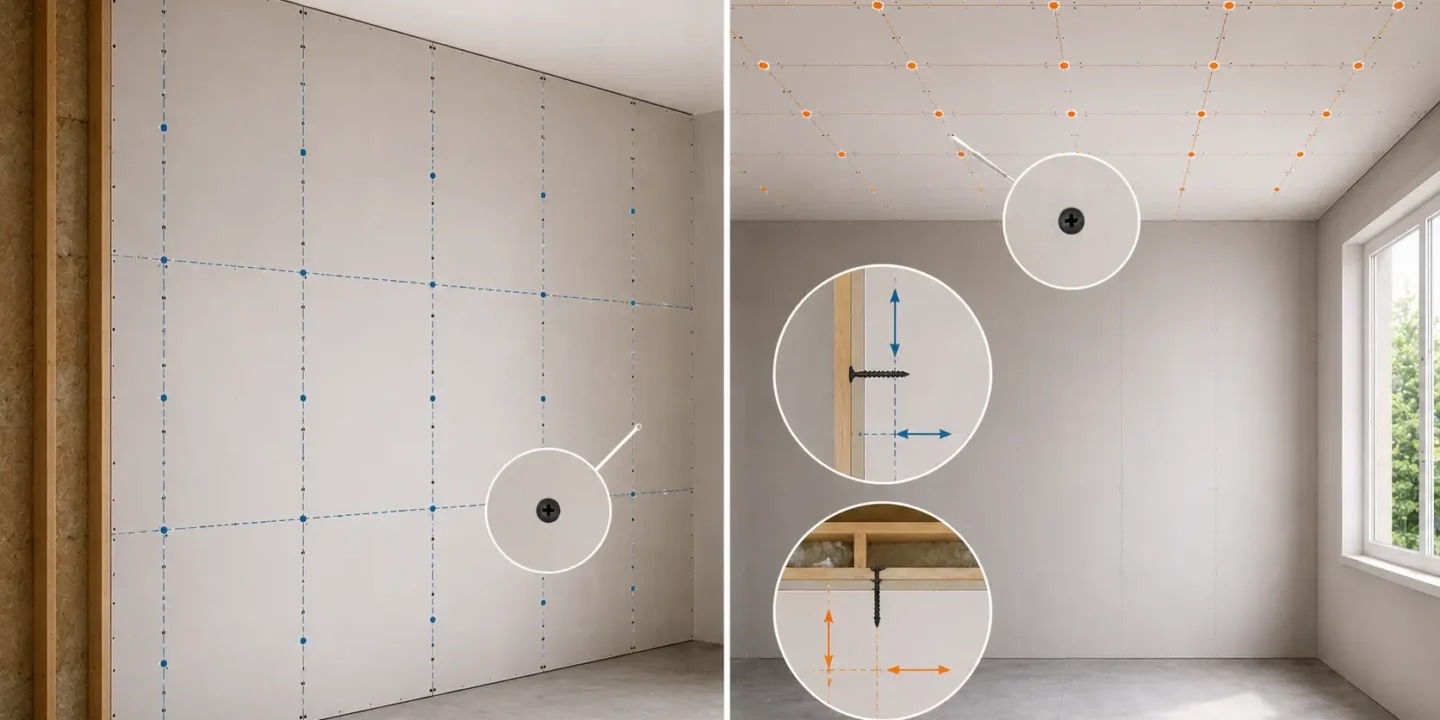
Ceilings need tighter spacing than walls because gypsum panels overhead are fighting gravity constantly, as reflected in USG gypsum panel fastening recommendations. Edges need tighter spacing than field areas because seams must stay perfectly flat for taping and finishing to work properly.
What “Field” and “Edge” Mean
Before getting into specifics, it helps to understand the terminology used by drywall professionals and the Gypsum Association.
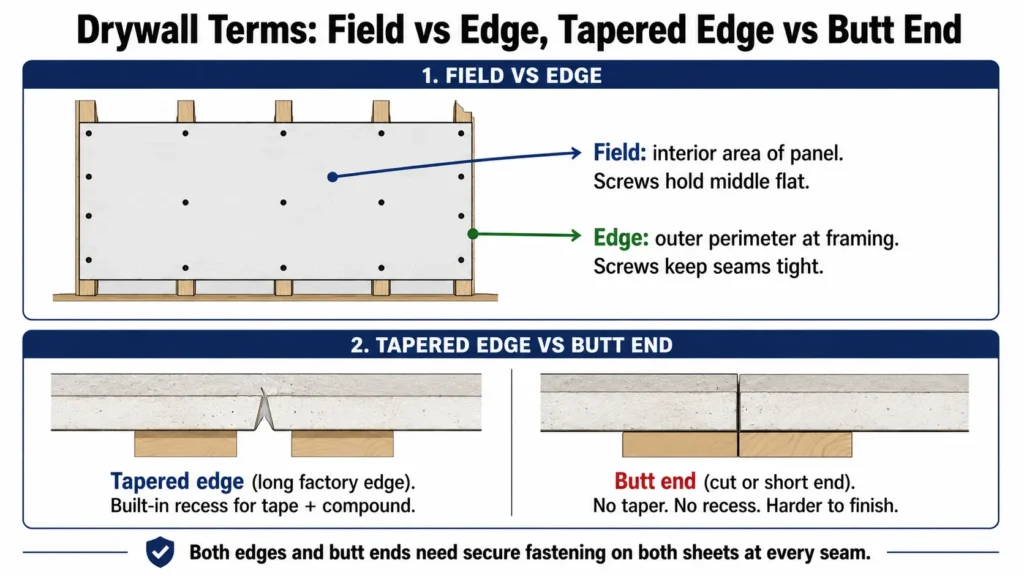
The field refers to the interior area of a drywall panel, away from its edges. These are the screws that hold the middle of the sheet flat against the framing.
The edge refers to the outer perimeter of the panel where it meets a framing member. These fasteners keep seams tight and prevent panels from lifting away from studs or joists at the joint.
There are also two distinct types of panel edges worth knowing:
Tapered edges are the long factory edges of a standard drywall sheet. They have a slight concave taper built in specifically to accommodate joint tape and compound. Most seams in a finished wall use these edges.
Butt ends are the cut or short ends of a panel where the gypsum core is exposed without any factory taper. Butt joints require more care because there is no recess to hide the tape and compound.
Both edges and butt ends require secure fastening on both sheets at every seam.
Drywall Screw Spacing for Walls
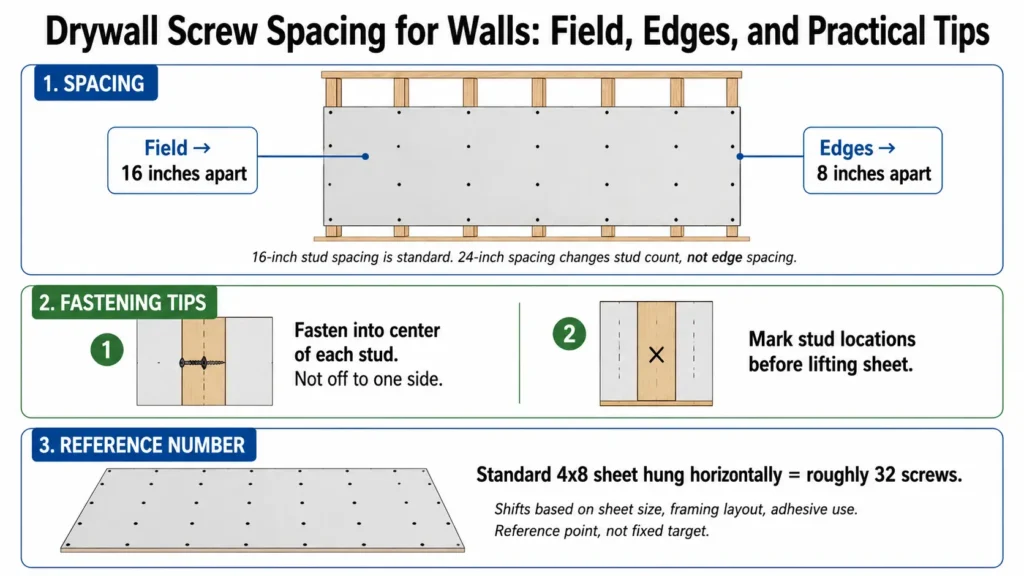
On a standard wall, the field of a drywall panel gets screws spaced about 16 inches apart. The edges get screws about every 8 inches.
Most residential framing uses studs at 16 inches on center, which lines up conveniently with field screw spacing. Some walls are framed at 24 inches on center, which changes how many studs you are fastening into but does not change the edge spacing requirement.
A few practical points that matter more than they seem:
Fasten into the center of each stud, not off to one side. Screws that miss the center of framing have less holding power and can cause edge damage on the framing member.
Mark stud locations before lifting the sheet. Trying to locate studs with a loaded panel in your hands is frustrating and often leads to missed fasteners.This is a core part of proper drywall layout and planning that pays off throughout the whole job.
For a standard 4×8 sheet hung horizontally on a wall, expect roughly 32 screws per sheet. That number shifts based on sheet size, framing layout, the specific location on the wall, and whether adhesive is being used. Think of it as a reference point, not a fixed target.
Drywall Screw Spacing for Ceilings
Ceilings require closer fastener spacing than walls because panels are bearing a constant load from gravity rather than resting against a vertical surface.
Standard spacing for ceiling panels:
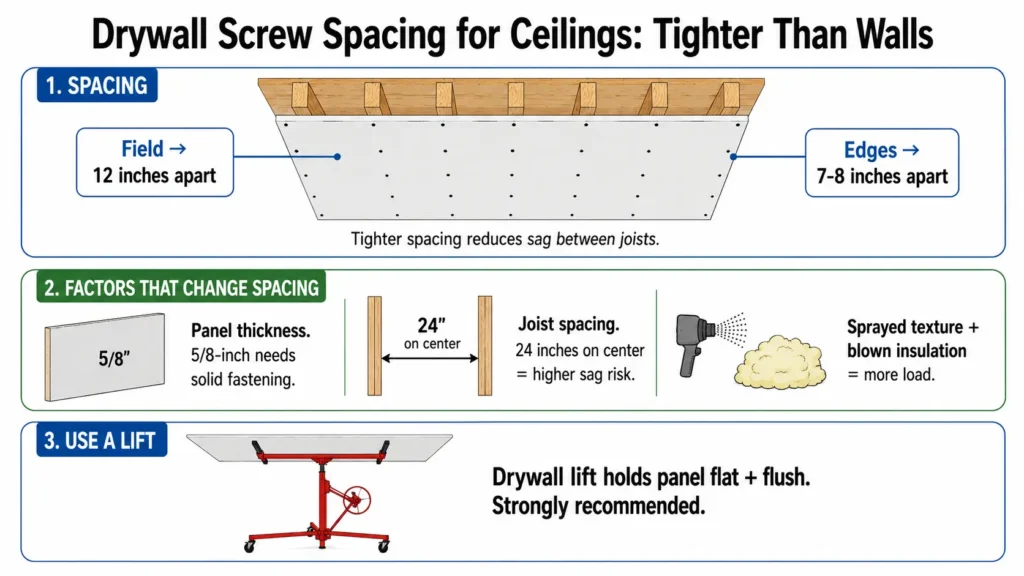
- Field: about 12 inches apart
- Edges: about 7 to 8 inches apart
The tighter spacing reduces the chance of sagging between joists, which is one of the most visible and frustrating drywall failures. Ceiling sag often shows up months after installation, particularly in areas with humidity fluctuations.
A few things that change ceiling fastening requirements:
Panel thickness matters. 5/8-inch drywall is commonly used for ceilings, especially in fire-rated assemblies or where code requires added mass. Heavier panels need solid fastening.
Joist spacing. If ceiling joists are 24 inches on center rather than 16, the risk of sag increases and fastening requirements become more critical.
Sag-resistant panels. Some manufacturers produce panels specifically designed for ceiling use with improved sag resistance. These still require proper fastener spacing, but their specs may differ slightly from standard board.
Texture and insulation. Sprayed texture adds weight. So does blown-in insulation above the ceiling. Both increase the load the fasteners and panels are managing over time.
Using a drywall lift for ceiling drywall installation is strongly recommended and aligns with OSHA material handling safety guidance. It holds the panel flat and flush against the joists while you fasten, which produces a flatter result than holding the sheet overhead manually.
How Far From the Edge Should Drywall Screws Go?
Keep screws at least 3/8 inch from the panel edge or end. This is a number that gets ignored more than it should.
Drive a screw too close to the edge and the gypsum core crumbles. The paper face loses its grip on the framing, and you end up with a fastener that looks set but is not actually holding anything.
Drive a screw too far from the edge and the seam does not pull tight. The panel can lift slightly at the joint, creating a ridge that complicates taping and finishing.
At every seam, both panels need to be properly fastened. It is not enough for one sheet to be tight while the other is loose. The joint only works when both sides are secure.
Correct Drywall Screw Depth
Getting screw depth right matters as much as spacing. The standard is straightforward: the screw head should create a slight dimple in the paper face without actually breaking through it.
| Screw Result | Problem |
| Screw sitting proud | Shows through finish coat, creates a bump |
| Proper dimple | Correct fastening, ready for compound |
| Torn paper | Weak holding power, likely screw pop later |
| Missed stud | No structural hold at all |
A screw that sits above the surface will telegraph through any amount of joint compound. A screw that tears through the paper face has compromised the panel. The paper is what gives drywall much of its tensile strength at the surface.
If a screw breaks through the paper, drive another screw about 2 inches away into solid framing. Either reset the failed screw flush or leave it in place. Do not try to rely on a torn-paper fastener.
Using a drywall screw gun with a depth-limiting nose piece makes consistent depth much easier to achieve. A standard drill without one requires more attention and produces more overdriven screws.
Drywall Screw Length and Type
Using the right screw matters almost as much as using the right spacing. Drywall screws are not interchangeable with deck screws or general-purpose fasteners.
For 1/2-inch drywall: Use 1-1/4 inch or 1-3/8 inch drywall screws.
For 5/8-inch drywall: Use 1-3/8 inch or 1-5/8 inch drywall screws.
Thread type:
- Coarse-thread drywall screws are used for wood framing. The coarse thread bites into wood studs and joists efficiently.
- Fine-thread drywall screws are used for metal studs. Coarse threads strip out in metal framing instead of holding.
Drywall screws have a bugle-shaped head designed to seat cleanly into the panel surface without tearing it. Deck screws and other fasteners lack this geometry and create finishing problems. They also lack the hardened shank that allows drywall screws to drive without bending.
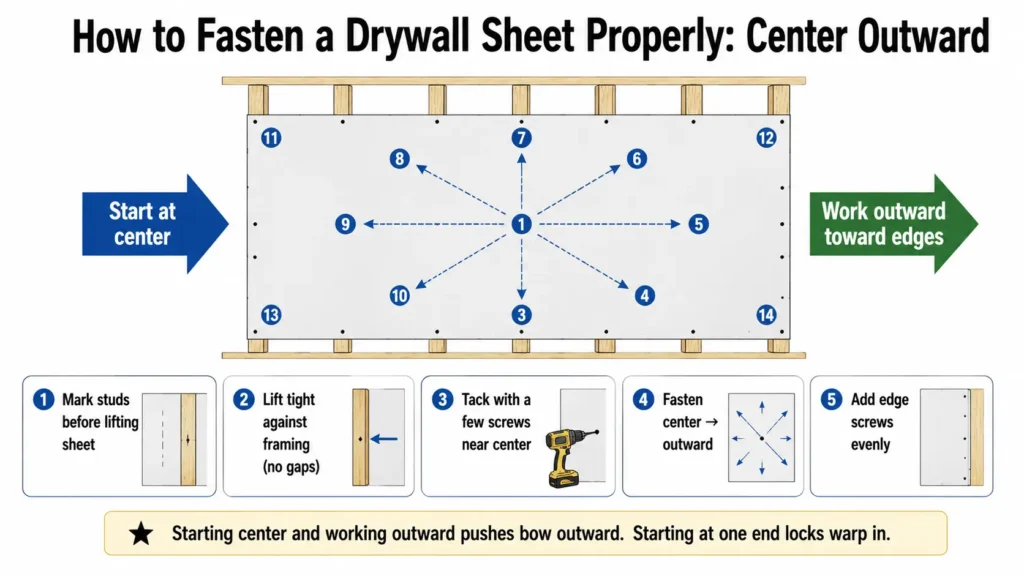
How to Fasten a Sheet Properly
The order of fastening affects how flat the panel ends up sitting against the framing during drywall hanging.
- Mark all stud or joist locations on the floor, ceiling, or adjacent wall before lifting the sheet as part of proper drywall installation planning.
- Hold or lift the sheet tight against the framing. No gaps between panel and stud.
- Tack the sheet in place with a few screws near the center.
- Fasten outward from the center toward the edges.
- Add edge screws evenly along each framing member.
- Check screw depth across the sheet before moving on.
Fastening from the center outward pushes any slight bow in the framing outward rather than trapping it in the middle of the panel. This produces a flatter result and reduces the chance of humps or hollow spots showing up after finishing.
Working outward also helps when panels are not perfectly flat themselves. Starting at one end and fastening straight across can lock in any warp that already exists.
Can You Use Too Many Drywall Screws?
Yes. More screws do not automatically mean a better job.
Over-fastening creates more dimples to fill with compound, which means more finishing time. Screws placed too close together can damage the edge of the panel, particularly near tapered edges and butt ends where the gypsum core is closer to the surface.
Adding extra screws will not fix problems caused by bowed framing. If a stud is badly warped, additional fasteners will not pull the panel flat. They will just multiply the stress on the gypsum core and give you more spots to fill.
Follow the spacing guidelines and address framing issues before hanging panels rather than trying to screw your way around them.
Does Drywall Adhesive Change Screw Spacing?
In some installations, yes. Construction adhesive applied to framing members improves contact between the panel and the stud, and certain building systems allow wider fastener spacing when adhesive is used alongside mechanical fasteners.
The tradeoff is significant for anyone doing their own work. A panel that has been glued to the framing is very difficult to reposition if something goes wrong. Once adhesive sets, you are committed to that sheet in that position.
DIYers should be careful about using adhesive without understanding the specific system they are following. Always check the adhesive manufacturer’s instructions and local code requirements. Using adhesive and then applying normal screw spacing anyway is not a problem, but reducing screw count without verifying that it is code-compliant in your jurisdiction is.
Special Cases That Change Screw Spacing
Several situations call for different fastening requirements than standard residential work:
Fire-rated wall assemblies have specific fastening schedules that must be followed exactly. These are not guidelines. Fire ratings are tested as complete systems, and changing fastener spacing can void the rating.
Type X drywall is used in fire-rated assemblies and has a denser core than standard panels. It often requires specific screw types and spacing as part of the assembly specification.
5/8-inch ceiling board used in fire-rated floor/ceiling assemblies has its own fastening requirements.
Garage separation walls between an attached garage and living space are typically required to be fire-rated under applicable International Residential Code fire-separation requirements. These need to follow the assembly spec, not just standard residential guidelines.
24-inch on-center framing increases the unsupported span between fasteners and often requires closer edge spacing or sag-resistant panels, especially on ceilings.
Resilient channel and sound isolation assemblies have very specific fastening requirements because the performance of the system depends on how the channel is attached and how the drywall connects to it.
Multi-layer drywall systems use different fastener lengths and sometimes different spacing for face layers versus base layers.
Tile backing areas in bathrooms may use cement board or moisture-resistant gypsum, which have their own fastening specs.
When in doubt on any of these situations, pull the specific assembly spec or consult local code before fastening.
Common Drywall Screw Spacing Mistakes
Most fastening problems come down to a short list of repeating mistakes:
Using wall spacing on ceilings. The most common error. Ceiling panels need closer spacing, and skipping this step is what causes visible sag later.
Missing studs or joists. A screw that hits only insulation or open air has no holding power. This is more common than it seems, especially when framing marks are not transferred to the panel before lifting.
Screws too close to the edge. Results in crumbled gypsum and a fastener that looks fine but is not actually holding the panel.
Overdriving screws. Tearing through the paper face weakens the hold and creates a screw pop candidate. A proper dimple is the target, not a hole.
Leaving screws proud. A screw that sits above the surface will show through finish coats regardless of how much compound is applied over it.
Using the wrong screw type. Deck screws, wood screws, or coarse-thread screws in metal framing all create problems. Match screw type to the application.
Not fastening both sides of a seam. One tight panel and one loose panel at a joint will cause the seam to fail. Both sheets need proper fastening along the shared framing member.
Using screws to flatten bowed framing. Framing problems should be corrected before panels go up. Screwing through a panel into a badly warped stud transfers the warp into the wall surface.
Ignoring fire-rated assembly instructions. Standard spacing is not a substitute for the tested assembly specification. These requirements exist for safety and must be followed precisely.
Final Screw Spacing Checklist
Before taping, run through this list:
Frequently Asked Questions
What is the standard drywall screw spacing?
For walls, the field gets screws about 16 inches apart and edges get screws about 8 inches apart. For ceilings, the field spacing tightens to about 12 inches and edges go to about 7 to 8 inches. These are standard residential guidelines. Code, assembly type, and manufacturer requirements can change these numbers.
How far apart should drywall screws be on walls?
Field screws on walls are typically spaced about 16 inches apart. Edge screws along each framing member run about 8 inches apart. The edge spacing is closer because seams need solid support on both sides to finish correctly.
How far apart should drywall screws be on ceilings?
Ceiling fields get screws about 12 inches apart, and edges get screws about 7 to 8 inches apart. The tighter spacing compared to walls accounts for gravity and the risk of panels sagging over time.
How close should drywall screws be to the edge?
Keep screws about 3/8 inch from the panel edge or end. Closer than that risks crumbling the gypsum core. Farther than that and the seam may not pull tight enough for a clean finish.
How many screws go into a 4×8 sheet of drywall?
A 4×8 sheet on a wall typically uses around 32 screws, but this varies with framing layout, sheet orientation, location on the wall, and whether adhesive is being used. It is a useful estimate for material planning, not a fixed count.
Can you put too many screws in drywall?
Yes. Over-fastening means more dimples to fill, more finishing time, and possible edge damage from screws placed too close together. Follow the recommended spacing instead of adding extra fasteners hoping for a stronger hold.
What happens if drywall screws go too deep?
Overdriven screws break through the paper face of the panel. Once the paper tears, the fastener loses much of its holding capacity. Torn paper fasteners are also prone to screw pops. Drive another screw about 2 inches away into solid framing to replace a broken-paper fastener.
Should I use coarse or fine drywall screws?
Use coarse-thread screws for wood framing and fine-thread screws for metal studs. Coarse threads in metal framing strip out rather than holding. Fine threads in wood do not grip as effectively as coarse threads.
Does 5/8-inch drywall need different screw spacing?
The field and edge spacing guidelines are similar, but screw length changes. Use 1-3/8 inch or 1-5/8 inch screws for 5/8-inch panels. If 5/8-inch board is part of a fire-rated assembly, follow the specific assembly fastening schedule rather than standard residential guidelines.
Does drywall adhesive reduce the number of screws needed?
Some adhesive-based systems allow wider fastener spacing, but this must be verified against the adhesive manufacturer’s instructions and local code. Reducing screw count on your own without confirming that it is code-compliant is not recommended. For most DIY installations, using adhesive and maintaining standard screw spacing is the safer approach.

Elena Hart is the founder and lead writer of Better Home Pro. She writes about drywall, home repair, and practical DIY home improvement topics, focusing on clear, useful information that helps homeowners make better decisions. Her work combines firsthand experience, manufacturer documentation, industry resources, and careful research to create content that is accurate, practical, and easy to understand. Through Better Home Pro, Elena aims to simplify complex home improvement topics and provide guidance that is genuinely helpful to homeowners and DIYers.


No Comments