

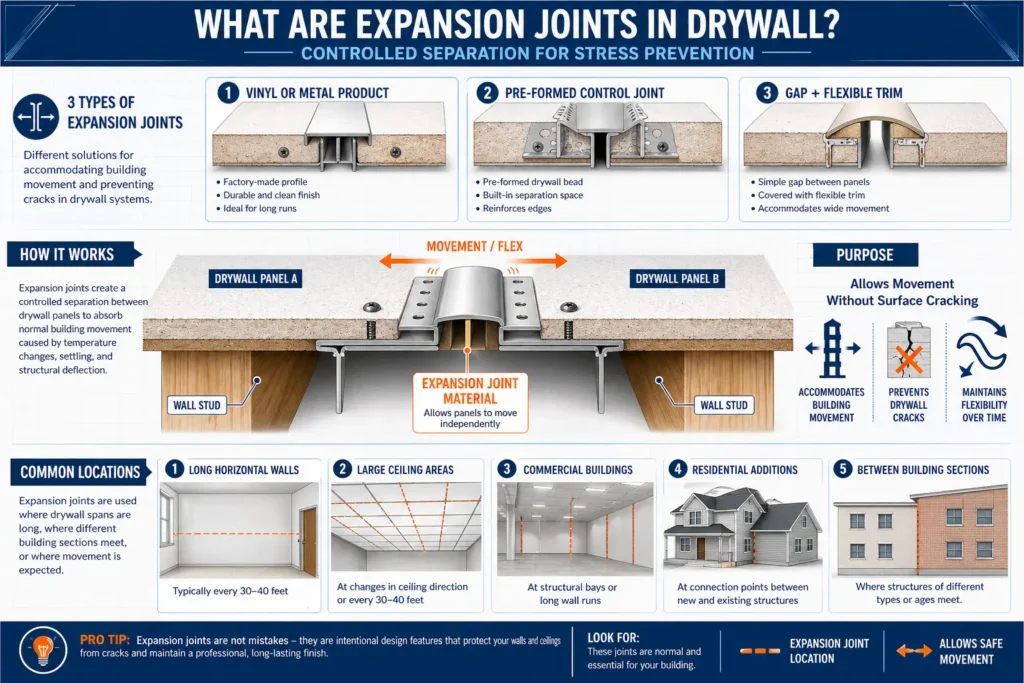
Expansion joints in drywall are intentional gaps or specialized joint assemblies that allow drywall to move slightly as a building expands and contracts.
They’re designed to prevent cracks by absorbing natural movement caused by temperature changes, humidity, and structural settling.
Drywall may look solid and rigid, but buildings are constantly shifting—just a little. When drywall doesn’t have space to move, that pressure often shows up as cracked seams, popped fasteners, or drywall ridging along ceilings and long walls. In many cases, those cracks could have been prevented with properly placed expansion joints.
If you’re installing drywall in a large room, a long hallway, or an area with temperature swings, understanding expansion joints can save you time, money, and future repairs.
Let’s break it down in simple terms.
Key Takeaways
- Expansion joints are typically needed in walls or ceilings over 30 feet, additions, and high-movement areas.
- Without expansion joints, normal temperature and humidity fluctuations, as well as structural shifts, can cause long cracks and seam failure.
- Proper installation requires a controlled gap and flexible center — never fill the joint solid with compound.
What Are Expansion Joints in Drywall?
An expansion joint in drywall is a planned separation between drywall panels that allows for slight movement without cracking the finished surface.
Instead of tightly butting every sheet together across a long span, an expansion joint creates a controlled break in the drywall system. This break can be formed using:
- A manufactured expansion joint product (often vinyl or metal)
- A pre-formed control joint designed specifically for drywall
- A gap was built into the layout and covered with a flexible trim piece.
The goal is simple: give the drywall room to move without damaging the finished surface.
You’ll most often see expansion joints in:
- Long walls
- Large ceilings
- Commercial buildings
- Residential additions
- Areas where two building sections meet
They’re not about decoration—they’re about preventing stress cracks.
Why Are Expansion Joints Necessary in Drywall?
All building materials expand and contract. Drywall is no exception.
Here’s what causes movement:
1. Temperature Changes
Drywall expands slightly in warm conditions and contracts when it cools. Large ceilings exposed to attic heat are especially vulnerable.
2. Humidity
Gypsum board absorbs moisture from the air. In humid conditions, it expands; when the air dries out, it shrinks. Building Science Corporation’s research on how moisture causes expansion and contraction in building materials explains that wetting and drying due to moisture adsorption causes expansion and contraction in many porous materials
3. Structural Movement
Homes settle over time. Foundations shift slightly. Roof trusses flex. Even minor structural movement can transfer stress to drywall.
When drywall is installed continuously across long spans without breaks, these small movements build pressure. Eventually, something gives—and that usually means:
- Long, straight cracks in ceilings
- Cracks above doors and windows
- Separated seams
- Nail or screw pops
Many contractors will tell you that recurring cracks in large ceilings are often due to missing expansion joints.
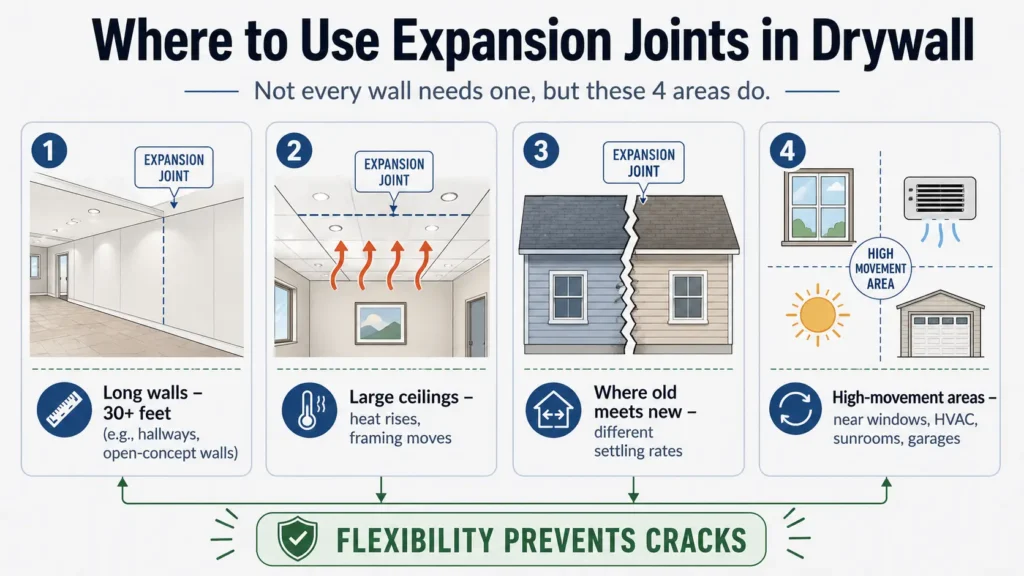
Where Should You Use Expansion Joints in Drywall?
Not every wall needs one. But certain situations almost always do.
1. Long Walls (30 Feet or More)
Industry Industry guidelines don’t just recommend expansion joints in walls longer than 30 feet — they mandate them. According to AWCI’s technical guidance on control joint spacing requirements, both ASTM C840 and the Gypsum Association’s GA-216 standard specify that control joints must be installed where a wall runs in an uninterrupted straight plane exceeding 30 linear feet.
For large ceilings, the limit extends to 50 feet between joints — but only when perimeter relief exists. Without it, the ceiling limit drops to the same 30-foot threshold as walls.
2. Large Ceilings (Especially Over 30 Feet)
Ceilings are even more prone to cracking because:
- Heat rises
- Roof framing moves
- Attics expand and contract.
In homes with wide-open floor plans, skipping expansion joints in ceilings is a common mistake that leads to long cracks down the middle.
Proper ceiling panel layout and fastening techniques become increasingly important as ceiling spans grow larger.
3. Where Different Building Sections Meet
If you’re adding a room to an existing home, you should strongly consider expansion joints where the new framing meets the old structure.
Why? Because:
- The old structure has already settled.
- The new addition will settle differently.
Without a joint, stress often shows up as cracks at the connection line.
4. High-Movement Areas
You may also need expansion joints near:
- Large windows
- Areas near HVAC vents
- Rooms with extreme temperature swings (sunrooms, garages)
Anywhere movement is likely, flexibility is your friend.
How to Install Expansion Joints in Drywall
Installing an expansion joint is manageable for experienced DIYers and standard practice for contractors. Here’s a simple step-by-step overview.
Tools and Materials You’ll Need
- Expansion joint or drywall control joint product
- Utility knife
- Drywall saw
- Screws
- Drill or screw gun
- Joint compound
- Taping knife
- Measuring tape
- Level
Step 1: Plan the Placement
Before hanging drywall, determine where the expansion joint will go. It should:
- Break up long spans evenly.
- Align with framing whenever possible.
- Be straight and centered in the run.
Planning ahead is critical. Retrofitting expansion joints later is much harder.
Step 2: Leave a Controlled Gap
Install drywall sheets so there’s a small gap where the expansion joint will sit. Follow the manufacturer’s recommended spacing for the specific joint product you’re using.
Do not tightly butt panels together in this location.
Step 3: Install the Expansion Joint Product
Attach the expansion joint over the gap using screws or fasteners as directed.
Make sure:
- It’s level and straight.
- It’s securely attached to the framing.
- It isn’t over-tightened (which can reduce flexibility)
Step 4: Apply Joint Compound
Apply joint compound over the flanges of the expansion joint, blending it into the drywall surface.
Avoid filling the center flexible section—this area needs to remain able to move.
Step 5: Sand and Finish
Once dry:
- Sand lightly
- Apply additional coats as needed.
- Prime and paint
When finished properly, the joint should be clean and subtle while still allowing movement behind the surface.

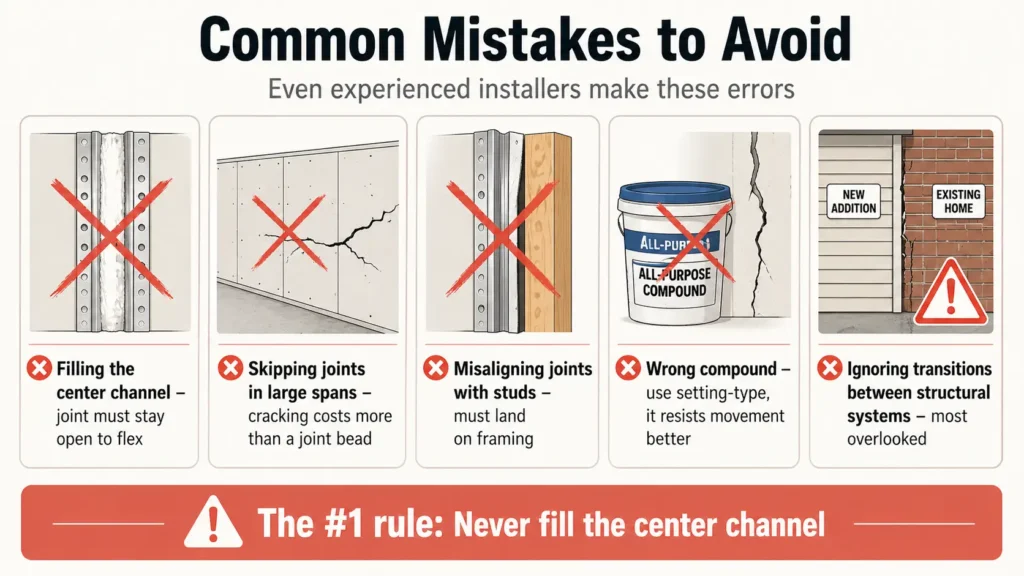
Common Mistakes to Avoid When Installing Expansion Joints
Even experienced installers make errors with expansion joints. Here are the most frequent ones to watch out for:
Filling the center channel with joint compound. The gap at the center of the bead must stay open. If you fill it in, you’ve essentially eliminated the joint’s ability to flex, which defeats the entire purpose.
Skipping joints in large spans. It can be tempting to see how far you can push it without adding a joint, especially when you’re trying to keep finishing work to a minimum. Don’t. The cost of repairing cracked drywall later far exceeds the cost of a proper joint bead and an extra round of taping.
Misaligning joints with studs. Expansion joints that aren’t secured to studs or structural backing can pull away from the wall over time. Always plan your joint locations to land on framing.
Using the wrong type of joint compound. Setting-type compound is often preferable around expansion joints because it’s harder and more resistant to movement once cured. All-purpose compound can crack or shrink if applied too thickly.
Ignoring transitions between structural systems. This is the most commonly overlooked situation. If your project involves an addition or a mixed-framing system, consult with a contractor or structural professional to ensure joints are placed correctly at every transition.
Maintaining Expansion Joints Over Time
Once installed, expansion joints don’t require much ongoing attention — but they should be inspected periodically, especially after extreme weather or noticeable settling.
Signs that a joint needs attention:
- Visible cracking along the joint line (not in it, but beside it)
- Paint peeling or bubbling near the joint.
- A gap that has widened noticeably on one side
Basic maintenance steps:
- Clean the area and remove any loose compound or paint.
- Apply a fresh layer of joint compound to the flanges if needed.
- Repaint to match the surrounding surface.
If you’re seeing significant gaps or structural movement that seems beyond normal settling, it’s time to bring in a professional. Persistent cracking or movement can occasionally signal deeper foundation or framing issues that go well beyond drywall.
Drywall Comparison: Expansion Joints vs. Control Joints
The distinction between these two joint types matters more than many installers realize. National Gypsum’s expert FAQ on the official difference between control joints and expansion joints clarifies: control joints prevent cracks in finish materials only, while expansion joints accommodate movement in the entire building structure — separating it at a structural level
This comparison guide highlights the structural and aesthetic differences between drywall control joints and expansion joints to ensure your installation meets industry standards
| Feature | Control Joint | Expansion Joint |
|---|---|---|
| Primary Goal | Relieves stress in the drywall surface only. | Accommodates movement in the entire structure. |
| Framing | Uses standard framing; only the drywall is cut. | Requires a physical gap in the wall or ceiling framing. |
| Common Locations | Long hallways, high walls, and large ceilings. | Where two buildings meet or at structural “breaks.” |
| Materials Used | Usually a “V” or “M” shaped plastic or zinc bead. | Often involves heavy-duty, deep-channeled metal tracks. |
| Visual Impact | A thin, clean line (often 1/4″ to 1/2″ wide). | Typically wider and more prominent for larger shifts. |
Final Thoughts
Expansion joints in drywall are simple but powerful tools. They:
- Prevent cracking
- Absorb natural building movement.
- Extend the life of your drywall finish.
They’re not complicated, but they do require planning and proper installation.
If you’re tackling a large drywall project, thinking about expansion joints now can save you from frustrating repairs later.
And if you’ve ever wondered why a ceiling keeps cracking in the same spot, there’s a good chance the building needed room to move.
Now you know exactly what expansion joints are, why they matter, and how to use them correctly in your drywall project.

Elena Hart is the founder and lead writer of Better Home Pro. She writes about drywall, home repair, and practical DIY home improvement topics, focusing on clear, useful information that helps homeowners make better decisions. Her work combines firsthand experience, manufacturer documentation, industry resources, and careful research to create content that is accurate, practical, and easy to understand. Through Better Home Pro, Elena aims to simplify complex home improvement topics and provide guidance that is genuinely helpful to homeowners and DIYers.


No Comments