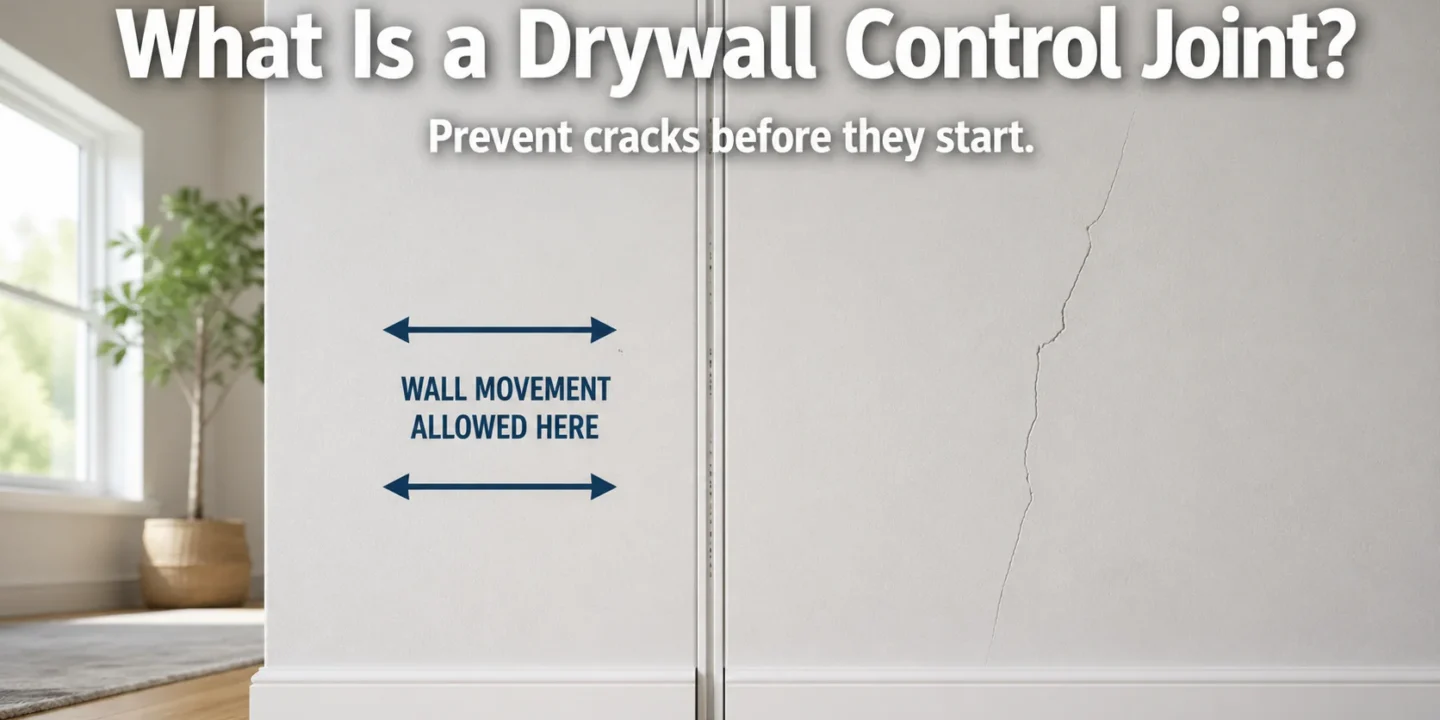

A drywall control joint is a planned separation or gap in the drywall finish specifically designed to absorb movement within the wall system.
Its use is governed by the Gypsum Association’s GA-216 standard — the industry’s official installation document referenced in the International Building Code — which specifies exactly where and how architects and installers must deploy these joints to prevent cracking.
Unlike standard seams that are taped and hidden, this joint is a visible, intentional weak point that prevents the material from cracking under stress.
Its primary purpose is to handle the expansion, contraction, and minor deflection that naturally occur in buildings over time. If you see a clean, straight line separating a large expanse of drywall, it is likely a control joint.
It is not a construction defect or a mistake; it is a deliberate engineering decision to protect the wall’s structural integrity and appearance by managing where movement occurs.
Key Takeaways
- A control joint is a planned, straight separation line (often with a flexible caulk-filled channel) that acts as a pressure relief valve for building movement, preventing random cracks—not a drywall mistake.
- Buildings constantly shift due to thermal changes, structural deflection, and moisture, and drywall is too rigid to handle that stress without a release point; skipping a control joint in large spans leads to ridging or jagged cracks.
- Control joints are mandatory in commercial construction and essential in residential open-concept homes with walls over 30 feet or expansive ceilings, even if local codes don’t explicitly require them.
- Never try to hide a control joint by taping and mudding over it—that guarantees cracking—but you can design around it as an intentional architectural feature by aligning it with lighting or using shadow-gap trim.
What Does a Drywall Control Joint Look Like?
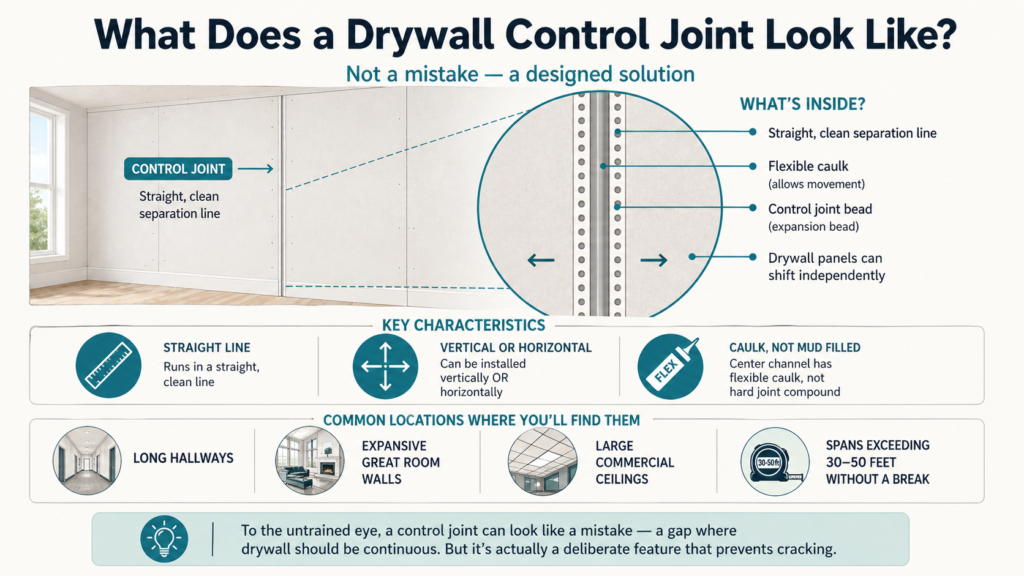
To the untrained eye, a control joint can look like a mistake—a gap where the drywall should be continuous. However, upon closer inspection, you will notice distinct characteristics that distinguish it from a simple error.
A control joint typically appears as a straight, clean separation line running vertically or horizontally across a wall or ceiling. It often features a specific trim piece known as a control joint bead or “expansion bead.” Like other forms of drywall corner bead, it creates a defined edge, although its purpose is movement control rather than impact protection. This bead creates a defined channel that is usually filled with caulk rather than joint compound.
The caulk remains flexible, allowing the two sides of the drywall to move independently without breaking the surface. You will most commonly find these in long hallways, expansive great room walls, or large commercial ceilings where spans of drywall exceed 30 or 50 feet without a break.
Why Control Joints Are Needed
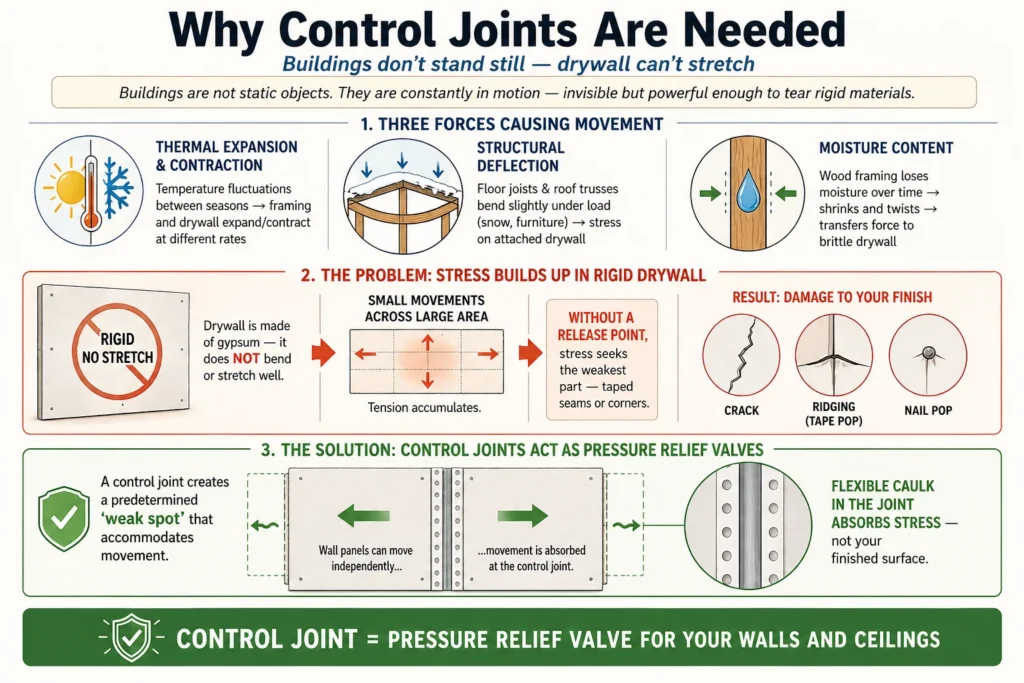
To understand why a control joint is necessary, you have to accept that buildings are not static objects; they are constantly in motion. This movement is invisible to the naked eye, yet powerful enough to tear rigid materials apart.
Several forces contribute to this movement:
- Thermal Expansion and Contraction: As temperatures fluctuate between seasons, the framing lumber and the drywall materials expand and contract at different rates.
- Structural Deflection: Floor joists and roof trusses are engineered to bend slightly under load — this is by design, not a defect. The American Wood Council explains how structural members deflect under load, noting that a floor joist spanning 10 feet may deflect up to 1/3 inch under maximum design loads. That movement directly transfers stress to any drywall attached to it, making a control joint the only engineered solution for long spans.
- Moisture Content: Wood framing loses moisture over time, causing it to shrink and twist. Building Science Corporation’s research on how wood movement transfers stress to drywall makes this clear: wood moves, drywall does not — and the more rigidly you attach drywall to wood, the more cracks you invite. The more attachment points between the two materials, the more stress is transferred when the wood shifts.
Drywall is a rigid material made of gypsum; it does not bend or stretch well. When you cover a large area, small movements accumulate, creating tremendous tension across the surface.
Without a release point, this stress seeks the weakest part of the wall—which is usually a taped seam or a corner. The result is cracking, drywall ridging, or nail pops as stress accumulates in areas that have no engineered way to absorb movement.
A control joint acts as a pressure relief valve. It creates a predetermined “weak spot” that accommodates that movement, ensuring the stress is absorbed by the flexible caulk in the joint rather than causing the finished surface to tear.
Where Control Joints Are Typically Installed
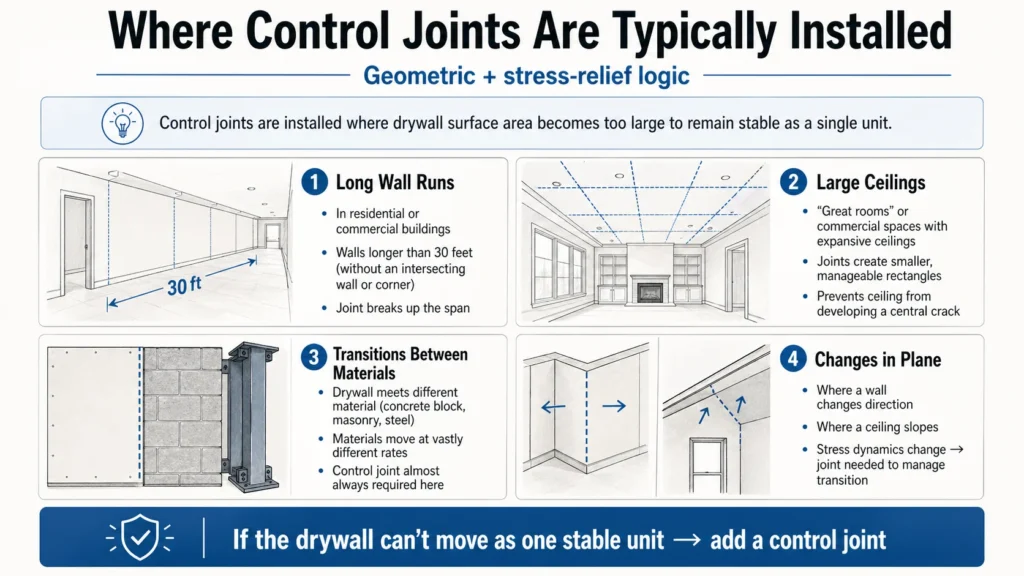
Control joints follow a geometric and stress-relief logic. According to AWCI’s technical guidance on control joint placement, both ASTM C840 and GA-216 specify that control joints must be installed where a wall or partition runs in an uninterrupted straight plane exceeding 30 linear feet.
- Long Wall Runs: In residential or commercial buildings with walls longer than 30 feet (without an intersecting wall or corner), a control joint is often placed to break up the span.
- Large Ceilings: In “great rooms” or commercial spaces with expansive ceilings, joints are used to create smaller, manageable rectangles. This prevents the ceiling from developing a central crack.
- Transitions Between Materials: If drywall meets a different material—like concrete block, masonry, or steel—there is almost always a control joint because these materials move at vastly different rates.
- Changes in Plane: Where a wall changes direction or a ceiling slopes, the stress dynamics change, often necessitating a joint to manage the transition.
Are Control Joints Required by Code?
The requirement for control joints is one of the most confusing areas for homeowners. The short answer is: it depends on the scope and the building code used (e.g., IBC vs. IRC).
In commercial construction, control joints are strictly mandated. Standards often dictate that control joints must be installed where the length-to-width ratio of the drywall exceeds specific limits (usually a 1:1 ratio for very large spans).
In residential construction, the building codes are sometimes less explicit. Many residential homes do not have control joints because the walls are broken up frequently by windows, doors, and corners, which naturally act as movement breaks. However, in modern “open concept” homes with 40-foot spanning walls or vaulted ceilings, ignoring control joints is a violation of the manufacturer’s specifications and best practices, even if a local inspector doesn’t flag it.
If you are building a large, uninterrupted wall or a massive ceiling, control joints should be treated as required, regardless of whether the codebook explicitly shouts it at you.
Control Joints vs. Cracks vs. Seams
Understanding the difference between these three features is crucial for evaluating the quality of a finish.
- A Seam: This is where two drywall sheets meet. It is taped, covered with joint compound, and sanded to be invisible. Its job is to disappear.
- A Crack: This is a failure. It usually appears as a jagged or straight line where the tape has torn or the gypsum board has split. This indicates stress was not managed correctly.
- A Control Joint: This is a feature. It is a straight line, often accented with a shadow reveal or plastic trim. It is visible. If you try to tape and mud over a control joint to hide it, you are simply creating a seam that will inevitably turn into a crack.
What Happens If You Skip a Control Joint?
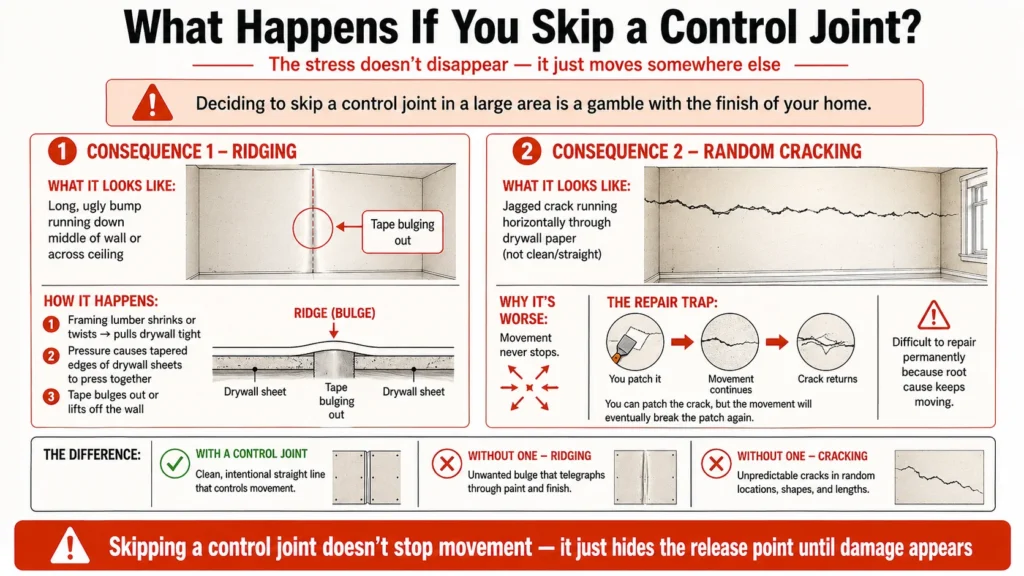
Deciding to skip a control joint in a large area is a gamble with the finish of your home. When you ignore the need for movement control, the stress does not disappear; it simply manifests elsewhere. This is why professional installers emphasize proper planning to avoid the most common drywall installation mistakes and their consequences, which often lead to expensive callbacks.
The most common consequence is drywall ridging. This happens when the framing lumber shrinks or twists, pulling the drywall tight. The pressure causes the tapered edges of the drywall sheets to press together tightly, causing the tape to bulge out or lift off the wall. It creates a long, ugly bump that runs down the middle of a wall or across the ceiling.
Alternatively, random cracking occurs. Instead of a clean, straight control joint line, you may see a jagged crack running horizontally through the paper of the drywall. These are difficult to repair permanently because the root cause—the movement of the building—never stops. You can patch the crack, but the movement will eventually break the patch again.
Can You Hide or Remove a Control Joint?
This is the most common question from homeowners and designers who dislike the look of a line cutting through their wall. The honest answer is: You shouldn’t try to hide it in the traditional sense.
You cannot simply tape and mud over a control joint. If you do, you have created a hard bond. When the building moves, that bond will snap, and you will be right back to having a crack. For larger commercial spaces or buildings with significant movement, you may actually need to look into a more robust expansion joint in your drywall rather than a standard control joint.
However, you can design around it. Many modern architects use control joints as architectural features. They align them with lighting fixtures, use “shadow gap” trim to make them look intentional and sleek, or paint them a contrasting color to emphasize the room’s geometry. If the joint is placed strategically (e.g., where a wall changes direction or at a column line), it can blend into the visual rhythm of the space rather than looking like a scar on the drywall.
When Homeowners Should Ask About Control Joints
If you are undertaking a renovation or building a new home, you should broach the subject of control joints during the framing stage. Specifically:
- In Open Concept Remodels: If you are removing load-bearing walls or merging rooms to create a 50-foot span of drywall, ask your contractor, “How are we handling the expansion in this long run?”
- In Great Room Ceilings: If you have a vaulted or tray ceiling spanning a large area, ask if a relief joint is necessary to prevent future ridging.
- When Attaching to Concrete: If you are finishing a basement where drywall meets concrete walls or floors, ensure a control joint or flexible molding is used at that transition.
By asking these questions, you shift the conversation from “fixing mistakes” to “planning for longevity.” You demonstrate that you understand the house is going to move, and you want to make sure the design accounts for it gracefully.

Elena Hart is the founder and lead writer of Better Home Pro. She writes about drywall, home repair, and practical DIY home improvement topics, focusing on clear, useful information that helps homeowners make better decisions. Her work combines firsthand experience, manufacturer documentation, industry resources, and careful research to create content that is accurate, practical, and easy to understand. Through Better Home Pro, Elena aims to simplify complex home improvement topics and provide guidance that is genuinely helpful to homeowners and DIYers.


No Comments