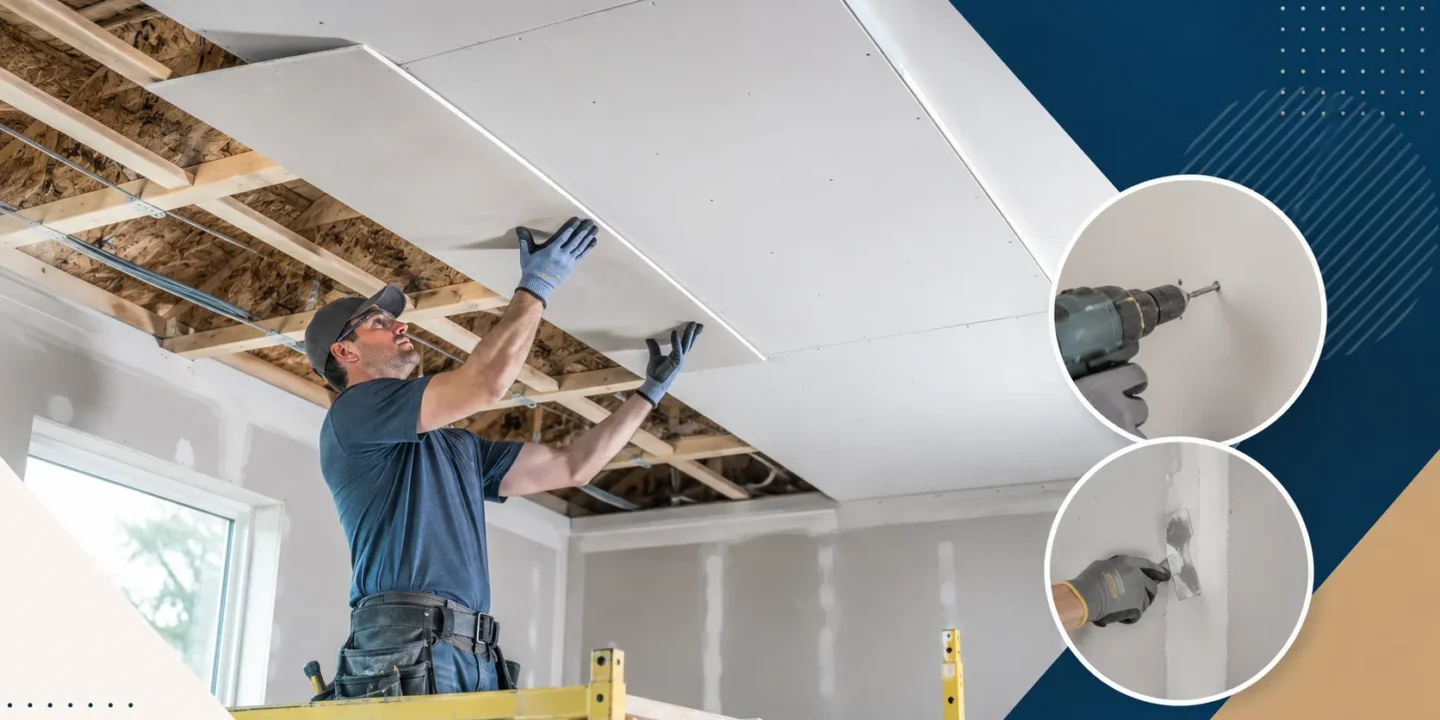



Ceiling drywall is a different animal from wall drywall. The sheets are just as heavy, but now gravity is working against you. Every cut has to be right before the panel goes up because fixing mistakes overhead is exhausting. Seams on ceilings catch light from every angle, so poor finishing work that would go unnoticed on a wall becomes glaringly obvious once you flip on a lamp.
That said, this is a manageable DIY project. Plenty of homeowners do it successfully without professional help. The ones who run into trouble are usually the ones who skip the planning phase, underestimate the physical demands, or try to do it alone without a drywall lift.
This guide covers everything you need to do the job right: choosing the correct material, laying out the job before you touch a single sheet, hanging and fastening properly, and finishing the seams so they actually disappear. Most ceiling failures are not caused by one big mistake but by small problems during the overall installation process that compound later under lighting and movement.
Key Takeaways
- Standard 5/8-inch drywall resists sagging over time and is mandatory for ceiling joists spaced 24 inches on center.
- Running sheets perpendicular to the ceiling joists distributes the weight load across framing and prevents weak points.
- Staggering the joints between drywall sheets prevents continuous lines of stress that lead to visible ceiling cracks.
- A rented drywall lift removes the physical strain of overhead installation so you can focus on accurate alignment and screw depth.
- Thin layers of joint compound feathered wider with each coat prevent visible ridges when light rakes across the ceiling.
Is This a DIY Job? Honest Assessment Before You Start
For a typical bedroom or basement room, yes, this is a reasonable DIY project. For a large open living area with high ceilings, the honest answer is: it depends on your experience, your physical ability, and how much time you have.
What makes ceiling work harder than walls is not just the weight. It is the combination of working overhead for hours at a time, the fact that every sheet has to be held in position while you drive screws, and the reality that visible seams on a ceiling are far less forgiving than seams on a wall. You can get away with a slightly rough wall seam because your eye naturally scans across it. On a ceiling, light rakes across the surface from the side, and every imperfection casts a shadow.
A drywall lift solves most of the physical challenge because stable overhead sheet positioning lets you focus on alignment and screw placement instead of physically supporting the panel weight the entire time. These are widely available for rent at most tool rental shops and big-box stores, and the rental cost is minor compared to the alternative of rigging up T-brace crutches or recruiting three people to hold sheets while you screw.
When hiring a pro makes more sense: large rooms with vaulted or cathedral ceilings, situations where the existing framing needs repair first, or projects where the finishing quality has to be genuinely perfect for a high-end renovation. Hanging is the easier part to DIY. Finishing to a Level 5 standard is where professional skill makes a real difference.
Choosing the Right Drywall for Ceilings
Thickness
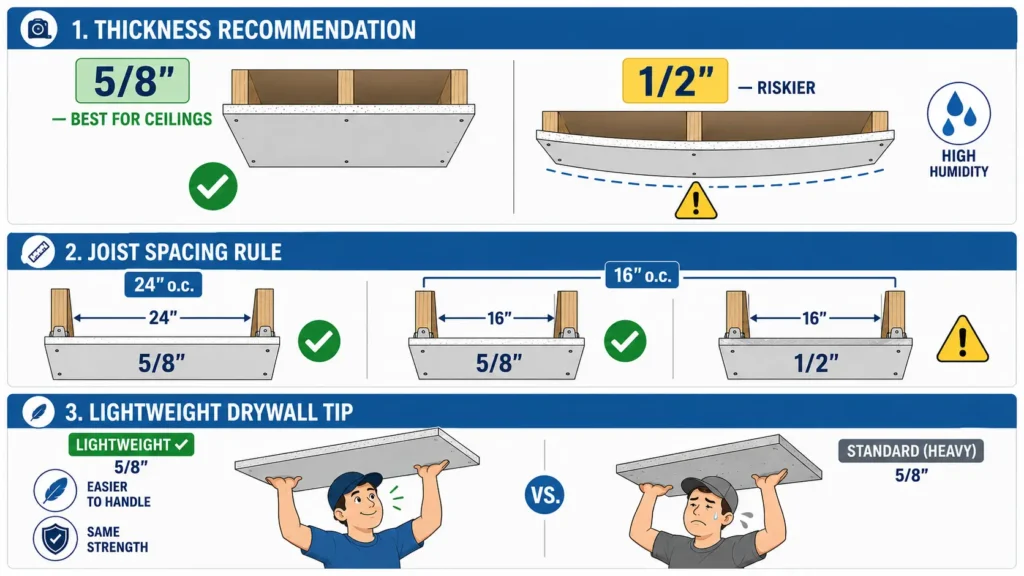
The standard recommendation for ceilings is 5/8-inch drywall, and there is a good reason for it. The extra thickness resists sag over time, which is one of the most common failure points in ceiling installations. Joists spaced 24 inches on center require 5/8-inch panels; there is no question about that. Even with 16-inch spacing, 5/8-inch is generally the safer choice.
Half-inch panels can work in some situations, but they carry more long-term risk, particularly in humid environments where the board absorbs moisture and softens slightly. If you are deciding between the two, the weight difference per sheet is not dramatic enough to justify the downside risk of using thinner material overhead.
Lightweight drywall panels are worth considering for DIYers. Standard 5/8-inch sheets are heavy and physically demanding to maneuver, especially in a tight space. Lightweight versions of both 1/2-inch and 5/8-inch are widely available and significantly easier to handle, although some lightweight ceiling panels trade a bit of rigidity for the reduced carrying weight.
Type
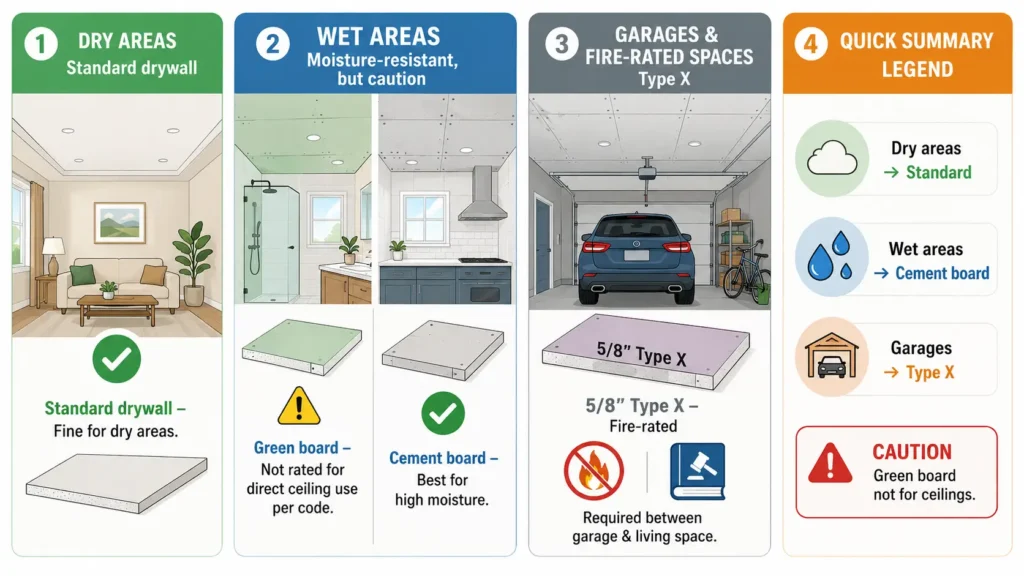
For most interior ceilings in dry areas, standard drywall works fine. For bathrooms, kitchens, and basements, use moisture-resistant panels because ceiling materials in elevated humidity conditions tend to soften faster over time than drywall installed in dry interior spaces.
One clarification worth making here: standard water-resistant drywall (the green board you often see in bathrooms) is actually not rated for direct ceiling use per most installation guidelines. For ceiling applications in wet areas, look specifically for panels rated for ceiling use, or use cement board if there is a real moisture exposure concern, especially for wet-area ceilings exposed to repeated moisture over long periods.
For garages or any space where fire resistance is required by code, 5/8-inch Type X fire-rated drywall is the right choice because fire-rated ceiling assemblies are designed to slow heat transfer longer during a fire event.
Tools and Materials You Will Need
Getting the right tools together before you start saves a lot of frustration mid-project.
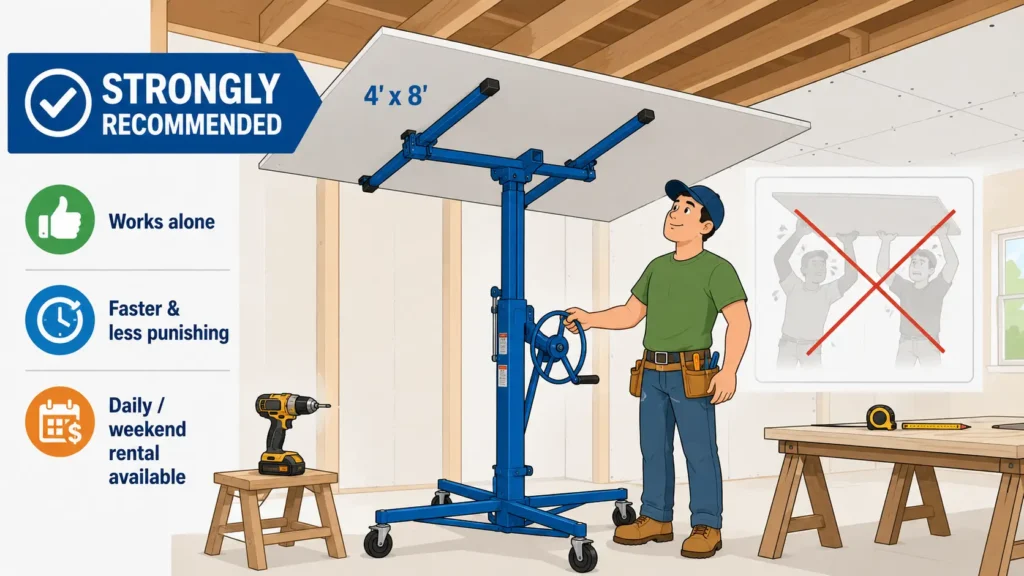
Drywall lift: Strongly recommended. Not optional if you are working alone. Even with two people, the lift makes the job faster and less physically punishing. Many rental shops offer day and weekend rates.\
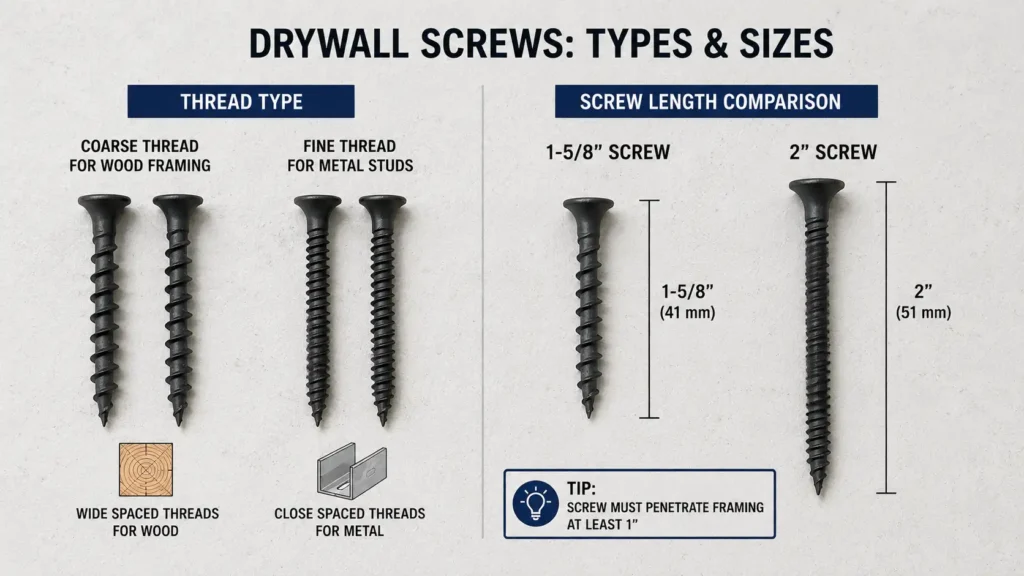
Drywall screws: Use 1-5/8-inch screws for 1/2-inch panels fastened to wood framing, and go longer for 5/8-inch panels. Coarse-thread screws for wood framing; fine-thread for metal studs.
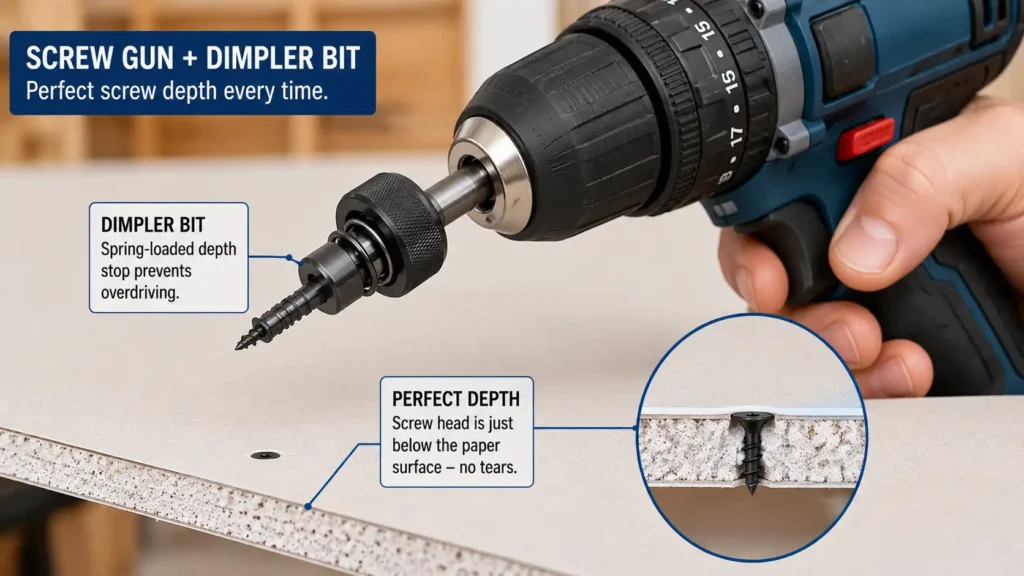
Screw gun or drill with a dimpler bit: A dimpler bit is worth having. It drives screws to a consistent screw depth so the head sits just below the paper surface without tearing through it. Overdriving is one of the most common and damaging mistakes in drywall installation.
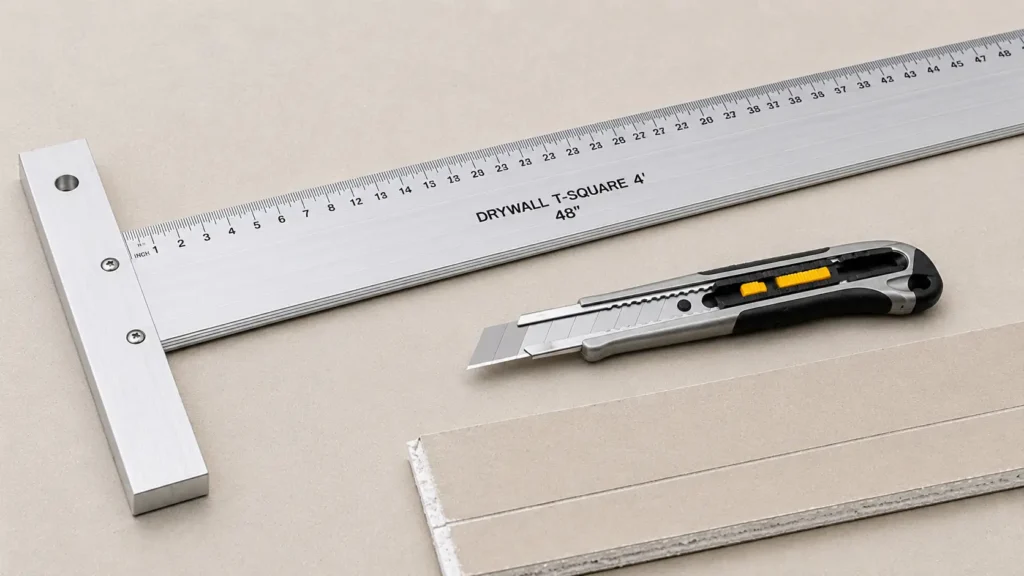
Drywall square and utility knife: For scoring and snapping cuts cleanly. A 4-foot T-square works perfectly for ceiling cuts.
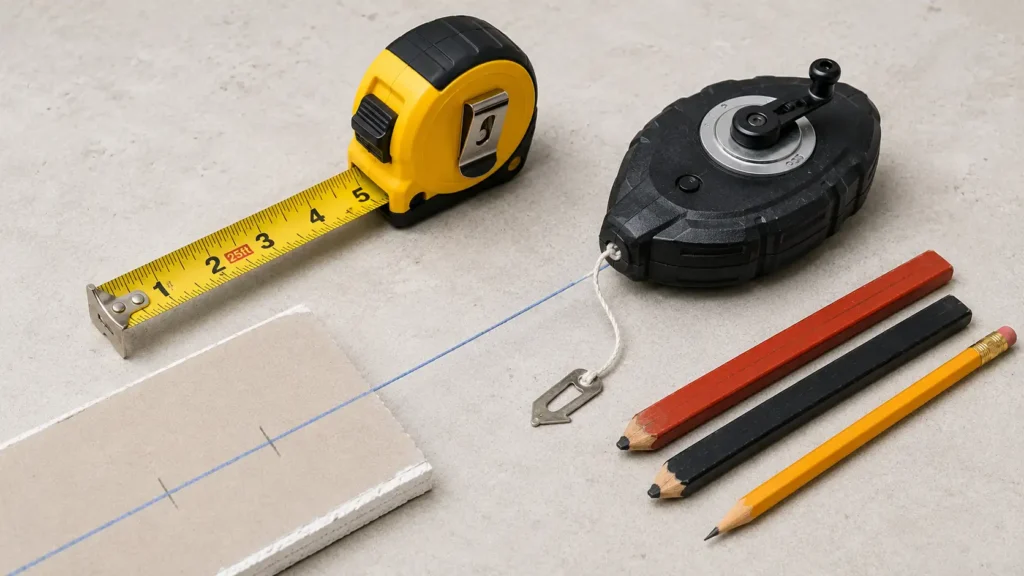
Tape measure, chalk line, and pencil: For layout work before any sheets go up.
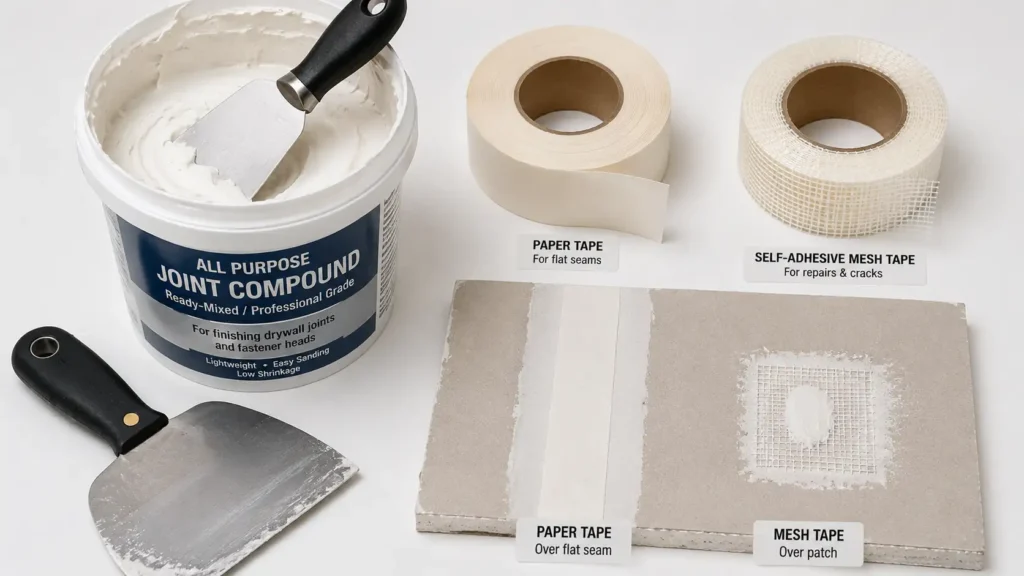
Joint compound and drywall tape: Pre-mixed all-purpose compound works for most ceiling jobs because different joint compound types balance bonding strength, sanding ease, and drying time differently. Paper tape works better on long ceiling seams because ceiling seam stability matters much more overhead than it does on smaller wall patches.
Safety glasses and a dust mask: Drywall dust is genuinely unpleasant to breathe and hard on eyes. This is not optional safety theater.

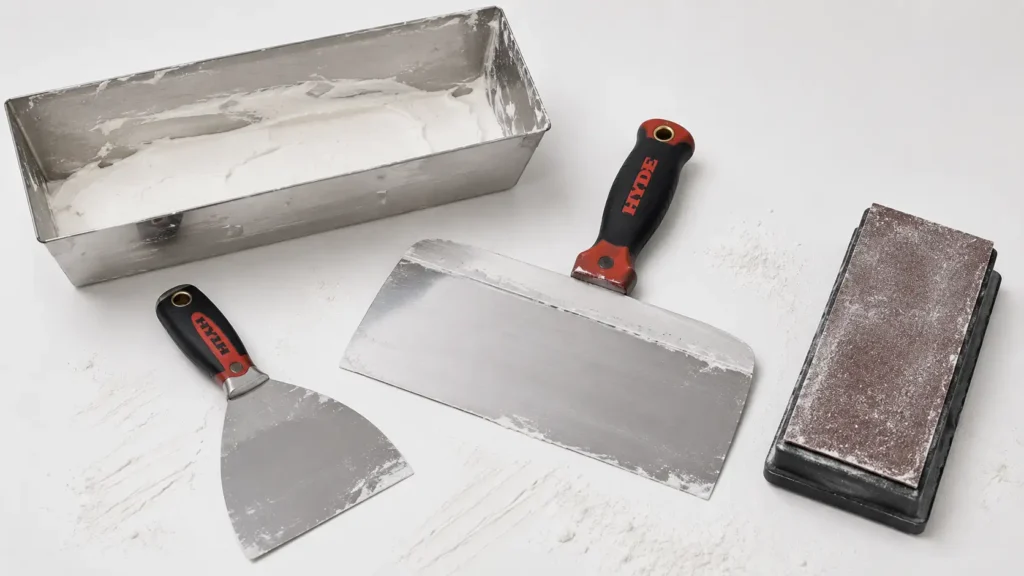
Mud pan, drywall knives (6-inch and 10-inch or 12-inch), and a sanding block: You will need a narrower knife for the first coat and tape work, and a wider knife for feathering finish coats.
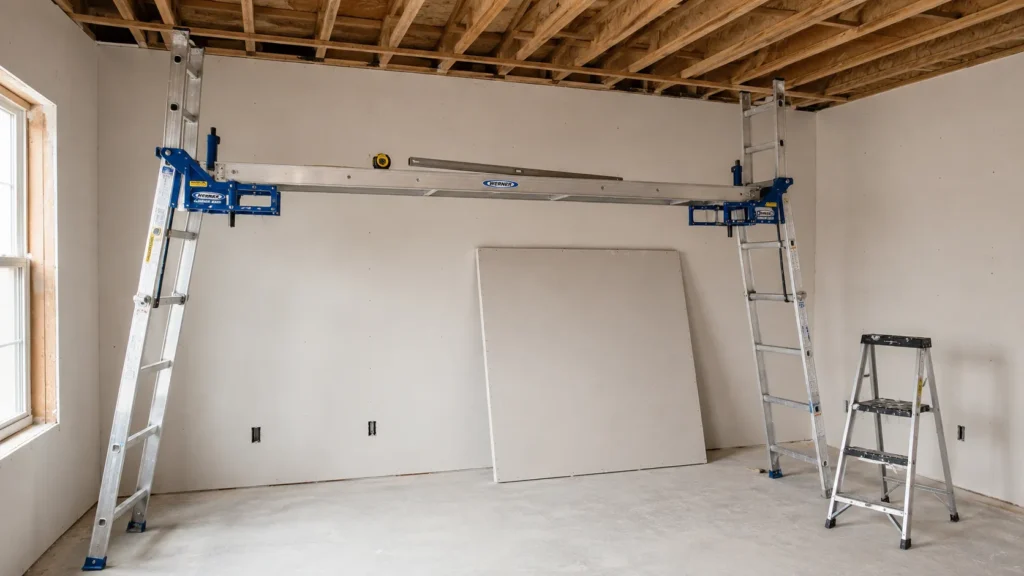
Sturdy ladder or scaffolding: A walk board between two ladder jacks or a pump scaffold is far safer and more practical than moving a step ladder every few feet.
Planning and Layout Before You Touch a Single Sheet
This is where most DIY ceiling projects either succeed or fail. Rushing into hanging without doing the layout work first leads to wasted material, poorly placed joints, and screws that miss framing entirely.
Finding and Marking Ceiling Joists
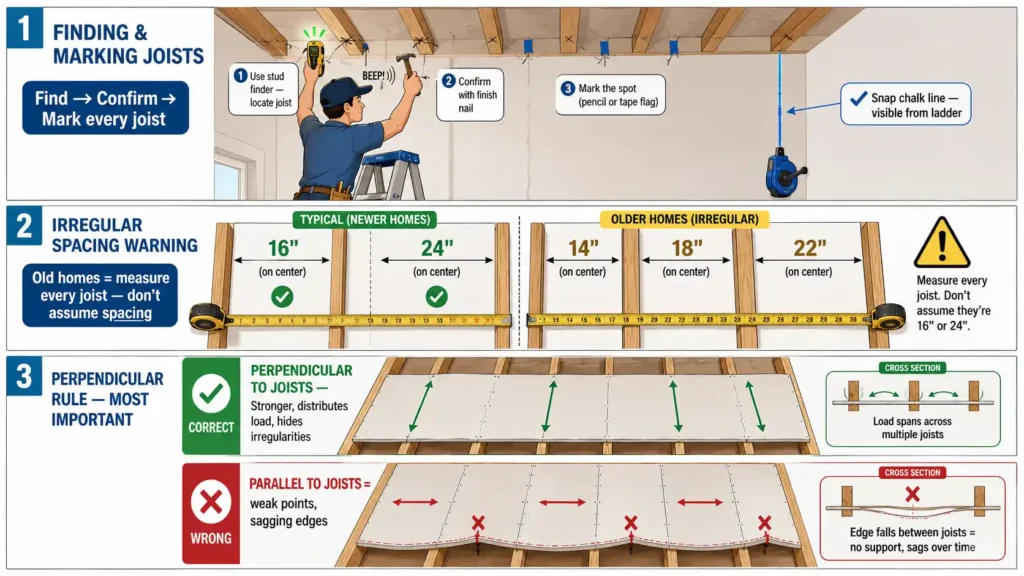
Before anything else, locate every joist and mark it clearly on the walls. Once a sheet is overhead, those marks are the only guide you have for where to drive screws.
Use a stud finder for initial detection, then confirm by driving a finish nail through the drywall or ceiling material in an inconspicuous spot. Joists are usually spaced 16 or 24 inches on center, but older homes sometimes have irregular spacing. Measure and mark every one across the full ceiling, then snap chalk lines on the wall at each joist location so they are visible from a ladder.
Sheets run perpendicular to the joists. This is not optional. Running sheets perpendicular to framing is stronger, distributes load across more joists, and helps hide any minor irregularities in joist spacing. Running them parallel to joists means the panel edges land between framing members, which creates weak points and sagging.
Planning Your Sheet Layout
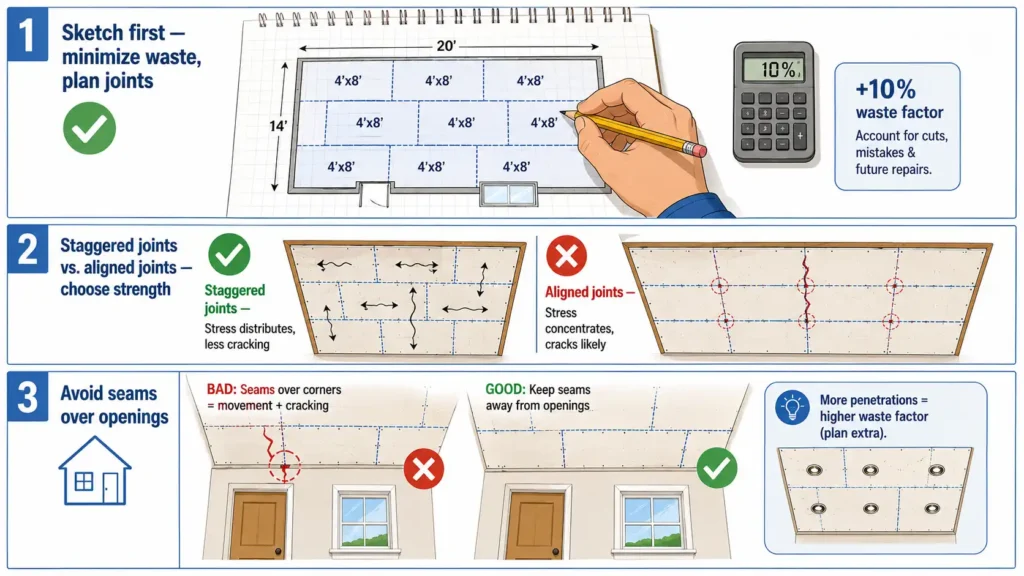
Take time to sketch the ceiling layout on paper before cutting anything. The goal is to minimize waste, stagger the joints between sheets (never align them in rows), and avoid placing seams directly over door or window corners.
Joint placement matters a lot on ceilings. Staggered joints are significantly less likely to crack over time because drywall movement stress spreads across multiple seams instead of concentrating along one continuous weak line. Seams over corners of openings are particularly prone to cracking because that area moves more than the surrounding structure.
Calculate how many sheets you need based on your room dimensions, then add about 10 percent for cuts and waste. For rooms with many recessed lights or other ceiling penetrations, that waste factor can be higher.
Checking Framing Condition
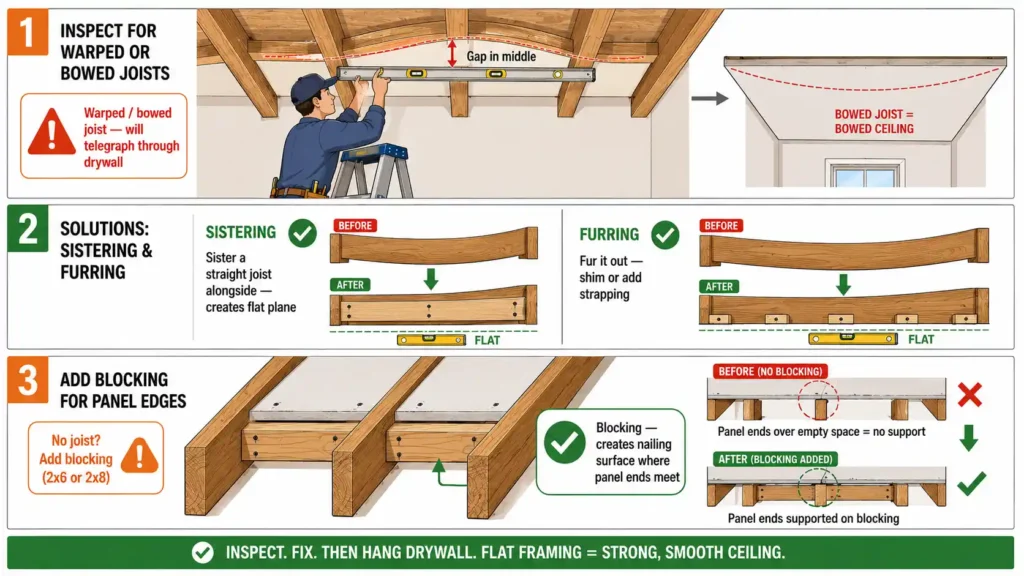
Before hanging a single sheet, inspect the joists carefully because hidden ceiling damage becomes much harder to repair once the drywall is installed. Look for warped or twisted framing, inconsistent spacing, and missing blocking at panel edges. Poor framing is one of the leading causes of panels that crack or sag over time because the board is not fully supported where it needs to be.
If a joist is bowed downward significantly, the panels on either side of it will often create visible ceiling surface waves once directional lighting hits the finished ceiling. You may need to sister a straight board alongside it or fur it out to create a flat plane. This is worth dealing with before you hang a single sheet.
Add blocking wherever two panel ends will meet and there is no joist to screw into. Blocking can be cut from 2×6 or 2×8 lumber and nailed or screwed between the joists to provide a nailing surface for panel edges.
Step-by-Step: How to Hang Drywall on a Ceiling
Step 1: Set Up Your Work Area
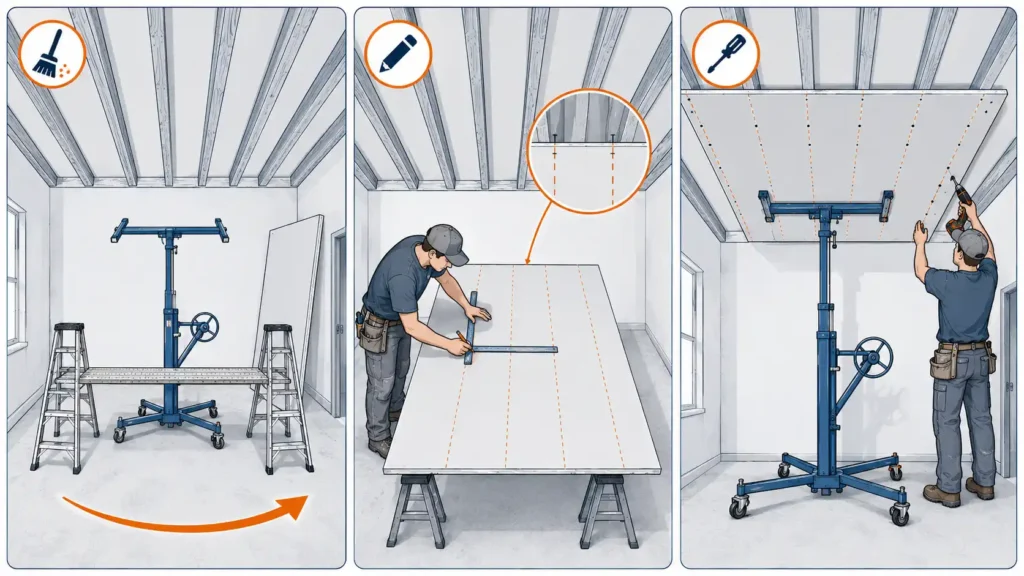
Clear the room as much as possible. Set up scaffolding or a walk board between two ladders so you can move laterally across the room without climbing down and repositioning constantly. Load the first sheet onto the drywall lift and confirm the orientation before you raise it.
Before lifting each sheet, mark the joist lines directly on the face of the drywall. This way, once the sheet is pressed against the ceiling, you know exactly where to drive screws without hunting.
Step 2: Hoist the First Sheet
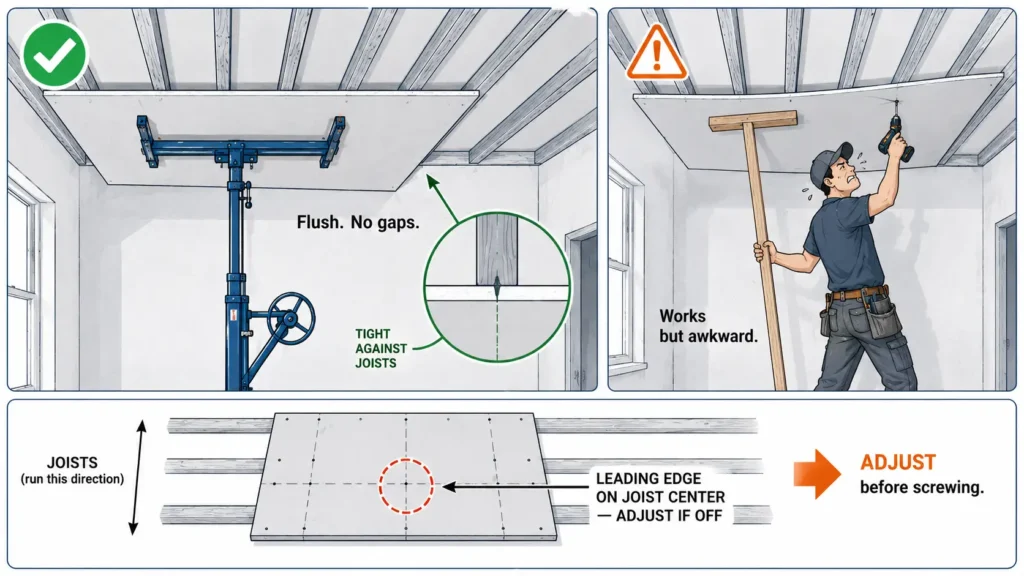
Start in a corner and work out from there. Use the lift to raise the sheet tight against the joists. The panel should be flush with the framing, not bowing or gapping. If you are working without a lift, a T-brace made from a 2×4 with a crosspiece can hold one end while you fasten the other, but this is considerably more awkward.
Check that the sheet is perpendicular to the joists and that the leading edge lands on the center of a joist. If it does not, adjust before screwing.
Step 3: Fasten the Sheet
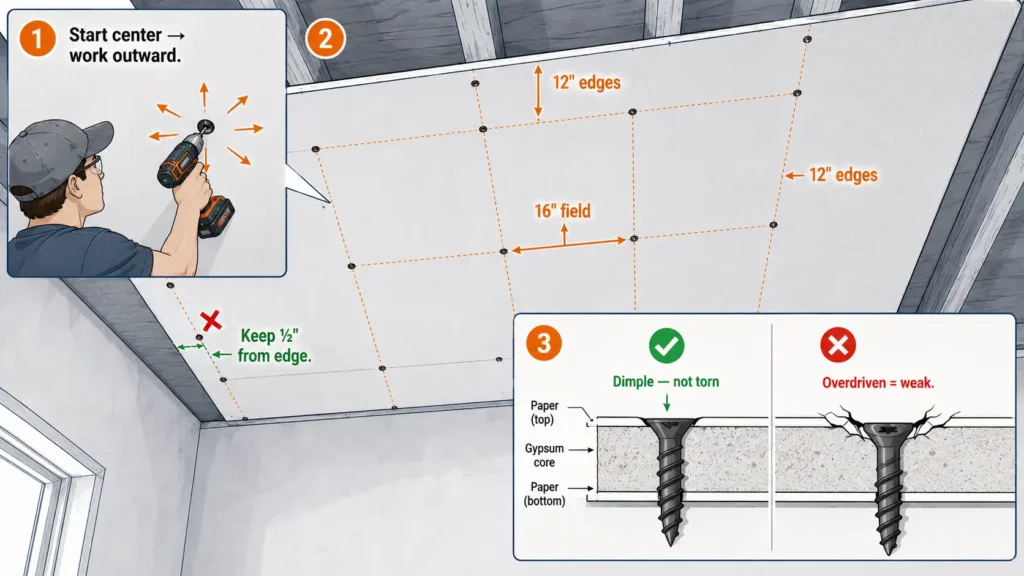
Start screwing from the center of the sheet outward toward the edges. Starting at the center pushes any slight bow out rather than trapping it in.
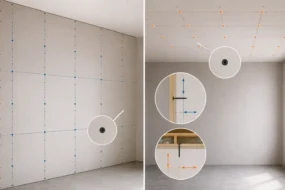
For screw spacing: every 12 inches along the panel edges and every 16 inches in the field (the interior of the sheet). Do not place screws closer than 3/8 inch to 1/2 inch from the edge of the panel. Too close to the edge and the paper tears, which weakens the hold and creates a crack point.
The screw head should sit just slightly below the paper surface, creating a small dimple. It should not break through the paper. Overdriving screws is one of the most common causes of drywall problems. A torn paper face cannot hold the screw effectively, and it creates a weak spot in the panel.
Step 4: Cut and Fit Partial Sheets
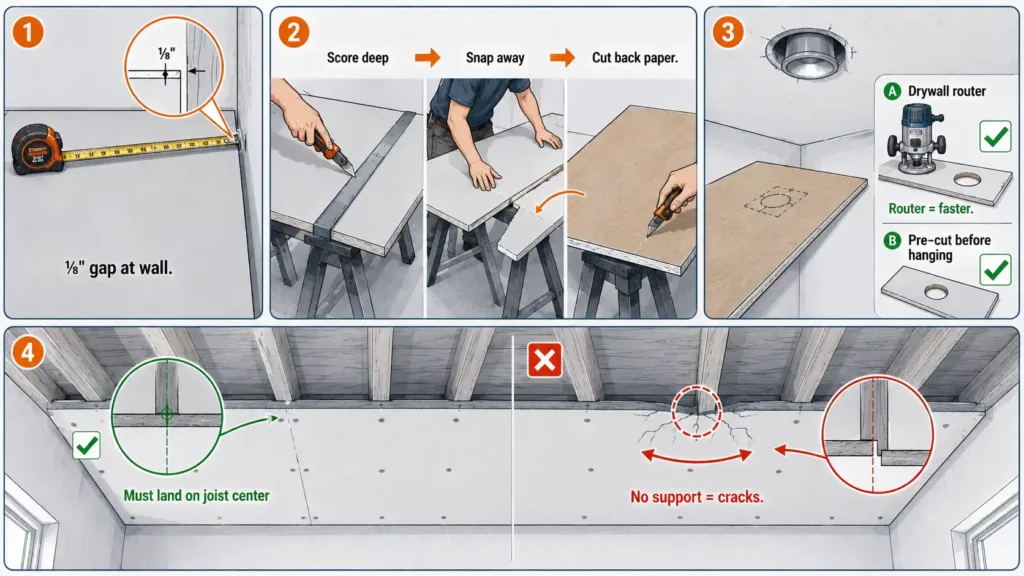
Most ceilings require at least a few partial sheets at the perimeter. Measure carefully from the last full sheet to the wall, accounting for the 1/8-inch gap you want to leave at the wall.
To cut drywall: score deeply along the cut line with a utility knife guided by a straightedge, then snap the board away from you over the edge of a table or sawhorse. The board will break cleanly along the score. Cut the paper backing on the other side to free the piece.
For cutouts around recessed lights and electrical boxes, mark the cutout location on the back of the panel before lifting it into position. You can use a drywall router to cut the opening cleanly after the sheet is up, or cut it before hanging if the measurements are precise. The router method is faster and more forgiving.
Every cut panel end needs to land on the center of a joist. Measure from the end of the room to the middle of the nearest joist and cut accordingly. A panel edge hanging in open air has no support and will flex, crack, and eventually fail.
Step 5: Continue Hanging Remaining Sheets
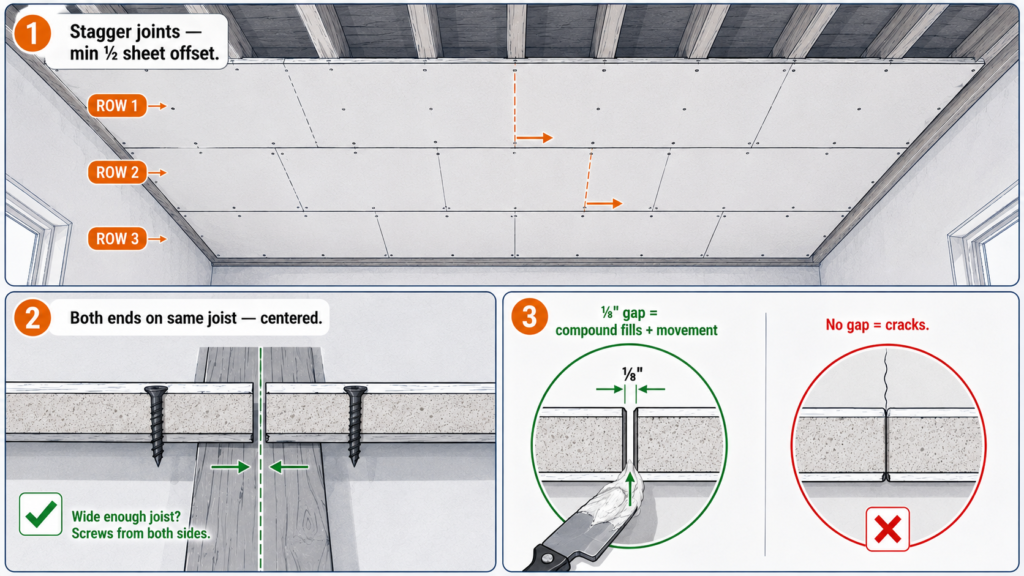
Work row by row across the ceiling. Keep joints staggered from one row to the next by at least half a sheet length. When two panel ends meet, both edges must land on the same joist with the joint centered over it. This requires that the joist is wide enough to accept screws from both sides without splitting.
Maintain a consistent 1/8-inch gap at butt joints (where two cut ends meet rather than factory tapered edges). This gap gives the joint compound room to fill properly and accommodates slight movement without cracking.
Taping and Finishing the Ceiling
Finishing ceiling drywall is where patience pays off. Rushed or thick coats of compound lead to cracking, and uneven feathering shows up clearly under finished lighting.
Filling Screw Dimples
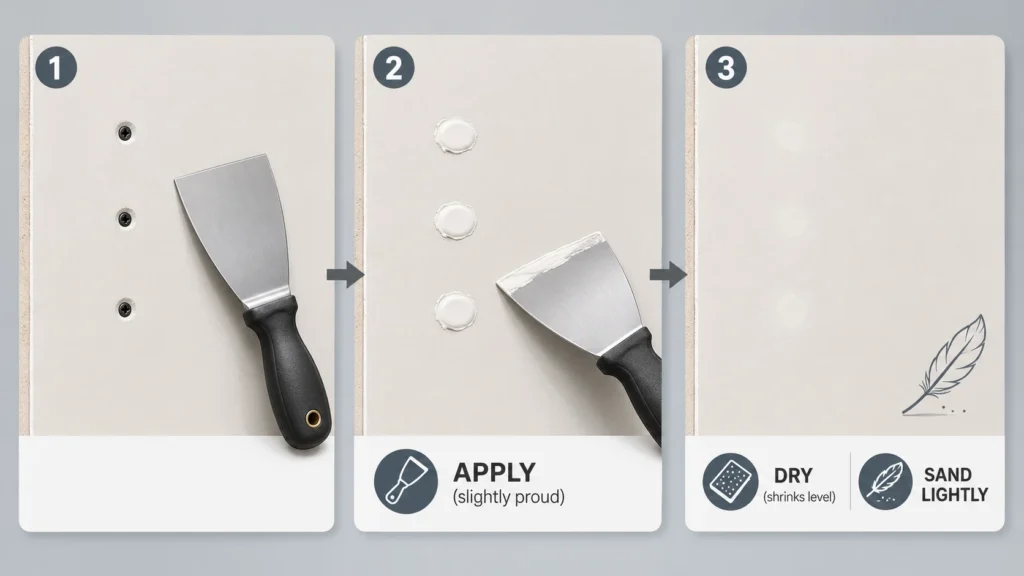
Apply the first coat of compound over every screw dimple with a 6-inch knife. Fill the dimple slightly proud of the surface. After the compound dries completely, it will shrink slightly and the dimple will be level or close to it. Sand lightly before the second coat if needed.
Taping Seams
Apply a bed coat of compound along the seam, center the tape over it, and press it firmly into the mud with a drywall knife. Remove excess compound from under the tape by dragging the knife along it with moderate pressure. The tape should be embedded and flat, with no bubbles or wrinkles, and covered with a thin skim of compound.
Paper tape is the better choice for flat ceiling seams. It is stronger than mesh tape and less prone to cracking on long, flat joints. Mesh tape is more useful for patches and inside corners where paper tape is harder to work with.
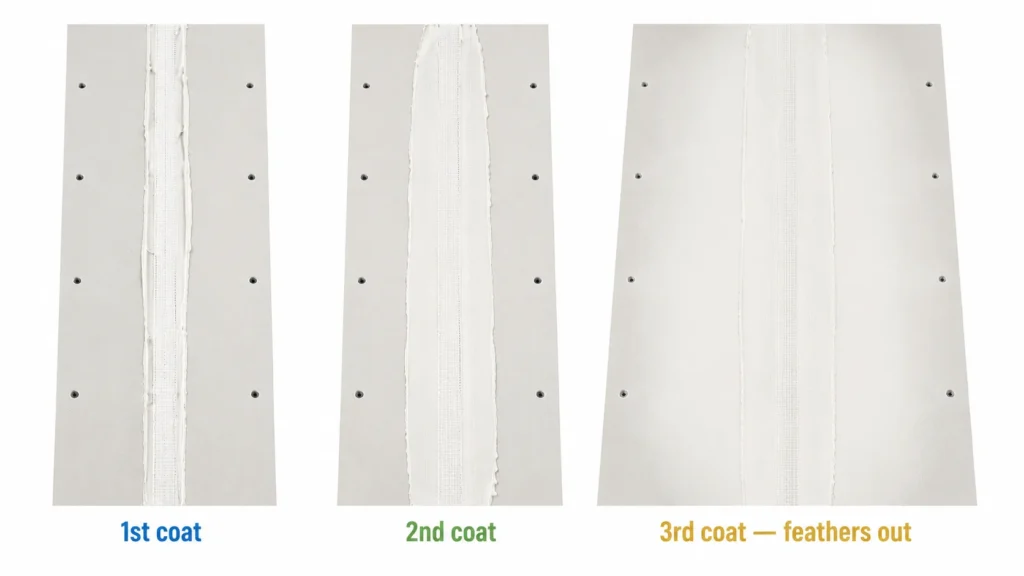
Ceiling seams are less forgiving than wall seams because of how light behaves on a horizontal surface. Angled light from windows or fixtures skims across the ceiling and reveals even small ridges in the compound. This is why feathering each coat out wide and applying thin coats matters more on ceilings than anywhere else.
Applying Finish Coats
Three coats is standard: the tape coat, a fill coat, and a finish coat. Each coat should be wider than the previous one. The tape coat might cover 6 to 8 inches across a seam. The fill coat should extend to 10 to 12 inches. The final coat should feather out even farther, blending gradually into the flat panel surface.
Let each coat dry fully before applying the next. Applying wet compound over a coat that is not fully dry traps moisture underneath and leads to cracking and bubbling. In humid climates or tightly sealed rooms, drying can take longer than the bag suggests. Do not rush it.
Sanding
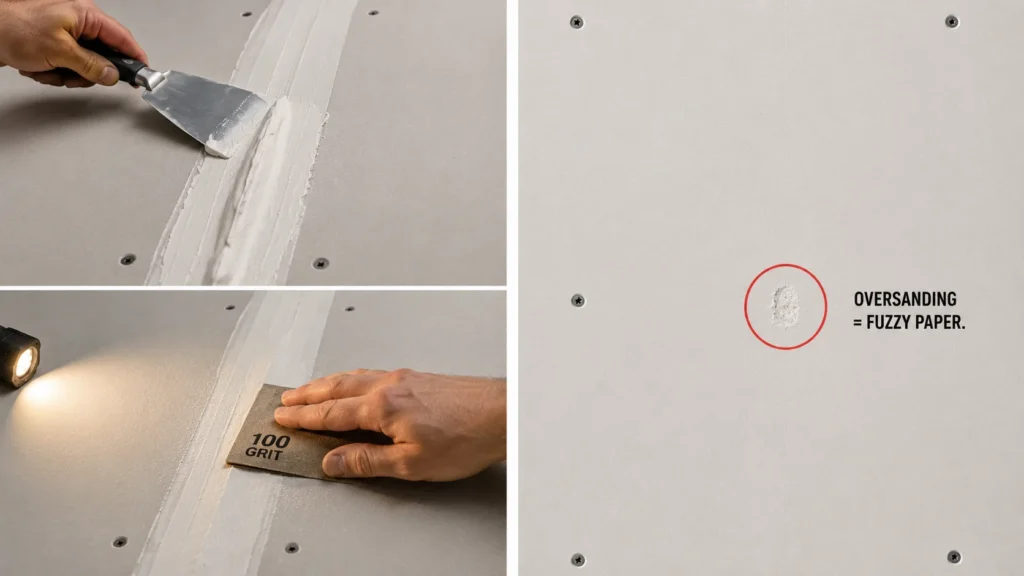
Start with 100 to 120-grit sandpaper and finish with finer grit for the final pass because drywall sanding scratches often stay hidden until primer and angled light expose them later. Sand with even, light pressure. The goal is to flatten high spots and blend the edges of the compound into the paper surface, not to remove material aggressively.
Do not oversand. The paper face of drywall is not thick, and if you sand through it, the surface becomes fuzzy and difficult to finish properly. Use a bright work light held at a low angle to reveal ridges and high spots before sanding.
Always prime new drywall before painting. Without primer, the paper face and the joint compound absorb paint at very different rates, and the seams will show through even with multiple finish coats. A PVA drywall primer applied evenly before painting eliminates this problem.
Common Mistakes That Cause Problems Later
Using 1/2-inch drywall where 5/8-inch is needed: The long-term sagging risk is real. On wider joist spacing especially, thin panels under their own weight over years will visibly bow. Use the right thickness from the start.
Not staggering joints: Aligned joints running across a ceiling create a continuous weak line. Normal building movement concentrates stress there, and visible cracks follow. Always offset joints by at least half a sheet.
Screws too close to panel edges: The paper tears, the screw does not hold properly, and the edge is prone to cracking. Stay back from the edge.
Skipping or rushing taping: This is the most common reason ceilings look poor after painting. A visible seam after two coats of paint is the result of inadequate taping work, not a painting problem. The seam is already failed before the paint ever goes on.
Applying compound in thick layers: Thick compound cracks as it dries and shrinks. Thin coats, properly dried between applications, produce far better results. It takes more passes, but the outcome is worth it.
Not accounting for expansion: Drywall needs a small amount of room at the perimeter to accommodate minor movement with temperature and humidity changes. Do not install panels tight against every wall and corner with no gap. A 1/8-inch perimeter gap is standard and will be covered by trim or corner bead.
Attempting the job alone without a lift: The physical strain of holding a heavy sheet overhead while trying to drive screws leads to rushed work, missed framing, and a back injury. Rent the lift.
Working Around Light Fixtures and Electrical
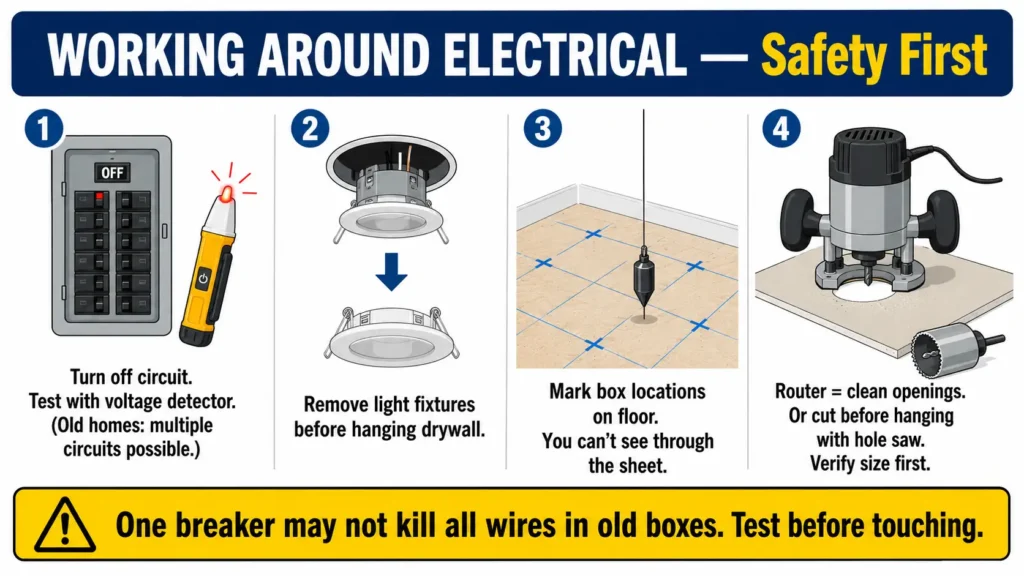
Turn off the circuit before doing any work near ceiling fixtures. Use a voltage detector to confirm the power is actually off. It sounds like basic advice, but electrical boxes in older homes are sometimes wired to multiple circuits, and the breaker you turned off may not control all of them.
Remove ceiling-mounted light fixtures before hanging the sheets. Working around an installed fixture is harder and increases the chance of damaging the wiring.
Mark the location of every electrical box on the floor using a plumb bob or a quick measurement before you lift a sheet into position. Once the sheet is overhead, you will not be able to see through it. Having floor marks lets you transfer the locations to the panel before or after lifting.
For cutting fixture cutouts, a drywall router makes clean, fast work of round and rectangular openings. If you prefer to cut before hanging, measure carefully from two reference points and use a hole saw for round fixtures. Verify the cutout size against the actual box or fixture ring before cutting.
When You’re Installing Over an Existing Ceiling
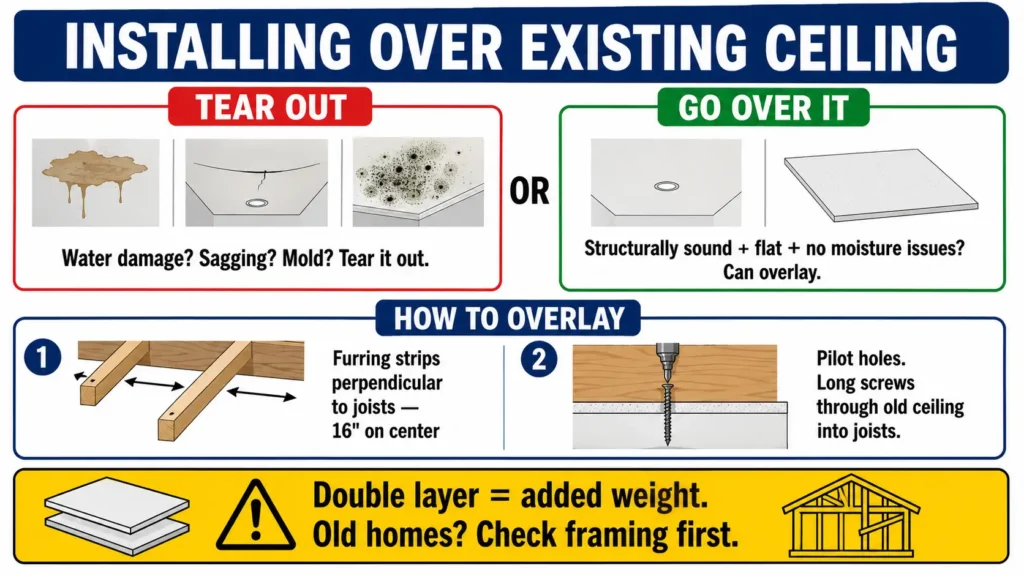
Whether to tear out the existing material or install over it depends on a few factors. If the existing ceiling is structurally sound, reasonably flat, and not hiding moisture damage or mold, furring and overlaying can save significant demo time and mess. If there is any sign of water damage, sagging, or mold, the old material needs to come down.
Installing over old acoustic tile or plaster requires furring strips to create a flat, level nailing surface. Fasten 1×3 or 1×4 furring strips perpendicular to the joists, spaced 16 inches on center. Use pilot holes to avoid splitting the strips, and drive long screws through the existing ceiling material into the joists.
Weight is a real concern when going over existing material. Double-layered ceilings add meaningful load to the framing. In most residential construction with typical joist sizing, this is not a structural problem. But in older homes with smaller-dimension lumber or longer spans, it is worth checking with a contractor before proceeding.
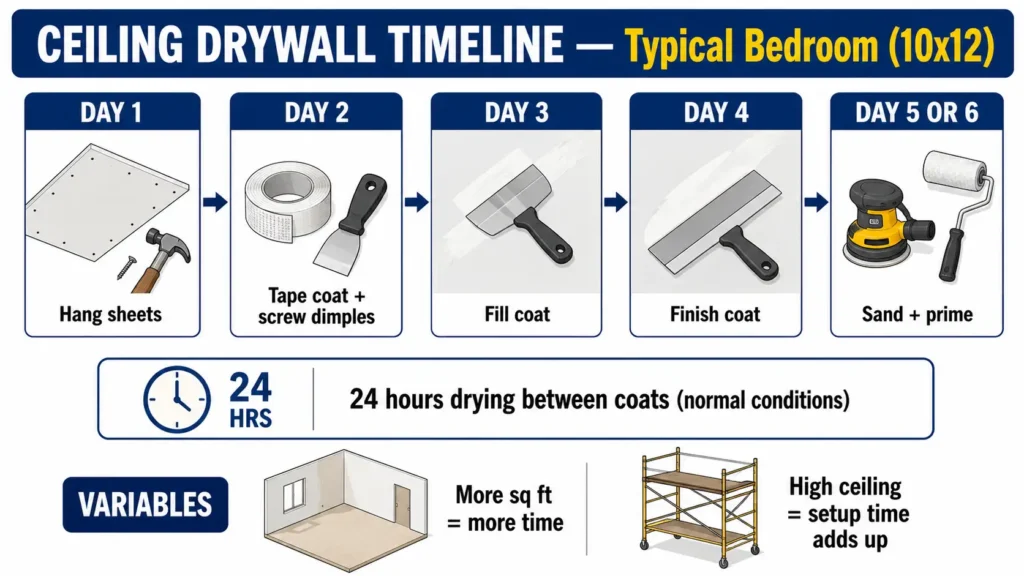
How Long Does a Ceiling Drywall Project Take?
For a typical bedroom (roughly 10×12 feet), a two-person team can hang the drywall in a few hours. Taping and the first coat of compound will take another few hours the same day or the next. From there, it is mostly waiting: each finish coat needs to dry before you can apply the next, and that is typically 24 hours per coat in normal conditions.
A realistic timeline for a single room from start to sanded finish:
- Day 1: Hang all sheets
- Day 2: Tape coat and screw dimples
- Day 3: Fill coat
- Day 4: Finish coat
- Day 5 or 6: Sand and prime
For a basement ceiling or a large open living space, multiply that accordingly. More square footage and more seams means more time taping and finishing. Ceiling height also adds time because setup and breakdown of scaffolding at each position adds up quickly.
Cost Breakdown: DIY vs. Hiring Out
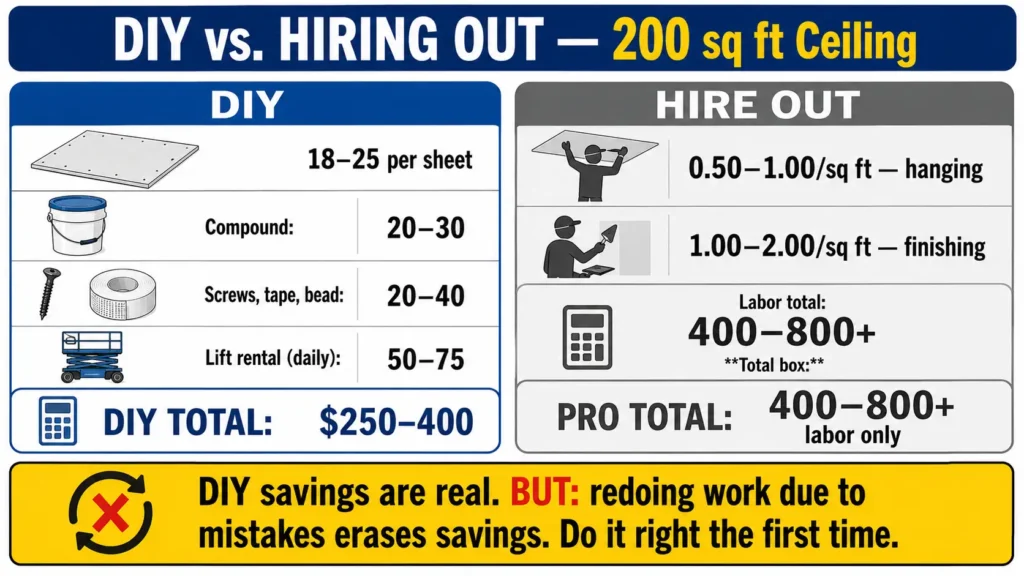
DIY material costs (approximate):
- Drywall sheets (5/8-inch, per sheet): $18 to $25 depending on region and supplier
- Joint compound (5-gallon bucket): $20 to $30
- Screws, tape, corner bead: $20 to $40
- Drywall lift rental (per day): $50 to $75
For a 200-square-foot ceiling, you are looking at roughly $250 to $400 in materials and tool rental for a DIY project, depending on local prices.
Hiring out:
Professional rates vary significantly by region. Hanging alone typically runs $0.50 to $1.00 per square foot for labor. Finishing (taping, coating, sanding) is often priced separately and can run $1.00 to $2.00 per square foot or more, depending on the finish level required. Combined, professional hanging and finishing for a standard room ceiling can easily run $400 to $800 or more in labor alone.
The DIY savings are real, but they come with a condition: if the work has to be redone because of poor material choice, missed framing, or inadequate finishing, the cost of materials a second time around erases most of the savings. Getting the preparation and execution right the first time is where the value of doing it yourself actually lives.
Conclusion
Ceiling drywall installation rewards preparation more than most DIY projects. The decisions that determine a good outcome are largely made before a single sheet goes up: choosing the right thickness, locating and marking every joist, planning the sheet layout so joints are staggered and properly supported, and making sure the framing is in good condition. Execution matters too, especially screw spacing and the finishing process. But an installer who has done thorough prep work is already most of the way to a successful job.
Finishing takes patience. Thin coats, full drying time between each, and careful feathering are what separate a ceiling that looks professionally done from one that clearly was not. There is no shortcut through that process that does not show up later.
Frequently Asked Questions
What thickness drywall should I use for a ceiling?
5/8-inch is the standard recommendation for ceilings. It resists sagging better than 1/2-inch over time, especially on joists spaced 24 inches on center. 1/2-inch can work on 16-inch spacing in dry conditions, but 5/8-inch is the safer long-term choice.
Can I hang ceiling drywall by myself?
It is possible but genuinely difficult without a drywall lift. With a lift, one person can manage the work for smaller rooms. Without a lift, you need at least two people to hold a sheet in position while it gets fastened. Trying to do it alone without a lift leads to physical strain and rushed work.
How many screws per sheet on a ceiling?
Screws go every 12 inches along panel edges and every 16 inches through the field (interior) of the sheet. For a standard 4×8 sheet, that typically means 30 to 40 screws depending on the number of joists it crosses.
Do I need special drywall for a bathroom ceiling?
Yes. Standard drywall is not appropriate for bathroom ceilings. Use moisture-resistant panels rated for ceiling use. Standard green-board water-resistant drywall is not approved for ceiling applications per most installation guidelines. Check the product specs to confirm ceiling suitability.
How do I prevent ceiling drywall from sagging?
Use 5/8-inch panels, run sheets perpendicular to the joists, screw at the correct spacing, and make sure the framing is in sound condition before hanging. Sagging is usually the result of using too-thin panels, improper screw spacing, or a combination of both. In humid environments, moisture-resistant panels reduce the added risk of the board softening over time.


Elena Hart is the founder and lead writer of Better Home Pro. She writes about drywall, home repair, and practical DIY home improvement topics, focusing on clear, useful information that helps homeowners make better decisions. Her work combines firsthand experience, manufacturer documentation, industry resources, and careful research to create content that is accurate, practical, and easy to understand. Through Better Home Pro, Elena aims to simplify complex home improvement topics and provide guidance that is genuinely helpful to homeowners and DIYers.








No Comments