
Holding a 57-pound drywall sheet overhead with one arm while driving screws with the other is unsafe and a likely cause of back injury, a cracked panel, or both. NIOSH’s ergonomics guide for construction workers identifies overhead reaching and awkward sustained postures as primary causes of work-related musculoskeletal disorders, stating that back injury rates in construction run 50% higher than in all other U.S. industries combined.
However, a drywall lift is not always necessary. For a standard 8-foot ceiling with two people and a small room, a $3 T-brace is sufficient. But when working solo, handling ceilings above 9 feet, or hanging 12-foot sheets, requirements change. A lift becomes necessary.
This article covers how a drywall lift works mechanically, a clear decision framework for when you need one, rental and purchase cost comparison, a step-by-step technique guide including the 12-foot sheet loading process, and alternatives that work for simpler situations.
Before beginning installation, see our guide to lightweight drywall options for ceilings. Sheet weight significantly affects overhead installation.
Key Takeaways:
- Rent a lift for any ceiling over 9 feet, solo projects, or sheets 12 feet and longer to prevent injury and panel damage.
- Standard lifts max out at 11 feet 2 inches; confirm you have an extended-reach model for higher residential ceilings or foyers.
- Loading 12-foot sheets solo works best by leaning the panel against a wall first rather than lifting from the center to prevent snapping.
- Secure the panel with at least eight screws before lowering the cradle to ensure the weight doesn’t pull the fasteners through the gypsum.
- Buying a mid-range lift often costs less than a week-long rental if you plan to resell the unit for 60% to 80% of its value afterward.
How a Drywall Lift Works: Components and Mechanism
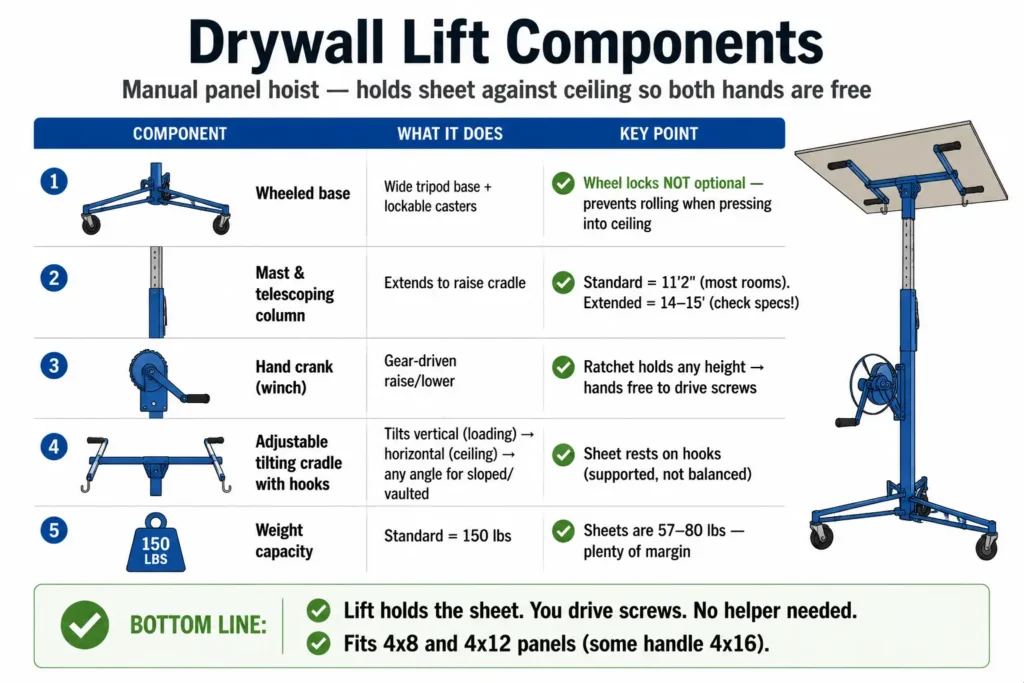
A drywall lift is a manually operated panel hoist. It holds a sheet against the ceiling so you can fasten it with both hands free. Here’s what each part does:
Wheeled base: A wide, tripod-style base with lockable caster wheels. The wide footprint prevents tipping when a loaded sheet is elevated. The wheel locks are not optional — they stop the lift from rolling backward when you’re pressing into the ceiling driving screws.
Mast and telescoping column: A vertical steel column that extends to raise the cradle. Standard models reach approximately 11’2″ ceiling height, which covers most residential rooms comfortably. For ceilings above that, you need an extended-reach model rated for 14 to 15 feet — a detail that matters enormously and tends to be buried in product specs rather than explained anywhere useful.
Hand crank (winch): A gear-driven mechanism that raises and lowers the cradle smoothly. The ratchet holds the sheet at any height without continuous cranking — once the sheet is positioned against the joists, your hands are completely free to drive screws.
Adjustable tilting cradle with hooks: The cradle tilts from vertical (for loading the sheet) to horizontal (for ceiling installation) to any angle in between for sloped or vaulted applications. The sheet rests on the hooks along its edges — it’s supported, not balanced. This is what makes the lift usable for anything other than a flat ceiling.
Weight capacity: Most standard models handle 150 pounds, well above the 57 to 80 pounds of a standard drywall sheet. Most are designed for 4×8 and 4×12 panels; some handle 4×16.
Do You Actually Need a Drywall Lift?
This is the question most guides either avoid or answer with a blanket “yes, rent one.” The honest answer is more specific.
| Scenario | Verdict |
| Standard 8′ ceiling — two people | Not needed. T-brace works fine. |
| Standard 8′ ceiling — solo | Strongly recommended. T-brace is possible but risky. |
| 9’+ ceiling — any configuration | Non-negotiable. Rent one. |
| 12′ or longer sheets — ceiling | Non-negotiable. T-braces can’t support the span. |
| Vaulted or sloped ceiling | Non-negotiable. Cradle tilt handles angles; nothing else does. |
| Stairwell ceiling | Non-negotiable. Impossible safely any other way solo. |
| Upper wall rows (horizontal hanging) — solo | Recommended. Lift handles this well; ledger board is an alternative. |
| Standard wall hanging 8′ vertical — any | Not needed. Panel carrier or helper is adequate. |
| Large project — whole floor or full house | Yes. Rental cost becomes negligible against time and injury risk. |
The one-line rule: If you’re doing ceiling drywall alone, ceiling height exceeds 9 feet, or sheets are 12 feet or longer — rent a lift. There’s no exception worth making.
If you are still planning the job, first estimate how many drywall sheets you need for the project. Knowing your sheet count makes it easier to decide whether a lift rental is worth the cost.
One question that genuinely confuses people is whether a lift helps for walls. The short answer: not for standard 8-foot vertical hanging, where you’re working at manageable heights and can use a panel carrier or foot lifter to position sheets. But for upper wall rows hung horizontally — where the sheet needs to sit near the ceiling and hold position while you drive screws — a lift is genuinely useful solo. A ledger board screwed to the studs at the right height is the low-cost alternative for that specific situation.
Rent vs Buy: The Real Cost Math
Most articles mention that you can rent a drywall lift but don’t give real numbers. Here’s what to actually expect.
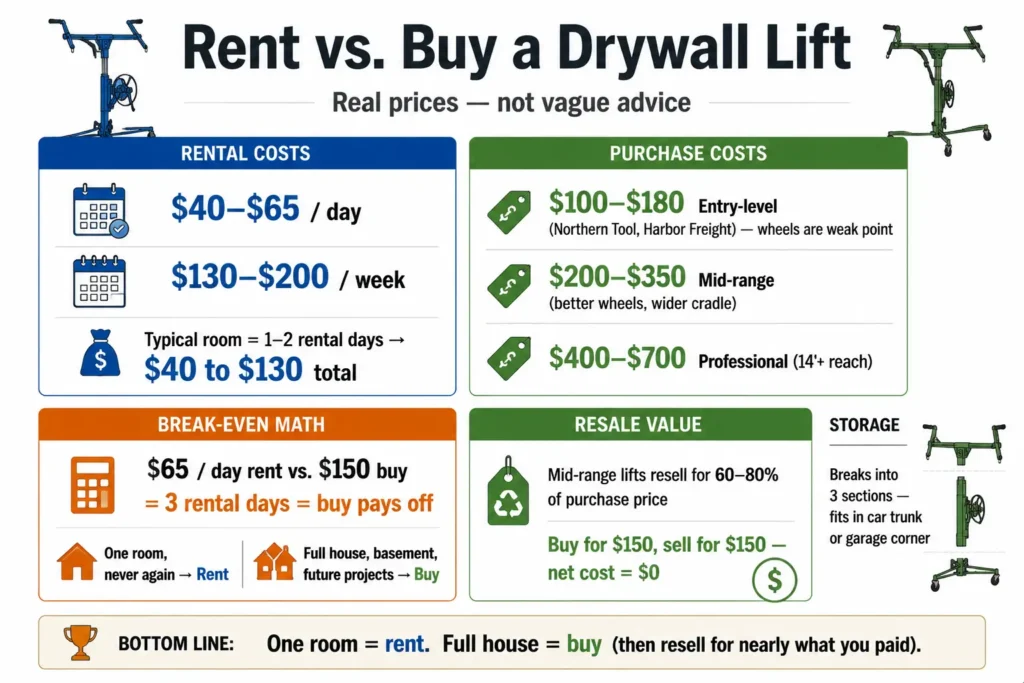
Rental cost: $40–$65 per day, $130–$200 per week at Home Depot Tool Rental, Sunbelt, and United Rentals. A typical residential ceiling project — one room, working steadily — takes 1 to 2 rental days. Total rental cost for most rooms: $40 to $130.
Purchase cost:
- Entry-level (standard reach, manual crank): $100–$180 at Northern Tool or Harbor Freight. Adequate for most DIY projects, but wheel quality is a known weakness on budget models. One forum user reported bending a wheel on a Harbor Freight lift mid-project — not catastrophic, but annoying.
- Mid-range (better wheels, wider cradle, 11-foot-plus reach): $200–$350
- Professional (extended reach 14 feet and up, heavy-duty construction): $400–$700
The break-even math: If you’re paying $65 per day to rent versus $150 to buy a budget lift, buying pays off after three rental days. That calculation becomes easier to evaluate once you understand the real-world strengths, limitations, and long-term value of budget lift models.
For a homeowner doing one room who will never drywall again, renting makes obvious sense. For someone drywalling a full house, finishing a basement, or planning another project in a few years, buying a mid-range model and reselling it afterward is nearly cost-neutral.
Resale value is underrated: Mid-range drywall lifts retain 60 to 80 percent of purchase price when resold after a project. Multiple people on drywall forums have bought lifts for around $100 to $150 and sold them for the same amount when done. Net cost on the tool itself approaches zero.
Storage: Most lifts break down into three sections and fit in a midsize car trunk. Stored flat in a garage, they take up surprisingly little space.
How to Use a Drywall Lift: Step by Step
Family Handyman covers the broad strokes of lift use, but there are two things no polished guide explains properly: how to load a 12-foot sheet solo, and how to cut outlet openings after the sheet is positioned. Both of these details come up constantly in forums and almost never in articles. That ends here.
Step 1: Assemble and Safety-Check the Lift
Most lifts break into three sections for transport and reassemble on site in a few minutes. Before loading any sheet: release the crank wheel catch and test raise and lower the lift several times with nothing on it. Confirm smooth operation with no binding or jerking. Check that all wheel locks engage properly.
A lift that catches or lurches under load can pop a sheet off the hooks. It takes two minutes to test. Do it.

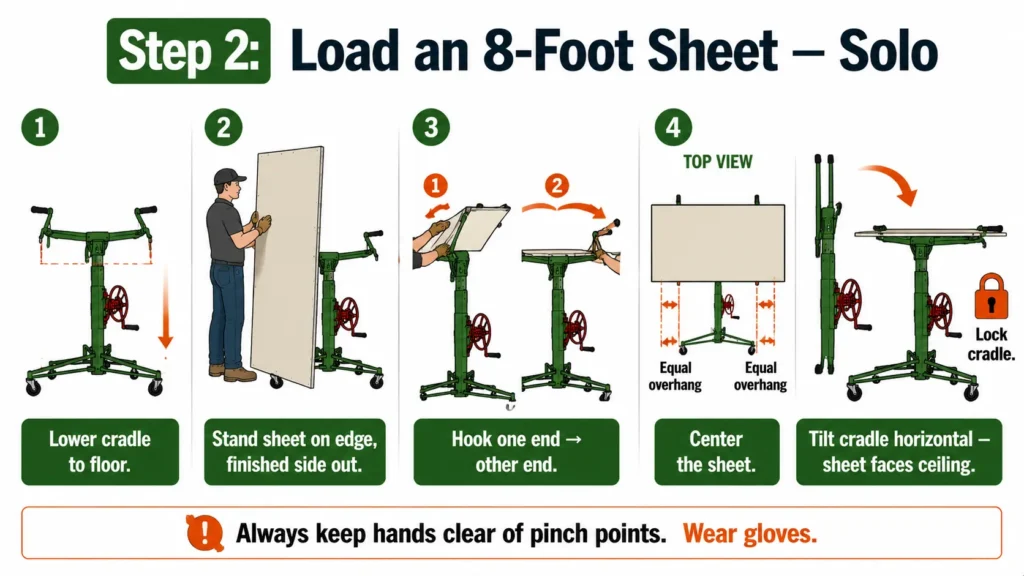
Step 2: Load an 8-Foot Sheet — Solo Technique
Lower the cradle to its lowest position. Stand the sheet on edge alongside the lift, finished side facing out (you’ll load it brown paper up so the finished side faces the ceiling when tilted to horizontal). Hoist one end up and onto the first hook, then slide the other end onto the second hook. Centre the sheet on the cradle — equal overhang on both sides.
Now tilt the cradle from vertical to horizontal. The sheet goes with it, lying flat and parallel to the ceiling. Lock the cradle in position.
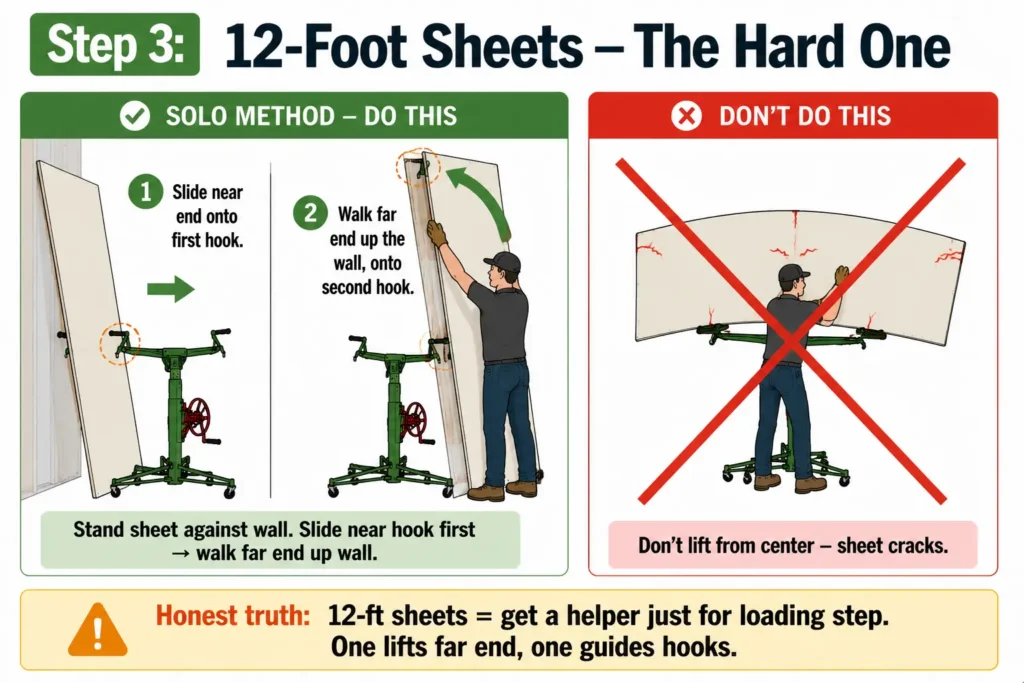
Step 3: Loading 12-Foot Sheets — The Specific Challenge
This is the step nobody explains and everyone struggles with. A 12-foot sheet is long enough to flex significantly when one end is lifted and the other is still on the floor. Don’t try to load from the centre. The sheet will bow and can crack.
The best solo technique: stand the sheet vertically against a wall first, close to the lift. Slide the near end onto the first hook, then slowly walk the far end up and guide it onto the second hook as the sheet comes off the wall. It’s awkward but manageable.
Honestly? This is the one step where a second person makes a meaningful difference on a lift project — one person lifts the far end while the other guides it onto the hooks. If you have any option to get a helper for just the loading step, take it on 12-foot sheets.
Step 4: Wheel Into Approximate Position
Don’t aim for exact placement yet. Get the lift roughly under where the sheet needs to go, then stop and clear the floor path between you and the ceiling position. You won’t want to step around extension cords or a tool bag with a loaded sheet elevated overhead. Castered wheels make fine positioning easy once the sheet is raised.
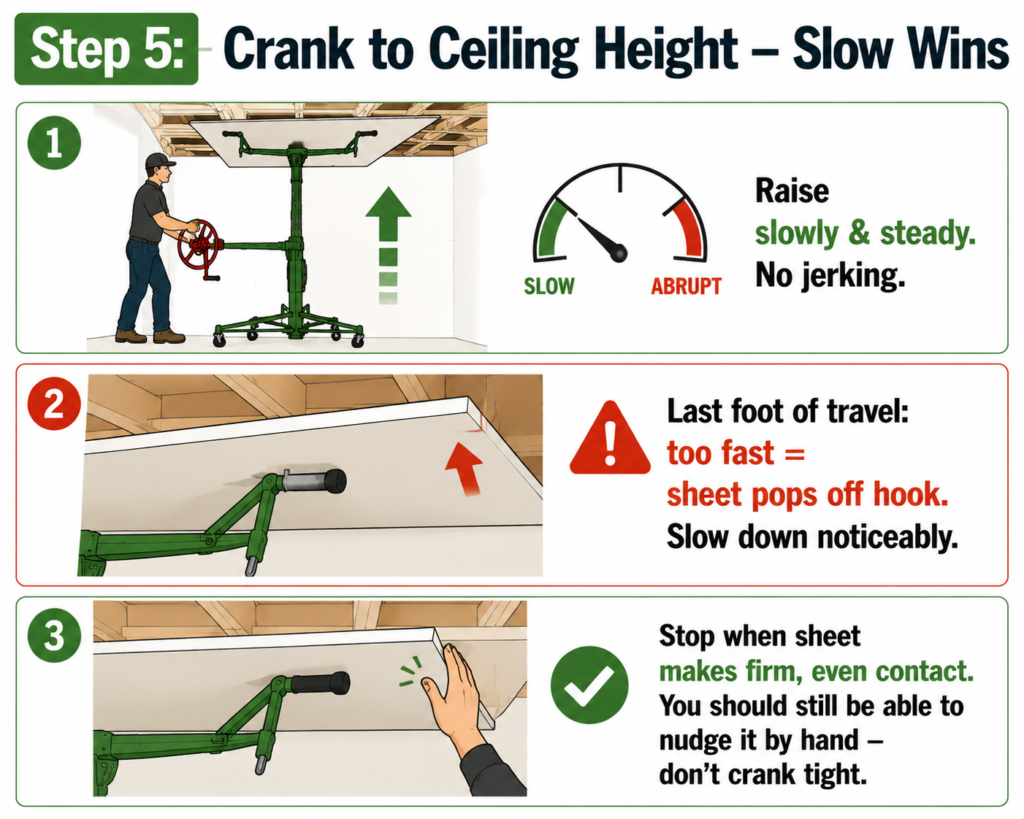
Step 5: Crank to Ceiling Height
Raise slowly and steadily. Abrupt cranking pops the front sheet edge off the hook, especially in the last foot of travel as the sheet gets close to the joists. Slow down noticeably as the sheet approaches the ceiling.
Stop when the sheet makes firm, even contact. You shouldn’t need to force it tight with the crank — if the sheet is positioned correctly, it should touch the joists smoothly. You should still be able to nudge the sheet with light hand pressure at this point.
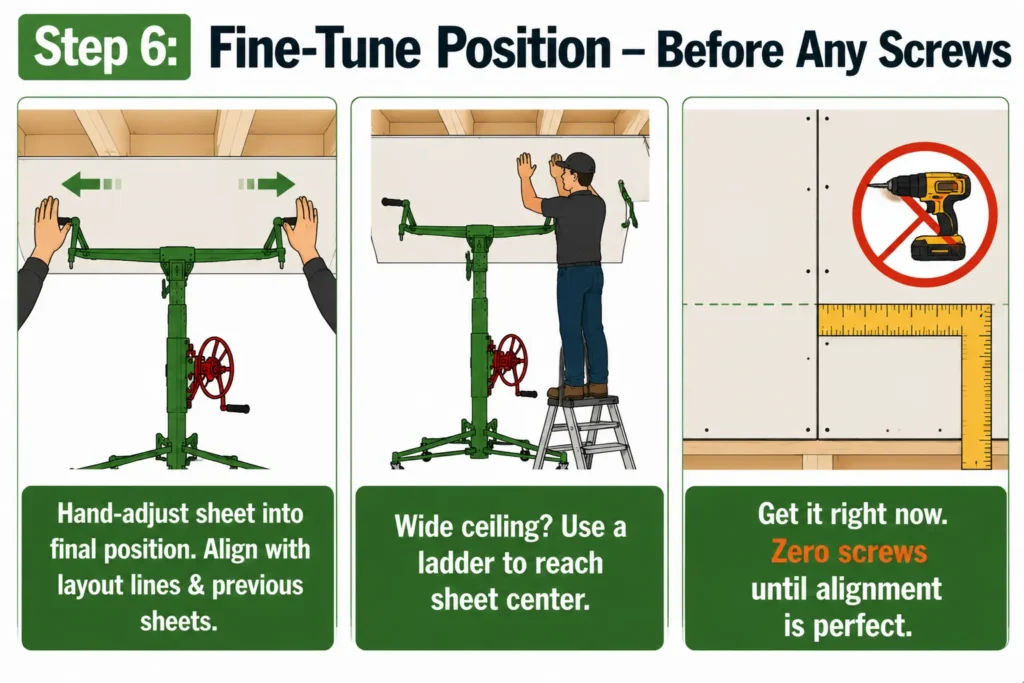
Step 6: Fine-Tune Position
With the sheet held against the ceiling by the lift, use your hands to adjust it into final position — aligned with your layout lines, edges meeting previous sheets cleanly. On wide ceilings you may need a ladder to reach the middle section of the sheet for final adjustments. Take the time to get it right before you drive a single screw.
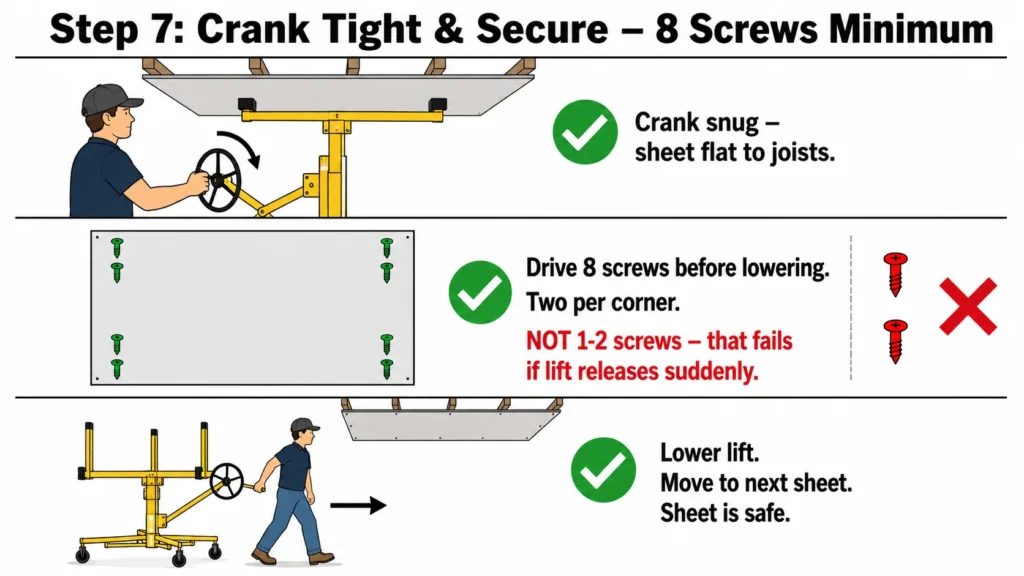
Step 7: Crank Tight and Secure
Once positioned, crank the sheet snug against the joists. Drive at least 8 screws before you lower the lift — two near each corner of the sheet. One or two screws are not enough to hold a sheet independently if the lift releases suddenly. Eight gives you genuine security before you take the lift away.
For screw placement and technique, see our drywall screw gun vs drill guide.
Step 8: The Outlet Cutout Technique After Positioning
This is worth reading twice if you’ve ever pre-cut an outlet opening, lifted the sheet, and discovered the hole is off by half an inch.
The standard instinct is to mark and cut all outlet, switch, and light fixture openings before lifting the sheet. The problem is that even careful measurements drift — the sheet shifts slightly during loading, or your measurements were slightly off, and suddenly you’re taking a sheet back down to recut.
The better approach: before lifting, mark only the centre point of each electrical box on the sheet face. Lift the sheet and crank it into final position. Then, with the sheet held against the ceiling, use a rotary cut-out tool to cut the openings in place. The bit finds the edge of the box automatically as you follow the perimeter.
This is significantly more accurate than pre-cutting, and it eliminates the rework problem entirely. Family Handyman mentions this in passing; nobody explains it as an actual technique with a proper workflow. Now you have it.

See our drywall saw and cutting tools guide for rotary cut-out tool technique
Alternatives to a Drywall Lift: When They Work and When They Don’t
Covering alternatives honestly is part of giving useful advice. Here’s when each option is genuinely adequate and where each one fails.
T-Brace (Deadman)
A simple 2×4 cut to a T-shape at ceiling height, used to prop one end of a sheet while a second person drives screws at the other end. Cost: $3 to $5 in lumber. Works well for standard 8-foot ceilings with two people.
Where it fails: You can’t use a T-brace solo — you can’t hold the brace in position and drive screws at the same time. It doesn’t work reliably for 12-foot-plus sheets because the unsupported span flexes under the sheet’s weight. And it’s useless on vaulted or sloped ceilings where the brace can’t stand vertical.
Ledger Board for Upper Wall Rows
A temporary horizontal board screwed to studs at the height of the sheet’s top edge. The bottom of the upper wall row rests on the ledger while you drive screws. Simple, effective, zero cost beyond a scrap 2×4.
Limited to walls only — specifically horizontal upper wall rows. Completely useless for ceilings.
Panel Carrier / Lifter Tool
A plastic foot hook that grips the bottom of a sheet so you can carry it with one hand while the other steadies the top. Excellent for moving sheets through a house to the work area. Not a ceiling installation tool — it holds the sheet vertical and doesn’t help you get a sheet horizontal and pressed against joists.
Two-Person No-Lift Method
Both people lift the sheet overhead and hold it against the joists while one drives enough screws to secure it. Standard professional practice when a lift isn’t available and a two-person crew is present.
Reality check: it’s physically demanding, gets harder with every sheet as fatigue accumulates, and precision suffers as the session goes on. Fine for one or two sheets in a pinch. Not recommended for a full room ceiling without a lift.

5 Drywall Lift Mistakes That Damage Sheets or Cause Injury
Not locking the wheels before cranking. An unsecured lift rolls backward as you apply ceiling pressure. Lock all four wheels before raising any sheet — every time.
Cranking too fast. Abrupt cranking pops the front sheet edge off the cradle hooks. Raise slowly, and slow down further in the final 12 inches as the sheet approaches the ceiling.
Off-centre loading. A sheet positioned to one side of the cradle creates lateral imbalance. When elevated, the lift can tip toward the heavier side. Always centre the sheet on the hooks before tilting to horizontal.
Lowering before adequate screws are driven. Eight screws minimum before the lift comes down — two near each corner. A sheet held by one or two screws can fail if the lift releases suddenly.
Using a standard lift on ceilings over 11’2″. Standard models max out around 11 feet 2 inches. Forcing the lift past its rated height stresses the telescoping column and risks failure under load. For ceilings above that height, specifically rent or buy an extended-reach model.
FAQ
Do I need a drywall lift for ceilings?
It depends on ceiling height and whether you’re working solo. For standard 8-foot ceilings with two people, a T-brace works. For anything above 9 feet, any solo ceiling work, or sheets longer than 8 feet, a lift is necessary. Trying to hold drywall overhead while driving screws is genuinely dangerous and physically exhausting across more than a few sheets.
Can one person use a drywall lift?
Yes — that’s one of its primary purposes. A single person can load a sheet, wheel the lift into position, crank the sheet to ceiling height, and drive all the screws without help. The main exception is loading 12-foot sheets, which is significantly easier with a second person to support the far end during loading. Once the sheet is on the hooks, solo operation is straightforward.
How much does it cost to rent a drywall lift?
Rental runs $40 to $65 per day or $130 to $200 per week at most equipment rental locations including Home Depot, Sunbelt, and United Rentals. Most single-room residential projects finish in one to two rental days, putting total rental cost between $40 and $130 for a typical ceiling job.
Can a drywall lift be used for walls?
A lift isn’t necessary for standard 8-foot vertical wall hanging, where a panel carrier or helper handles positioning adequately. However, for upper wall rows hung horizontally — where the sheet sits near the ceiling line — a lift is genuinely useful when working solo, because holding a sheet at that height while driving screws is awkward without support. A ledger board screwed to the studs is a simpler alternative for that specific situation.
How high can a drywall lift reach?
Standard models reach approximately 11 feet 2 inches, covering most residential ceilings including 8-foot, 9-foot, and 10-foot rooms. Extended-reach models handle 14 to 15 feet for high-ceiling spaces. If your ceiling is over 11 feet, confirm the model’s maximum reach before renting — standard lifts won’t get the sheet there safely.
Is it worth buying a drywall lift?
For a single room, renting makes more financial sense. For a full house, basement, or anyone planning future drywall work, buying a mid-range model in the $200 to $350 range is worth considering. Mid-range lifts resell for 60 to 80 percent of purchase price, so the net cost after resale is often comparable to or less than renting for a multi-room project.
How do you load drywall on a lift by yourself?
For 8-foot sheets: lower the cradle fully, stand the sheet on edge alongside the lift, hoist one end onto the first hook, slide the far end onto the second hook, centre the sheet, then tilt the cradle from vertical to horizontal. For 12-foot sheets: stand the sheet against a wall first, slide the near end onto the first hook, then walk the far end up and guide it onto the second hook as the sheet comes off the wall. The flex in a long sheet makes centre-loading difficult — near end first is the reliable method.
The Bottom Line
The one-line rule holds: working ceiling drywall alone, ceiling height above 9 feet, or sheets 12 feet or longer — rent a lift, no exceptions worth making.
For a single room, renting at $40 to $65 per day is the right call. For a whole house or future projects in the pipeline, buy a mid-range model around $250 and resell it when you’re done. For a simple 8-foot ceiling with a second person, cut a T-brace from a 2×4 and save the rental cost entirely.

Elena Hart is the founder and lead writer of Better Home Pro. She writes about drywall, home repair, and practical DIY home improvement topics, focusing on clear, useful information that helps homeowners make better decisions. Her work combines firsthand experience, manufacturer documentation, industry resources, and careful research to create content that is accurate, practical, and easy to understand. Through Better Home Pro, Elena aims to simplify complex home improvement topics and provide guidance that is genuinely helpful to homeowners and DIYers.


No Comments