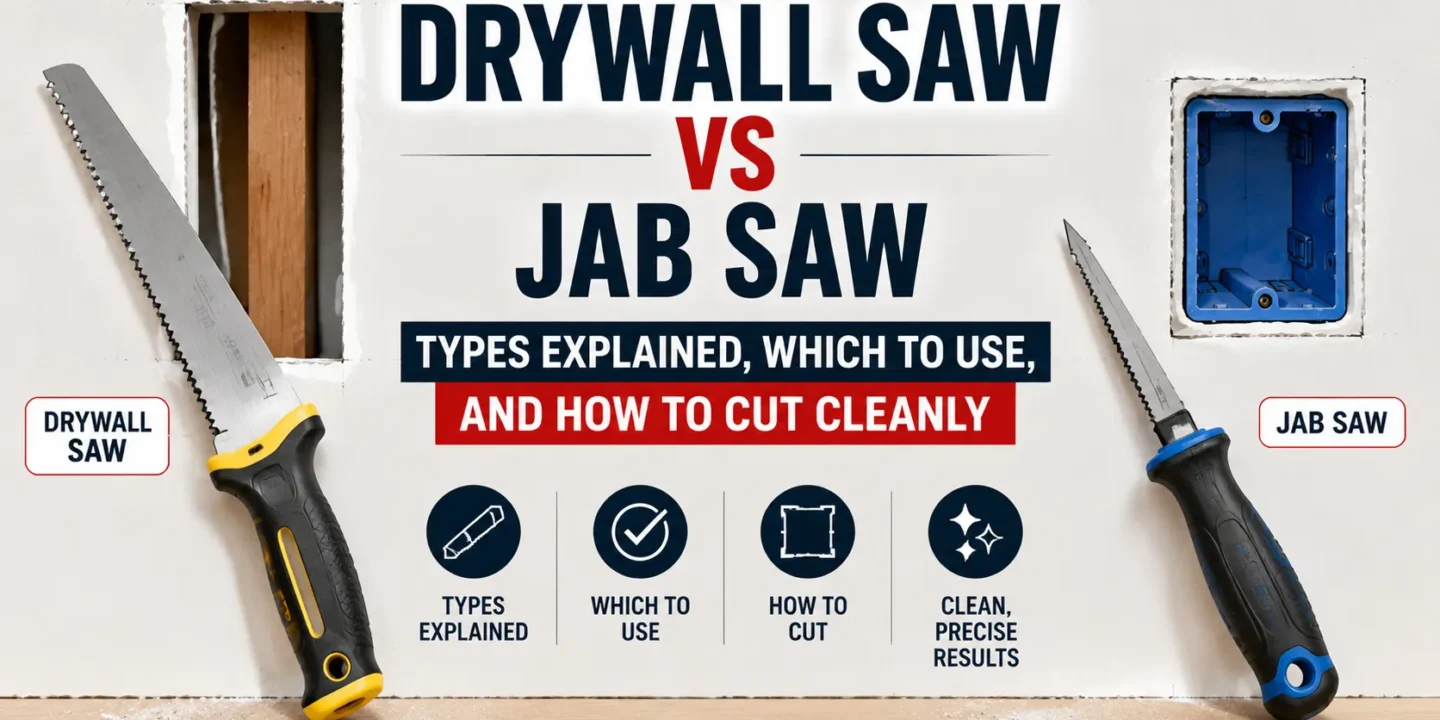

If you’ve searched “jab saw vs drywall saw” expecting to find two different tools — here’s the short answer: they’re the same thing. A jab saw, drywall saw, keyhole saw, and pad saw are all names for the same category of hand saw designed for plunge cuts in drywall. The confusion comes from manufacturers using different names for nearly identical tools.
The decision isn’t jab saw vs drywall saw. It’s hand jab saw vs rotary cut-out tool vs oscillating multi-tool — three different tools for three different cut scenarios. Choosing correctly ensures every opening you cut will fit cleanly.
This article covers: a type guide, a cut-scenario decision matrix, step-by-step technique for both hand and power options, and the wiring safety protocol. If you are building a full tool collection from scratch, knowing which saw fits into the overall workflow helps you avoid buying redundant equipment.
Our guide to essential drywall tools explains every category from cutting and hanging to taping and sanding, so you only buy what you need.
Key Takeaways
- A hand jab saw is the most efficient tool for single outlet cuts, while power rotary tools are only worth the setup for 10 or more identical openings.
- Position the saw at a 45 degree angle for the initial plunge to prevent the tip from skipping and tearing the drywall face.
- Always disable the circuit breaker and use a voltage tester before cutting into existing walls to avoid hitting hidden horizontal or vertical wire runs.
- Use short four inch strokes to maintain control, as long strokes often cause the blade to flex and drift away from your marked cut line.
- Make four independent plunge cuts for rectangular openings rather than sawing around corners to ensure the sharpest fit for electrical boxes.
Clearing Up the Names Once and for All
Jab saw, drywall saw, keyhole saw, pad saw — four names, one tool family.
All four terms refer to the same long, narrow, pointed hand saw designed for plunge cuts in soft materials like drywall. The keyhole saw gets its alternate name from its historical use cutting keyholes in door hardware. The defining feature is a sharpened point that can be pushed — or jabbed — directly through the face of a drywall panel without needing to drill a starter hole first. That’s what separates it from every other saw in your toolbox, and what makes it the default choice for cutting openings in the field (middle) of a panel.
Three physical variants — minor differences, same use case:
Fixed blade: The most common configuration. Rigid, durable, and provides the most control during a cut. This is the standard choice for professionals and serious DIYers. If you’re buying your first jab saw, this is the one to get.
Folding blade: The blade folds back against the handle for safer storage in a tool bag. Slightly less rigid than a fixed-blade model, but perfectly adequate for occasional use. A practical option if you want something compact.
Retractable blade: The blade length is adjustable, which helps when working in confined areas. Less common than the other two, but useful if you’re frequently cutting in tight spots.
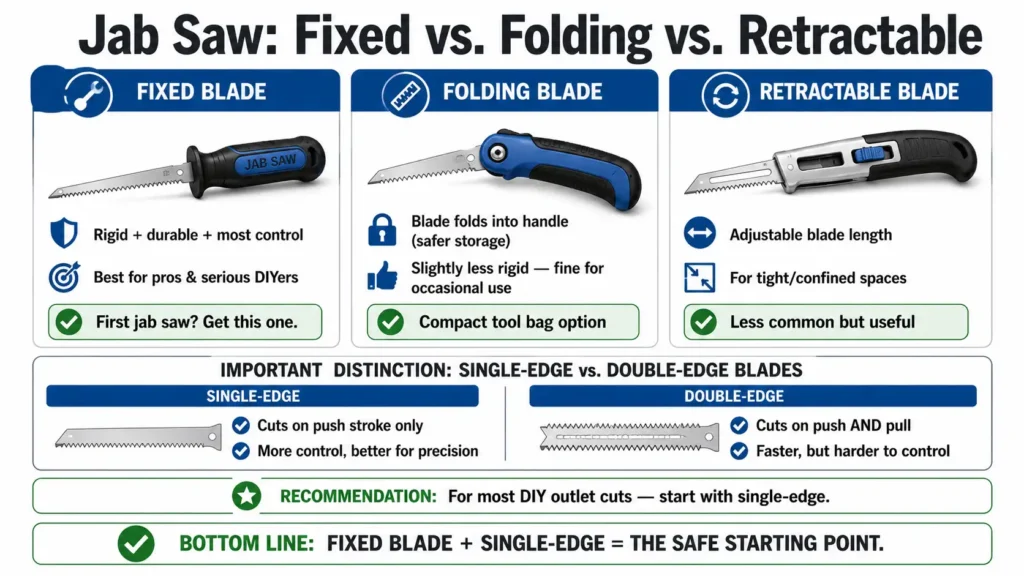
One more distinction worth knowing: single-edge blades cut on the push stroke only, while double-edge blades cut on both push and pull. Double-edge cuts faster but is slightly harder to control on precision work. For most DIY outlet and switch box cuts, single-edge is the better starting point.
The Complete Drywall Saw Family: All Four Types Explained
The hand jab saw handles most residential drywall cutting tasks on its own. But it’s not the right tool for every situation. Here’s the full picture.
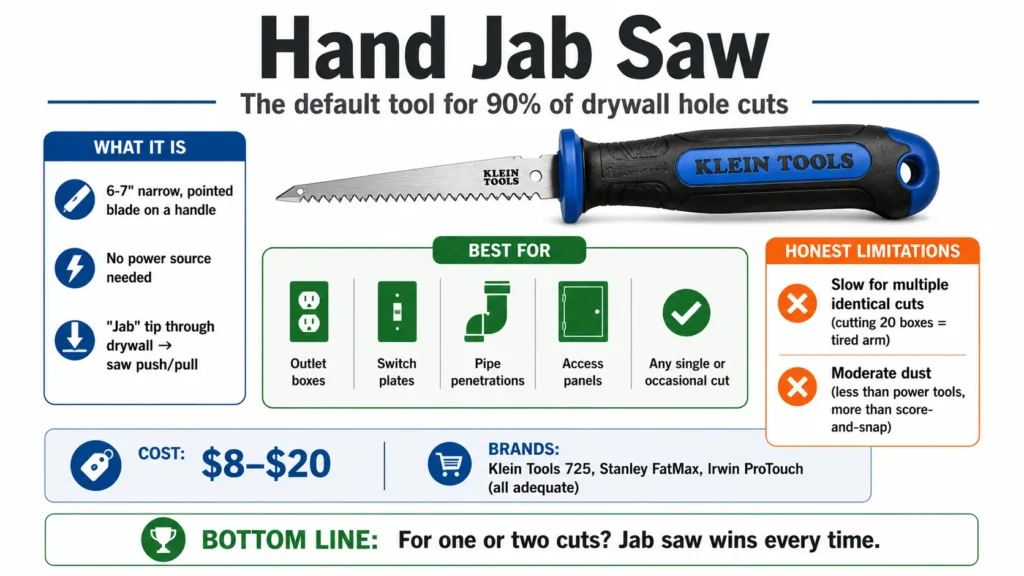
Hand Jab Saw (Keyhole Saw) — Manual
What it is: A 6–7″ narrow, pointed blade mounted on a handle. No power source needed. You cut by jabbing the tip through the drywall face and sawing with push and pull strokes.
Best for: Outlet boxes, switch plates, pipe penetrations, access panels, and any single or occasional cut in the field of a panel. This is the default tool for approximately 90% of all drywall hole-cutting tasks.
Cost: $8–$20. Klein Tools 725, Stanley FatMax, and Irwin ProTouch are all widely available and all adequate for the job.
Honest limitation: Slow for multiple identical cuts. If you’re cutting 20 outlet boxes in a single room, your arm will be tired before you’re half done. It also produces moderate dust — less than power tools but more than score-and-snap cutting.
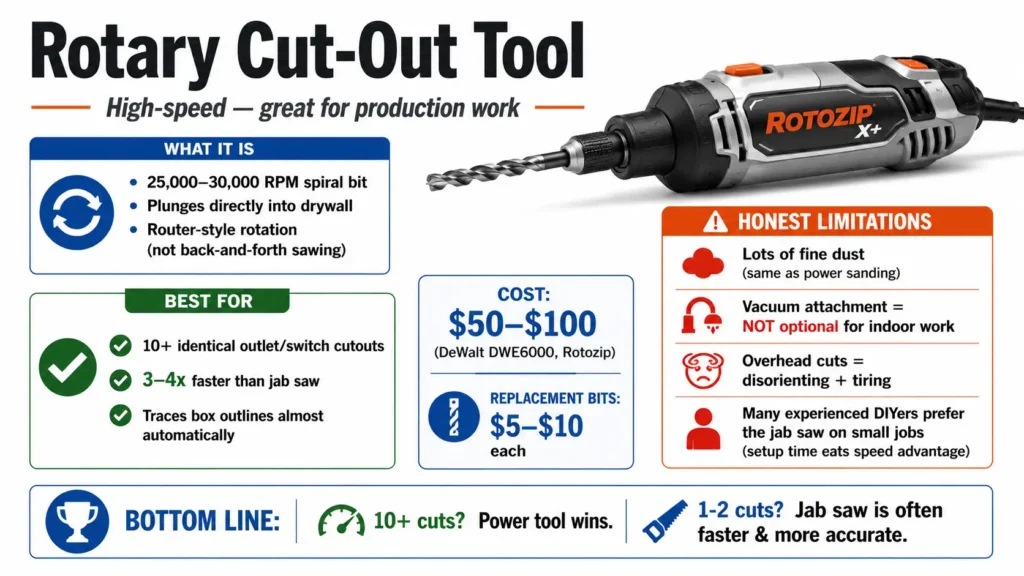
Rotary Cut-Out Tool (Rotozip / Dremel) — Power
What it is: A high-speed rotary tool running at 25,000–30,000 RPM with a spiral cut-out bit. It plunges directly into drywall and cuts using router-style rotation rather than back-and-forth sawing motion.
Best for: Multiple identical outlet and switch box cutouts. When you have 10 or more identical cuts to make, a rotary tool is roughly 3–4 times faster than a jab saw. It can trace box outlines almost automatically, with very little effort per cut.
Cost: $50–$100 (DeWalt DWE6000, Rotozip). Replacement bits run $5–$10 each.
Honest limitation: Produces significantly more fine dust than any hand tool — in the same league as power sanding. A vacuum attachment is not optional for indoor work. Overhead cuts with a rotary tool can also be disorienting and tiring. Many experienced DIYers actually prefer the jab saw over a rotary tool, finding it faster and more accurate on small jobs where setup time eats into any speed advantage.
Oscillating Multi-Tool — Power, Most Precise
What it is: An oscillating blade that moves in a tight arc rather than rotating or reciprocating. The result is a very controlled plunge cut with minimal vibration and precise material removal.
Best for: Tight spaces, curved cuts, precision repairs where a jab saw would remove too much material, and cuts made close to existing trim or fixtures. Produces less fine dust than rotary tools.
Cost: $60–$180 (DeWalt DCS356, Milwaukee M18). Drywall-specific blades run $10–$20.
Honest limitation: Slower material removal than a jab saw for large rectangular cuts. It earns its place on precision work — not bulk cutting. Blade cost adds up on large projects.

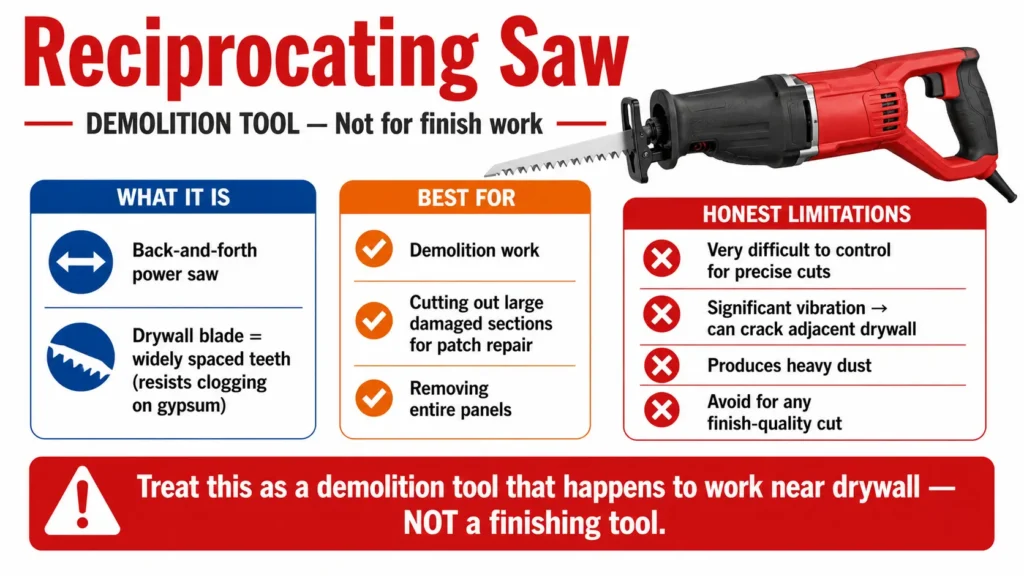
Reciprocating Saw with Drywall Blade — Use With Caution
What it is: A back-and-forth power saw fitted with a drywall blade, which has widely spaced teeth specifically designed to avoid clogging on gypsum.
Best for: Demolition work — cutting out large damaged sections for patch repair, removing entire panels. Not for precision openings.
Honest limitation: Very difficult to control for precise cuts. The significant vibration can crack adjacent drywall. Produces heavy dust. Avoid for any finish-quality cut. Treat this as a demolition tool that happens to work near drywall, not a finishing tool.
Cut-Scenario Decision Matrix: Right Tool for Every Opening
| Cut Scenario | Right Tool |
| Single outlet or switch box cutout | Hand jab saw |
| 10+ identical outlet/switch boxes in one room | Rotary cut-out tool |
| Round hole for pipe or conduit (standard sizes) | Bi-metal hole saw on drill |
| Round hole for recessed light (4″, 5″, 6″) | Adjustable hole saw (Hole Pro) |
| Rectangular access panel opening | Hand jab saw — score perimeter, cut corners |
| Tight space or cut near existing trim/fixture | Oscillating multi-tool |
| Curved or irregular opening (archway, custom shape) | Jab saw with short strokes + rasp to finish |
| Removing large damaged section for patch repair | Reciprocating saw or jab saw for clean stud cuts |
| Cutting around an electrical box already in the wall | Oscillating multi-tool — most precise for existing features |
The one-tool answer: If you’re only buying one saw for drywall work, buy a hand jab saw ($8–$20). It handles 80% of all residential drywall cutting scenarios, requires no power, creates moderate dust, and costs almost nothing. The power tools only justify themselves when volume or precision exceeds what a jab saw can deliver comfortably.
How to Use a Jab Saw: Step-by-Step Technique
Every competing article assumes you already know how to use a jab saw. Most give you a few sentences at best. This section covers the actual technique — the entry angle, hand position, stroke length, and corner method that determine whether your cut comes out clean or ragged.
Before Every Cut — The Wiring Safety Protocol
This is not optional. Plunging a saw blade blindly through a wall risks severing live wires, which is a serious shock and fire hazard. Before every field cut on an existing wall:
- Turn off the circuit breaker for that room. Don’t assume the room is safe — confirm it.
- Scan with a stud finder that has AC wire detection mode. Run it slowly over the entire cut area, not just directly along the cut line.
- Trace the wire path if cutting near any switch or outlet. Wire runs horizontally between boxes and vertically from ceiling to receptacles. Give yourself at least 6″ of clearance from any known wire path.
- Confirm with a non-contact voltage tester held close to the cut line. A negative result takes two seconds and rules out any active current in the area. According to the Electrical Safety Foundation International, cutting or drilling into walls where electrical wires may be present is among the highest-risk DIY activities, with power tool-related electrocutions representing a significant percentage of annual consumer electrical fatalities.
If you are cutting into a wall that has experienced prior water damage, knowing the acceptable moisture level in drywall helps you decide whether the panel is still safe to work on or needs replacement before you cut.
Step 1 — Mark the Cut Accurately
Measure twice. Mark outlet box positions using two reference points: horizontal distance from the nearest corner and vertical distance from the floor. Use a pencil — pen bleeds through joint compound and shows through paint. For outlet and switch boxes, use the box itself as the template: hold it against the panel face in the correct position and trace directly around it. That trace is your cut line.

Step 2 — Position for the Jab-Start
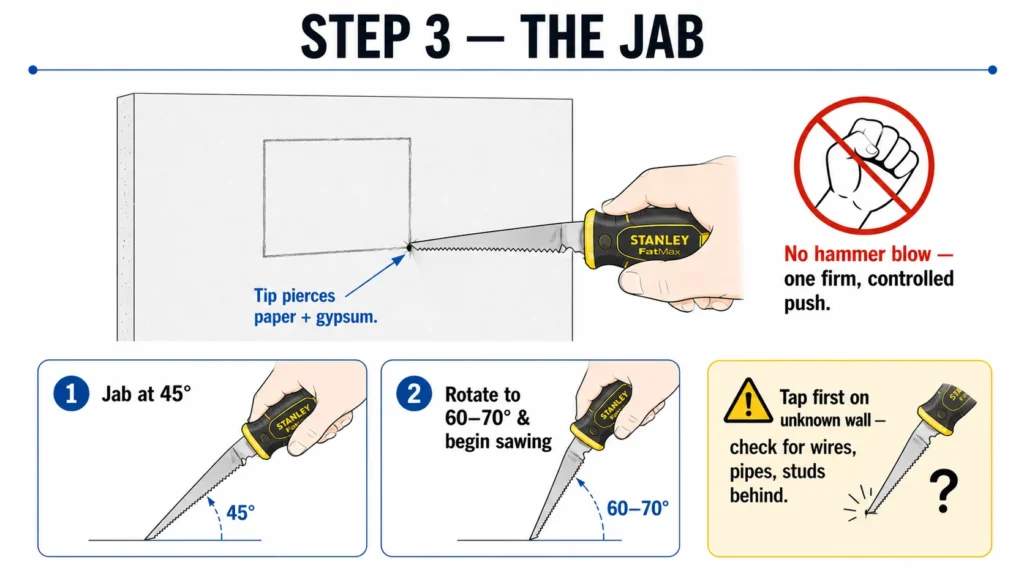
Hold the saw at approximately 45° to the wall surface — not perpendicular. This angle is important. At 45°, the pointed tip enters cleanly because it’s angling into the material. Held perpendicular, the tip tends to skip across the paper face before penetrating, tearing the surface rather than piercing it. Place the tip on the marked line just inside one corner of the shape you’re cutting.

Step 3 — The Jab
One firm, controlled push — not a hammer blow. The tip pierces the paper face and the gypsum behind it. Once the tip is through, rotate the saw to your cutting angle (roughly 60–70° to the wall surface) and begin sawing. Do not jab hard on an unknown wall — tap first to confirm there’s nothing solid directly behind the entry point. You’re listening and feeling for resistance that would suggest a wire, pipe, or unexpected structural element.
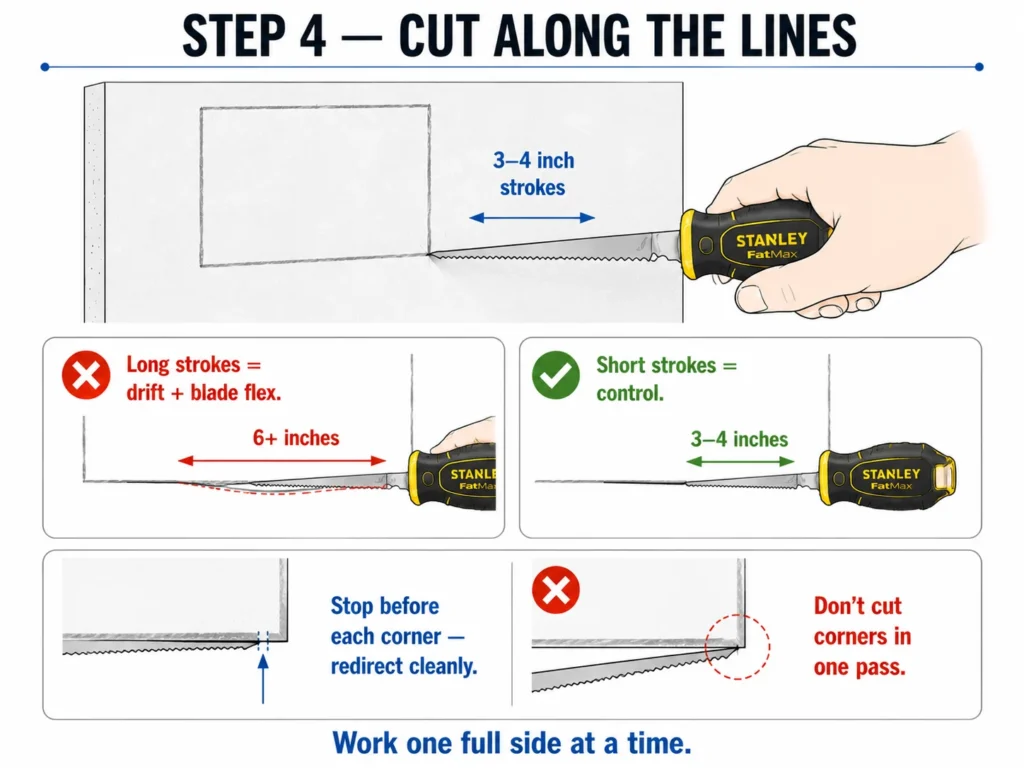
Step 4 — Cut Along the Lines
Short, controlled strokes — 3 to 4 inches of blade movement. Long strokes drift off the cut line on curves and cause blade flex on straight cuts. For rectangular cuts, work along one full side at a time. Don’t cut corners in a single continuous motion — stop just before each corner and redirect cleanly.
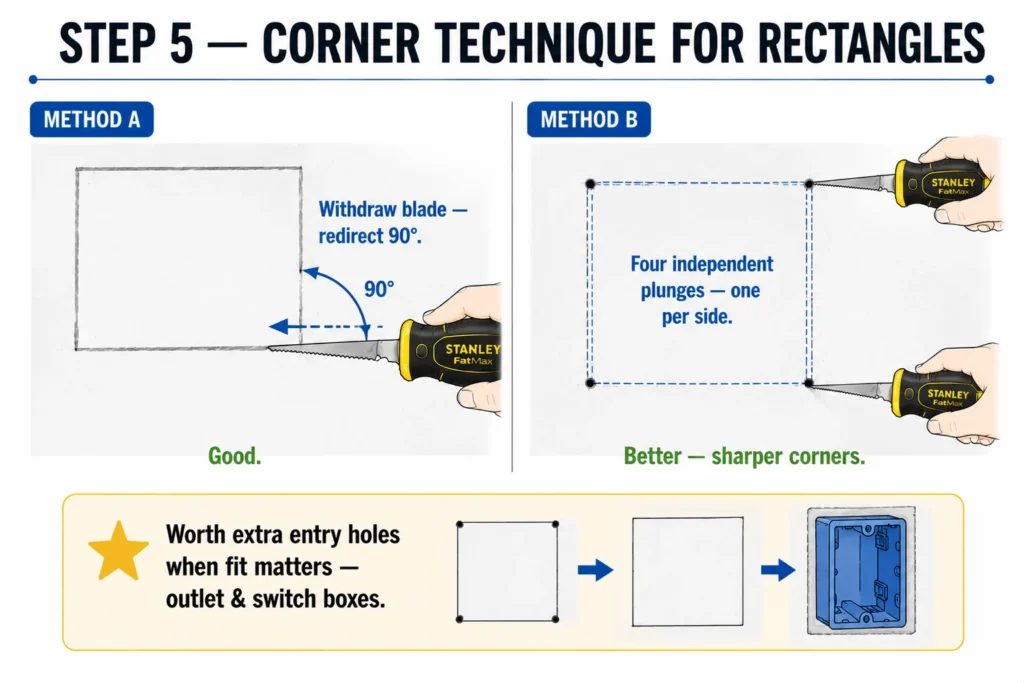
Step 5 — Corner Technique for Rectangles
When you reach a corner, withdraw the blade slightly and redirect at 90° to begin the next side. The cleaner method for outlet box openings is to make four independent plunge cuts — one per side — meeting at the corners. This second approach gives sharper, more consistent corners and is worth the extra entry holes on any cut where fit matters.
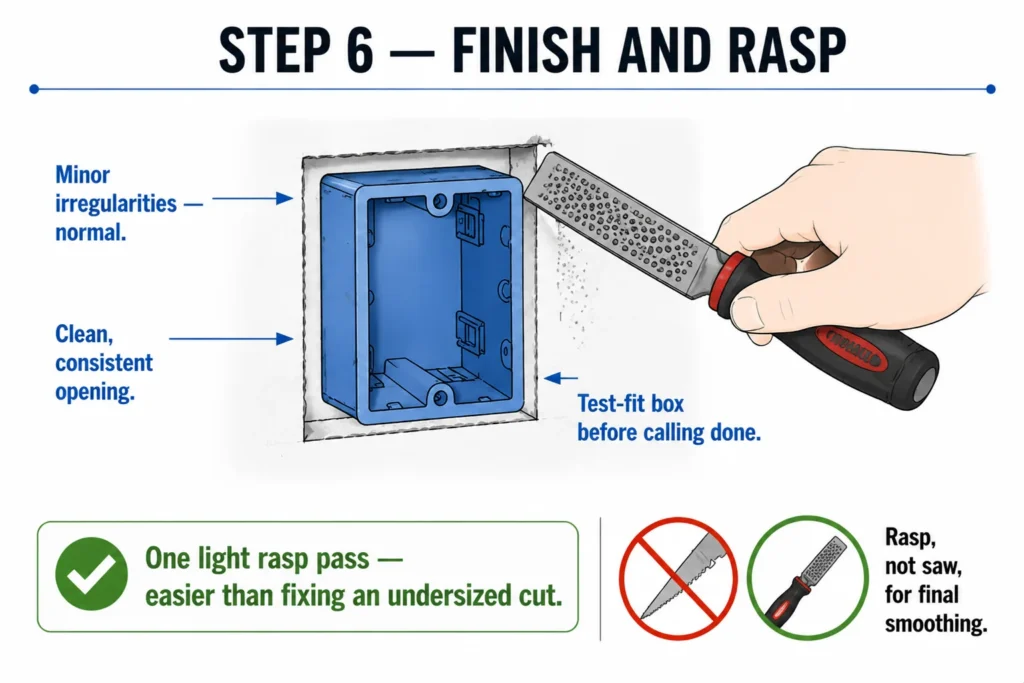
Step 6 — Finish and Rasp
The cut edge will have minor irregularities — completely normal for a hand saw cut. Run a drywall rasp lightly along the cut edge to knock down any high points and achieve a clean, consistent opening. Test-fit the outlet box or fixture before calling the cut done. A light rasp pass is far easier than trying to adjust a cut that’s already slightly too small.
How to Use a Rotary Cut-Out Tool for Drywall
The rotary cut-out tool earns its place on projects with volume — 10 or more identical outlet cuts where hand-sawing each one becomes genuinely tedious. Here’s how to use it correctly.
Bit selection: Use a ⅛” spiral cut-out bit for standard drywall. Carbide-tipped bits last significantly longer than standard steel. Replace the bit when it starts skating on the surface rather than cutting cleanly — a dull bit is the primary cause of blown-out cuts with a rotary tool.
Plunge technique: Set bit depth to just through the drywall thickness — ½” for standard panels, ⅝” for thicker panels. Too shallow and you won’t cut through. Too deep and you risk hitting a stud or any wiring running directly behind the board. Plunge at a slight angle to start, then bring the tool perpendicular once the bit has entered the panel.
Tracing outlet boxes: Mark the box location on the panel face. Set the bit on the inside edge of the marked line. Run the tool around the perimeter — the bit follows your pencil line with the tool body acting as a guide. Work clockwise for the most natural hand motion.
Dust management: Rotary tools produce more fine drywall dust than any other cutting method. Use the vacuum port attachment on every indoor cut; it is required. Wear a NIOSH-approved N95 minimum even with dust extraction running because drywall cutting generates respirable crystalline silica particles that standard dust masks do not filter adequately..
When the rotary tool causes more problems than it solves: On panels that aren’t fully secured to studs yet, the high-speed vibration can cause the panel to flex and crack adjacent to the cut. Secure all panel edges to framing before running a rotary tool. If you’re working on installed panels in an existing space, confirm they’re fully fastened before starting.
4 Jab Saw Mistakes That Ruin Cuts
Mistake 1: Wrong Entry Angle
Jabbing perpendicular to the wall surface causes the tip to skip across the paper face before it penetrates — creating a torn, ragged entry rather than a clean hole. The fix is simple: always position the saw at 45° to the surface for the jab, then straighten to your cutting angle once the tip is through.
Mistake 2: Sawing Too Fast on the Backstroke
Aggressive pull strokes on a jab saw can blow out the back paper of the panel, particularly near the edge of a cut where the gypsum has less support. Short, controlled strokes throughout the cut. Speed comes with practice and proper technique — not from applying more force.
Mistake 3: Skipping the Wire Check
This isn’t a technique mistake — it’s a safety protocol failure. Live wires run horizontally between boxes and vertically from ceiling to outlets. A jab saw blade is long enough to reach them through a standard drywall panel. Always turn off the circuit breaker first. Always scan with a stud finder or non-contact voltage tester before plunging. There is no shortcut here.
Mistake 4: Using a Dull Blade
A dull jab saw tip jumps off the cut line rather than biting into it, especially on curves. Unlike many tool blades, jab saw blades can be sharpened with a file — but given that a replacement blade costs $5–$10, replacement is usually the faster fix. A sharp, pointed tip that pierces cleanly is essential for controlled entry and accurate cuts throughout.
FAQs
What is the difference between a jab saw and a drywall saw? There is no meaningful difference. Jab saw, drywall saw, keyhole saw, and pad saw are all names for the same category of tool — a long, narrow, pointed hand saw designed for plunge cuts in drywall. Different manufacturers use different names for what are essentially identical products. The tool is the same; only the label on the packaging changes.
How do you start a cut with a jab saw? Hold the saw at 45° to the wall surface — not perpendicular — and push the pointed tip firmly through the drywall face at one corner of your marked outline. Once the tip is through, rotate the saw to your cutting angle and begin sawing with short, controlled strokes. The 45° entry angle is critical; jabbing straight in causes the tip to skip across the surface.
Do I need to drill a hole before using a jab saw? No. The defining feature of a jab saw — the reason it exists — is that the hardened, pointed tip can pierce drywall without a pilot hole. This is what separates it from a standard hand saw and makes it the default tool for field cuts. Drill a starter hole if you want one, but it’s not required.
What saw should I use to cut drywall? For a single outlet, switch box, or pipe penetration: a hand jab saw ($8–$20). For 10 or more identical outlet boxes: a rotary cut-out tool. For precision cuts in tight spaces or near existing fixtures: an oscillating multi-tool. For round penetrations like recessed lights: a hole saw on a drill. The hand jab saw covers 80% of all residential scenarios on its own.
Is a jab saw the same as a keyhole saw? Yes, definitively. The terms are interchangeable. “Keyhole saw” refers to the tool’s historical use cutting keyholes in door hardware. “Jab saw” refers to the plunge-cutting technique. “Drywall saw” describes its most common modern application. All three names point to the same narrow, pointed hand saw. When you see any of these terms on a product listing, you’re looking at the same type of tool.
What is the best tool for cutting outlet holes in drywall? For a single box or a handful of boxes: a hand jab saw. Inexpensive, no setup time, no dust control equipment required, and accurate enough for clean outlet box fits. For a high-volume job with 10 or more identical cuts: a rotary cut-out tool saves significant time. Most DIYers are better served starting with the jab saw and only adding a rotary tool if they find themselves doing high-volume outlet work regularly.
Can a reciprocating saw cut drywall? Yes, but with important caveats. A reciprocating saw with a drywall-specific blade (widely spaced teeth to resist clogging) will cut through drywall panels, and it’s the right tool for demolition work — cutting out large damaged sections for patch repair. It is not suitable for precision finish cuts. The vibration is difficult to control for accurate outlines, and aggressive blade action can crack adjacent panels. Use a jab saw or oscillating multi-tool for any cut where fit and finish matter.
Conclusion
Jab saw, drywall saw, and keyhole saw are the same tool family with different names. Naming confusion exists, but they all refer to the same narrow, pointed hand saw, and manufacturer selection is based on handle comfort and budget.
A hand jab saw handles 80% of residential drywall opening cuts, costs $8–$20, and requires no power or dust-control setup. Recommended starting point.
If you are cutting more than 10 identical outlet boxes, add a rotary cut-out tool. If you are working in tight spaces or near existing fixtures, an oscillating multi-tool provides greater precision than a hand saw. For round penetrations such as recessed lights or pipe penetrations, a hole saw on a standard drill is the correct tool regardless of existing equipment.
Before each plunge cut in an existing wall, turn off the circuit breaker, scan for wires with a stud finder, and confirm with a non-contact voltage tester. It takes two minutes and is a critical safety step.

Elena Hart is the founder and lead writer of Better Home Pro. She writes about drywall, home repair, and practical DIY home improvement topics, focusing on clear, useful information that helps homeowners make better decisions. Her work combines firsthand experience, manufacturer documentation, industry resources, and careful research to create content that is accurate, practical, and easy to understand. Through Better Home Pro, Elena aims to simplify complex home improvement topics and provide guidance that is genuinely helpful to homeowners and DIYers.


No Comments