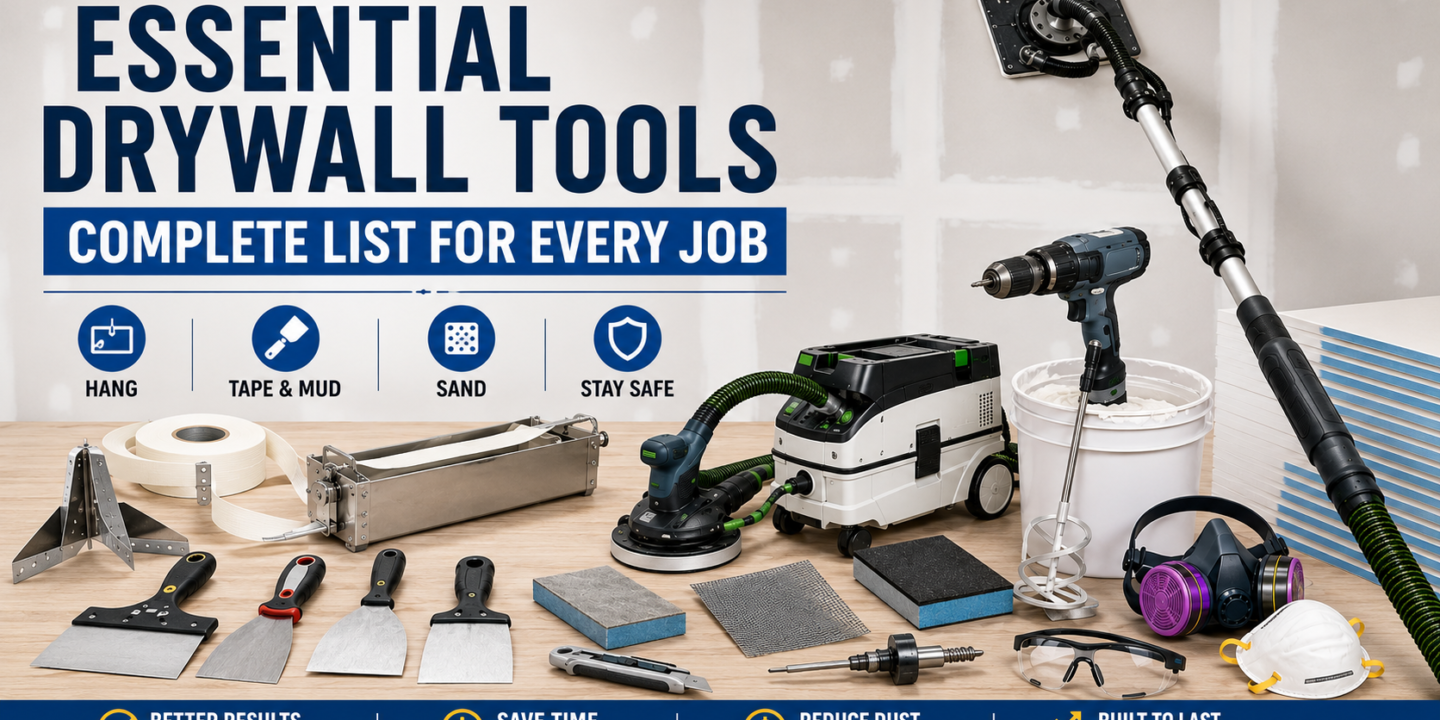

Whether you’re a first-time DIYer patching a damaged wall or a contractor finishing a whole house, having the right drywall tools determines how good your results look and how long the job takes. This guide covers every tool you’ll need across all phases of drywall work, from cutting and hanging to taping, mudding, and sanding, with honest notes on what’s worth buying, what you can skip, and what pros use that beginners rarely know about.
Key Takeaways:
- A dedicated drywall T-square is the most critical layout tool because it eliminates the measurement creep and crooked cuts that lead to oversized gaps and difficult-to-hide seams.
- While a standard drill works for small patches, a dedicated screw gun or a dimpler bit is essential to ensure screws sit just below the paper surface without tearing it and losing structural integrity.
- Clean, invisible seams require a sequence of progressively wider knives—starting with 4 inches and moving up to 12 inches—to feather out the joint compound and prevent a visible ridge.
- Paper tape remains the professional standard for new construction because it offers superior tension strength compared to self-adhesive mesh, which is prone to cracking if the framing shifts.
- Drywall dust is fine enough to bypass standard shop vacuum filters and household masks, making a vacuum-integrated sander and an N95 or P100 respirator a necessity rather than an optional upgrade.
Why Having the Right Drywall Tools Matters
A lot of beginners ask some version of the same question: “Do I need special tools for drywall, or can I just improvise?” You can improvise. But you’ll pay for it in quality and time.
Drywall work is deceptively technique-dependent. A bad knife wipe leaves ridges. Using the wrong blade causes tear-out on cuts. Trying to hold a ceiling panel overhead by hand while driving screws is nearly impossible without a lift. The tools aren’t just conveniences — they directly affect whether your tape bubbles, your seams are visible after paint, and your finish coat feathers properly.
For beginners, a basic set of drywall tools for beginners costs less than you’d think and prevents hours of rework. For pros, the right tools are the difference between a one-day job and a two-day job. Either way, buying the right gear upfront saves money over redoing work.
Drywall Cutting and Measuring Tools
Cutting drywall cleanly is foundational. Rough cuts mean wider gaps, which means more mud, which means more visible seams after paint. This phase requires precision more than speed.
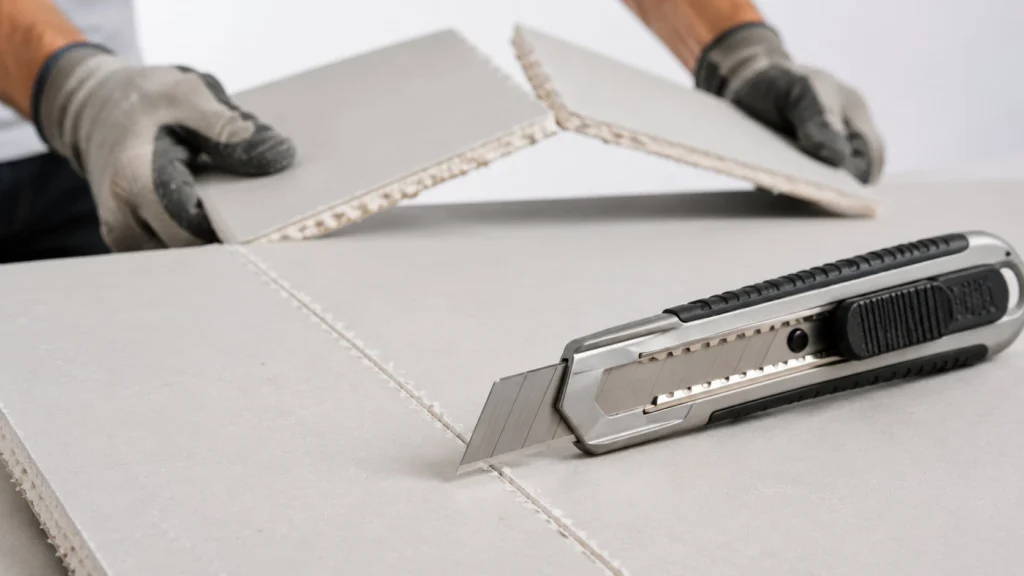
Drywall Utility Knife / Scoring Knife
The drywall scoring knife is the first tool to buy. You don’t cut through drywall with a utility knife — you score and snap. Draw the knife firmly along your cut line, snap the panel backward, then slice the paper backing.
For blades, use a standard snap-off utility knife with fresh blades. Drywall dulls blades fast; don’t try to push through with a worn one. Some installers prefer a dedicated drywall knife with a thicker handle for better grip, but any quality utility knife does the job. Change blades every few panels.
When to use a saw instead: If you’re cutting outlets, light boxes, or irregularly shaped cutouts, a knife won’t work cleanly. That’s where choosing the right drywall saw for the job makes a noticeable difference.
Many common drywall cutting failures happen because the scoring and snapping sequence is done incorrectly, especially when installers try to force cuts that are better handled with a saw
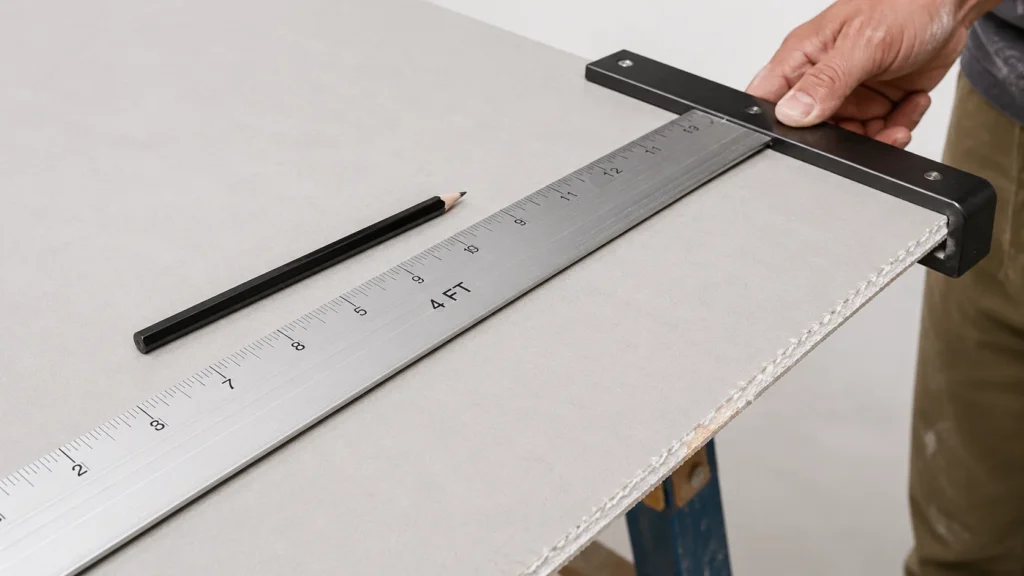
Drywall T-Square
A drywall T-square is the most underrated tool in the kit. It’s a 4-foot aluminum straightedge with a crossbar that hooks over the edge of the sheet, letting you draw a perfectly perpendicular line in seconds.
Without it, you’re relying on a tape measure and a separate straightedge, which adds time and introduces error. A good T-square costs around $25 to $40 and lasts indefinitely. Don’t skip it.
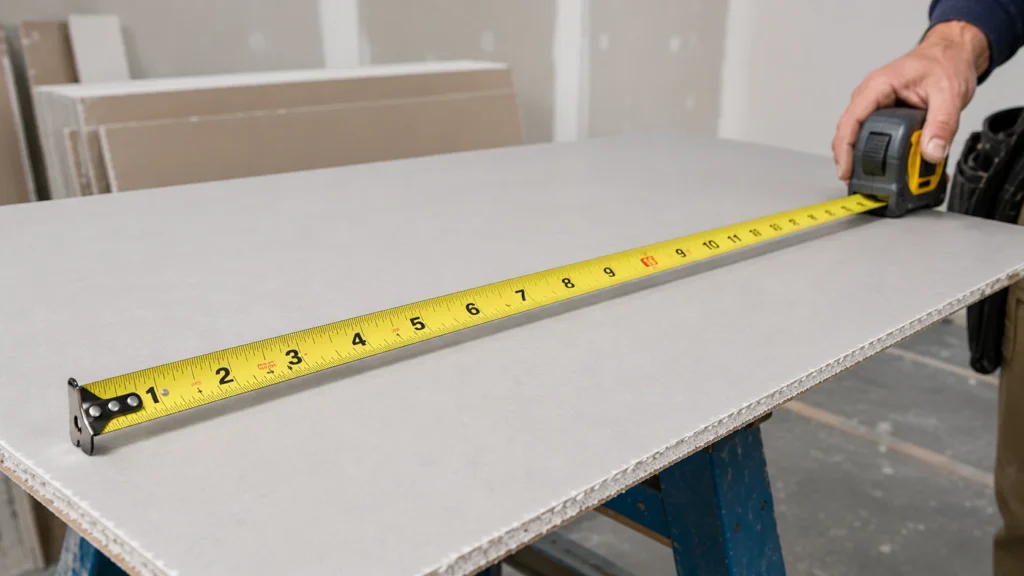
Tape Measure
Nothing special to say here except: get one with a wide, stiff blade that holds its shape across long distances. A 25-foot tape is enough for most drywall work. Cheap tape measures with floppy blades make accurate marking harder.
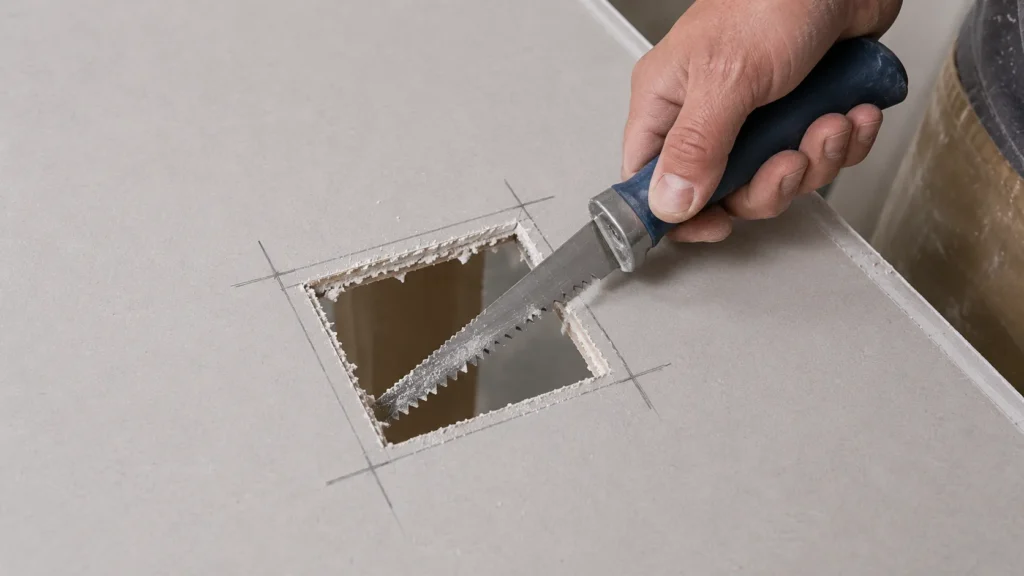
Drywall Saw / Jab Saw
A jab saw (also called a drywall hand saw) has a pointed tip so you can pierce the panel and start cutting without a pre-drilled hole. The blade is short, aggressive, and cuts on both push and pull strokes.
Use it for smaller cutouts — outlet boxes, switches, junction boxes — where a rotary tool would be overkill or impractical. The limitation is that freehand cuts with a jab saw can wander slightly, so for anything that needs to look clean, measure and mark carefully before cutting.
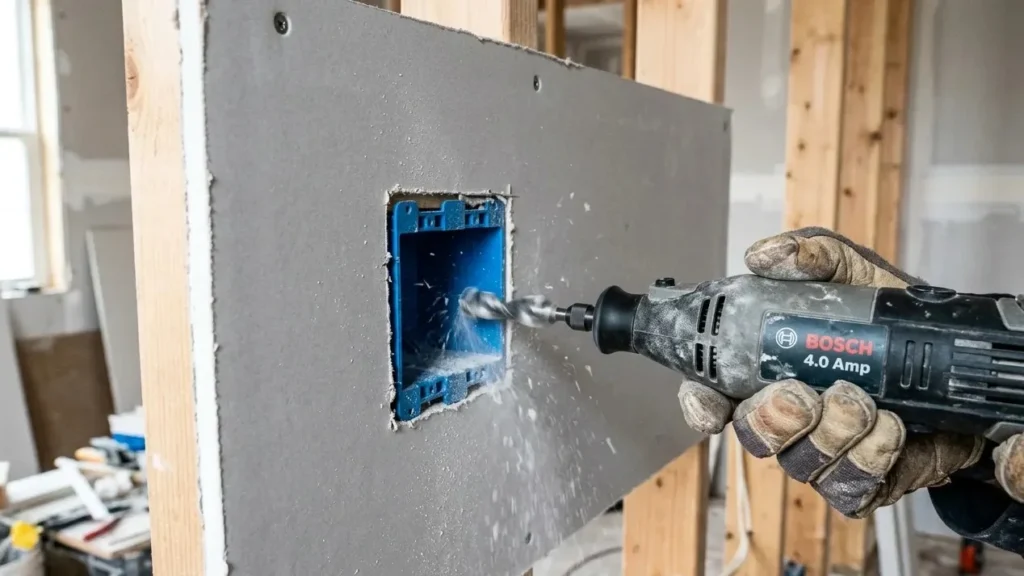
Rotary Cut-Out Tool
The -sometimes called a spiral saw or cut-out tool) is a game-changer for anyone hanging drywall regularly. Instead of measuring and marking every outlet and switch box, you hang the sheet, then use the rotary tool to trace around the box from the front of the panel. Precision cutouts become even more important when installing heavier specialty panels like soundproof drywall, where mistakes are harder to correct after fastening.
Brands like Rotozip and Dremel make dedicated drywall cut-out tools, typically 4 to 5 amps. They’re fast, accurate, and once you’ve used one, you won’t go back to jab saws for outlet cutouts. Expect to spend $60 to $100 for a reliable model. If you’re doing more than a single room, it’s worth buying rather than borrowing.
Drywall Hanging and Fastening Tools
Hanging the panels correctly sets up everything else. Panels that aren’t tight to the framing or that have fasteners driven incorrectly cause problems during finishing that are hard to fix after the fact. The Gypsum Association’s GA-216 standard, referenced in the International Building Code, governs proper fastener types, spacing, and panel installation requirements for compliant drywall work.
Drywall Screw Gun / Dimpler
A dedicated drywall screw gun is different from a regular drill in one critical way: it has an adjustable clutch that stops driving the screw the instant it reaches the right depth. When deciding between a drywall screw gun vs. drill, the main advantage of the dedicated tool is the slight dimple it leaves without tearing the paper. That dimple gets filled with mud. If you overdrive and tear the paper, the fastener loses its holding power.
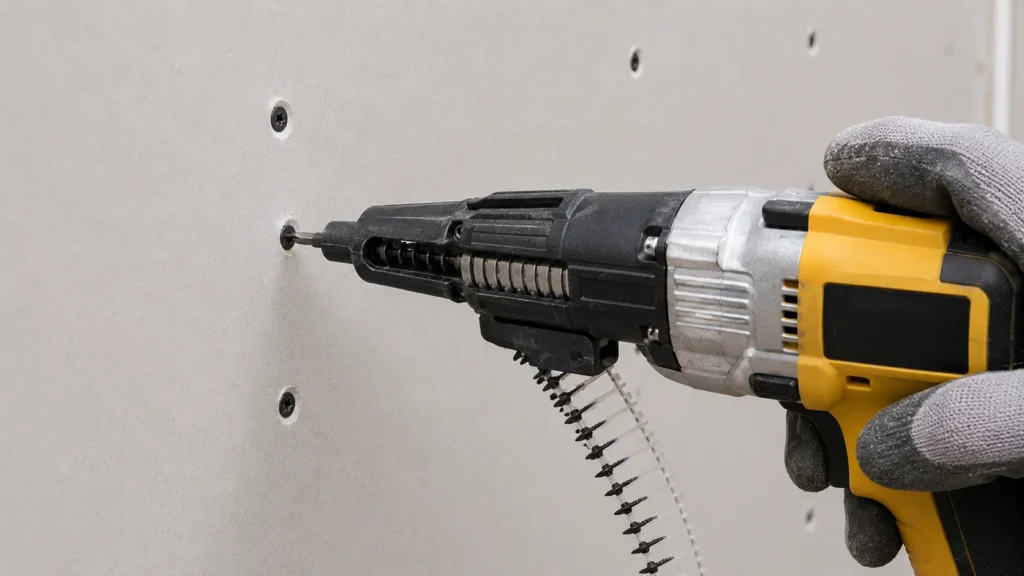
Can I use a regular drill for drywall screws? Yes, but with a caveat. Attach a dimpler bit to your drill — it’s an inexpensive hex bit with a depth stop that prevents overdriving. It works well, though not quite as consistently fast as a dedicated screw gun. For a small job, a drill with a dimpler is fine. If you’re hanging more than a few sheets, the efficiency of a screw gun adds up.
Corded screw guns (like DeWalt’s DW272) are the go-to for pros because they maintain consistent torque without battery concerns. For DIY, a quality cordless with a dimpler bit works well.
Choosing the correct screw type and length is just as important as driving them to the proper depth.
Cordless Drill
You already own one, most likely. For drywall, it handles pilot holes, mixing mud, and driving screws when used with a dimpler bit. A compact 18V or 20V drill is plenty. If you’re dedicated to a single battery platform (DeWalt, Milwaukee, Makita), stick with it — no need to buy a second system.
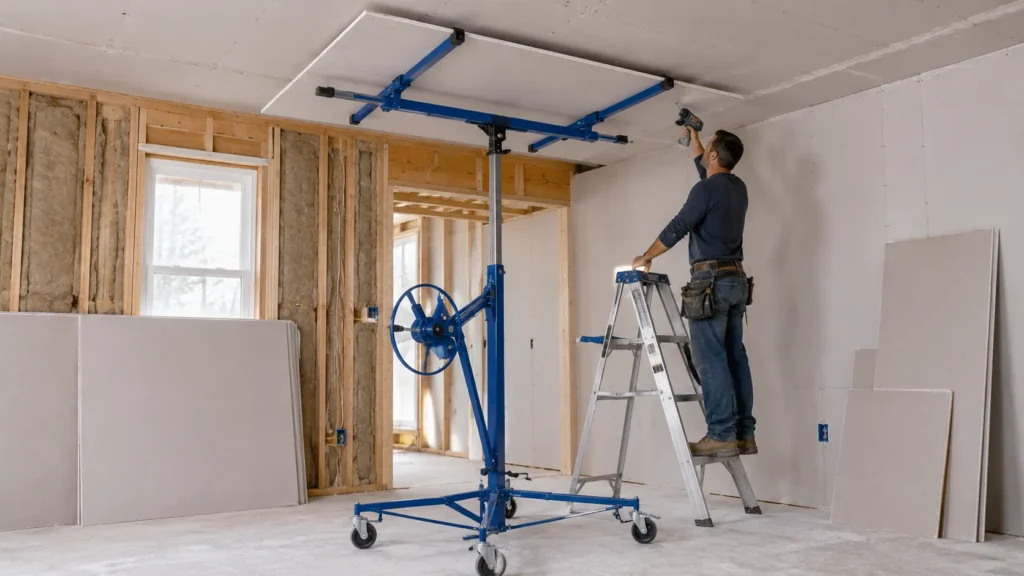
Drywall Panel Lift / Hoist
Hanging ceiling drywall solo without a drywall lift is possible. It’s also a good way to hurt yourself or end up with a poorly attached panel.
A panel lift is an adjustable crank mechanism on a rolling base that holds the sheet overhead while you drive screws. If you’ve never used one before, understanding setup, loading, and positioning techniques can prevent damaged panels and wasted time.
You load the panel at waist height, roll it into position, crank it up, and it holds steady hands-free. This is how professional crews hang ceiling panels efficiently without needing a third person on the team.
For drywall lift rental: most tool rental shops, including Home Depot’s Tool Rental Center, carry them for $40 to $70 per day. If you’re doing a full room or more of ceiling work, renting one is easily worth it.
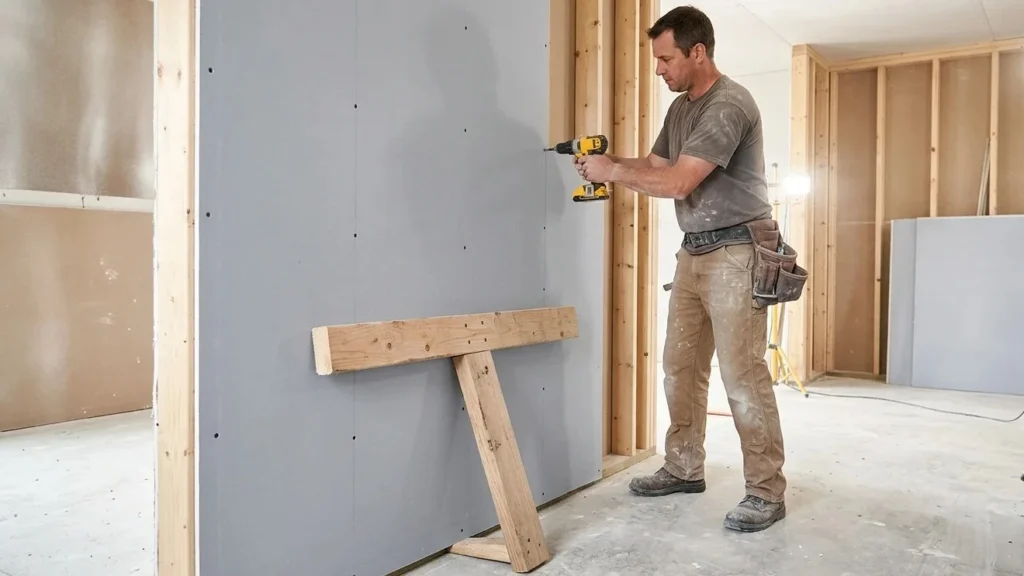
Deadman / Panel Prop
A deadman is a simple T-shaped brace — sometimes improvised from two pieces of lumber — that props a wall panel in position while you fasten it. It’s most useful for large walls where you need both hands free to drive screws.
A store-bought version (sometimes called a panel prop or drywall prop) is adjustable and more convenient than building one each job, but a site-built version costs almost nothing and works fine.
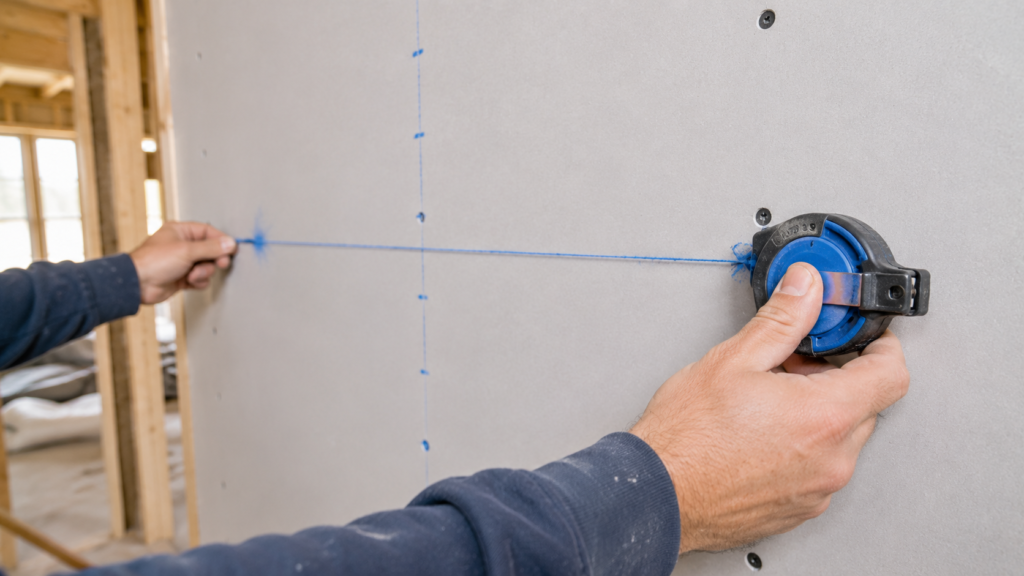
Chalk Line
A chalk line is how you mark stud locations across a sheet before you start driving screws. Snap a line where the stud runs and you won’t lose track of it halfway through driving fasteners. It’s also useful for establishing straight lines on framing before hanging.
Drywall Taping and Mudding Tools
The finishing phase is where most DIY drywall work either succeeds or falls apart. The tools matter, but so does understanding the process: taping comes first, then multiple coats of mud with sanding in between. Rushing this phase is the single most common mistake.
Drywall Knives (4″, 6″, 10″, 12″)
Each width has a purpose. Professional finishers rely on a progression of knife sizes rather than using a single blade for every stage of the finishing process.
| Knife Width | Use |
| 4″ | Embedding tape, tight corners, first coat over screws |
| 6″ | Second coat over seams, small fills |
| 10″ | Third (finish) coat, feathering wide seams |
| 12″ | Final skim coat, large flat areas |
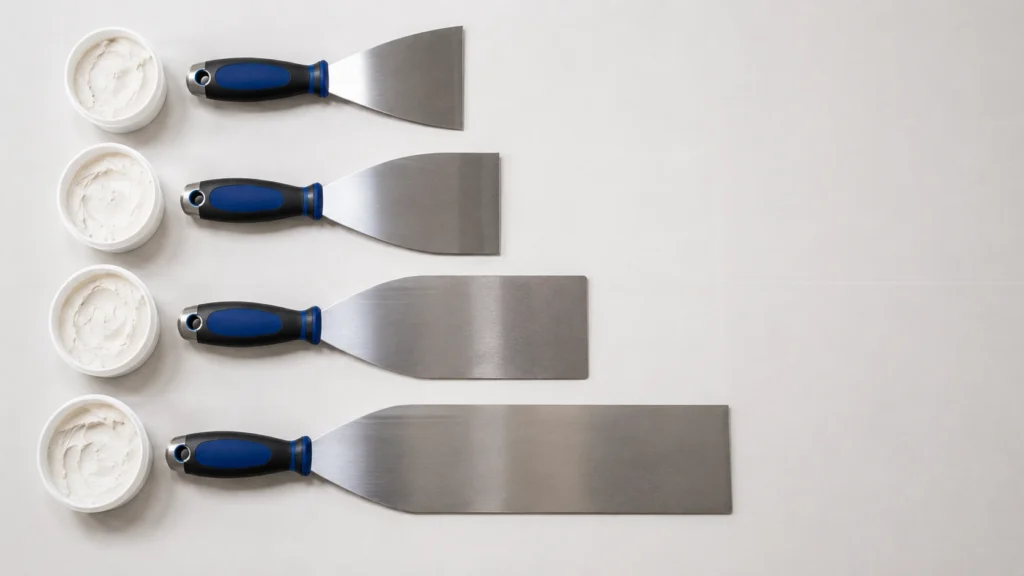
The logic is that each successive coat should be wider than the last. If you apply all coats at the same width, you end up with a visible ridge on both sides of the seam. Feathering out progressively is what makes seams invisible under paint.
Stainless steel blades stay cleaner and flex more consistently than cheap carbon steel. A set from Marshalltown, Hyde Tools, or Duratech will outlast lower-priced alternatives significantly.
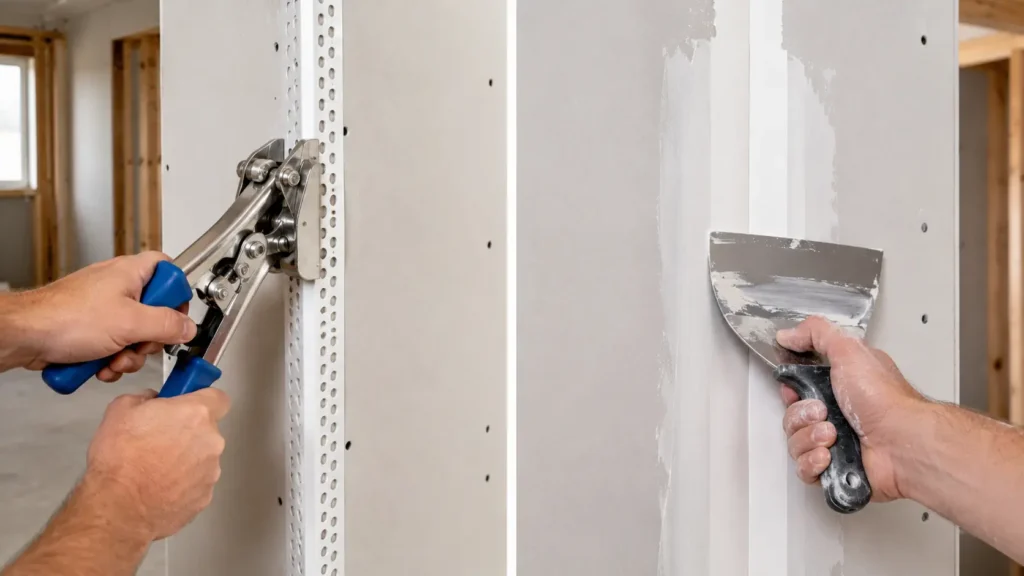
Corner Bead Tools (Inside and Outside)
Outside corners need metal or vinyl bead for protection and a clean straight edge to mud against. You can fasten bead with crimpers (a specialized tool that embeds it without screws), with corner bead staple guns, or simply with screws. A corner bead crimper is faster and leaves a cleaner result, but screws work fine. Specialized finishing tools can make inside and outside corner work significantly easier
Inside corners use paper tape, not bead. The tape is folded along its center crease and embedded in mud on both walls of the corner.
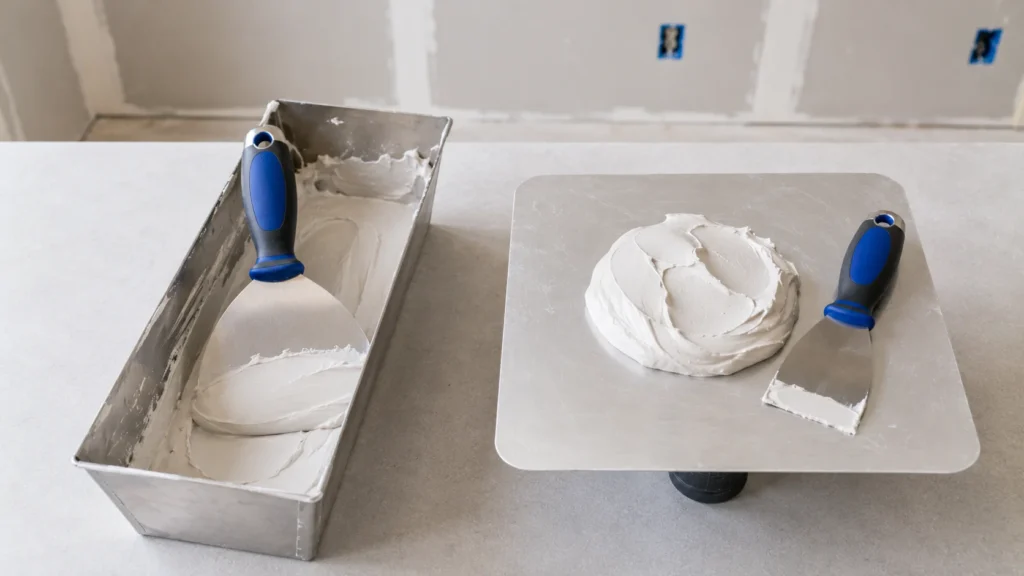
Mud Pan / Hawk
A mud pan is a rectangular trough — typically 12 to 14 inches — that holds joint compound while you work. You load your knife from the pan as you go.
The type of compound you’re working with affects how easily it loads onto the knife and feathers across the wall
A hawk is a flat platform on a handle that lets you hold mud at arm level, avoiding repeated trips to the bucket. Professionals use hawks constantly; DIYers often skip them and just work from the pan or bucket. If you’re finishing more than one room, a hawk speeds things up noticeably.
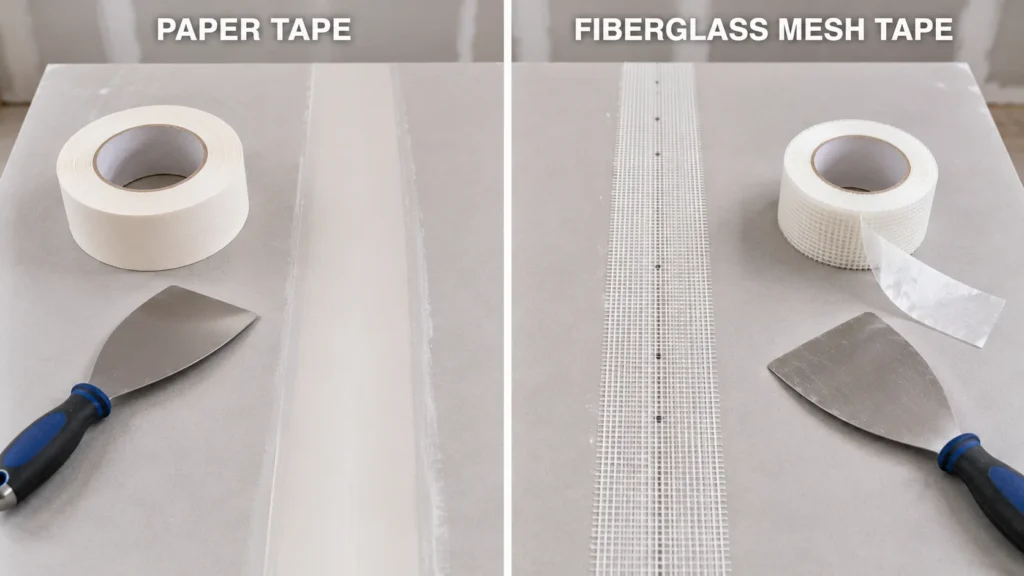
Drywall Tape (Paper vs. Fiberglass Mesh)
Paper tape is what professional finishers use almost exclusively. It’s stronger than mesh over flat seams, it doesn’t stretch, and it produces smoother results when properly embedded in mud. USG’s drywall finishing guide recommends paper tape for standard joint finishing, with mesh reserved for specific applications.
Fiberglass mesh tape is self-adhesive, which makes it faster to apply. The trade-off is that it’s weaker in tension and prone to cracking over time if the underlying structure has any movement. It works reasonably well for small repairs and patches where speed matters more than longevity. For new construction or full room finishing, paper tape is the better choice.
Automatic Taper / Banjo
The drywall banjo (automatic taper) is a tool that simultaneously loads tape from a roll and coats it with mud as you feed it along the seam. One pass applies both tape and first coat of compound.
This is squarely a professional efficiency tool. A good banjo costs $150 to $300, and using it well takes some practice. For a one-room DIY job, it doesn’t make sense to buy one. For contractors running finish crews, it’s standard equipment. The rental market for these is limited, so pros typically own them.

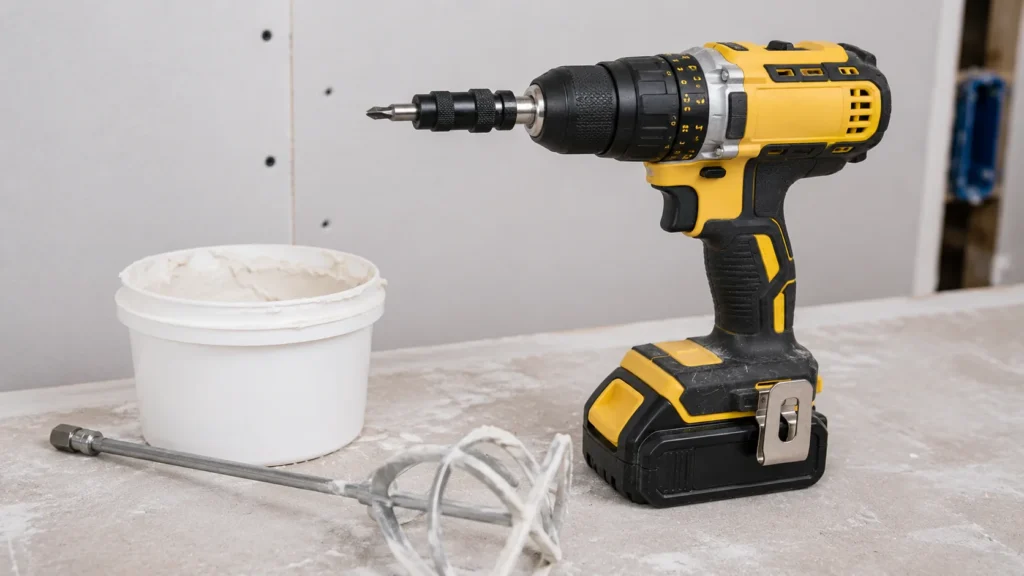
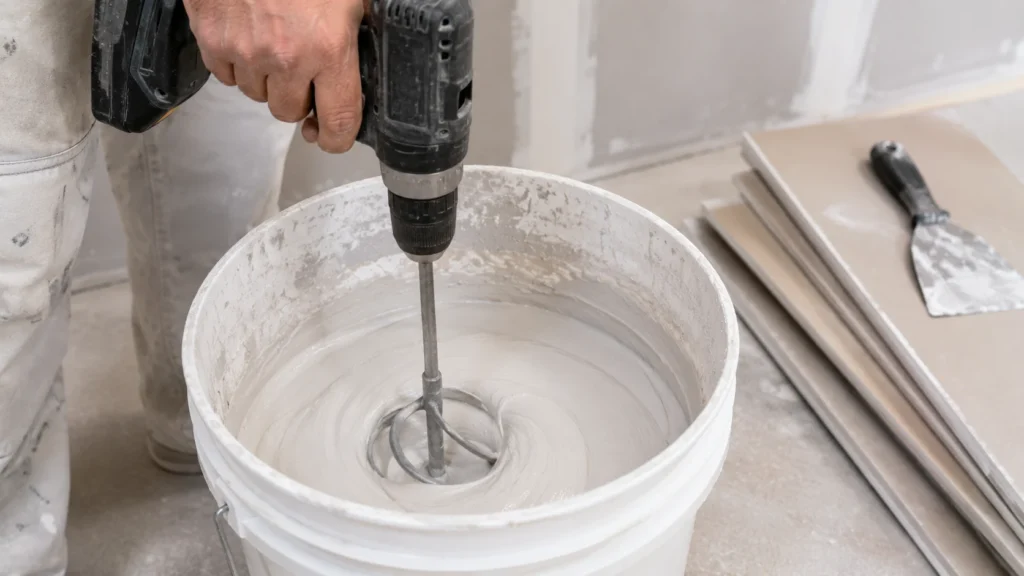
Mud Mixer / Drill Mixer Attachment
Joint compound needs to be mixed before use, especially after it’s been sitting. A paddle-style mixing attachment for your drill does this in about 30 seconds. Without it, you’re mixing by hand, which takes longer and rarely gets as smooth a result.
Pick up a mixing paddle for your drill. They cost $10 to $15 and fit any standard chuck. Mix on low speed to avoid whipping air into the mud, which creates bubbles in your finish coat.
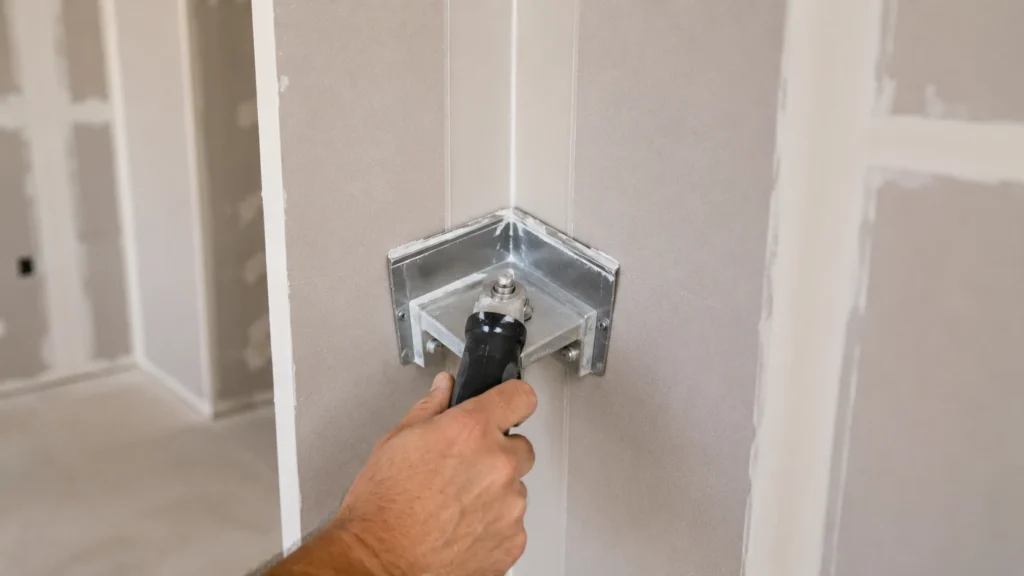
Corner Finisher / Angle Head
A corner finisher is a specialized knife with a 90-degree profile that applies and smooths compound along inside corners in a single pass. Without one, inside corners require two separate passes — one wall at a time — and blending the overlap.
Professionals use these constantly. For a DIYer doing a few inside corners, a standard knife works fine with some patience. If you have a lot of inside corners to finish, a corner finisher saves time and reduces the chance of a wavy corner.
Drywall Sanding Tools
Sanding is where drywall finish work either comes together or gets destroyed. The goal is to knock down high spots without sanding through the tape or gouging into the paper face of the board. Aggressive sanding with the wrong tool causes more work, not less.
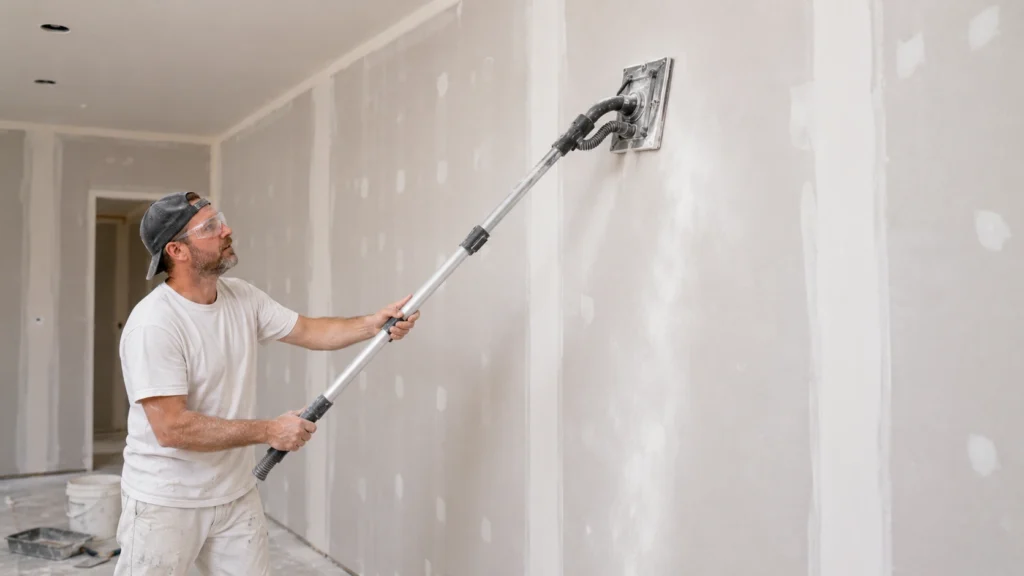
Pole Sander
A drywall pole sander is a flat sanding head on an extendable pole. It’s the right tool for sanding walls and ceilings without a ladder. The head pivots slightly to follow the surface.
Use 100 to 120 grit screen or paper for general sanding between coats. Pole sanders cover large areas quickly but don’t give you precise control over tight spots or corners. Pair it with a sanding block for detail areas.
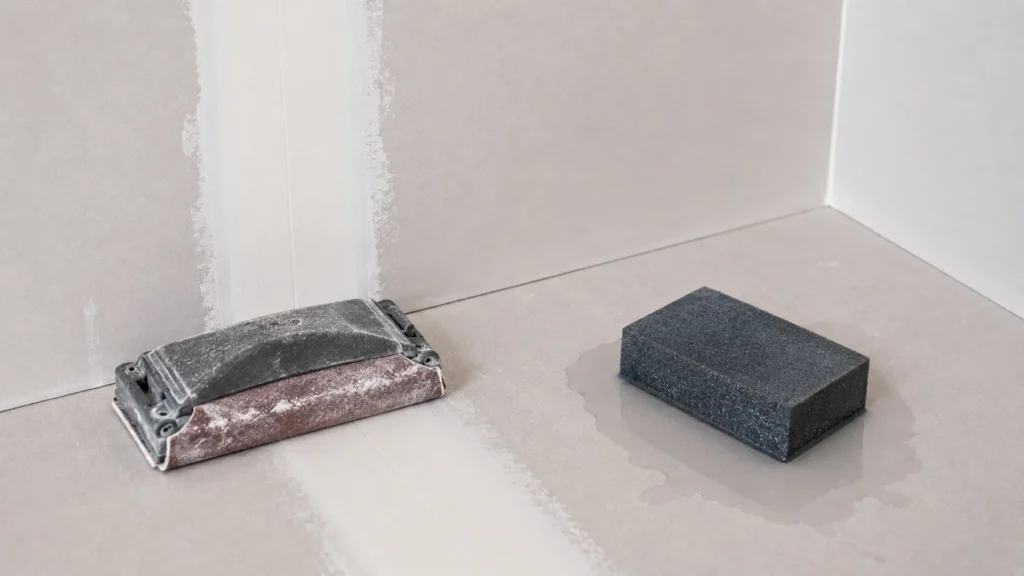
Sanding Blocks and Sponges
Sanding blocks let you work by hand with better control than folded sandpaper. They’re essential for feathering the edges of dried mud where it meets the paper face of the drywall.
Wet sanding sponges are useful for light touch-up work and final passes. They’re gentler than dry sanding and produce almost no dust, but they’re slower and can soften the mud if you use too much water. Best for small areas and final touchups, not for general sanding.
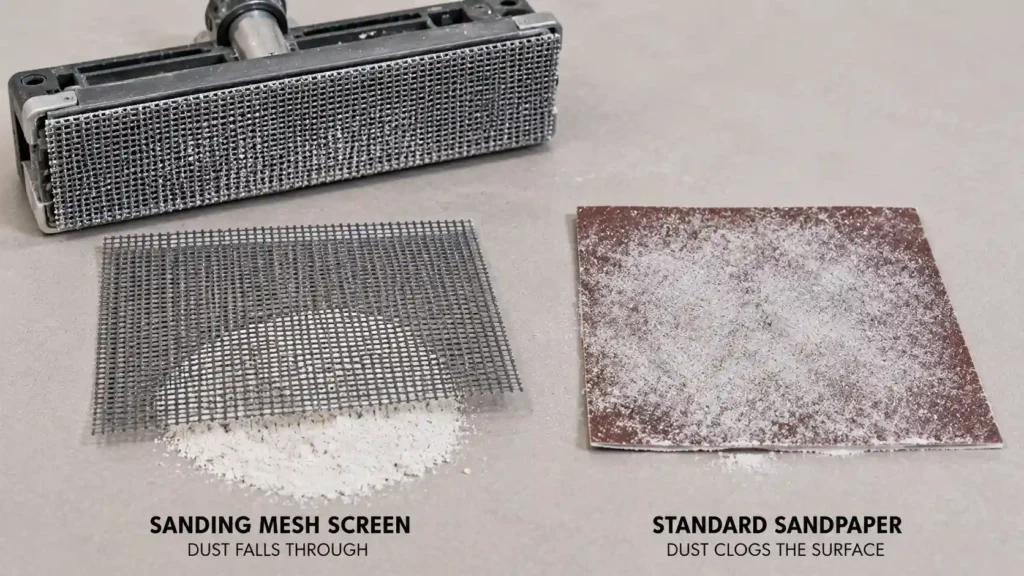
Drywall Sanding Mesh / Screens
Sanding mesh (open-weave abrasive screens) works like sandpaper but resists clogging much better because the compound dust falls through the mesh. They last significantly longer than standard sandpaper for drywall work and cost about the same per sheet.
For pole sanders especially, mesh screens are the better choice over paper because they won’t load up as fast.
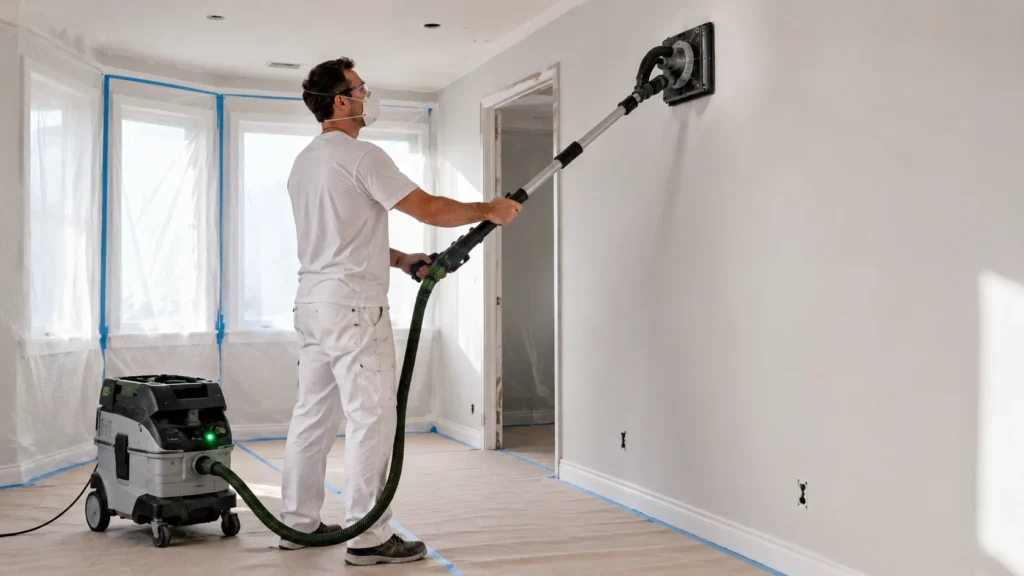
Dustless Drywall Sander (Vacuum Sander)
A dustless drywall sander connects directly to a shop vacuum and captures the dust at the source before it spreads across the room. This is one of the more significant quality-of-life upgrades in drywall finishing.
Drywall dust is ultra-fine and gets everywhere — into HVAC systems, over furniture, into adjacent rooms. Even with plastic sheeting up, dry sanding a whole room coats everything in a fine white film that takes hours to clean. A vacuum sander eliminates most of that.
Good options come from companies like Festool, Mirka, and PORTER-CABLE. Prices range from $80 for basic corded models to $400+ for professional-grade tools with variable speed. If you’re concerned about cleanup (or have a freshly painted adjacent room), a dustless sander pays for itself in time saved.
Safety and Accessory Tools
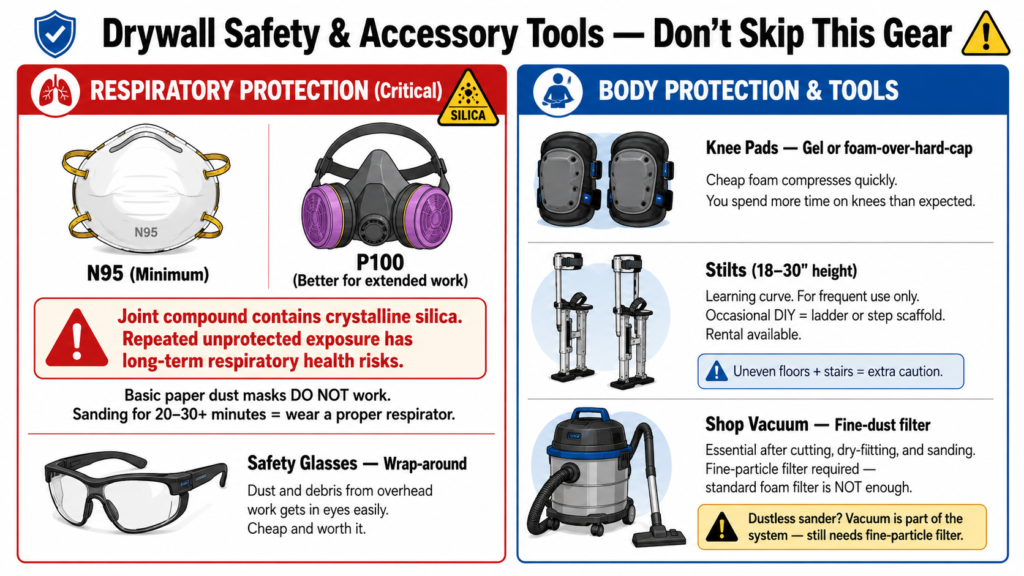
Drywall safety gear gets skipped more often than it should, especially sanding dust protection. Joint compound contains crystalline silica. Repeated unprotected exposure isn’t just uncomfortable — it has long-term respiratory health implications, including silicosis, an irreversible and potentially fatal lung disease recognized under OSHA’s respirable crystalline silica standard for construction.
Respirator / Dust Mask (N95 or Better)
A disposable NIOSH-certified N95 respirator is the minimum for sanding. A reusable half-face respirator with P100 filters is better for extended work. Basic paper dust masks (the cheap surgical-style ones) don’t filter drywall dust adequately.
If you’re sanding for more than 20 to 30 minutes, wear a proper respirator. The difference in how you feel at the end of the day is noticeable.
Safety Glasses
Drywall dust and debris, especially from overhead work, easily gets into eyes. Wrap-around safety glasses are cheap and worth keeping on throughout installation and sanding.
Knee Pads
You spend more time on your knees during drywall work than you might expect — cutting panels, installing bottom plates, taping floor seams. Good knee pads protect you on extended jobs. Cheap foam knee pads compress quickly; look for gel or foam-over-hard-cap designs for longer comfort.
Stilts
Drywall stilts are height-adjustable platforms that strap to your feet and lower legs, elevating you 18 to 30 inches so you can tape and mud the upper wall and ceiling seams without constantly repositioning a ladder.
There’s a learning curve, and they’re only worth owning if you do this work frequently. For occasional DIY use, a sturdy ladder or step scaffold does the job. Rental is an option if you have a large project. Safety note: working on stilts on uneven floors or near stairs requires extra caution.
Shop Vacuum
A shop vacuum with a fine-dust filter is essential throughout the process. Use it after cutting (drywall gypsum and paper dust), after dry-fitting panels, and especially after sanding. If you’re using a dustless sander, the vacuum is already part of the system — just make sure you have a fine-particle filter installed, not just the standard foam filter.
Drywall Tools for Beginners vs. Professionals
The gap between a beginner kit and a pro kit isn’t just about quality — it’s about volume and efficiency. A beginner doing one room doesn’t need every pro tool. A contractor doing ten rooms a week does.
| Tool | Beginner Kit | Pro Kit |
| Utility knife | ✓ Basic utility knife | ✓ Quality drywall knife with blade snapper |
| T-square | ✓ 4′ aluminum T-square | ✓ Same |
| Jab saw | ✓ Basic drywall saw | ✓ Rotary cut-out tool (replaces saw) |
| Screw fastening | ✓ Drill + dimpler bit | ✓ Dedicated screw gun |
| Panel lift | Rental for ceilings | ✓ Owned |
| Mud knives | ✓ 4″, 6″, 10″ set | ✓ Full set + corner finisher |
| Taping | ✓ By hand with pan | ✓ Banjo / automatic taper |
| Sanding | ✓ Pole sander + block | ✓ Vacuum sander + pole sander |
| Respirator | ✓ N95 | ✓ Half-face respirator with P100 |
| Mud mixer | ✓ Drill paddle | ✓ Same |
| Stilts | No | ✓ For high-volume finishing |
For someone asking “what tools do I need to drywall a room,” the beginner column is your answer. You can hang, tape, mud, and sand a standard room with those tools and get a result you’ll be happy with.
If you’re still deciding what type of drywall system to install, understanding the differences between standard, moisture-resistant, soundproof, and paperless panels can help you avoid buying tools you may never need
Tool Kits and Bundles Worth Considering
Buying individual tools piecemeal adds up. Starter kits and finishing sets from Marshalltown, Goldblatt, and Hyde Tools bundle the essentials at a lower combined cost than buying each piece separately — and the tools in these sets are generally solid quality.
Good starting points to look for:
- Drywall finishing tool sets from Marshalltown typically include a mud pan, knives in multiple widths, and a corner tool. Marshalltown is the industry standard for finish knives; their stainless blades hold up extremely well.
- Taping knife sets from Hyde or Duratech offer good value at a mid-range price point. Look for sets that include at least a 6″ and 10″ knife — you can add the others individually.
- Combo kits on Amazon and Home Depot often bundle a screw gun, bits, and sometimes a T-square or utility knife. Quality varies significantly by brand; read reviews carefully and prioritize sets from recognized tool brands over generic bundles.
For a full comparison of current top-rated kits, check product listings at Home Depot or Amazon — filter by rating and read the professional reviews specifically, since they’ll tell you how tools hold up with regular use, not just out of the box.
Frequently Asked Questions About Drywall Tools
What tools do I need to hang drywall? The core hanging kit is a utility knife, T-square, tape measure, cordless drill or screw gun with a dimpler bit, and chalk line. For ceiling work, add a panel lift or rent one. A jab saw or rotary cut-out tool handles electrical box cutouts.
Can I use a regular drill for drywall screws? Yes, as long as you use a dimpler bit attachment. The dimpler creates the depth stop that prevents overdriving screws through the paper face. Without it, you’ll either overdrive (tearing the paper) or underdrive (leaving proud fasteners that show through mud). A dedicated screw gun is faster for large jobs, but a drill with a dimpler works well for typical DIY projects.
What is a drywall banjo used for? A drywall banjo (automatic taper) is a tool that applies joint compound and tape to seams simultaneously. You feed the tape roll through the banjo, which coats it with mud as you run it along the joint. It’s a professional efficiency tool that significantly reduces taping time on large jobs. For single-room DIY projects, hand taping with a pan and knife is more practical.
Do I need a drywall lift? For walls, no. For ceilings, yes — especially if you’re working alone or with only one helper. Trying to hold a 4×8 or 4×12 sheet overhead while driving screws is exhausting and leads to poorly attached panels. Renting a lift for a day costs less than dealing with a panel that wasn’t properly secured.
What grit sandpaper for drywall finishing? Use 120 grit for sanding between coats to knock down ridges and knife marks. For the final finish coat before painting, 150 grit leaves a smoother surface. Don’t go finer than 150 — drywall paper can burnish at very fine grits, which can cause paint adhesion issues.
How many coats of mud before sanding? Typically three coats: a tape coat (embedding the tape), a second coat (building), and a finish coat (feathering). Some professionals add a skim coat as a fourth pass for a perfectly smooth surface, especially on walls that will receive flat or satin paint, which shows imperfections more than eggshell. Light sanding between each coat is standard.
Build Your Drywall Tool Kit the Smart Way
The biggest mistake people make with drywall tools is buying too little at the start and spending more in the long run through poor results and rework.
Here’s the simplest way to think about building your kit by phase:
Cutting and measuring: Utility knife, T-square, tape measure, jab saw. Add a rotary tool if you’re doing a full room or more.
Hanging: Drill with dimpler bit, chalk line, panel prop. Rent a panel lift for any ceiling work.
Taping and mudding: Pan, 4″/6″/10″ knife set, corner bead, paper tape, mixing paddle. Add a corner finisher if you have many inside corners.
Sanding: Pole sander with mesh screens, sanding block, N95 respirator. Invest in a vacuum sander if dust control matters.
You don’t need everything immediately. A beginner handling a first repair or small room can start with about $100 to $150 in tools and complete quality work. Professionals gradually add efficiency tools such as banjos, vacuum sanders, and dedicated screw guns as volume justifies the investment.

Elena Hart is the founder and lead writer of Better Home Pro. She writes about drywall, home repair, and practical DIY home improvement topics, focusing on clear, useful information that helps homeowners make better decisions. Her work combines firsthand experience, manufacturer documentation, industry resources, and careful research to create content that is accurate, practical, and easy to understand. Through Better Home Pro, Elena aims to simplify complex home improvement topics and provide guidance that is genuinely helpful to homeowners and DIYers.


No Comments