
Most people who tackle drywall for the first time discover the same thing halfway through: hanging the sheets was the easy part. The finishing is where the job either comes together or falls apart. And finishing takes longer, requires more patience, and shows every shortcut you took.
That’s not meant to discourage anyone. It’s just the honest framing you need going in. Hanging a room’s worth of drywall is genuinely manageable for a careful DIYer. Taping, mudding, and sanding to a smooth painted finish is a different kind of work entirely, and it’s where most of the visible result lives.
This guide covers the full process: material selection, tools, framing prep, hanging sequence, taping and mudding technique, finish levels, priming, and the mistakes that are easy to make and surprisingly hard to fix. Whether you’re finishing a basement, rebuilding after a renovation, or just trying to understand the process well enough to manage a contractor, this is a practical walkthrough of how it actually gets done.
If you are still choosing panels before starting, it helps to compare the main drywall types and where each one belongs before moving into layout, fastening, and finishing.
One honest caveat upfront: ceilings are harder than walls, and that gap in difficulty is bigger than most people expect.
Key Takeaways:
- Standard 1/2-inch gypsum board fits most residential walls, but code requires 5/8-inch Type X fire-rated panels between attached garages and living spaces.
- Moisture-resistant greenboard handles bathroom humidity but will fail if used directly behind tile shower surrounds instead of waterproof cement board.
- Running wall and ceiling seams require paper tape embedded in compound, as self-adhesive mesh tape is significantly more prone to cracking over time.
- Hanging panels horizontally on walls creates a recessed, tapered edge that is much easier to tape and finish smoothly than vertical butt joints.
- Avoid flashing by sealing raw drywall and joint compound with a dedicated PVA primer before applying standard interior finish paint.
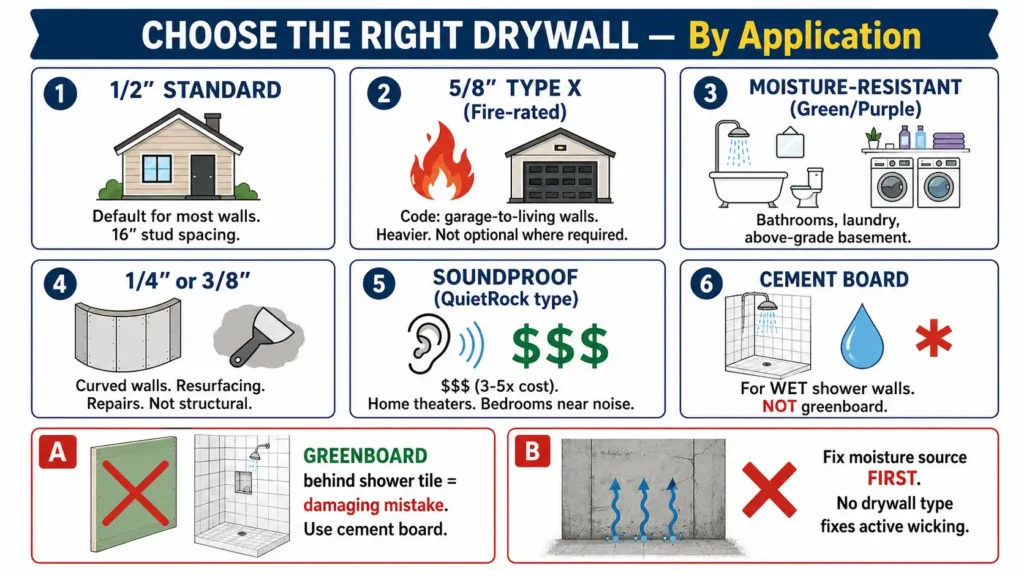
Choosing the Right Drywall for the Job
The default answer for most residential projects is standard 1/2-inch gypsum board. It’s what most walls in most homes are built with, it’s widely available, and it’s the assumed material in most framing schedules. For walls with 16-inch on-center stud spacing, 1/2-inch handles the load without flexing. Start there and deviate only when the application calls for it.
For a broader breakdown of standard, fire-rated, moisture-resistant, soundproof, lightweight, and paperless panels, see our guide to choosing the right drywall panel for each room and risk.
5/8-inch Type X (fire-rated) is required by code in many garage separation assemblies, and the difference between Type X and Type C fire-resistant drywall matters when code or fire performance is the reason for the upgrade. It’s heavier, harder to handle alone, and adds cost, but it’s not optional where code requires it. The fire resistance comes from a denser core with glass fibers, not just thickness. Don’t substitute standard 5/8-inch for Type X and assume it’s equivalent.
Moisture-resistant drywall (often called greenboard or purple board, depending on the manufacturer) is appropriate for bathrooms, laundry rooms, and above-grade basement walls. The critical thing to understand here is the difference between moisture-resistant and waterproof. These panels resist incidental moisture and humidity. They are not rated for direct water exposure. Using greenboard behind a tile shower surround instead of cement board is one of the more common and damaging mistakes in residential construction. Cement board or a comparable waterproof backer is the correct material for wet shower applications. Greenboard is for the wall next to the shower, not the wall of the shower.
Shower walls need a true tile backer, which is why cement board is safer than drywall in direct wet areas.
In basements, the moisture question starts before you choose any product. If the concrete block or slab is actively wicking moisture, no panel type fixes that. The moisture source needs to be addressed before any drywall goes up, regardless of what’s on the label.
If you are using greenboard specifically, make sure you understand where moisture-resistant drywall helps and where it fails
1/4-inch and 3/8-inch panels serve a specific purpose: curved walls, resurfacing over damaged existing drywall, and repair work where matching a thinner profile matters. They’re not structural choices. For anything with a tight radius, 1/4-inch can be wet and bent to shape, or score-and-snapped to achieve a curve in segments.
Soundproof drywall (QuietRock and similar products) does reduce sound transmission meaningfully, but it’s expensive, often running three to five times the cost of standard panels. The performance improvement is real in the right application, particularly home offices and bedrooms that share walls with mechanical rooms or high-traffic hallways.
For a basement playroom or a general utility room, the cost rarely justifies the upgrade. For a home theater or a bedroom above a noisy garage, it can be worth the premium. For noise-sensitive rooms, compare the real-world tradeoffs in whether soundproof drywall is worth the cost.
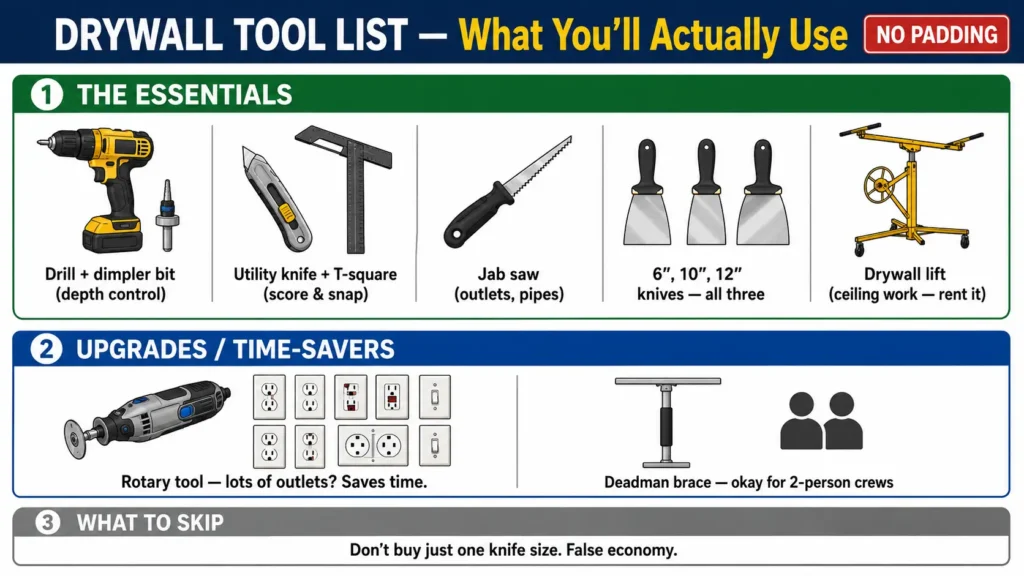
Tools and Materials: What to Buy, What to Rent, What to Skip
The tool list for drywall gets padded quickly in most guides. Here’s a more selective take based on what you’ll actually use.
The essentials:
A drywall screw gun (or a drill with a depth-setting dimpler bit) is genuinely important. The depth of the screw matters more than most beginners expect. You’re trying to set the screw head just below the paper face without breaking through it. A regular drill without a depth stop makes this harder to control consistently. A dimpler bit is inexpensive and solves the problem. A dedicated screw gun makes controlling screw depth without tearing the drywall paper much easier on full-room projects.
A utility knife and drywall T-square handle the majority of straight cuts. The score-and-snap technique is fast and clean once you’ve done it a few times. The T-square keeps your cuts straight without measuring each line independently.
A jab saw (also called a drywall saw) handles outlet cutouts, pipe penetrations, and anything that requires an internal cut. It’s a simple tool and you’ll use it constantly.For cutouts and rough openings, compare a drywall saw vs a jab saw before choosing your cutting tool.
A drywall lift is worth renting for ceiling work. If you are hanging ceilings solo, read the full guide on using a drywall lift safely and deciding whether to rent one. Holding a 4×8 sheet of drywall overhead while trying to drive screws is dangerous and exhausting. A deadman brace (a simple T-shaped prop) can work for two-person crews, but a lift is safer and less fatiguing.
For taping knives, you’ll need a 6-inch, a 10-inch, and ideally a 12-inch. Each has a role in the finishing process. The 6-inch is for the tape coat and spot work. The 10 and 12-inch are for feathering out subsequent coats. Buying just one size and trying to make it work across all three coats is one of those false economies that creates more work than it saves. That three-knife setup is explained in more detail in our drywall taping knife size guide
A rotary cut-out tool is useful in rooms with a lot of outlets and fixtures. For a single room with a handful of boxes, the jab saw is fine. For a full basement with twenty boxes, the rotary tool saves significant time.
For a more complete buying/renting breakdown, use this drywall tools setup for cutting, fastening, taping, sanding, and lifting.
Materials checklist:
Calculate your square footage (total wall and ceiling area), divide by 32 for standard 4×8 sheets, and add 10 to 15 percent for waste and cuts. Order a bit more than you think you need; running short mid-project costs you a trip and sometimes causes work stoppages.
Use coarse-thread screws for wood framing and fine-thread for metal studs. The distinction matters for holding power.
For joint compound, you’ll work with at least two types. The compound choice matters because all-purpose, lightweight, and setting compound behave differently during taping, recoating, and sanding.
All-purpose compound works for all coats but is heavier and shrinks more. Lightweight compound is better for second and third coats because it sands more easily and shrinks less. Setting compound (sometimes called hot mud) sets chemically rather than by drying, which makes it useful in humid or cold spaces where drying time becomes a problem. Once setting compound sets, it can’t be re-wetted, so mix only what you can use quickly.
Paper tape vs. mesh tape: This is a genuine debate in the trades, but it’s not as close as the packaging might suggest. Paper tape is the professional standard for flat seams because it embeds in the compound and bonds mechanically with it. Mesh tape sits on top of the compound and is significantly more prone to cracking over time on running seams. Mesh tape has its place in patching small holes and isolated repairs. For finishing full walls, paper tape is the more durable choice.
For a full joint-by-joint breakdown, compare paper, mesh, and FibaFuse drywall tape before taping seams.
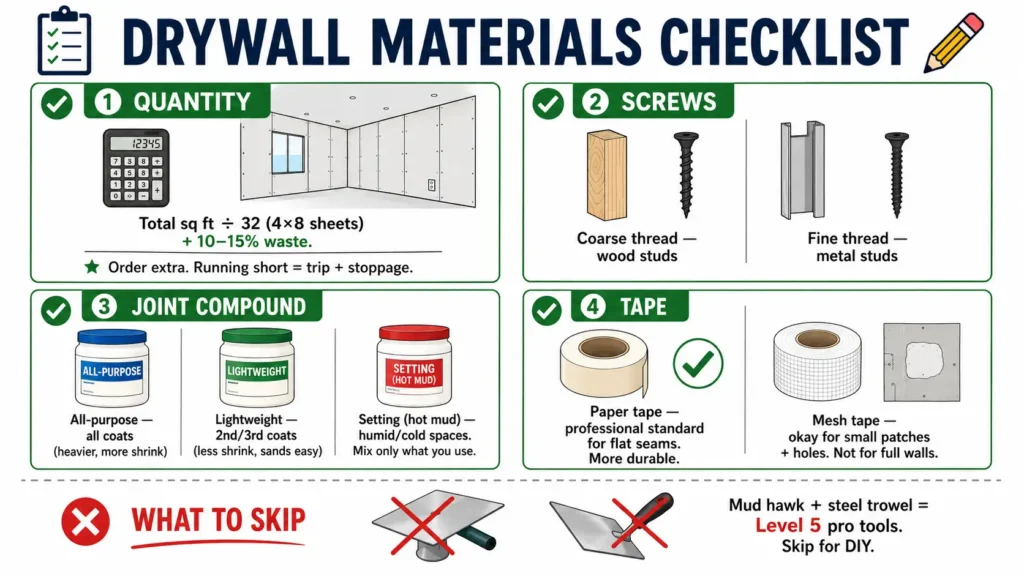
What to skip: specialty tools like a mud hawk and steel pool trowel are for skim-coat professionals doing Level 5 work. For most DIY projects, they add complexity without enough benefit to justify the learning curve.
Before the First Sheet Goes Up
The planning and prep phase is where most of the problems that show up at the finishing stage are created. It’s also the phase that most guides rush through, which is why so many finished walls have waves, ridges, and visible irregularities that have nothing to do with how the drywall was hung.
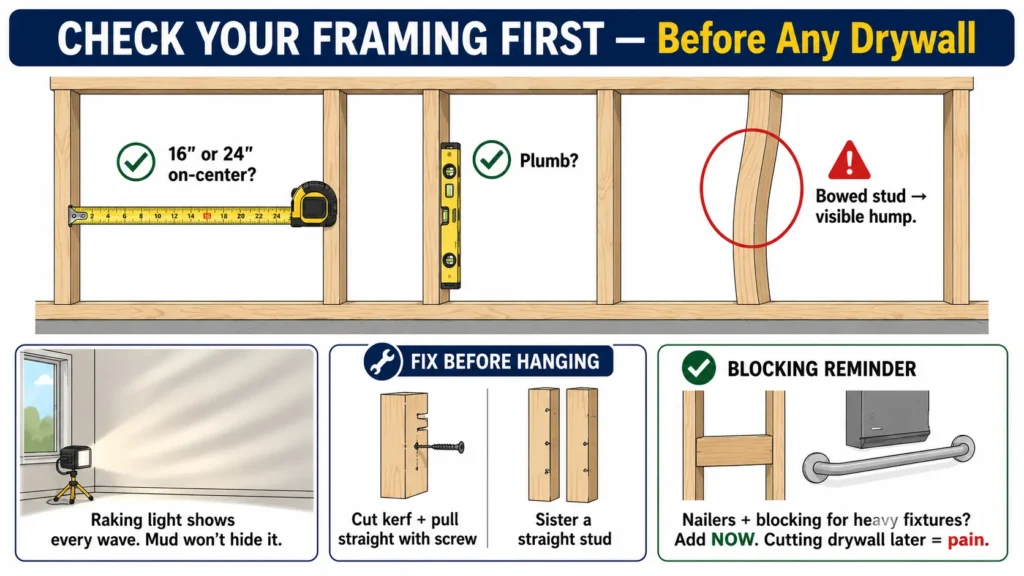
Check your framing first. Walk every wall and confirm that studs are consistently 16 or 24 inches on-center. Check that they’re plumb with a level. Framing irregularities can later show up as drywall ridging, waves, or raised seams under light. Look for any bowed studs along the face. A stud that bows even 3/8 of an inch toward the room creates a visible hump in the finished wall, and no amount of mudding hides it cleanly. Address bowed studs before hanging by cutting a kerf into the back of the stud and pulling it straight with a screw through a backer, or sistering a straight stud alongside it. This is unglamorous work, but skipping it is the single most common reason finished drywall looks wavy under raking light.
Framing inspection is also when you confirm that any nailers or backing blocking are in place for heavy fixtures, grab bars, or cabinet mounting locations. Adding blocking after the drywall is up means cutting it open.
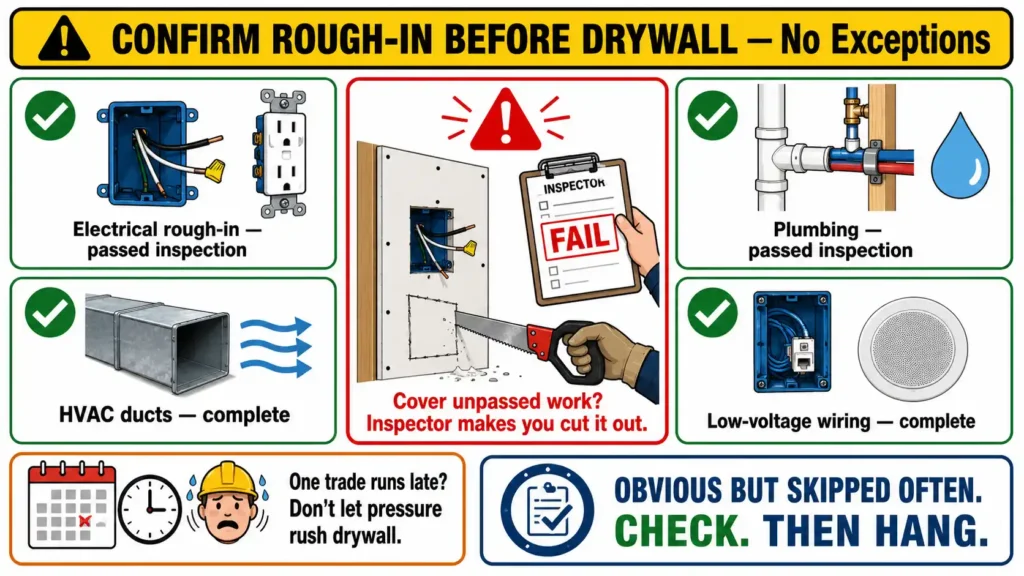
Confirm rough-in work is complete and inspected. If you are hiring the work out or managing a remodel, it helps to understand what a pre-drywall inspection checks and what it usually costs. Electrical rough-in, plumbing, HVAC ducts, and any low-voltage wiring all need to be done and passed inspection before drywall goes up. This sounds obvious, but on fast-moving projects it’s easy for one trade to finish late and pressure the timeline. Drywall over unpassed electrical work creates the same problem everywhere: the inspector makes you cut it out.
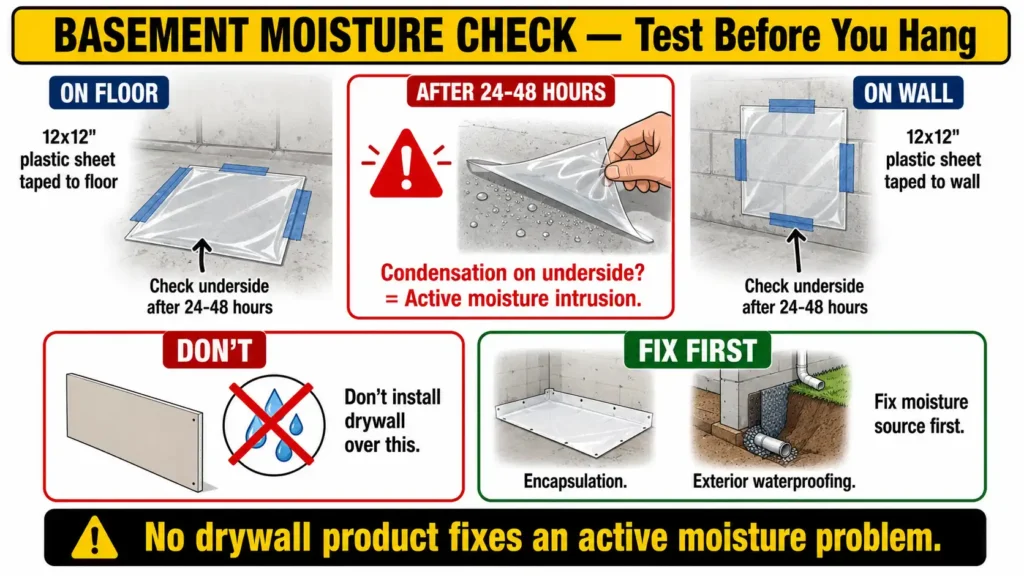
Moisture check in basements. Tape a 12-by-12-inch piece of plastic sheeting to the concrete floor and wall and leave it for 24 to 48 hours. If moisture condenses on the underside of the plastic, you have active moisture intrusion that needs to be resolved before any framing or drywall goes in. Products exist to encapsulate concrete, and in some cases exterior drainage and waterproofing is the real fix. Don’t install drywall against a problem you haven’t addressed.
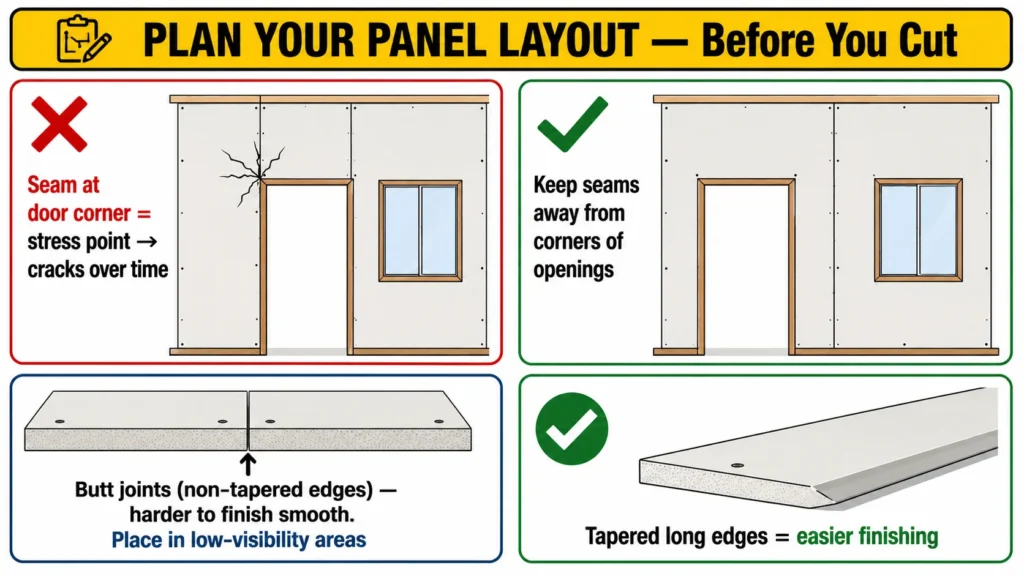
Plan your panel layout before you start. Think through where seams will fall. On long walls, large ceilings, and movement-prone areas, layout should also account for where drywall control joints may be needed. Seams at the corners of door openings and window openings are stress concentration points and will crack over time if the opening shifts slightly. Keep seams away from corners of openings whenever possible. Think about where your butt joints (the non-tapered short edges of the panels) will land. These joints are harder to finish smoothly than the tapered long edges, so plan their placement in lower-visibility areas where you can.
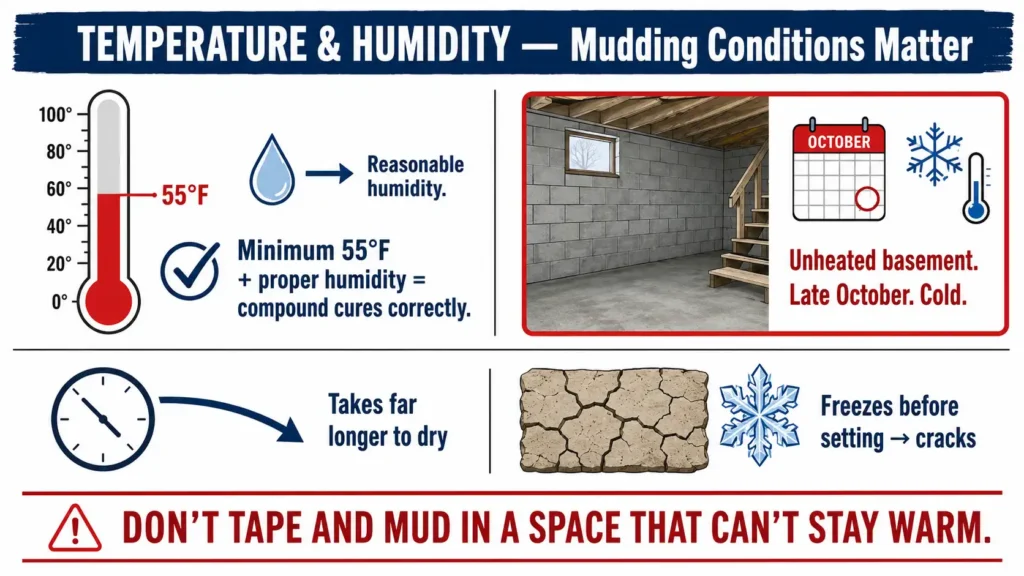
Temperature and humidity matter for mudding. Joint compound needs a minimum of about 55 degrees Fahrenheit and reasonable humidity to cure properly. Don’t tape and mud an unheated basement in late October and expect the mud to set up correctly. The compound will take far longer to dry and is prone to cracking if it freezes before it sets.
Hanging Drywall: Sequence, Technique, and the Details That Matter
Start with the Ceiling
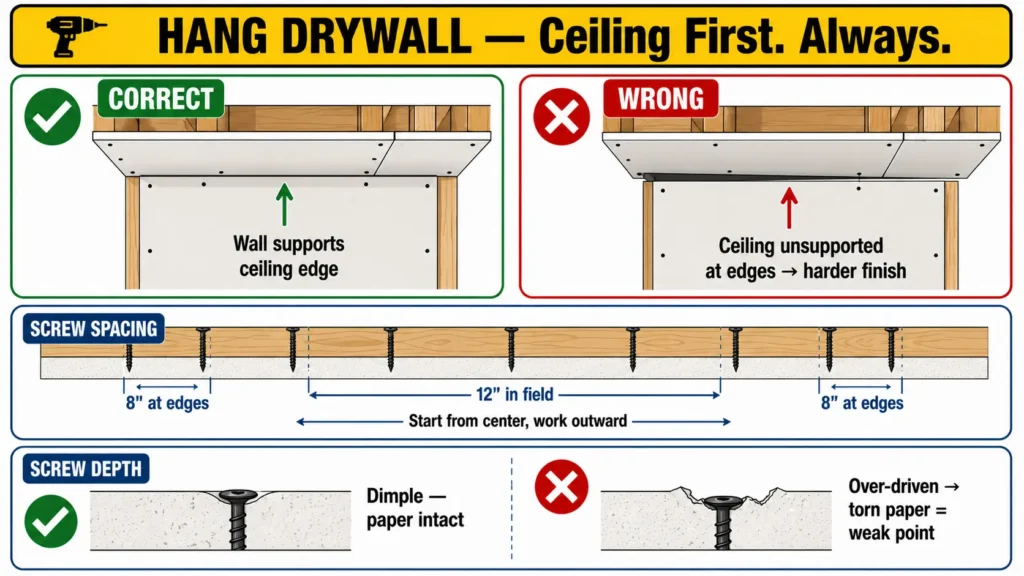
Hang the ceiling before the walls, always. The logic is simple: wall panels butt up against the ceiling panels at the top, which means the wall panels help support the ceiling panels at the perimeter. Hanging walls first leaves the ceiling unsupported at the edges and creates a harder finishing condition where the ceiling seam has no mechanical support from below.
On the ceiling, screw spacing is 12 inches in the field and 8 inches at the edges. Once spacing is set, you can estimate how many screws each drywall sheet usually needs. Mark your joist locations on the adjacent walls with a pencil before the panels go up so you’re not searching for them once you’re holding a sheet overhead.
Use the lift. Position the panel, raise it against the joists, confirm it’s tight to the framing, and drive screws starting from the center of the sheet and working outward. Starting from the edges can cause the center to bow away from the joist slightly.
Hanging Walls
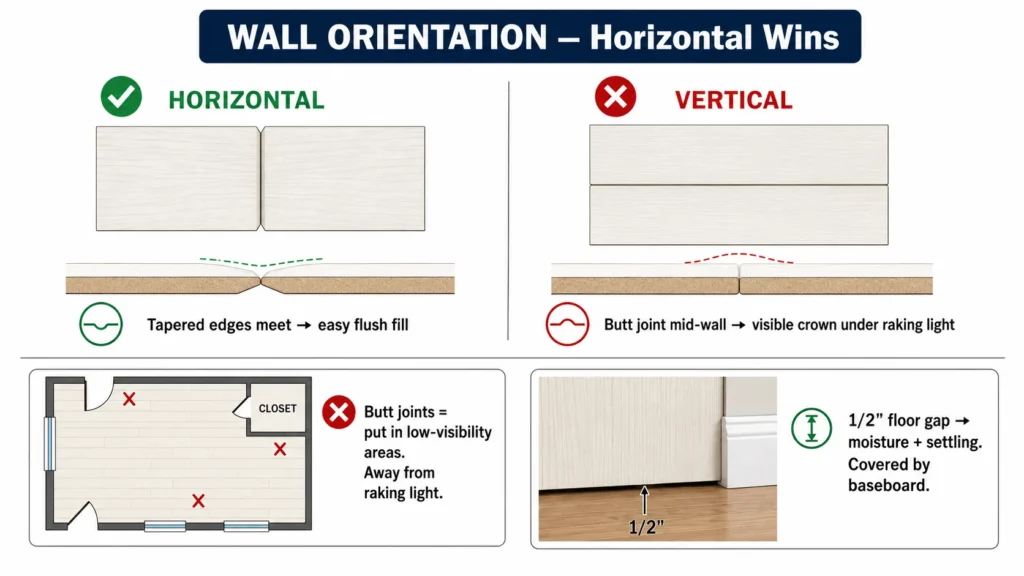
Horizontal panel orientation is generally preferred over vertical for walls under 9 feet. Here’s why it matters for your finishing work: when panels are hung horizontally, the tapered long edges of adjacent panels meet each other at the seam. Tapered edges are designed to receive joint compound and tape, and they create a gentle recess that’s easy to fill flush. When panels are hung vertically and you have a butt joint midspan, you’re trying to feather compound across two square, non-tapered edges, which creates a low crown on the wall that’s visible under any raking light.
Horizontal orientation also puts the seam at roughly 4 feet from the floor, which is a more comfortable height to work at during taping. The total linear footage of seams is also typically lower with horizontal hanging.
Start at the top and work down. The top course goes up first, tight to the ceiling panel. Leave a 1/2-inch gap at the floor. The floor gap is there to prevent moisture wicking from the subfloor over time and to accommodate minor settling movement. It gets covered by baseboard.
Cut panels by scoring the paper face with a utility knife along a straightedge, snapping the panel over the edge, and cutting the back paper. For curved or internal cuts, use the jab saw or rotary tool. For outlet boxes, the X-mark method works reliably: hold the panel in approximate position, tap it with your palm over the box location to transfer the box impression, then cut to the marks.
Fastening Correctly
The target screw depth is a dimple just below the paper face, deep enough that the screw head won’t interfere with the taping knife later, but not so deep that the paper tears or the gypsum crumbles around the head. A torn paper face is a weak point that shows through finish coats. Over-driven screws are common on first projects, and each one adds a small but real problem to the finishing stage.
In the field, screws go every 16 inches. At edges and butt joints, every 8 inches. At corners where panels overlap, make sure screws are landing in framing, not in the gap.
Construction adhesive on studs is sometimes used to reduce fastener count and add a small amount of sound damping. Some experienced hangers use it consistently; others skip it entirely. It’s not necessary for standard residential work, but it’s not wrong either if you want to go that direction.
Handling Difficult Areas
Butt joints (where the non-tapered short ends of two panels meet) are a fact of life on most projects. Plan them deliberately. Put butt joints in lower-visibility locations: closet walls, behind doors, areas that don’t get strong light from windows. In the main living areas where natural light hits the wall at a low angle, tapered-edge seams are far more forgiving.
Arched openings typically require a flexible strip of 1/4-inch drywall or a series of closely spaced score cuts to achieve the curve. For stairwells with vaulted ceilings, plan sheet placement carefully before you start so you’re not trying to fit odd-shaped cuts into hard-to-reach areas with a single person.
Taping and Finishing: Where the Real Skill Lives
This is the part most DIY articles gloss over, and it’s where the job is actually won or lost. A moderately careful hanger can hang a room. Getting it to paint-ready is a separate skill set that takes time, patience, and multiple coats done correctly.
The Tape Coat
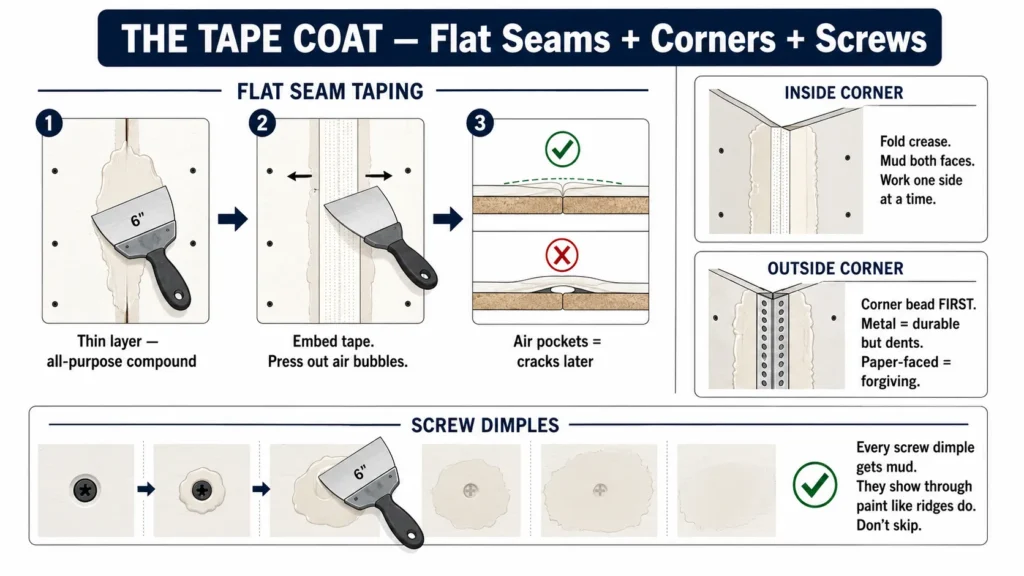
Start with a thin layer of all-purpose compound spread over the seam with your 6-inch knife. Don’t work dry; the mud needs to be thin enough to bed the tape but not so thin it squeezes out completely. Embed the paper tape into the wet compound by pressing it in with the knife, smoothing out air bubbles as you go. Air pockets under tape crack later, so take the time to press them out.
Corners are easier when you use the right drywall corner tools for inside corners, outside corners, and bead work.
Inside corners use the pre-creased center of paper tape. Fold the tape along the crease, spread mud on both faces of the corner, and embed the tape while the mud is wet, working one side at a time to avoid disturbing the other. Outside corners get corner bead installed before any mud goes on. If you are not sure which bead to use, compare metal, vinyl, paper-faced, and flexible drywall corner bead.
Metal corner bead is durable and holds a clean line, but it’s prone to small dents from impact. Paper-faced metal bead is slightly more forgiving in high-traffic corners.
Every screw dimple gets a coat of mud with the 6-inch knife. Don’t skip these; they show through paint just as clearly as seam ridges do.
Second and Third Coats
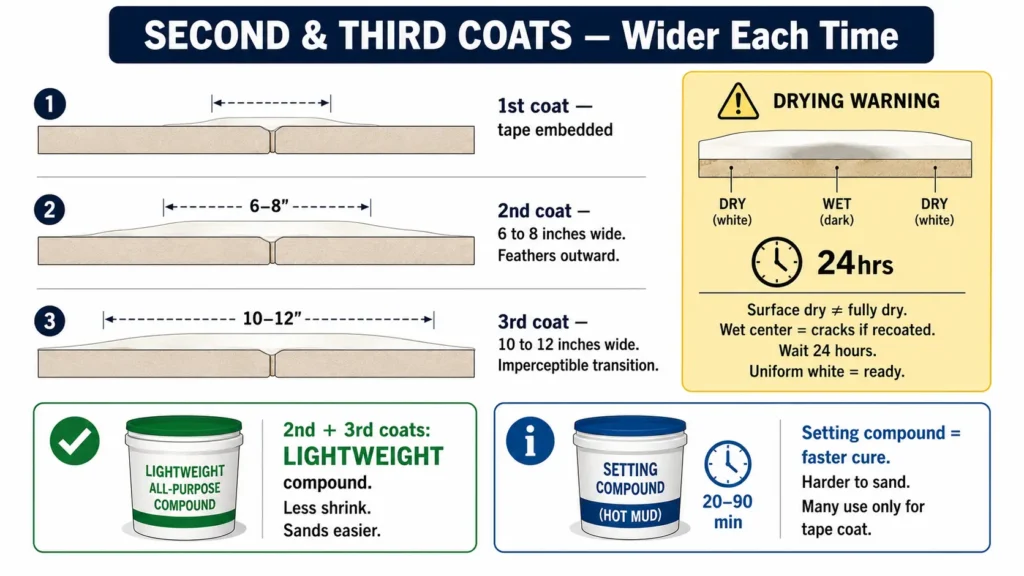
Each subsequent coat gets wider than the last. The second coat feathers out 6 to 8 inches from the seam center. The third coat feathers to 10 to 12 inches. This gradual widening creates the nearly imperceptible transition from the built-up area of the seam to the flat face of the panel.
Allow full drying between coats. Surface drying isn’t the same as full drying. Joint compound that looks white and dry on the surface can still be wet in the center, especially in thicker coats or humid conditions. Applying a new coat over compound that isn’t fully cured traps moisture, causes cracking, and often means redoing the work. Wait until the compound is uniformly white with no dark spots, which typically means at least 24 hours in normal conditions.
Switch to lightweight compound for the second and third coats. It shrinks less than all-purpose, sands more easily, and generally produces a smoother result on the final coat.
Setting compound is useful when you need to work faster or in marginal conditions. It reaches working hardness in 20 to 90 minutes depending on the formula (the number in the name indicates rough working time), and it doesn’t rely on evaporation to cure. The trade-off is that it’s harder to sand than lightweight compound. Many finishers use setting compound only for the tape coat and switch to lightweight for everything after.
Sanding
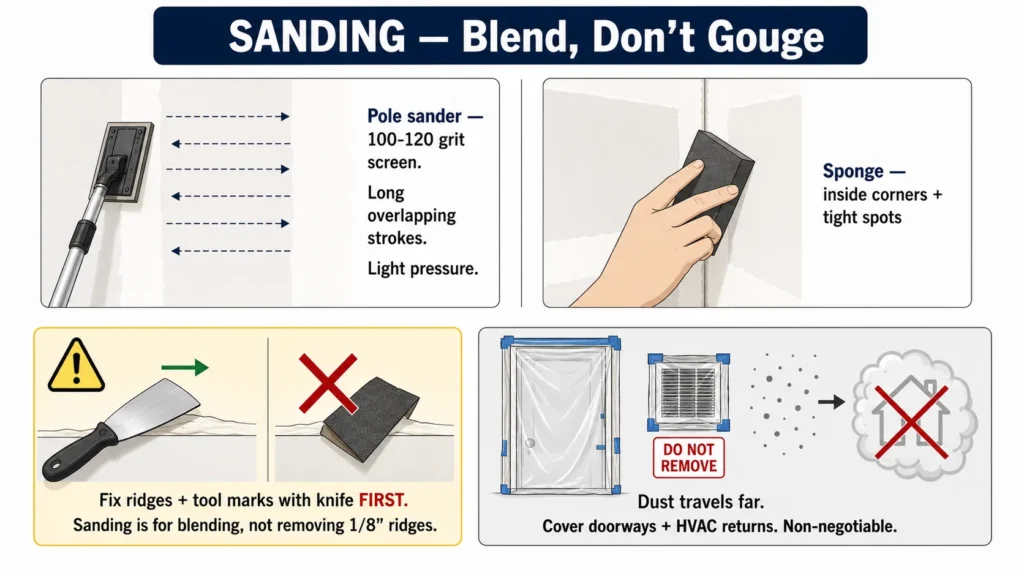
A pole sander with 100- to 120-grit screens handles most of the flat wall and ceiling area efficiently. Work in long, overlapping strokes. Don’t press hard enough to cut through the paper face of the tape.
Use a sanding sponge for inside corners and tight areas where the pole sander won’t reach.
Before sanding, it’s worth taking a minute to fix any obvious ridges or tool marks with a flexible knife rather than trying to sand them out. Sanding is for blending, not for removing a 1/8-inch ridge from a poorly feathered coat.
Plan for the dust. It is remarkable how far drywall dust travels. Plastic sheeting over doorways and covering HVAC returns is not overcaution; it’s necessary if you don’t want a coating of white powder on everything in the house.
The raking light test: When you think you’re done sanding, hold a work light parallel to the wall at a low angle (simulating window light) and look across the surface. Every tool mark, seam ridge, unfilled dimple, and sanding hollow will be visible. This is the test that tells you whether the wall is actually ready. Check it before paint goes on, not after. Paint under strong natural light from a window is a harsh judge of drywall work, and primer reveals imperfections that direct overhead light completely hides.
Finish Levels 0 Through 5: What They Mean in Practice
Finish levels are a standardized system that defines how much finishing work has been applied to a drywall surface. Knowing them matters if you’re specifying work to a contractor or trying to understand what you’re bidding on.
| Level | What It Is | Where It’s Used |
| 0 | Panels hung, no finishing | Active construction, temporary |
| 1 | Tape embedded, tool marks acceptable | Hidden plenum areas, above finished ceilings |
| 2 | One coat over tape and fasteners | Tile substrate, utility spaces |
| 3 | Two coats, light texture acceptable | Walls receiving heavy spray texture |
| 4 | Three coats, lightly sanded | Standard residential painted walls |
| 5 | Skim coat over Level 4 | High-gloss paint, strong natural light, premium finish |
Level 4 is the default for residential construction. When a contractor quotes “finish drywall” without further specification, Level 4 is typically what’s included.
Level 5 is not a luxury upgrade, it’s the only appropriate finish for walls that will receive semi-gloss or gloss paint, or rooms with strong raking natural light from large windows. The skim coat fills micro-imperfections and texture differences between the paper face and the compound that become visible under those conditions. Satin finish is more forgiving than gloss, and flat paint the most forgiving of all. If you’re finishing a room with a lot of natural light and you want to use anything shinier than flat paint, plan for Level 5 from the start. Trying to fix it after painting is far more expensive than doing it right before.
If you are deciding whether that upgrade is worth it, compare Level 5 drywall finish cost and when it actually makes sense.
Priming Drywall: Don’t Skip This Step
New drywall has two surfaces that absorb paint at different rates: the paper face of the gypsum panel, and the dried joint compound over the seams and screw heads. If you apply finish paint directly to unprimed drywall, the compound areas will absorb the paint differently than the paper areas, creating a visible sheen difference called flashing. This can show through two coats of finish paint and is frustrating to fix after the fact.
The correct primer for new drywall is a PVA (polyvinyl acetate) primer, sometimes called drywall primer or first coat. It seals the paper face and the compound uniformly so the finish paint behaves consistently across the entire surface. Regular wall primer or paint-and-primer products don’t seal the same way on raw gypsum.
Apply primer before any texture work if you’re planning to texture. If you’re going for a flat finish and skip texture, prime and then do the raking light inspection one more time before paint goes on. Primer reveals surface irregularities that raw mud can partially hide, so this is your last practical checkpoint. Touch up any imperfections with a thin coat of lightweight compound, sand lightly after it dries, and wipe off the dust before painting.
Mistakes That Are Easy to Make and Hard to Fix Later
Not checking framing before hanging. A bowed or out-of-plumb stud hides behind the drywall but shows up clearly in the finished surface. It creates a wave that no amount of finishing corrects because the problem is behind the panel. The framing inspection takes twenty minutes and prevents hours of futile repair attempts later.
Over-driving screws. Driving screws too deep tears the paper face and collapses the gypsum around the head, creating a weak hollow spot that doesn’t hold finishing compound well. A dimpler bit is a minor investment, and it’s the right tool for the job.
Using mesh tape on flat seams. It’s easier to apply than paper tape, but it sits on top of the compound rather than embedding in it. On running wall and ceiling seams that experience minor movement and temperature cycling over time, mesh tape cracks at a significantly higher rate. It’s fine for small patches. It’s not the right choice for production taping.
Rushing coats. Applying the second coat before the first is fully dry doesn’t accelerate the schedule. It traps moisture, leads to cracking, and often means stripping the coat and starting over. Joint compound is inexpensive. Time is not. Let each coat dry completely.
Skipping the raking light inspection. This is the one test that actually tells you if the surface is ready for paint. Normal overhead lighting is forgiving in a way that natural window light is not. The light from a window hitting a wall at a low angle reveals everything. Check with a work light before you prime, and again after you prime, not after the finish coat is on.
Drywall in contact with concrete floors. Without the bottom gap, moisture from the slab wicks into the panel over months and years, softening the lower edge and eventually causing deterioration and mold. Leave the gap. Baseboard covers it.
Treating greenboard as waterproof. Moisture-resistant drywall resists humidity and incidental splashing. It is not rated for wet areas like shower walls, where water contacts the surface directly. Greenboard behind a tile shower fails over time, leading to mold behind the tile and structural damage to the framing. Cement board or a comparable tile backer is the correct product for that application.
Starting without a layout plan. Layout planning also includes knowing when control joints or expansion joints are needed to prevent cracks. Walking into a room and just hanging panels from one corner without thinking through seam placement leads to avoidable problems: short awkward cuts at doorways, unnecessary butt joints in high-visibility locations, and more taping work than a well-planned layout would require. Twenty minutes of planning before you pick up the first sheet saves hours of finishing work.
When to DIY and When to Hire It Out
The honest answer depends on the project and your expectations, not a general rule about whether DIY is worth it.
DIY makes practical sense when:
- The project is a single room or a basement with standard 8-foot ceilings
- You’re not on a tight timeline and can let mud coats dry fully between sessions
- You accept that your first project will likely have some visible imperfections, particularly in the finishing, and you’re okay with that outcome
- Labor cost is a significant factor and you can trade time for money
Hire it out when:
- Ceilings are vaulted, over 10 feet, or involve complex angles
- You want a Level 5 finish: skim coating is a real skill that takes practice to develop, and a bad skim coat is harder to fix than no skim coat
- Multiple rooms need to be completed on a contractor’s timeline
- You’re working in a high-visibility area where imperfections will matter and you won’t be satisfied with learning-curve results
What to ask a contractor before signing:
What finish level is included in the scope? Get the level number, not just “finish drywall.” Ask whether priming is included or whether that falls to the painter. Clarify who handles touch-ups after final penetrations from other trades (electricians, HVAC, plumbers all make cuts and holes after drywall goes up).
On cost: labor typically represents 50 to 70 percent of total drywall installation cost. That’s why DIY has real savings potential on straightforward projects, especially once you understand how much of the budget goes to hanging each sheet. The materials themselves are relatively inexpensive; it’s the time to hang, tape, sand, and prime that drives the number.
Frequently Asked Questions
Can I hang drywall alone?
For walls, yes, with care. For ceilings, you need either a second person or a rented drywall lift. Trying to hold a ceiling panel overhead while driving screws solo is unsafe and almost always results in damaged panels or injury.
How long does drywall mud take to dry between coats?
Under normal conditions (65 to 70 degrees, reasonable humidity), all-purpose compound typically needs 24 hours to dry fully. In cold or humid spaces, that extends significantly. Don’t go by surface color alone; the compound needs to be uniformly white with no darker areas remaining before you recoat.
How many coats of mud do I need?
For a standard Level 4 finish: a tape coat, a second coat, and a third finish coat. Some surfaces with minimal imperfections can be done in two coats after the tape coat, but plan for three. Trying to rush into two coats often means the third coat ends up being a fix coat.
What’s the difference between drywall and Sheetrock?
Sheetrock is a brand name owned by USG Corporation. Drywall is the generic term for gypsum board panels of any brand. They refer to the same product. The brand name became so common it’s used interchangeably in the trades.
How do I cut drywall without a saw?
Score the paper face with a utility knife along a straightedge, snap the panel away from the score, and cut the back paper. This works cleanly on straight cuts. For curves and internal cutouts, you need a jab saw or rotary tool.
Do I need to prime drywall before painting?
Yes, and specifically with a PVA drywall primer. Skipping primer causes flashing, where the paint sheen looks different over the compound areas than over the paper face. It can show through two finish coats and is significantly harder to fix after the fact than it is to prevent with the right primer.
Closing Thoughts
The thing that separates a drywall job that looks fine from one that looks genuinely good is almost entirely in the finishing, and the finishing is almost entirely about patience. The hanging goes faster than most people expect. The taping and mudding takes longer, and those who try to compress the timeline by applying coats too quickly usually end up redoing work.
Going in with a realistic picture of where the time actually goes changes how you plan the project. Budget time generously for the finishing phase. Do the raking light inspection before you prime. And don’t treat greenboard like waterproofing.
If you’re working through a basement finishing project or planning drywall repair work, see the related guides on drywall patching and texturing techniques for the next steps.

Elena Hart is the founder and lead writer of Better Home Pro. She writes about drywall, home repair, and practical DIY home improvement topics, focusing on clear, useful information that helps homeowners make better decisions. Her work combines firsthand experience, manufacturer documentation, industry resources, and careful research to create content that is accurate, practical, and easy to understand. Through Better Home Pro, Elena aims to simplify complex home improvement topics and provide guidance that is genuinely helpful to homeowners and DIYers.


No Comments