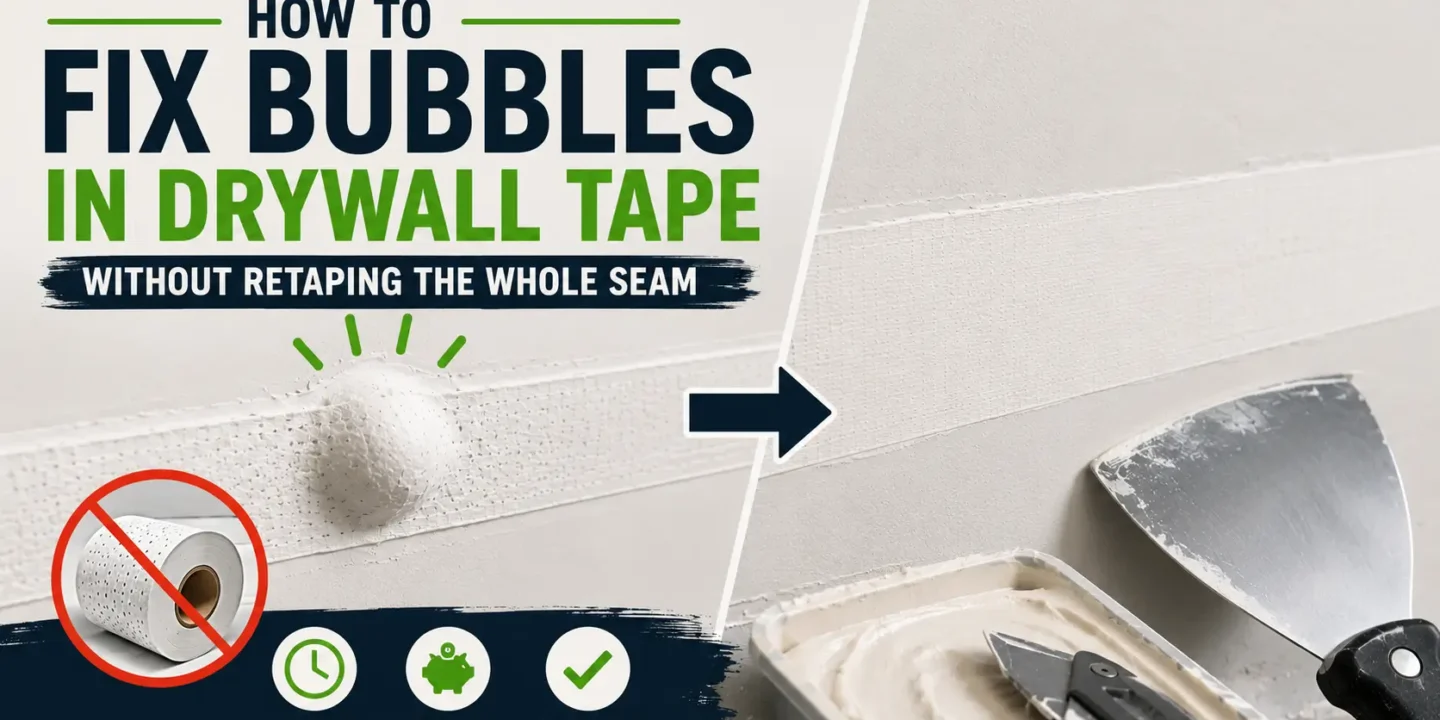

Bubbles in drywall tape usually mean air got trapped underneath, or the tape never fully bonded to the joint compound. The good news is that most bubbles can be fixed without tearing out the whole seam. Small bubbles where the surrounding tape is still tight can be sliced open, filled with fresh compound, and smoothed flat. Larger bubbles where the tape has lifted or gone hollow along a longer stretch usually need that section cut out and retaped. Before you grab a knife or mud, the first step is figuring out which situation you’re actually dealing with.
If you’re still working through the full process, our drywall installation guide explains how hanging, taping, and finishing all connect.
Key Takeaways:
- Trapped air or a dry spot under the paper tape causes bubbles; pressing too aggressively with a taping knife can force all the compound out.
- Small tape bubbles with a tight surrounding bond can be sliced open, filled with fresh joint compound, and pressed flat without re-bedding the seam.
- Large or elongated bubbles indicate a widespread failed bond, requiring you to cut out the loose section entirely and embed fresh paper tape.
- Mudding directly over an active bubble only hides the issue temporarily; the unbonded tape underneath will eventually crack or show through paint.
- Fix all raised or hollow spots before priming, as even an eggshell sheen will highlight minor surface flaws under normal room lighting.
Why Drywall Tape Bubbles Happen
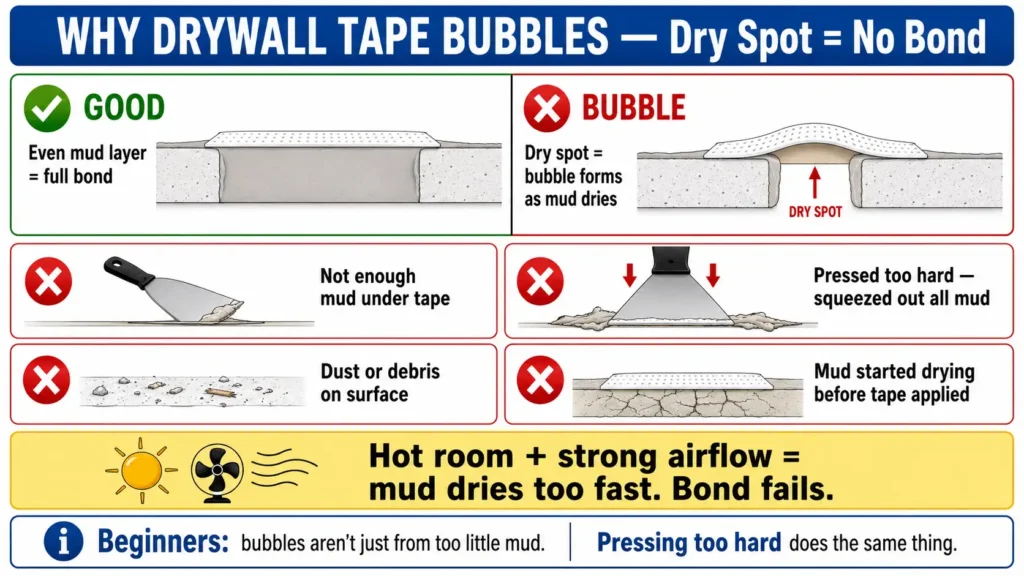
The short answer is that paper tape needs a thin, even layer of joint compound behind it to bond properly. If there’s a dry spot anywhere along the seam, the tape has nothing to grip, and a bubble forms as the compound dries.
A few things cause this:
- Not enough compound was applied under the tape before embedding
- Too much compound was squeezed out by pressing too hard with the taping knife, which leaves a dry spot just as surely as applying too little
- The drywall surface had dust or debris on it
- The tape was applied over compound that had already started to dry
- The room was hot or had strong airflow, causing the mud to dry faster than the tape could bond
That last point about pressing too hard is something a lot of beginner guides skip over. Most people assume bubbles only come from not using enough mud, but if you press aggressively during embedding, you can force all the compound out from behind the tape and end up with the same dry bond problem.
First, Check Whether the Bubble Is Small or the Tape Is Loose
Before doing anything, press gently on the bubble and feel what’s happening.
- Is the bubble smaller than a coin?
- Does the tape around it feel tight against the wall?
- Does the bubble move or flex when you press it?
- Is the tape starting to lift at the edges near the bubble?
- Is this along a flat seam or inside a corner?
The answers tell you which repair to make.
| What You See | Best Fix |
| Small bubble, tape still tight around it | Slice open, fill with compound, smooth flat |
| Bubble feels hollow but tape is mostly bonded | Cut open and re-bed that spot |
| Long bubble running along the seam | Cut out the loose tape section and retape |
| Tape peeling or lifting at the edges | Remove the loose section and retape |
| Bubble in an inside corner | Cut carefully and re-bed, or replace that corner tape section |
The bubble itself is not really the problem. The failed bond underneath is. That’s why the repair approach has to match what’s actually going on with the tape, not just what you can see on the surface.
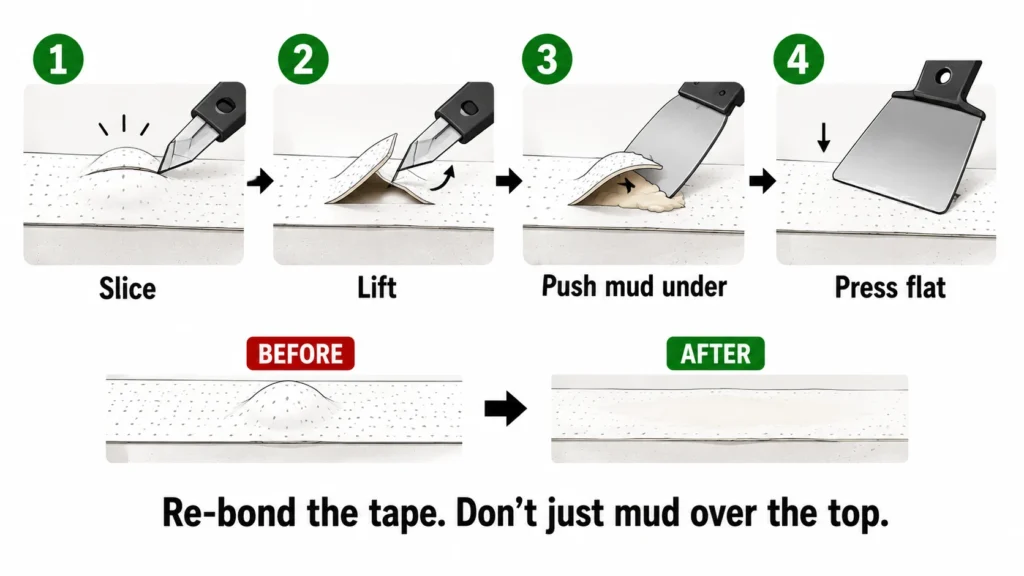
How to Fix a Small Bubble in Drywall Tape
If the tape around the bubble is still firmly bonded and the bubble is small, this repair is straightforward. Let the existing compound dry completely before starting. Trying to work on wet mud makes the repair messier and less reliable.
Steps:
- Use a sharp utility knife to slice through the center of the bubble. A clean cut works better than a ragged one.
- Lift the flap slightly. Be careful not to tear the tape beyond the bubble area.
- Push a small amount of all-purpose joint compound underneath the tape with the tip of your knife or a narrow putty knife.
- Press the tape flat against the wall using a taping knife.
- Wipe away any compound that squeezes out from the edges.
- Let it dry fully. Do not rush this.
- Apply a thin skim coat over the repaired area.
- Sand lightly after the skim coat dries, then prime and inspect.
The goal here is to re-bond the tape to the wall, not to build up mud over the top of the bubble. Piling compound on the surface without addressing the bond underneath is how you end up with a ridge that shows through paint.
These repairs go a lot smoother with the right tools on hand. A sharp utility knife, a 6-inch taping knife, and a small mud pan are the basics. These repairs go smoother when you already have basic tools worth having before a drywall repair, especially a sharp utility knife, a 6-inch taping knife, and a small mud pan.
When You Need to Cut Out and Replace the Tape
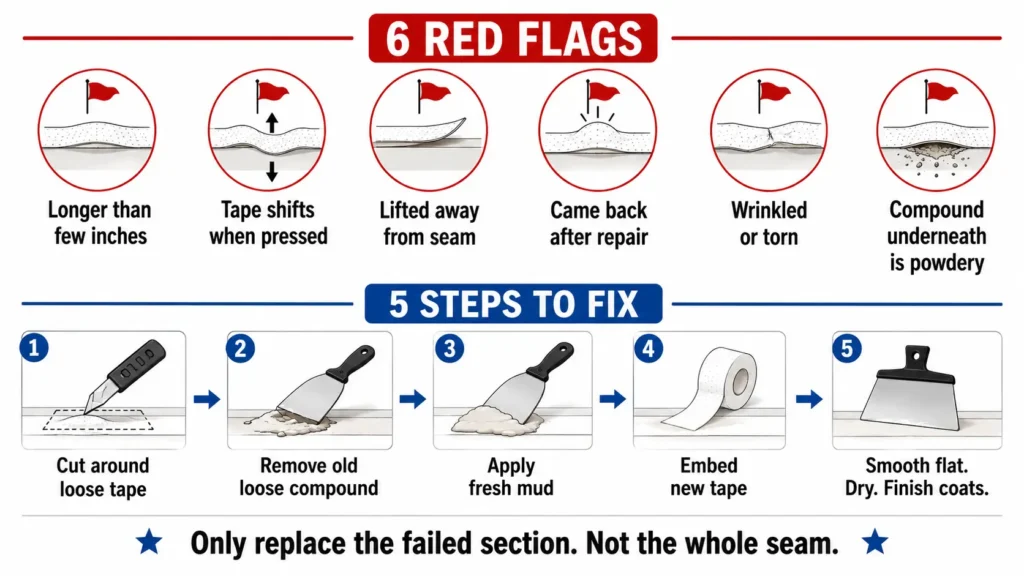
Some bubbles cannot be patch-repaired. If any of the following apply, cutting out the failed section and retaping is the better call:
- The bubble is longer than a few inches
- The tape shifts or moves when you press on it
- The tape has lifted away from the seam
- You repaired the bubble before and it came back
- The paper tape is wrinkled, torn, or deformed
- The compound underneath crumbles or feels powdery when you cut in
What to do:
- Score around the loose tape with your utility knife and remove only the failed section.
- Scrape away any loose or powdery compound from the seam.
- Apply fresh joint compound to the area.
- Embed a new piece of paper tape, pressing it firmly without squeezing out all the mud.
- Smooth it flat with a taping knife.
- Let it dry, then apply your finish coats as normal.
Keep this focused on the problem area. You do not need to redo the entire seam if the rest of the tape is bonded solidly.
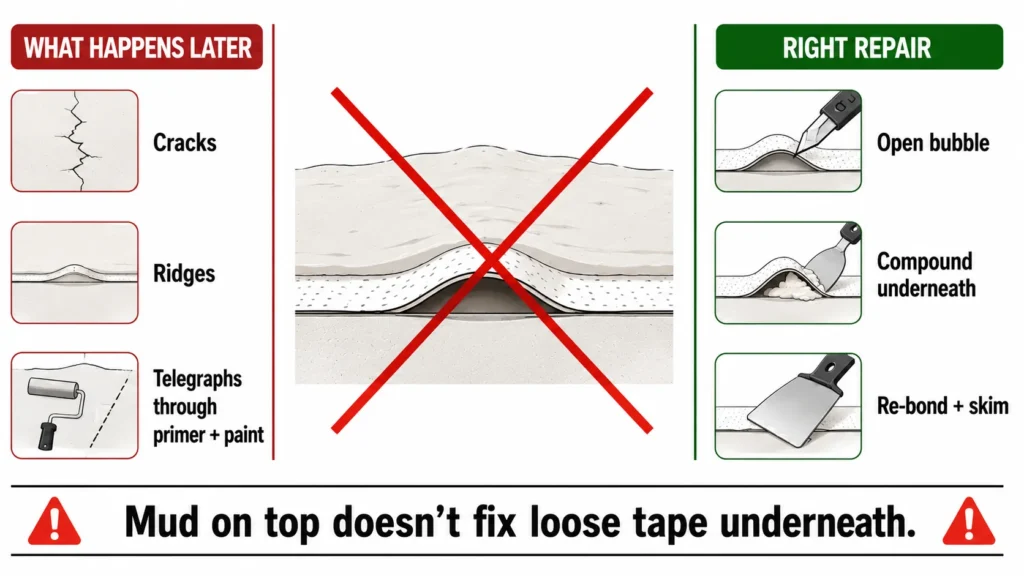
Can You Just Mud Over Drywall Tape Bubbles?
Usually, no. This is one of the more common mistakes people make when they’re trying to save time.
Applying compound over a bubble may hide the shape temporarily, but the tape underneath is still loose. That failed bond doesn’t go away because there’s mud on top of it. As the wall experiences normal movement, temperature changes, or paint and primer are applied, the loose tape can crack, ridge, or telegraph through the finished surface.
Primer is particularly unforgiving with this. Bare compound can hide minor flaws, but once primer goes on and the light hits the wall at an angle, raised or hollow spots become obvious. Fixing a bubble before you paint is significantly easier than cutting through a painted wall to repair it afterward.
The right repair is to open the bubble, get fresh compound under the tape, re-bond it, and then skim over the top.
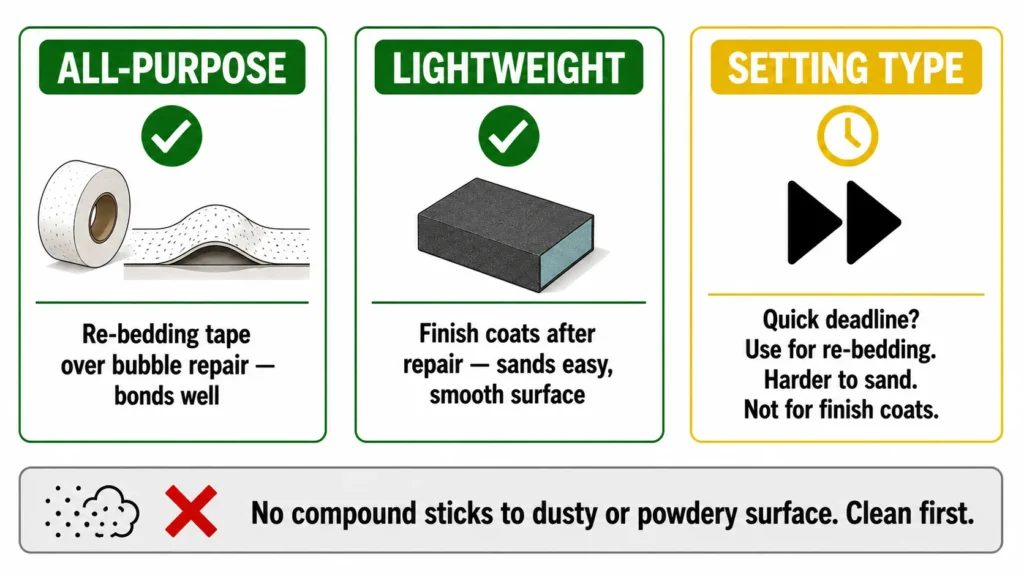
What Type of Joint Compound Should You Use?
For re-bedding paper tape over a bubble repair, all-purpose joint compound is a solid choice. It bonds well and is easy to work with.
For the finish coats after the repair, lightweight compound is easier to sand and leaves a smoother surface.
If you need the repair to set quickly because you’re on a deadline, setting-type compound (the kind that chemically hardens rather than air-dries) gives you more strength and a faster working time. Just know that it’s harder to sand, so use it for re-bedding, not finish work.
Avoid applying any compound over a dusty or powdery surface. If the area around the bubble is chalky or loose, clean it off before applying fresh mud or nothing will bond properly. Before buying mud, compare all-purpose, lightweight, and setting-type compound differences so you use a bonding compound for re-bedding and an easier-sanding compound for finish coats.
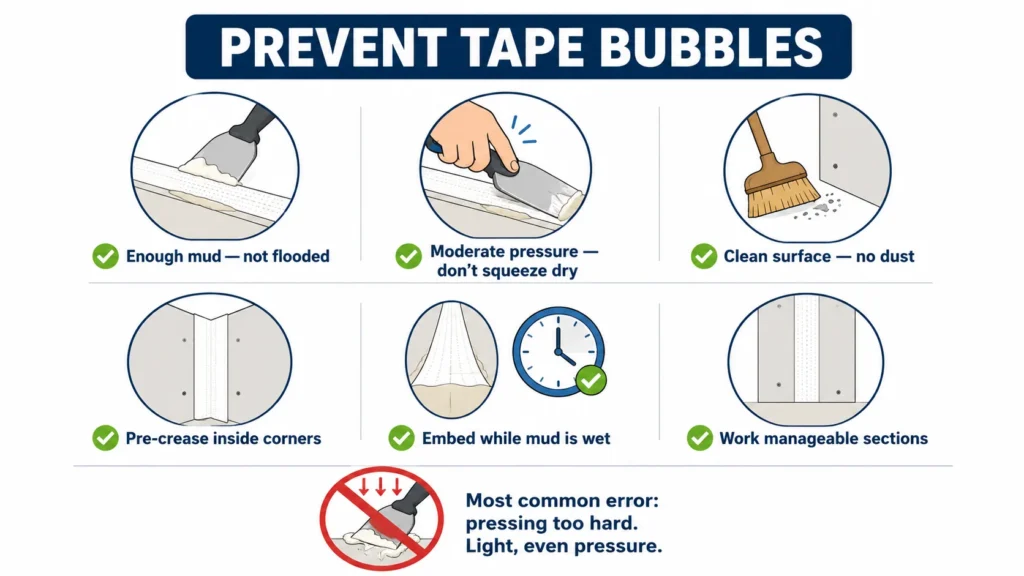
How to Prevent Drywall Tape Bubbles Next Time
A few habits during taping make a real difference:
- Apply enough compound under the tape so there’s something to bond to, but don’t flood the seam
- Use a consistent, moderate amount of pressure when embedding. Pressing too hard squeezes out the mud and creates dry spots
- Make sure the drywall surface is clean and dust-free before applying compound
- Pre-crease paper tape before using it in inside corners
- Always embed tape while the compound is still wet
- Work in manageable sections so the mud doesn’t start drying before you finish embedding
The most common beginner error is going too heavy-handed with the taping knife during embedding. Light, even pressure is enough to smooth the tape flat without stripping the mud from behind it.
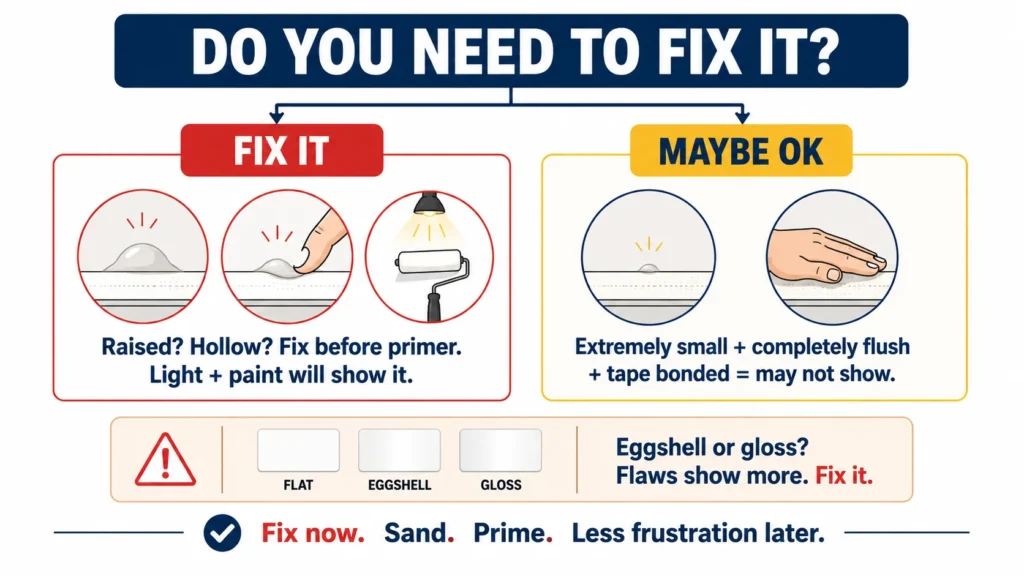
Do Bubbles in Drywall Tape Always Need to Be Fixed?
If the bubble is raised or hollow, fix it before priming. Once primer goes on, bubbles that weren’t visible in bare compound can become obvious, especially under raking light or in rooms with windows.
If the bubble is extremely small and completely flush with the wall surface, it may not show. But it’s still worth pressing on it to confirm the tape is bonded. A bubble that feels solid and flat is a different situation than one that flexes.
If the wall will be painted with any kind of sheen, even eggshell, surface flaws show more than they would under flat paint. Fix now, sand lightly, and prime correctly. It saves a lot of frustration later. Before priming, use the right drywall sanding grit before primer so the repaired spot blends instead of flashing through paint.
Quick Repair Checklist
- Let the mud dry completely before starting
- Press the bubble to check whether the tape is still bonded
- Slice small bubbles open cleanly
- Work fresh compound underneath rather than piling it on top
- Press the tape flat with a taping knife
- Let the repair dry fully before skimming
- Apply a thin finish coat
- Sand lightly after it dries
- Prime and inspect under good light before painting
Frequently Asked Questions
Why did my drywall tape bubble after drying?
The tape did not bond fully to the joint compound. This usually means there wasn’t enough mud behind the tape, the surface was dusty, or too much compound was pressed out during embedding.
Can I fix drywall tape bubbles after painting?
Yes, but the repair is more involved. You’ll need to cut or sand through the painted surface, repair the tape, apply a skim coat, sand, prime, and repaint the area.
Should I pop drywall tape bubbles?
Don’t just pop them and leave them open. Slice the bubble carefully with a utility knife, add fresh compound underneath, press the tape flat, let it dry, and skim over it before painting.
Will drywall tape bubbles crack later?
They can. A bubble means the tape is not fully bonded, so normal wall movement, drying, or paint application can make the flaw more visible over time or cause cracking along the seam.
Is mesh tape less likely to bubble than paper tape?
Mesh tape doesn’t bubble the same way paper tape does, but it carries its own risks. Mesh tape is more prone to cracking if paired with the wrong compound or used in structural seams. It’s not automatically the better option.

Elena Hart is the founder and lead writer of Better Home Pro. She writes about drywall, home repair, and practical DIY home improvement topics, focusing on clear, useful information that helps homeowners make better decisions. Her work combines firsthand experience, manufacturer documentation, industry resources, and careful research to create content that is accurate, practical, and easy to understand. Through Better Home Pro, Elena aims to simplify complex home improvement topics and provide guidance that is genuinely helpful to homeowners and DIYers.


No Comments