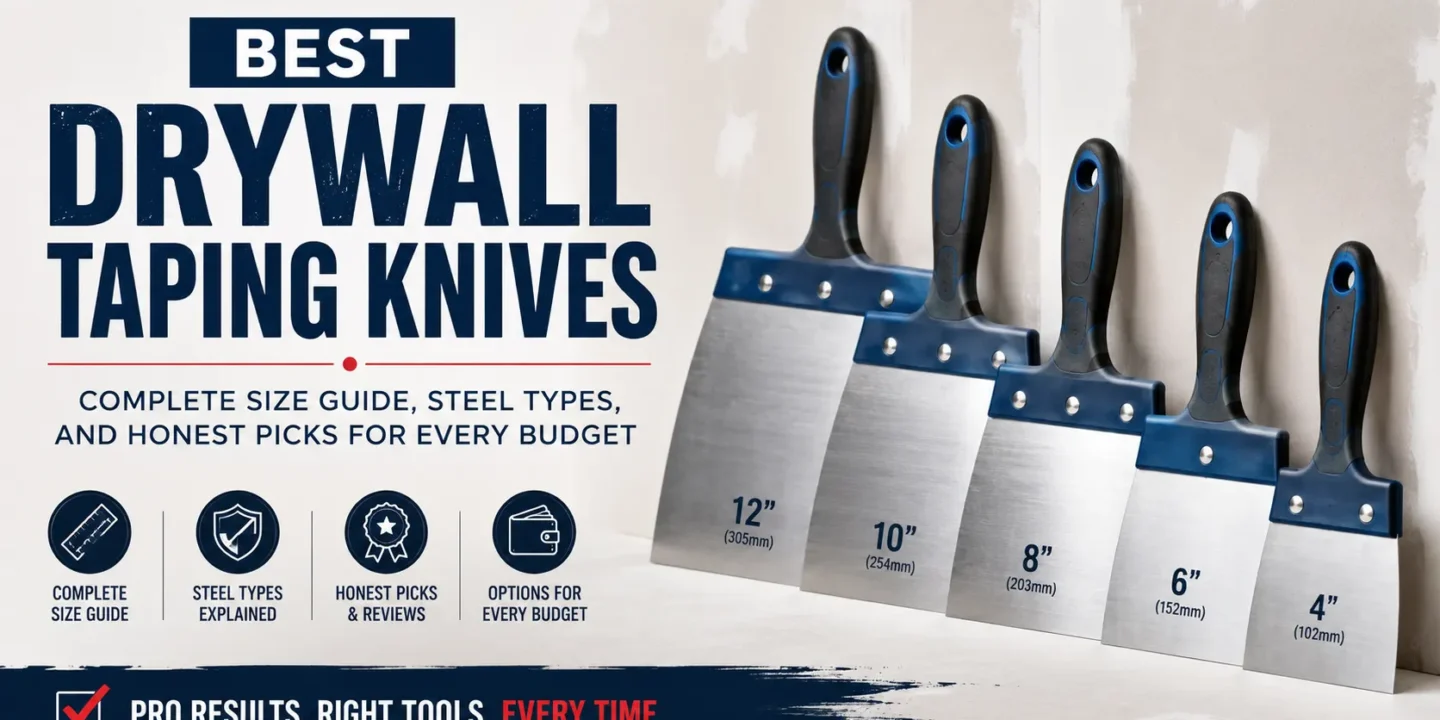

Most DIYers buy one taping knife. Most experienced finishers own at least three — a 6″, a 10″, and a 12″. That’s not brand loyalty. Each size has a specific job in the three-coat finishing process, and using the wrong size for the wrong coat is the most common reason DIY drywall finishes look amateur.
The 6″ handles bedding tape and covering screws on the first coat. The 10″ feathers the second coat wider. The 12″ is your finish coat knife, spreading compound across the widest zone to create the flattest possible transition. If you skip any of these steps or try to use a single knife throughout, you will end up fighting the process instead of working with it.
This guide explains the coat-by-coat size progression, covers the stainless vs blue steel debate honestly (including what professional finishers on trade forums actually say), and gives specific picks for three different use cases and budgets. No filler, no vague roundup copy.
Want to see how these knives fit into a full tool kit? Check out our essential drywall tools list for everything else you’ll need on the job.
Key Takeaways:
- A professional finish requires a three-knife set of 6, 10, and 12 inch blades to properly feather each successive coat of compound.
- Stainless steel is the best choice for DIYers because it resists rust, while pros often prefer blue steel for its superior flex and tactile feedback.
- Avoid using small putty knives for seams as their rigid, narrow blades cannot create the smooth, wide transitions needed to hide drywall joints.
- Clean knives immediately after every use because hardened compound can ruin blade edges and cause blue steel tools to rust within hours.
- Pros often slightly bend their blades to create a subtle crown, which naturally lifts the edges and reduces visible tracks during the feathering process.
Taping Knife vs Joint Knife vs Putty Knife: What’s Actually Different
The naming around drywall finishing tools is genuinely confusing because manufacturers don’t agree on terminology. Here’s how to cut through it.
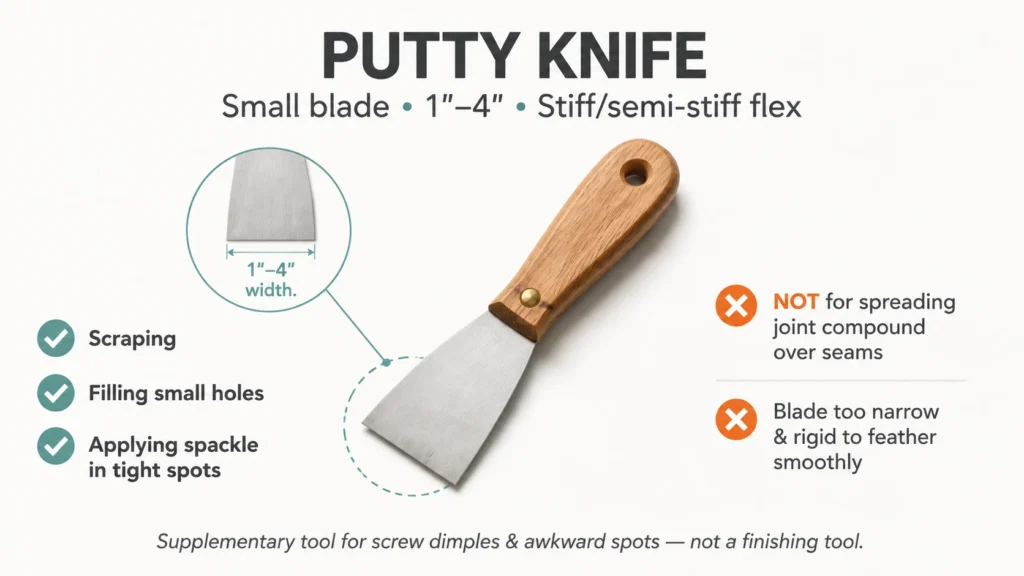
Putty Knife
Small blade, typically 1″ to 4″, with a stiff or semi-stiff flex. Designed for scraping, filling small holes, and applying spackle in tight spots. Not built for spreading joint compound over seams — the blade is too narrow and too rigid to feather compound smoothly. You’ll use one as a supplementary tool for individual screw dimples in awkward spots, but it’s not a finishing tool.
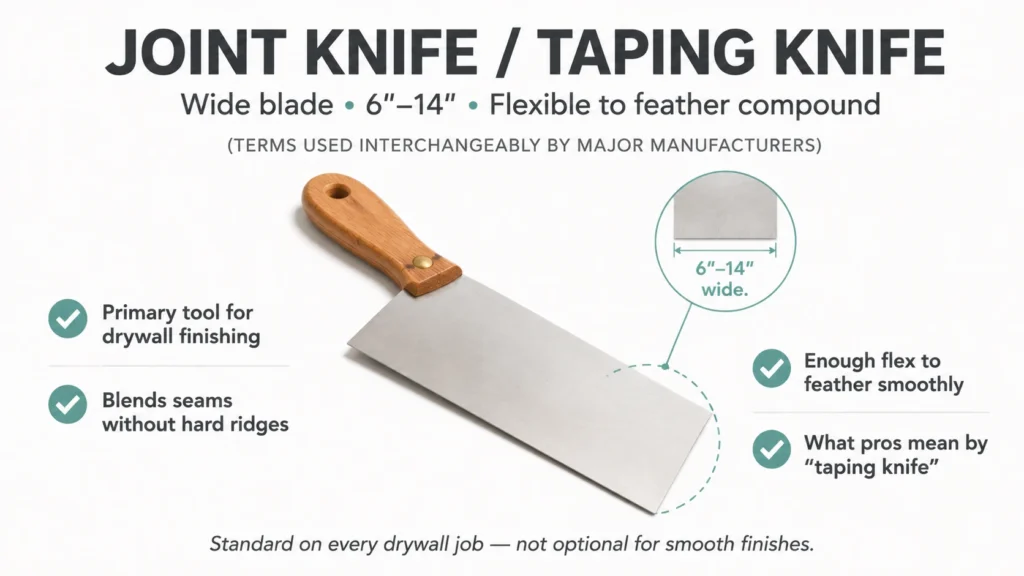
Joint Knife / Taping Knife
These two terms are used interchangeably by virtually every major manufacturer. Wide blade, 6″ to 14″, with enough flex to feather compound without leaving hard ridges. This is the primary tool for drywall finishing. When someone in a forum or on a job site says “taping knife,” this is what they mean.
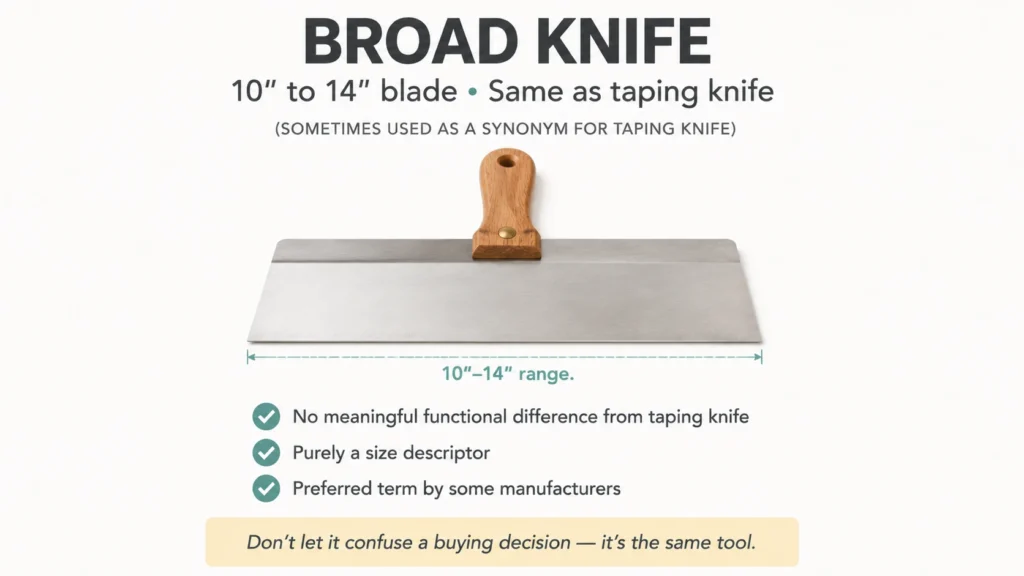
Broad Knife
Sometimes used as a synonym for taping knife in the 10″ to 14″ range. No meaningful functional difference — it’s a size descriptor that some manufacturers prefer. Don’t let it confuse a buying decision.
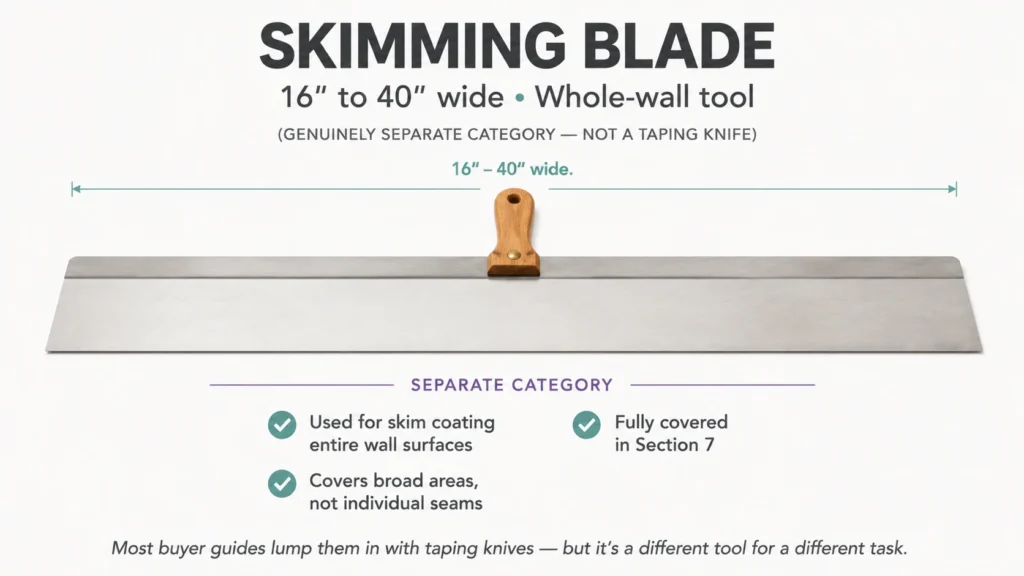
Skimming Blade
A genuinely separate category. Blades from 16″ to 40″ wide, used for skim coating entire wall surfaces rather than individual seams. This is covered fully in Section 7. Most buyer guides lump skimming blades in with taping knives — they’re a different tool for a different task.
What You Actually Need
For a complete drywall finishing kit, you need a set of taping/joint knives in at least three sizes. Putty knives are supplementary. Skimming blades are an optional upgrade for advanced work. The rest of this guide focuses on taping knives — the core tool.
The Coat-by-Coat Knife Size Guide
This is the most practically useful thing to understand before buying a single knife. The size you need changes with each coat — and this progression is rarely explained in buyer guides.
| Size | Use For | Why This Size |
| 3″–4″ | Covering individual screw dimples, very tight patches | Precision only — narrow enough to fill a dimple without spreading mud too wide |
| 6″ | Bedding tape, first coat over seams, inside corners | Wide enough to embed tape fully, narrow enough to control mud and prevent waste. The workhorse of the first coat. |
| 8″–10″ | Second coat feathering, wiping tape, patching tub surrounds | Wider feather means a less visible seam edge. The step up from 6″ that softens the transition from compound to drywall face. |
| 12″ | Final coat, wide feathering, finish skim | Maximum feather width for hand tools. Distributes compound across the widest zone, creating the flattest possible transition. |
| 14″ | Floating out humps, joining old and new drywall | Specialty use — when you need to float a compound bridge over a height difference between panels. Not needed on standard installations. |
The professional 3-knife minimum set is 6″ + 10″ + 12″. Each coat in the sequence corresponds directly to the finishing levels defined in GA-214, the Gypsum Association’s Levels of Finish standard, the industry document used by architects, specifiers, and contractors to define acceptable finish quality on every project from residential to commercial.
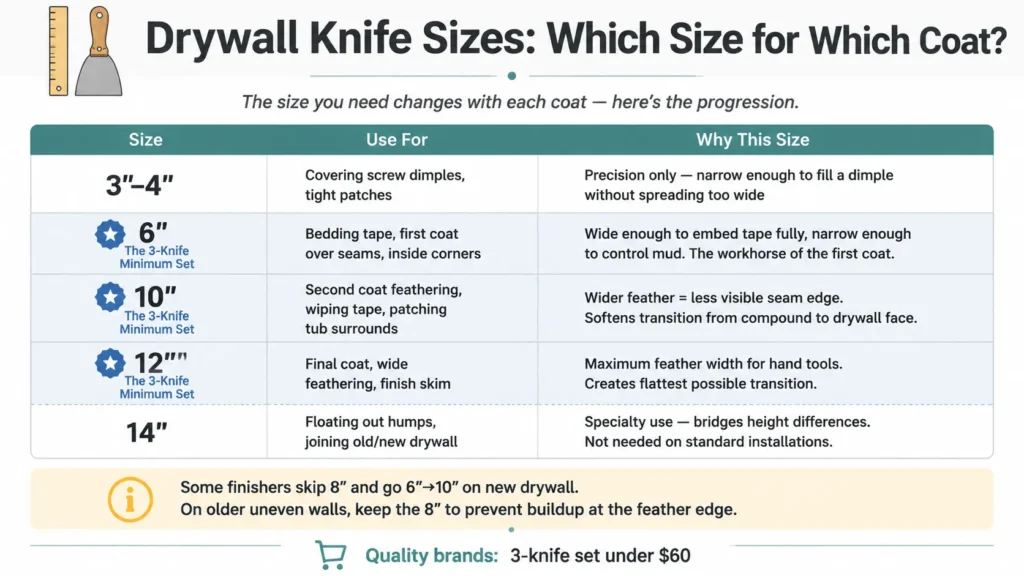
One practical note: some finishers skip the 8″ entirely and go straight from 6″ to 10″. That’s fine on newer drywall with tight seams. On older or uneven substrate, the 8″ transition step helps prevent compound buildup at the feather edge.
Stainless vs Blue Steel vs Carbon Steel: The Honest Debate
Blade material is where most buyer guides either give you a one-line answer or say nothing useful at all. Professional finishers on Drywall Talk forums debate this constantly — and both camps have real reasons for their preferences.
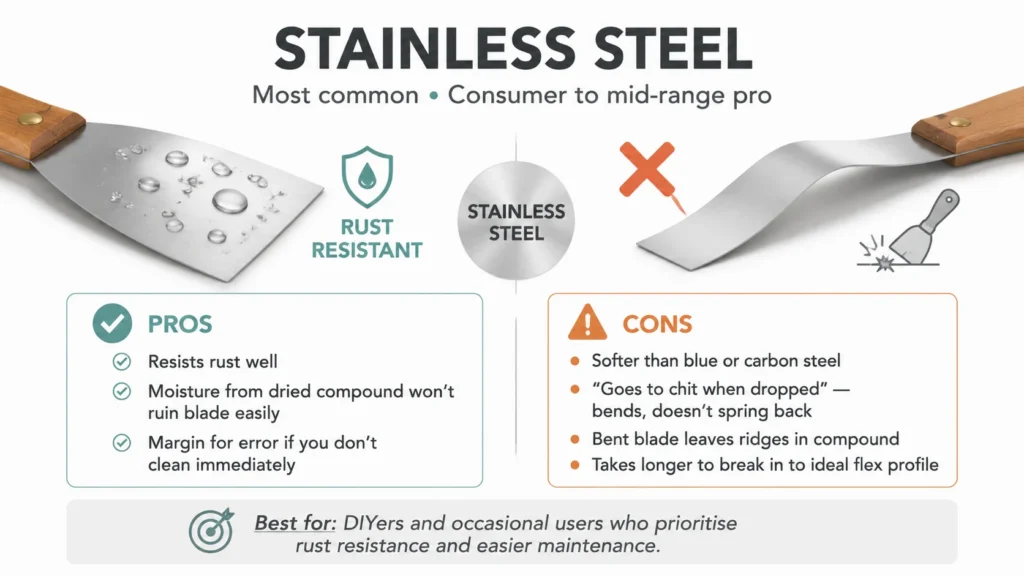
Stainless Steel
The most common material in consumer and mid-range professional knives. Stainless resists rust well, which matters practically: joint compound left to dry on a blade pulls moisture away and creates rust spots, especially with cheaper alloys. If you don’t clean your knives immediately after use, stainless gives you a margin for error.
The trade-off is that stainless is a softer metal than blue or carbon steel. Pros on trade forums note that stainless blades “go to chit when dropped” — the softer metal bends rather than springing back, and a bent blade leaves ridges in compound. Stainless also takes longer to break in to an ideal flex profile.
Best for: DIYers and occasional users who prioritise rust resistance and easier maintenance.
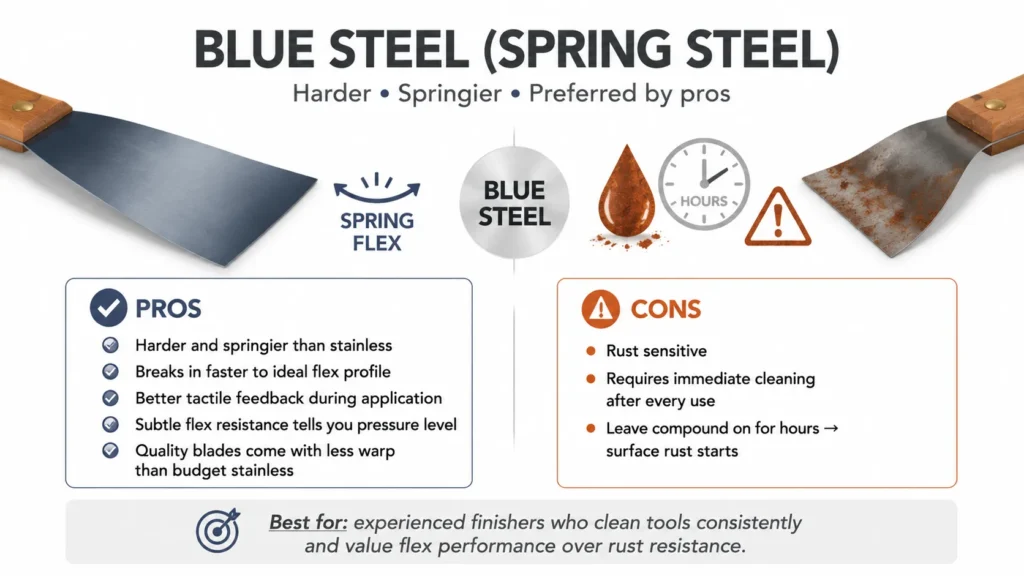
Blue Steel (Spring Steel)
Harder and springier than stainless. Blue steel breaks in faster to an ideal flex profile, and many experienced finishers describe better tactile feedback through the blade during application. That matters when you’re feathering compound across 50 seams in a day — subtle flex resistance tells you how much pressure you’re applying.
The downside is rust sensitivity. Blue steel requires immediate cleaning after every use. LEVEL5 Tools’ official blade care guidance confirms that carbon and blue steel blades must be cleaned, dried, and treated with a light lubricant after each use, and that even stainless blades can show surface oxidation within days if left with compound residue on them.
Best for: experienced finishers who clean tools consistently and value flex performance over rust resistance.
Carbon Steel
Similar hardness to blue steel but less common in modern knives. More rust-prone than both alternatives without a protective finish. Some budget knives use carbon steel — adequate for a one-time project but requires the most maintenance discipline to keep in good condition.
Best for: budget DIY use when a proper cleaning routine is in place.

The Practical Verdict
Both stainless and blue steel have genuine advocates among professional finishers, and neither side is wrong. For homeowners and DIYers: buy stainless. The rust resistance benefit significantly outweighs the flex performance difference for anyone who isn’t finishing drywall every day. Buy stainless, clean immediately after use, and you’ll never notice the flex difference on a weekend project.
If you’re finishing drywall professionally or planning to use your kit for years of regular work, the blue steel argument is worth taking seriously.
Best Taping Knives by Use Case
These picks are organized by use case rather than an arbitrary ranked list, because the right knife depends entirely on who you are and how you work. Each pick includes an honest limitation.
Best Overall Set: LEVEL5 Professional Matrix Taping Knife Set (6″–10″–12″)
The three-knife set covers every coat of a professional finish. Stainless blades with excellent weight balance, a metal hammer end for sinking nails without a separate tool, and a flex profile that the drywall finishing community consistently rates above DeWalt and Goldblatt at the same price point. LEVEL5 is a trade-focused brand — not a general tool company that happens to sell drywall knives. That specialization shows in the build quality.
Price: approximately $55–$75 for the 3-piece set.
Honest limitation: Slightly stiffer out of the box than blue steel alternatives. Takes a few uses to reach ideal flex — plan for a break-in session on scrap compound before using it on a finished surface.
- Stainless steel blades
- 6″ + 10″ + 12″ sizes
- Metal hammer end
- Best for: serious DIYers and working pros
Best Value Set: Goldblatt 5-Piece Stainless Steel Drywall Knife Set
Over 100 years of construction tool manufacturing behind this brand. The 5-piece set includes sizes from 6″ to 14″, corrosion-resistant stainless blades, and a lightweight design that reduces wrist fatigue on long finishing sessions. Consistently rated at the top of independently analyzed review aggregates with nearly 1,000 reviews evaluated.
Price: approximately $40–$55 for the 5-piece set.
Honest limitation: Handle quality is a step below LEVEL5. Comfortable for DIY use, but some pros find the grip less precise for fine finishing work. If you’re doing occasional work around the house, you won’t notice. If you’re finishing drywall daily, you probably will.
- Stainless steel
- 5-piece set covering 6″–14″
- Best for: homeowners and first-time buyers
Best for Pros: Ames Blue Steel Taping Knife Set (8″–10″–12″)
Spring steel blades with a patented handle design — the combination preferred by professional finishers who use knives all day. Tapered blade edges for corner access. Lighter than stainless equivalents at the same size. Widely used and respected in the finishing trade, not a crossover from general hardware.
Price: approximately $60–$90 for the 3-piece set.
Honest limitation: More rust-prone than stainless — requires cleaning immediately after each use without exception. Not the right choice for DIYers who may leave compound drying on the blade. If that describes you, go with LEVEL5 stainless instead.
- Blue spring steel
- 8″ + 10″ + 12″
- Best for: professional finishers who clean tools religiously
Best for DIYers: DeWalt Stainless Steel Taping Knife and Mud Pan Set
The DeWalt name carries genuine trust in the DIY market, and the quality holds up. Stainless blades, comfortable grip, and available as a set with a mud pan — ideal for someone putting together their first complete kit. The mud pan inclusion makes this a practical buy for anyone starting from scratch.
Price: approximately $25–$40 for the knife and pan set.
Honest limitation: The blade flex profile is adequate rather than exceptional. Fine for DIY finishing; not the first choice for pros feathering dozens of seams daily.
- Stainless steel
- Includes mud pan
- Best for: first project, occasional use
Best for Corners: LEVEL5 Inside Corner Knife (6.5″ x 11.5″)
Standard taping knives cannot fully reach into inside corners without the blade edge scratching the adjacent wall. The right-angle corner knife solves that — one tool for one specific problem. LEVEL5’s version has a metal hammer end and glass-reinforced nylon handle. Not essential for a first kit, but the quality-of-life improvement on corner work is real once you’ve struggled with a standard knife in tight corners.
Price: approximately $18–$25.
- Right-angle blade
- Inside corners only
- Best for: second purchase once the basics are covered
What to Look for When Buying
Beyond the steel type and size question, here are the buying criteria that actually affect how a knife performs over time.
Blade Material
Stainless for DIY. Blue or spring steel for pros who prioritise flex performance. Carbon steel is an acceptable budget choice, not a performance upgrade.
Flex Profile
Press the blade tip and it should bend noticeably under moderate pressure. A blade with too little flex leaves ridges in compound because you’re essentially dragging a rigid edge. Too much flex and you lose control of compound distribution. The sweet spot is medium flex that firms up under heavier pressure. If a knife feels like a spatula or a ruler, either extreme is a problem.
Handle Design
Look for rubber or textured grip — not smooth plastic. Joint compound makes hands slippery, and a smooth handle becomes a liability on long finishing sessions. Weight balance toward the handle reduces wrist fatigue. A metal hammer end means you can sink nails and screw heads without a separate tool, ensuring your drywall screw gun vs drill didn’t leave any fasteners sitting proud of the surface before you start your first coat of mud.
Blade Backing
Higher-end knives have an aluminum backing plate behind the blade, which adds rigidity and prevents warping under heavy use. Budget knives skip this, and the blade can develop a bow after repeated stress — especially with setting-type compounds that require more pressure. If you’re buying for a single project, this matters less. For a kit you’ll use regularly, the backing plate is worth paying for.
Full Tang vs Riveted Construction
Full tang means the blade steel runs through the handle — stronger and more durable. Riveted blades are adequate for light DIY but can loosen over time with regular use. Check the product specs if this matters to you; it’s not always listed prominently.
Price Reality
Under $15 per knife: adequate for a one-time project. $20–$35 per knife: quality that holds up to years of occasional use. $40 and up per knife: professional grade, designed for daily use. The sweet spot for most homeowners is the middle tier — enough quality to last, not overpaying for daily-use durability you don’t need.
When building your kit, remember that knives are just one part of an essential drywall tools list that every DIYer or pro should have on hand before the first bucket of mud is opened.
Skimming Blades: A Different Tool for a Different Job
Most buyer guides treat skimming blades as oversized taping knives. They’re not. They’re a distinct tool used for a distinct task, and conflating them creates confusion for people trying to buy the right thing.
What They Are
Wide, thin, flexible blades ranging from roughly 10″ to 40″ wide, typically mounted on a handle or extension pole. Used for skim coating — applying a thin, even layer of compound over an entire wall surface rather than over individual seams.
When You Need One
Skim coating a full wall before painting. Floating compound over textured walls you want to make smooth. Bridging the height difference between old and new drywall on a patch where the surfaces aren’t flush. If you’re only taping seams on a new installation, you probably don’t need one.
Key Difference From Taping Knives
A taping knife feathers compound at seams — its purpose is to create a smooth transition between the seam and the flat wall surface. A skimming blade spreads compound uniformly across a large flat area. Different motion, different pressure, different result. Attempting to skim coat a wall with a 12″ taping knife is possible but slow and prone to overlap marks.
Size Guide for Skimming Blades
- 10″–16″: Hand skim work on patches and smaller areas
- 24″–32″ on an extension handle: Wall and ceiling skim coating
- 40″: Large commercial skim work
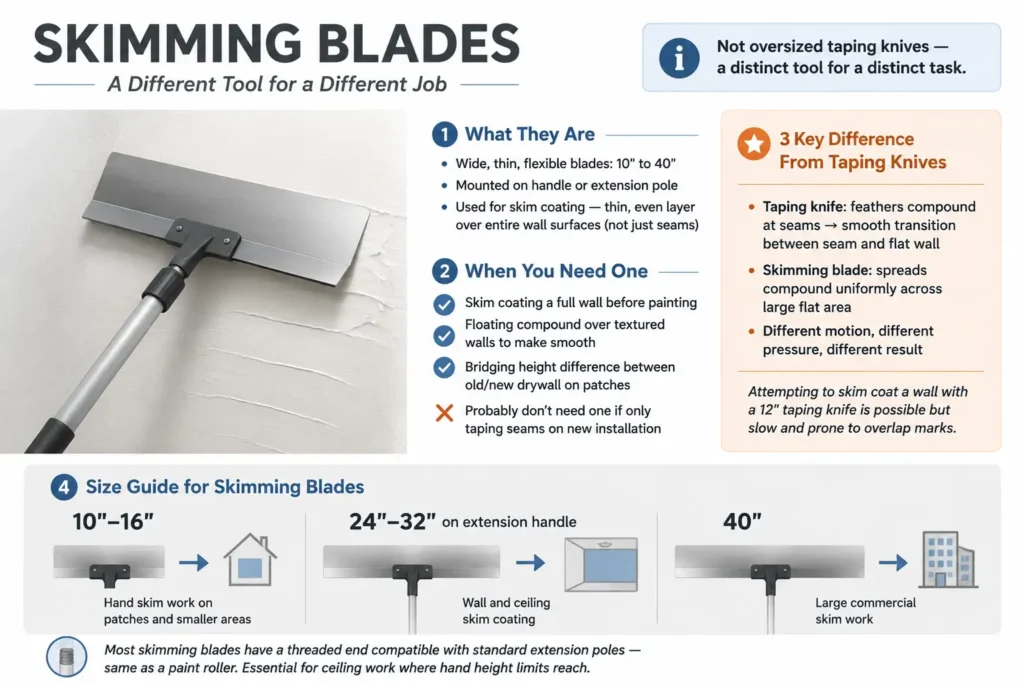
Most skimming blades have a threaded end compatible with standard extension poles — the same as a paint roller. That’s essential for ceiling work where hand height limits what a standard handle can reach.
Knife Care and the Blade-Bending Technique
The One Rule
Clean your knives immediately after every use. Joint compound hardens fast — setting-type compounds can cure in as little as 20 minutes. Once fully hardened, removing dried mud requires aggressive scraping that damages blade edges and accelerates blade flex degradation. This is especially important with blue and carbon steel blades, where dried compound accelerates rust formation.
Cleaning Technique
Wipe the blade on the mud pan rim to remove bulk compound. Rinse under running water, wiping with a damp cloth. For partially dried compound, soak the blade in water for 10 to 15 minutes before wiping — it softens enough to wipe clean without force. Dry completely before storage, particularly for blue and carbon steel blades where moisture sitting on the surface overnight will create rust.
Storage
Store knives flat or hanging — never blade-down in a bucket where the tip can make contact with a hard surface. A bent or chipped tip creates ridges in every compound application afterward. That’s a damage pattern that’s almost impossible to reverse without professional sharpening.
The Blade-Bending Technique (Pro Insight)
Here’s something that gets passed around in professional circles but rarely makes it into written guides: experienced finishers deliberately bend their taping knife blades slightly, creating a subtle crown — a gentle convex curve across the width of the blade.
Why? A crowned blade feathers compound with a natural lift at the edges during each pass. Instead of the blade edge sitting flat against the wall (which deposits compound evenly all the way to the edge), a slight crown creates a thinner application at the extreme edge of the pass — which is exactly what feathering requires. The result is fewer visible tracks and a smoother finish with less sanding.
To do it: hold the knife handle and blade tip, and apply gentle, controlled pressure across the center of the blade. The bend should be subtle — a millimeter or two of crown is enough. Do it gradually and test on scrap compound before using it on a real surface. Once you find the crown that matches your technique, the knife produces consistently better feathering than a flat blade.
This isn’t a shortcut — it’s a genuine craft technique developed by finishers who found that the off-the-shelf blade geometry isn’t optimized for hand application. Some pros do this to every new knife before using it. Others develop a preference for one broken-in knife that’s naturally acquired its ideal crown through use.
Frequently Asked Questions
What size taping knife do I need for drywall?
For a complete finish, you need at least three sizes: a 6″ for bedding tape and covering screws on the first coat, a 10″ for second coat feathering, and a 12″ for the final coat wide feathering pass. A single knife won’t produce a professional-quality finish because each coat requires a different feather width.
What is the difference between a joint knife and a taping knife?
In practice, nothing. Most manufacturers use these terms interchangeably. Both describe the same tool — a wide, flexible-bladed knife for spreading joint compound over drywall seams. If you see both terms, the distinction is usually just marketing language, not a functional difference.
Is stainless steel or blue steel better for taping knives?
It depends on how you work. Stainless resists rust and requires less immediate maintenance, making it the better choice for DIYers and occasional users. Blue (spring) steel is harder, springs back better when dropped, and develops a preferred flex faster — making it the choice of many professional finishers who clean their tools immediately after every job. Neither is objectively superior; the right choice depends on how often you use the knife and how disciplined your cleaning routine is.
What is the best brand of drywall taping knives?
For professional use, LEVEL5 and Ames are the most respected trade brands. For DIY and value, Goldblatt’s 5-piece set offers solid quality at a lower price point. DeWalt is a reliable choice for homeowners building their first kit. The best brand for you depends on use frequency and whether rust resistance or flex performance is the higher priority.
Do I need multiple sizes of taping knives?
Yes, if you want a professional result. The three-coat process requires progressively wider feathering — each coat needs to extend further from the seam than the one before it. A 6″ blade can’t feather compound wide enough for a second or finish coat without leaving a visible transition line. The 3-knife minimum (6″, 10″, 12″) is standard for a reason.
How do you clean a drywall taping knife?
Immediately after use, wipe excess compound off the blade using the edge of your mud pan. Rinse under running water while wiping with a damp cloth. For compound that’s started to set, soak the blade in water for 10 to 15 minutes before wiping — it softens enough to remove without scraping. Dry the blade completely before storage, especially for blue or carbon steel knives where residual moisture leads to rust.
Conclusion
The coat-by-coat size progression is the most important thing to take from this guide: 6″ to bed tape, 10″ for the second coat, 12″ to feather the finish. One knife is never enough for a clean result, and knowing why — rather than just which sizes to buy — means you’ll use each one correctly.
For steel type: stainless for DIYers, blue steel for pros who clean religiously. The flex performance difference is real but matters far less than rust resistance for anyone who isn’t finishing drywall every day.
To start, the LEVEL5 3-piece set or Goldblatt 5-piece set gives you everything needed for a full project. Either covers the full coat progression and will hold up through repeated use.

Elena Hart is the founder and lead writer of Better Home Pro. She writes about drywall, home repair, and practical DIY home improvement topics, focusing on clear, useful information that helps homeowners make better decisions. Her work combines firsthand experience, manufacturer documentation, industry resources, and careful research to create content that is accurate, practical, and easy to understand. Through Better Home Pro, Elena aims to simplify complex home improvement topics and provide guidance that is genuinely helpful to homeowners and DIYers.


No Comments