

Most people don’t think about drywall finish levels until they’re standing in a freshly painted room and something looks off. The walls catch the light at a weird angle, and suddenly every seam, ridge, and fastener dimple is visible.
That’s usually when someone starts asking questions they should have asked before the paint went on.
The Gypsum Association established a standardized system, known as the GA-214 Recommended Levels of Finish for Gypsum Board, that defines six finish levels (Level 0 through Level 5) for gypsum board surfaces.
These levels describe how much surface preparation work has been done before a wall is considered ready for its intended finish, whether that’s paint, texture, tile, or something else.
The system exists so that contractors, architects, and building owners are all speaking the same language when they talk about what “finished” actually means.

This article covers what each level involves, where each one is appropriate, and how to decide which level your specific room actually needs.
Key Takeaways
- Match Room Purpose: Finish level should align with the room’s paint type, lighting conditions, and intended use.
- Level 4 Standard: Most painted residential walls perform well with a Level 4 finish and proper drywall primer.
- Level 5 for Lighting: Large windows, wall sconces, and semi-gloss or gloss paints often justify upgrading to Level 5.
- Texture Changes Requirements: Level 3 is suitable for heavy textures but not for smooth painted finishes.
- Plan Lighting Early: Finalize lighting design before specifying finish levels to avoid costly rework later.
What Are Drywall Finish Levels?
The GA-214 standard came out of a practical need. Before it existed, “finished drywall” meant different things to different people, which led to disputes, cost surprises, and walls that looked nothing like what the client expected.
The standard creates a consistent vocabulary. When a spec sheet calls for Level 4 finish, every contractor reading it knows exactly what work is included and what isn’t. That matters on new construction projects where multiple trades are involved, and it matters for homeowners who want to know what they’re paying for.
One thing worth clarifying upfront: finish level refers to surface preparation, not to the paint or texture that goes on afterward. A Level 4 wall is ready to receive paint. What paint you choose, and how it looks under your specific lighting, is a separate question that the finish level influences but doesn’t fully determine.
Choosing the wrong finish level is one of the more common and expensive mistakes on drywall projects, and it almost always comes from not thinking through the final application and lighting conditions before work starts.
The 6 Drywall Finish Levels Explained (Level 0 to Level 5)
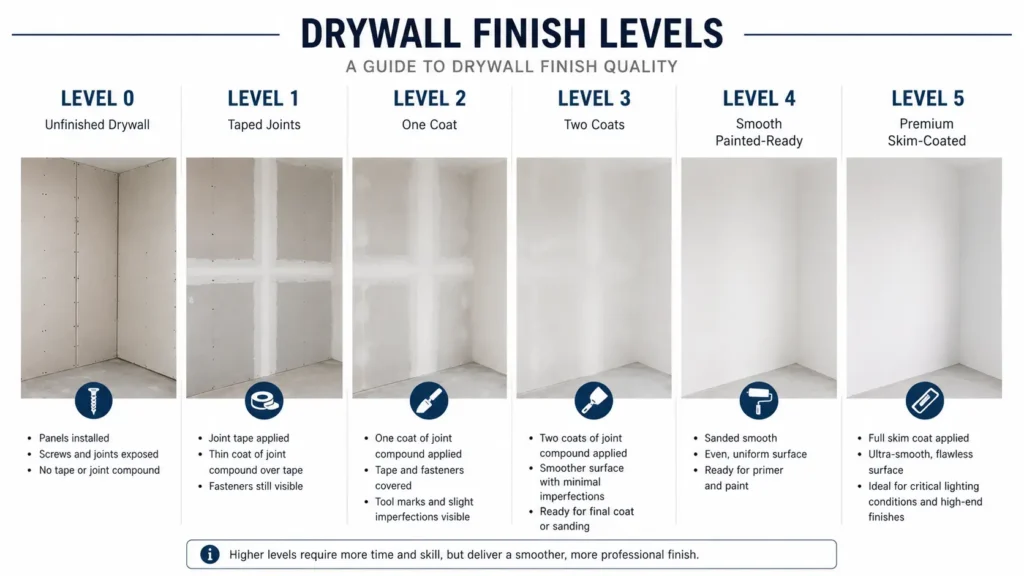
Level 0: No Finish Required
Level 0 means no taping, no joint compound, no finishing work of any kind. The boards are hung and that’s it.
This level is appropriate for temporary construction, areas slated for demolition, or spaces where the final use hasn’t been decided yet. If walls are being boarded in a space that will eventually be tiled floor to ceiling, Level 0 may be the right call since tile adhesive bonds directly to the board surface and a finish coat would just be an unnecessary step.
The most common mistake at this level is leaving walls at Level 0 when they were supposed to move forward. It sounds obvious, but in large projects where different areas are at different stages, it happens. If a space transitions from temporary to permanent, the finish level needs to catch up.
Level 1: Tape Set in Joint Compound
At Level 1, all joints and interior angles have tape embedded in joint compound. That’s the extent of the work. Excess compound is not smoothed out, and tool marks and ridges are acceptable.
This level is used in plenum spaces above drop ceilings, attics, mechanical rooms, and other concealed areas that will never be seen. It also satisfies the requirements for many fire-rated assemblies where the taping is required for code but the aesthetics are irrelevant.
Level 1 is not suitable for any visible or occupied space according to ASTM C840 gypsum board application and finishing standards. It exists almost entirely to meet code requirements in areas where appearance doesn’t matter.
Level 2: Tape and One Coat
Level 2 involves embedding tape and applying one coat of joint compound over the tape and fasteners. The surface is functional but still rough and visibly uneven.
This level is appropriate for garages, warehouses, and spaces that will receive tile or heavy texture. The cement board vs drywall comparison matters here too, because in wet areas where tile is going directly over the substrate, Level 2 on standard drywall (or the equivalent on cement board) is often all that’s needed before the adhesive goes on.
Level 2 is not appropriate for paint. The surface under most lighting conditions is too rough to hold a smooth painted finish without obvious imperfections showing through. In residential construction, Level 2 is typically the minimum specified for garages, but if the homeowner later decides to paint that garage, the walls need to be brought up to Level 4 first.
Level 3: Tape and Two Coats
Level 3 involves two coats of joint compound over the tape, one coat over fasteners, and light sanding. The surface is noticeably smoother than Level 2 but still has visible texture and slight variations.
This level works well as a base for medium to heavy texture finishes and certain heavy-grade wall coverings. Orange peel and knockdown textures are good examples of finishes that can go over Level 3 because the texture itself masks whatever unevenness exists in the substrate.
The common mistake at this level is painting directly over it with flat paint and expecting it to look clean. It won’t. Under normal lighting, seams and tape edges will show through. Level 3 is a legitimate stopping point only when a heavy texture is going on top. If your plan involves smooth paint of any sheen, you need to keep going.
If you’re working through a drywall taping knife size guide, understanding these coat stages helps explain why wider knives are used for the second and third coats: feathering the compound farther out from the joint is what makes each successive coat blend more smoothly.
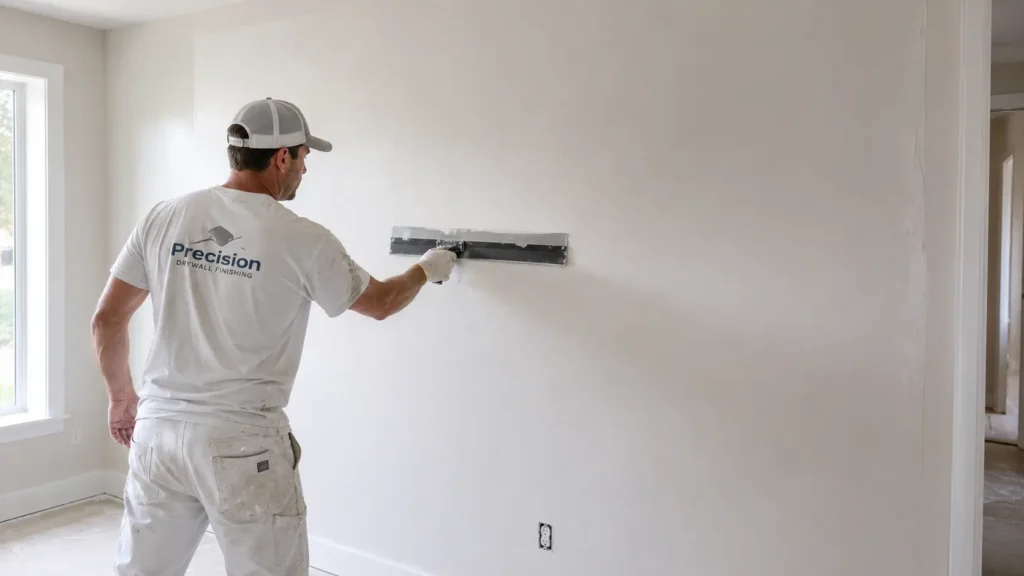
Level 4: Tape, Three Coats, Skim Primed
Level 4 is the standard residential finish. It includes three coats of joint compound, fasteners covered, surface sanded smooth, and a skim coat of drywall primer applied over everything.
This level is appropriate for flat, eggshell, and satin paints in rooms with standard lighting conditions. Most bedrooms, living rooms, hallways, kitchens, and home offices are finished to Level 4. It’s what most contractors will deliver by default unless the spec says otherwise.
The drywall primer at this stage isn’t optional. It’s part of the Level 4 spec for a reason. Without it, paint absorbs differently into the joint compound versus the drywall paper, which creates a visual inconsistency called flashing: areas where the sheen appears slightly different across the wall surface. A purpose-made drywall primer seals the surface uniformly so the topcoat goes on consistently.
Level 4 is not recommended for gloss or semi-gloss paints, or for walls that will be hit by strong raking light. In those situations, the surface isn’t uniform enough and the paint sheen will amplify any remaining imperfections.
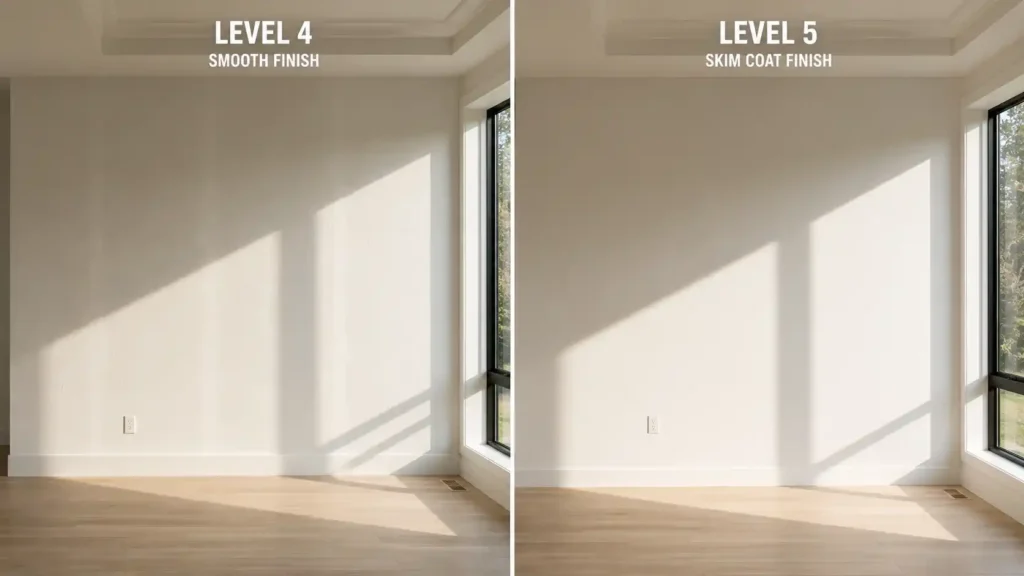
Level 5: Full Skim Coat Over Entire Surface
Level 5 includes everything in Level 4 plus a thin skim coat of joint compound or topping compound applied over the entire wall surface. Not just the joints and fasteners, the whole thing.
The result is an exceptionally uniform surface with minimal variation in texture or porosity. This is the level required for high-gloss and semi-gloss paints, rooms with critical lighting conditions (large windows on one wall, planned wall sconces, accent lighting), high-end residential projects, and commercial office spaces where appearance standards are strict.
The reason Level 5 exists is that even a well-executed Level 4 surface will show imperfections under raking or grazing light. The skim coat eliminates the subtle differences in texture between the joint compound areas and the surrounding drywall paper, creating a surface that holds up under demanding lighting situations.
For a detailed look at what that skim coat process actually involves and what it looks like before and after, the skim coat before and after guide covers the technique in depth.
Cost note: Level 5 adds labor more than materials, since it’s mostly an additional pass of topping compound and sanding time. It’s worth specifying in the right rooms. It’s unnecessary in others.
How Lighting Conditions Affect Which Level You Need
Lighting is the variable that most finish level guides skip over, and it’s the one that causes the most disappointment after the fact.
Raking light, also called grazing light, is light that hits a wall surface at a low angle rather than straight on. It’s unforgiving because it casts shadows across even minor surface variations that would be invisible under normal overhead lighting.
Rooms with large windows on one wall are the most common example. Early morning or late afternoon sun coming through a window at a low angle will reveal every seam, every fastener dimple, and every slight ridge in the compound work. The same wall under typical overhead lighting might look perfectly fine.
The practical rule: if your room has any of the following, step up at least one finish level from what you’d otherwise use. Large windows, especially east or west facing ones that catch low-angle sun.
Planned wall sconces or picture lights. Accent lighting that directs light across a wall surface rather than straight down from the ceiling.

Paint sheen compounds the issue. High-gloss paint reflects light at a consistent angle, which means any variation in the surface underneath gets amplified. Flat paint scatters light in multiple directions, which masks imperfections. Here’s how sheen maps to minimum recommended finish level:
| Paint Sheen | Minimum Finish Level | Notes |
| Flat / Matte | Level 4 | Most forgiving sheen |
| Eggshell | Level 4 | Standard residential choice |
| Satin | Level 4 | Level 5 in critical lighting |
| Semi-gloss | Level 5 recommended | Kitchen and bath trim areas |
| High-gloss | Level 5 required | Amplifies every imperfection |
Photography studios, art galleries, and media rooms almost always call for Level 5, regardless of paint sheen, because controlled directional lighting is part of how those spaces are used.

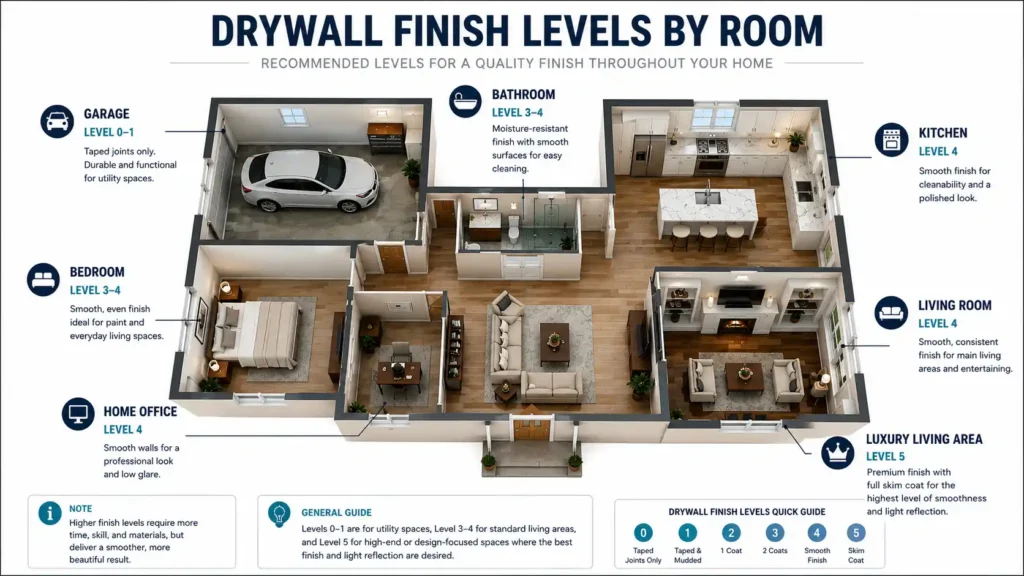
Which Finish Level Does Each Room Need?
| Room / Space | Typical Level | Notes |
| Attic / Plenum | Level 1 | Concealed, non-occupied |
| Garage | Level 2 | Level 4 if walls will be painted |
| Utility / Mechanical Room | Level 2 | |
| Bedroom | Level 4 | Level 5 if large windows or accent lighting |
| Living Room | Level 4 to 5 | Depends on lighting plan |
| Kitchen | Level 4 | Tile backsplash areas can be Level 2 |
| Bathroom | Level 4 | Tile areas Level 2, painted surfaces Level 4 |
| Home Office | Level 4 | |
| High-End Residential | Level 5 | Especially with semi-gloss or gloss paint |
| Commercial Office | Level 4 to 5 | Depends on spec and lighting design |
A few things worth noting beyond the table: bathrooms are a good example of mixed-level work within a single room. The area behind the tile doesn’t need a finish coat. The painted surfaces above the tile line do. Treating them the same way wastes time and money.
For new construction projects, the finish level should be written into the drywall scope of work before work begins. Leaving it vague creates disputes later, especially if the homeowner’s expectation was Level 5 and the contractor quoted Level 4.
Spelling it out in the contract is straightforward and saves everyone involved a headache. You can also get a clearer sense of total project costs by reviewing the cost to tape and mud drywall broken down by finish level.
Common Mistakes and Misconceptions
Specifying Level 5 everywhere. Level 5 adds cost where it’s not necessary. A closet doesn’t need the same finish as a living room with floor-to-ceiling windows. Save Level 5 for rooms where the lighting conditions or paint sheen actually demand it.
Painting directly over Level 3 without texture. This is one of the more reliable ways to end up with walls that look unfinished. The seams and tape edges will telegraph through smooth paint under normal lighting. It’s not a shortcut, it’s a visible mistake that often requires remediation.
Skipping drywall primer at Level 4. The primer is part of the spec, not an optional add-on. Skipping it leads to flashing, where the sheen of the final paint coat looks inconsistent across the surface because the compound and paper absorb paint at different rates. This is a particularly common issue with drywall tape types and compound combinations that haven’t been properly sealed.
Making finish level decisions before the lighting plan is finalized. A room that looks fine under basic overhead lighting during construction can look completely different once wall sconces or accent lighting are installed. Finish level and lighting design should be confirmed together, not independently.
Confusing finish level with texture. Finish level describes how smooth and complete the surface is before any texture or paint is applied. Texture is a separate step that goes on top of a finished surface. A Level 3 wall receiving knockdown texture is different from a Level 3 wall being painted smooth. Understanding this distinction prevents a lot of confusion when reading specs or talking with contractors.
Level 5 vs Level 4: Is the Upgrade Worth It?
The cost difference between Level 4 and Level 5 is mostly about labor rather than materials. The skim coat process uses topping compound that isn’t expensive, but it adds sanding time and an additional pass across every surface.
Depending on the region and contractor, Level 5 typically adds somewhere in the range of 10 to 20 percent to the drywall finishing cost. For a full breakdown, the Level 5 drywall finish cost guide covers what to expect by project type.
Worth the upgrade in: living rooms with large or west-facing windows, any room with planned wall sconces or picture lights, spaces where semi-gloss or high-gloss paint will be used, home theaters, photography spaces, and high-end residential rooms where wall quality is part of the design intent.
Not worth it in: closets, utility areas, rooms receiving heavy texture finishes, ceilings with flat paint and standard overhead lighting, and any space that won’t be subject to critical or raking light.
The practical advice here is to finalize the lighting plan before committing to a finish level spec. What looks like a Level 4 room at the time of framing might turn out to need Level 5 once the lighting design is confirmed. Catching that early costs nothing. Changing it after the walls are painted is expensive.
Frequently Asked Questions
What is the standard drywall finish level for painting?
Level 4 is the standard for most residential paint applications using flat, eggshell, or satin paint. Level 5 is recommended for semi-gloss or high-gloss paints and any space with critical lighting conditions such as large windows or wall-mounted lighting.
What drywall finish level do I need for flat paint?
Level 4 is typically sufficient for flat paint in standard lighting. If the room has large windows or wall lighting that hits the surface at a low angle, Level 5 will give a better result. Flat paint is the most forgiving sheen, but it doesn’t completely hide a poor surface when the light is harsh.
What is Level 5 drywall finish?
Level 5 is the highest finish level under the GA-214 standard. It includes all the work done at Level 4 plus a thin skim coat of joint compound or topping compound applied over the entire wall surface. The result is a smooth, uniform surface that holds up under semi-gloss or high-gloss paint and critical lighting conditions.
Can you paint over Level 3 drywall?
Technically yes, but it’s not recommended unless a heavy texture is going on top. Painting directly over Level 3 with a smooth finish will likely reveal seams and taping marks under normal lighting. If you want smooth painted walls, the surface needs to be brought up to at least Level 4.
How do I know what finish level my contractor used?
Ask directly, and make sure it’s specified in the scope of work or contract before work begins. If it isn’t listed, get clarity before the job starts. After the fact, you can get a rough read by holding a flashlight at a low angle across the wall surface in a darkened room. The amount of shadow and variation you see will tell you a lot about how much finishing work was actually done.
Conclusion
The core decision logic isn’t complicated: match the finish level to the paint sheen and the lighting conditions of the specific room. Level 4 covers the vast majority of residential spaces. Level 5 is worth the cost when lighting conditions or paint sheen demand it. Lower levels have legitimate uses in garages, mechanical rooms, and concealed spaces where paint is never going on.
The mistake most people make is treating finish level as a one-size decision across an entire project, rather than thinking through each room based on how it will actually be lit and finished. Get the lighting plan settled before you finalize the spec, and the rest of the decision usually becomes straightforward.

Elena Hart is the founder and lead writer of Better Home Pro. She writes about drywall, home repair, and practical DIY home improvement topics, focusing on clear, useful information that helps homeowners make better decisions. Her work combines firsthand experience, manufacturer documentation, industry resources, and careful research to create content that is accurate, practical, and easy to understand. Through Better Home Pro, Elena aims to simplify complex home improvement topics and provide guidance that is genuinely helpful to homeowners and DIYers.


No Comments