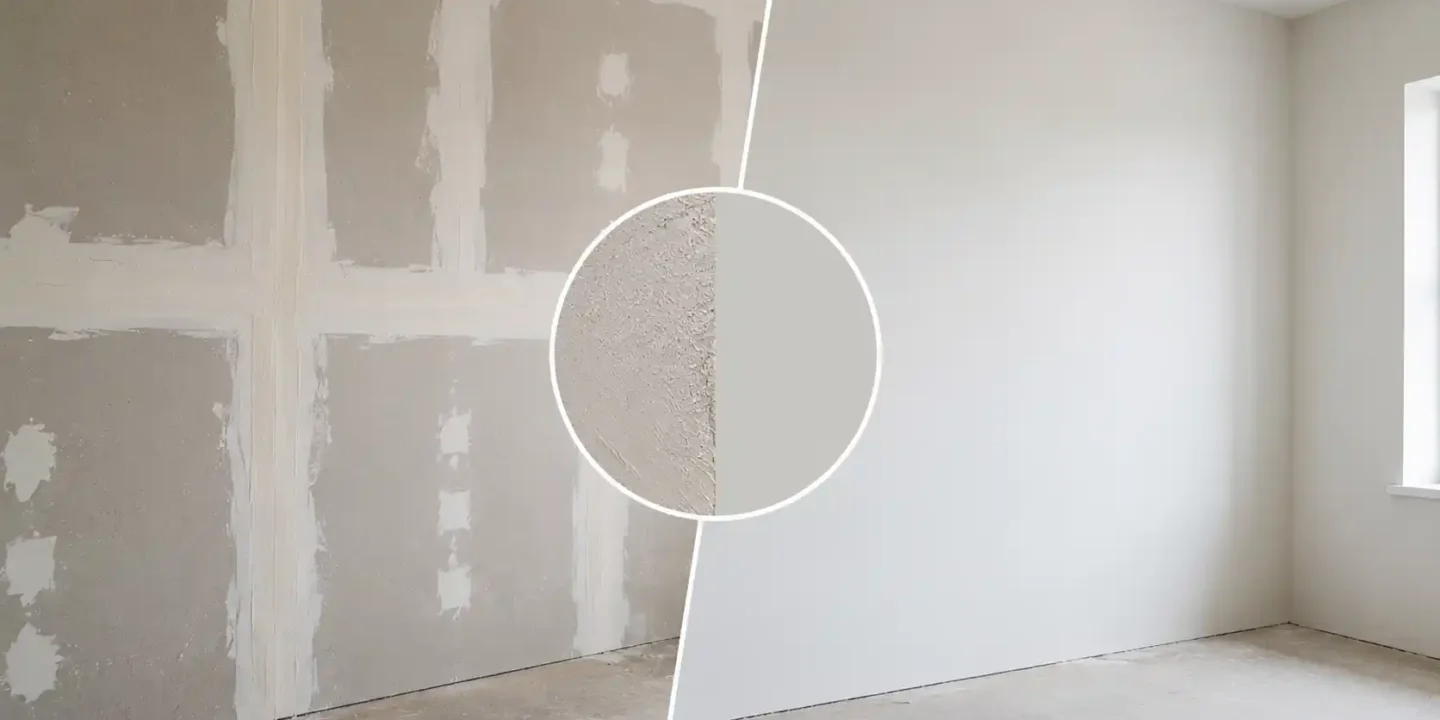

Most walls that look “off” after painting aren’t suffering from bad paint color or poor technique. The surface itself is the problem. Skim coating is a drywall finishing process where a thin layer of joint compound is spread across a wall to level out texture, hide old repairs, and create a uniform surface that paint can sit on evenly. The before-and-after difference isn’t just cosmetic. It changes how light moves across the wall and how the finished surface holds up visually under different lighting conditions. If your walls show patchy finishes, visible texture, or strange shadowing under certain lights, skim coating is likely what’s missing.
Key Takeaways:
- Skim coating creates a uniform wall surface that reflects light in a single plane, removing the micro-shadows that make texture look uneven.
- Patch flashing occurs when a repair absorbs paint differently than original drywall, a flaw eliminated by the uniform porosity of a skim coat.
- Side lighting or raking light exposes minor drywall defects aggressively, making these areas show the most dramatic improvement after skim coating.
- Skim coating cannot fix structural cracks or framing issues, which will quickly reappear if the underlying movement is not corrected first.
- A high-quality PVA primer must be applied over dry joint compound to seal the surface and prevent uneven paint absorption and flashing.
What Walls Typically Look Like Before Skim Coating
Surface problems usually fall into a few recognizable categories, and most homeowners have seen at least one of them without knowing the name for it.
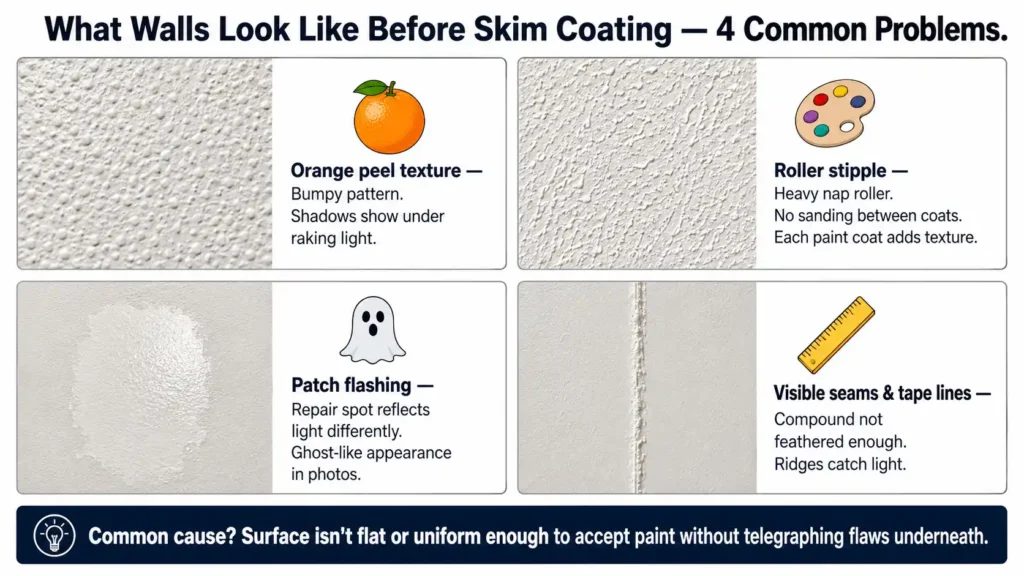
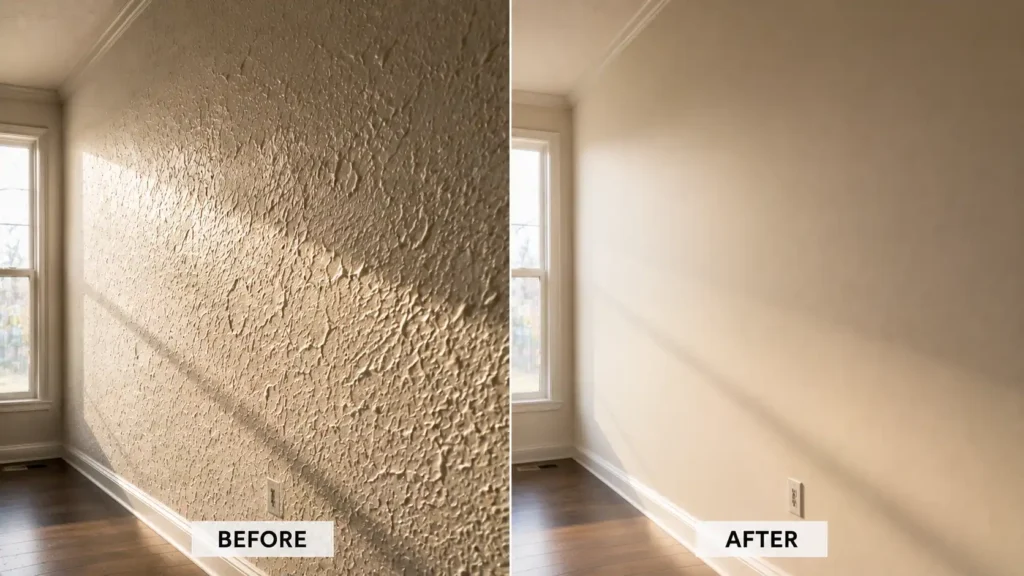
Orange peel texture is one of the most common drywall texture patterns found in older homes and builder-grade finishes. It’s that bumpy, slightly dimpled pattern that was applied intentionally at some point but now looks dated or uneven. Under flat lighting it can seem subtle. Move a lamp close to the wall or open a window on a sunny morning, and the shadows from each tiny bump become impossible to ignore.
Roller stipple shows up on walls that were painted with a heavy nap roller without any sanding between coats. The dried paint itself forms a texture pattern that compounds with each additional coat. Repainting over it doesn’t help. If anything, fresh paint with a slightly different sheen draws more attention to it.
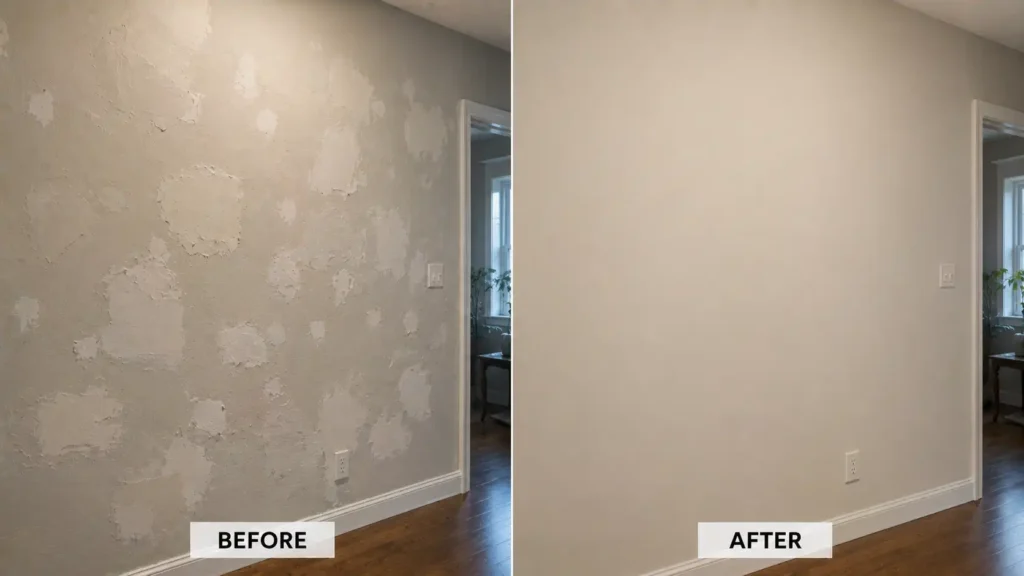
Patch flashing is what happens when a repaired spot reflects light differently than the surrounding wall. The compound used for patching absorbs paint at a different rate than the original drywall surface, so even after two or three coats of paint, the patch has a slightly duller or shinier appearance compared to the area around it. In photos, these spots look like ghosts.
Visible drywall seams and tape lines are a sign of an underfinished job. Drywall installers who didn’t feather the compound far enough out leave ridges that catch light. Paint makes these more visible, not less.
These problems share a common cause: the surface isn’t flat or uniform enough to accept paint without telegraphing every flaw underneath.
What Actually Changes After a Skim Coat
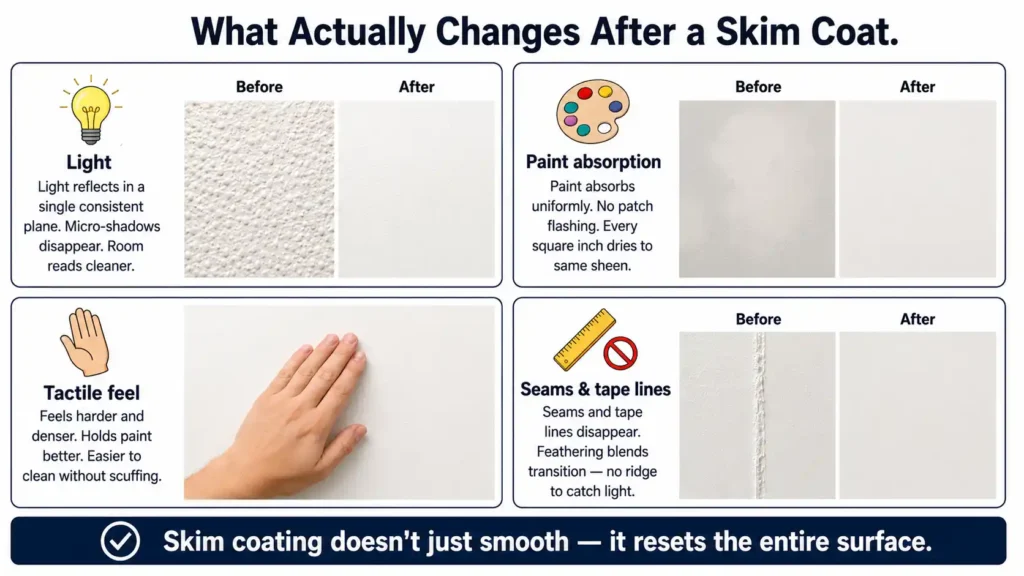
A skim coat doesn’t just smooth the wall. It resets the surface entirely.
The most significant change is how light interacts with the wall. Uneven drywall surfaces create micro-shadows that exaggerate ridges, texture peaks, and surface imperfections under angled lighting . Once those are gone, light reflects off the wall in a single consistent plane. The room reads as cleaner, even before you notice specific improvements.
Paint absorption becomes uniform across the whole surface. This is what eliminates patch flashing. When the entire wall has the same porosity and texture, every square inch absorbs paint the same way. The wall dries to a consistent sheen with no visible transitions between old repairs and original drywall.
The tactile quality changes too. Running a hand across a freshly skim-coated and sanded wall feels noticeably different from drywall that was only primed and painted. It’s harder and denser. That surface quality holds paint better and is easier to clean without scuffing.
Seams and tape lines, if properly embedded before skim coating, essentially disappear. Not because they’re hidden under heavy compound, but because the feathering process blends the transition over a wide enough area that there’s no ridge left to catch light.
The Most Dramatic Before-and-After Improvements
Some situations produce a more striking result than others, and it’s worth knowing which ones before you decide whether the labor is justified.
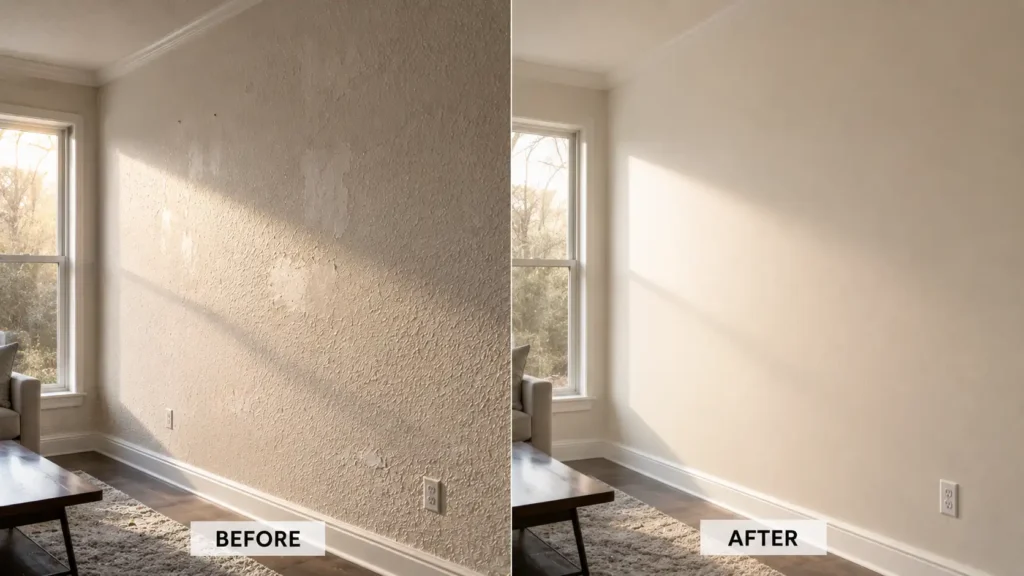
Walls under raking or side lighting show the most dramatic improvement. Raking light exposes even tiny drywall finishing defects because shadows travel aggressively across uneven wall surfaces. This lighting condition reveals every imperfection in stark relief. After skim coating, the same walls under the same lighting conditions look professionally finished. The transformation in these rooms is often surprising even to people who’ve seen it before.
Old patched walls with layers of repairs are another area where skim coating makes an obvious difference. Years of spackling, painting over patches, and touch-ups create a wall with varying surface depths and inconsistent textures. A skim coat levels everything back out in a single process.
Walls with heavy texture that was painted over are harder to fix, but skim coating is still effective. The key is that enough drywall compound needs to be applied to fill the peaks of the texture completely, which may require two passes. When done correctly, the result looks like the texture was never there.
Rooms being repainted after wallpaper removal are perhaps the most dramatic case. Wallpaper adhesive leaves a rough, pitted surface that looks terrible under paint. Skim coating after wallpaper removal produces results that look like a brand new drywalled wall.

What Skim Coating Does Not Fix
This is important to understand before starting a project, because skim coating gets credit for things it can’t actually do.
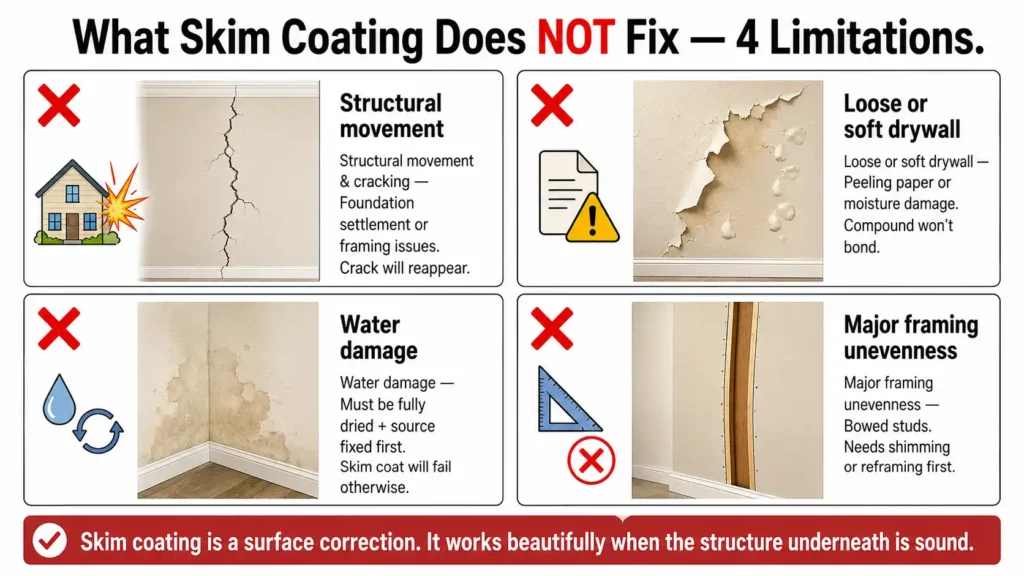
Structural movement and cracking will reappear through a skim coat. If a wall is cracking because of foundation settlement, seasonal wood movement, or framing issues, applying compound over the surface is temporary at best. The crack will open back up, sometimes within a single heating season.
Loose or soft drywall needs to be addressed before skim coating. If the paper face of the drywall is peeling, blistering, or soft from moisture exposure, compound won’t bond properly and will eventually crack and fall off.
Water damage has to be fully dried and the source of moisture resolved before any surface work happens. Skim coating over a wall that’s still cycling through wet and dry conditions is pointless. The compound will fail.
Major framing unevenness can’t be corrected with skim coat alone. If studs are bowed or the wall plane itself is inconsistent, you’ll need shimming or reframing before finishing work makes sense.
Skim coating is a surface correction process. It works beautifully when the structure underneath it is sound.
Why Some After Results Look Better Than Others
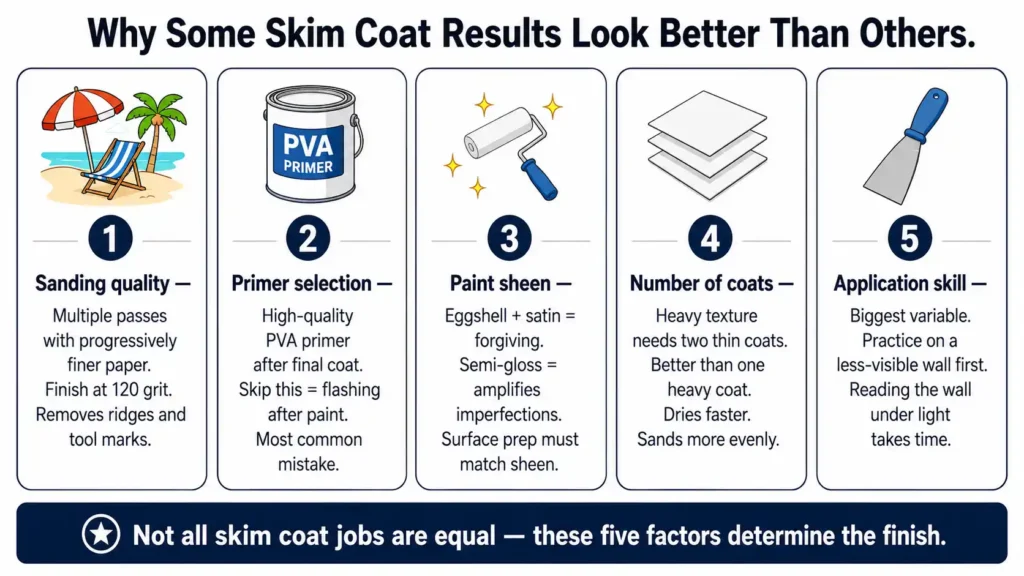
Not all skim coat jobs produce the same result, and the reasons why have nothing to do with the product itself.
Sanding quality matters more than most people realize. A skim coat that isn’t sanded properly still has ridges and tool marks. These may be smaller than the original texture, but they’re still visible under raking light. The best results come from multiple passes of sanding with progressively finer paper, finishing at around 120 grit.
Primer selection changes everything. Skim-coated surfaces are porous and will absorb paint unevenly if not properly primed. A high-quality PVA primer, applied after the final coat of compound has dried, seals the surface so paint goes on uniformly. Skipping this step or using a low-quality primer is the most common cause of a skim coat that still shows flashing after painting.
Paint sheen amplifies surface quality. Eggshell and satin sheens are more forgiving than semi-gloss. A skim coat that looks perfectly smooth under eggshell paint might still show minor imperfections under a semi-gloss application in a brightly lit room. This doesn’t mean semi-gloss is wrong, just that surface prep needs to be proportionally better if that’s the chosen sheen.
Number of coats affects the result on heavily textured walls. One skim coat often isn’t enough to completely fill deep texture. Two thin coats produce a better outcome than one heavy one, because thin coats dry faster, crack less, and sand more evenly.
Application skill remains the biggest variable. Someone experienced with a 12-inch knife who knows how to read a wall under light while they’re working will always produce a better result than someone working with unfamiliar tools on a steep learning curve. That’s not a reason to avoid DIY, but it is a reason to practice on a less-visible wall first.
Is Skim Coating Worth It Before Painting?
For most walls with visible texture, old repairs, or shadowing issues, yes. Spot repairs handle isolated damage, but they rarely solve the underlying surface inconsistency that causes flashing and uneven sheen.
The calculation changes based on the room. A bedroom with flat lighting and no harsh shadows might look perfectly acceptable after spot repairs and a good paint job. A living room with multiple windows, a bathroom with bright overhead lighting, or a hallway where light hits the wall at a sharp angle will show every flaw that was there before painting. These are the rooms where skim coating earns its labor cost.
Texture is a different conversation. If the existing texture is in good condition and consistently applied, there’s no real reason to remove it unless the design goal is a flat wall. Damaged or inconsistent texture, though, is harder to repair selectively than it looks. Skim coating is often the cleaner solution.
The honest answer is that skim coating delivers a noticeably better result than paint alone whenever surface irregularity is the real problem. It doesn’t fix what’s underneath, and it doesn’t replace good priming or careful painting. But for walls that look bad no matter how carefully they’re painted, it’s almost always the right next step.

Elena Hart is the founder and lead writer of Better Home Pro. She writes about drywall, home repair, and practical DIY home improvement topics, focusing on clear, useful information that helps homeowners make better decisions. Her work combines firsthand experience, manufacturer documentation, industry resources, and careful research to create content that is accurate, practical, and easy to understand. Through Better Home Pro, Elena aims to simplify complex home improvement topics and provide guidance that is genuinely helpful to homeowners and DIYers.


No Comments