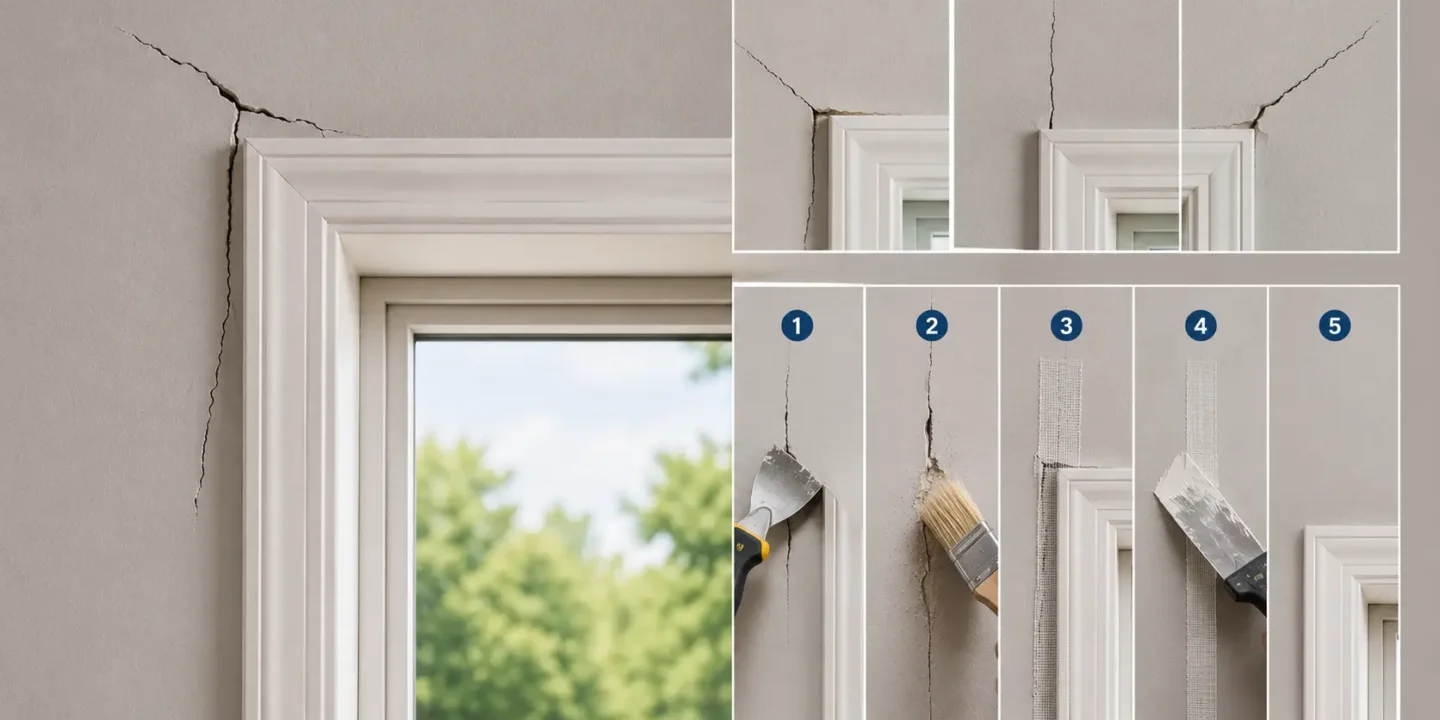



Cracks that radiate from the corners of windows are one of the most common wall defects homeowners notice, and also one of the most misread. Some are completely normal. Some are early signs of a structural problem worth taking seriously. The tricky part is that they can look nearly identical on the surface.
Window openings are inherently stress concentration points in a wall. The framing above a window carries load that gets redirected around the opening, and that stress shows up in the drywall at the corners where the concentration is highest. Understanding that basic fact makes it much easier to read what a crack is telling you.
This article covers why cracks form at window openings specifically, how to assess what you’re looking at, when professional input is warranted, and how to repair them so the fix actually holds. Most window cracks are cosmetic and manageable. A smaller number signal something worth investigating before you pick up the joint compound.
Key Takeaways:
- Window corners are structural stress points where cracking is common and usually cosmetic.
- Crack width, growth over time, and associated symptoms are the three most reliable diagnostic signals.
- Cracks wider than 1/8 inch, those that are actively growing, or those paired with sticking windows or exterior damage warrant professional assessment before repair.
- Rigid joint compound cannot accommodate ongoing seasonal movement. Paintable flexible caulk is the better long-term approach at locations where cracks recur.
- A repair that comes back quickly is telling you the movement hasn’t stopped, not that the repair was done wrong.
Why Window Corners Are Crack-Prone
Before looking at specific causes, it helps to understand why window openings are so consistently the location where cracks appear.
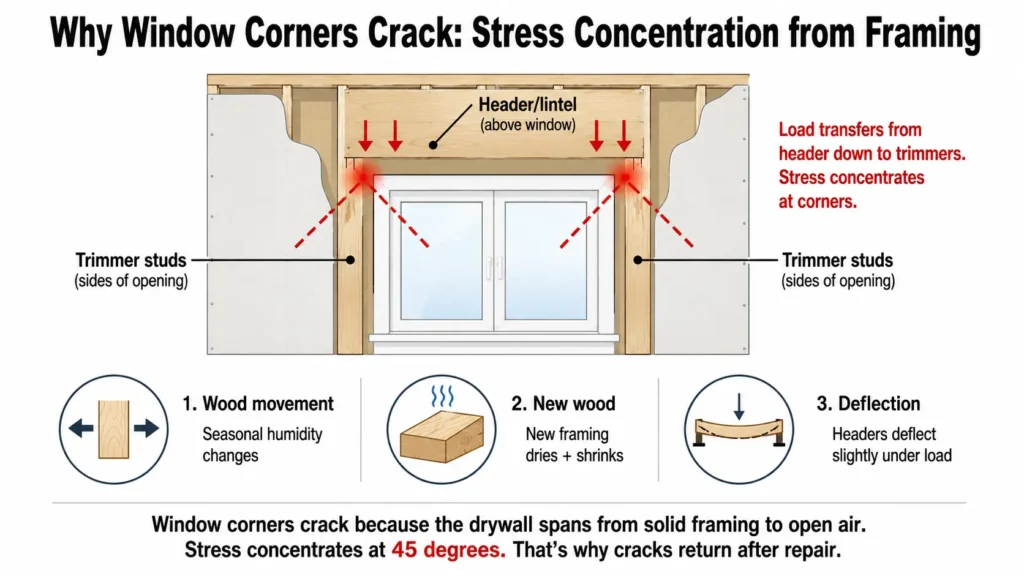
A window opening interrupts the continuous load path in a wall. The framing above the opening, the header or lintel, carries the load from above and transfers it down to the trimmer studs on either side of the rough opening. That load transfer creates stress concentrations at the corners of the opening. The drywall at those corners is spanning a transition from solid framing on one side to open air on the other, and that change in stiffness is exactly where cracking happens first.
The framing around windows also moves more than framing in the middle of a wall. Headers and lintels deflect slightly under load. The wood expands and contracts with seasonal humidity changes. New framing dries and shrinks in the years after construction. All of that movement expresses itself in the drywall at the corners of the opening, almost always as diagonal cracks running at roughly 45 degrees from the corner.
This is why window corner cracks are so common and why they tend to return after repair when the underlying movement is still happening. The geometry of the opening guarantees that stress concentrates there. The repair approach has to account for that reality.
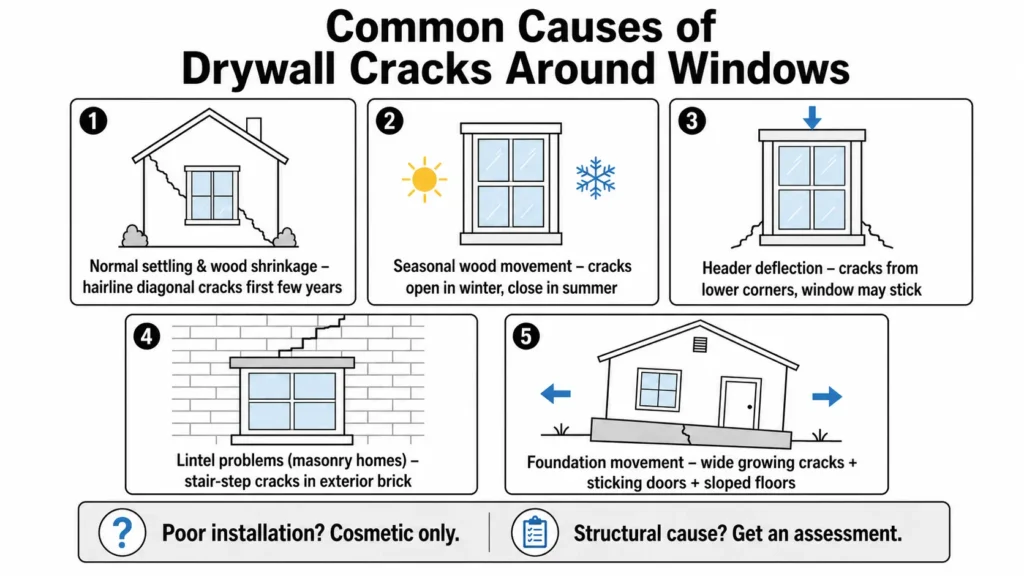
Common Causes of Drywall Cracks Around Windows
Normal Settling and Wood Shrinkage
The most common cause, particularly in homes under 10 years old or in recently finished spaces. Framing lumber contains residual moisture when it’s installed. As it dries and shrinks over the first few years, the framing around window openings moves slightly, and the drywall at the corners cracks in response.
These cracks are typically hairline to 1/16 inch wide, diagonal, and appear within the first few years of a building’s life or shortly after a renovation. They tend to stabilize once the framing has dried to equilibrium with its environment.
The key diagnostic signal: a crack that appeared once, has not grown in over a year, and has no accompanying symptoms is almost certainly settling-related and cosmetic. It can be repaired with confidence that the fix will hold.
Seasonal Wood Movement
Even in older, fully settled buildings, the framing around windows moves seasonally as humidity and temperature shift throughout the year. This is more pronounced in climates with significant humidity swings and in buildings without active humidity control in winter.
Cracks that open slightly in winter and seem to close or tighten in summer are driven by this mechanism. The wood dries and shrinks in the heating season, then absorbs moisture and expands when conditions are more humid. Monitoring drywall moisture levels can help explain these seasonal changes.
These cracks are cosmetic but tend to recur if repaired with rigid joint compound. The compound simply cracks again when the movement cycles back. Paintable flexible caulk handles the ongoing movement much better than rigid compound at these specific locations. Adding whole-home humidification in dry winter climates can also reduce the frequency and severity of these cracks over time.
Header Deflection
The header above a window opening carries the load from the framing above and deflects slightly under that load over time. Some deflection is normal and expected. Engineered lumber headers in modern construction deflect very little. Older solid wood or built-up lumber headers over wide openings can deflect more noticeably, particularly as the wood ages and the load above has had years to bear down.
When a header deflects, it pushes the trimmer studs outward slightly at the bottom of the opening. That movement concentrates at the lower corners of the window and produces diagonal cracks running downward and outward from those corners.
Minor deflection in a settled older home that hasn’t changed in years is generally not a concern. Progressive deflection in a newer home, or in a home where load conditions above the window have recently changed, is worth having assessed. The clearest signal that deflection may be affecting the rough opening: the window has become difficult to open, close, or latch, or the casing has begun separating from the wall at the top corners.
Lintel Problems in Older Masonry Homes
In homes with masonry construction or brick veneer, a steel or concrete lintel above the window carries the masonry load above it. Steel lintels rust over time, and as rust expands, the lintel pushes against the masonry and causes movement. Concrete lintels can crack. Older cast iron lintels can fail entirely.
Lintel problems cause cracking not just in the interior drywall but in the exterior masonry as well, typically as stair-step cracks in the brick mortar joints above the window. If you’re seeing diagonal cracks at a window corner on the interior and stair-step or horizontal cracks in the brick or block above the same window on the exterior, the lintel deserves professional attention.
This is not a DIY repair situation. Lintel replacement or reinforcement requires a structural assessment and typically involves masonry work that goes well beyond surface repair.
Foundation Movement and Differential Settlement
Diagonal cracks radiating from window corners are one of the classic visual signs of foundation movement, particularly differential settlement where one part of the foundation moves more than another.
Foundation-related cracks tend to be wider than normal settling cracks, often 1/8 inch or more, and they continue to grow rather than stabilizing. They frequently appear in consistent patterns across multiple windows or doors on the same wall or elevation of the house, not just at one isolated location.
Other symptoms that show up alongside foundation movement: sticking doors and windows throughout the house, sloping or uneven floors, gaps at baseboards, and cracks that return quickly after repair. Any combination of these signals alongside wide or growing window cracks warrants a professional assessment before any repair work begins.
Poor Original Installation
Drywall that wasn’t properly fastened around window openings, missing backing at window corners, or compound applied too thick during the original drywall installation can all produce cracks that appear relatively soon after installation. These are typically shallower and more surface-oriented than structurally caused cracks.
Installation-related cracks are common in DIY-finished spaces and in production builds where finishing speed was prioritized over quality. They’re cosmetic and repairable once identified. The repair approach is straightforward once you rule out structural causes.
How to Read a Window Crack Diagnostically
Before reaching for any repair material, spend a few minutes reading the crack carefully. These four factors give you most of what you need to make a sound diagnostic judgment.
Crack Width
Hairline to 1/16 inch: almost always cosmetic. Normal settling or seasonal movement. Repair with confidence once stable.
1/16 to 1/8 inch: worth monitoring. Could be settling in a newer home or minor header deflection. Note the date, photograph the crack, and check back in 30 to 60 days to see whether it has grown.
1/8 inch or wider: worth professional assessment, particularly if the crack is growing or accompanied by any other symptoms.
A simple monitoring method: mark the ends of the crack with a pencil and date the marks. If the crack hasn’t extended past those marks after a month or two, it’s stable and safe to repair.
Crack Pattern
A single diagonal crack at one corner of one window is common and usually cosmetic. Diagonal cracks at multiple corners of the same window are more notable and worth monitoring. Consistent diagonal cracks at window corners across multiple windows on the same wall are a stronger signal of systematic movement, whether from the foundation, framing, or load conditions above.
Cracks that step diagonally across multiple drywall sheets or that correspond to stair-step patterns visible in exterior masonry are the pattern that most clearly warrants getting professional input.
Crack Direction
Upward and outward from the top corners of a window typically indicates header deflection or load concentration at the top of the rough opening.
Downward and outward from the bottom corners can indicate foundation settlement pulling the wall downward, or issues with the sill plate or framing below the opening.
Horizontal cracks directly above or below the window are less common and worth noting. They can indicate lintel movement or header-related issues and don’t fit the standard settling pattern.
Associated Symptoms
A window that sticks, won’t latch, or no longer closes squarely is a meaningful signal. It suggests the rough opening geometry may be changing, which means movement is still happening.
Gaps between the window casing and the surrounding wall indicate framing movement pulling the assembly apart. Cracks visible on the exterior at the same location suggest the movement is going through the full wall assembly, not just the surface drywall. Multiple cracking locations throughout the house, particularly at both windows and doors, broadens the diagnosis toward foundation or systemic framing issues rather than an isolated settling crack.
When to Call a Professional
Most window cracks don’t require a professional. Some do, and patching over an active structural problem doesn’t fix it. It just hides it while it continues to worsen.
Get a professional assessment before attempting repair if any of the following apply:
- The crack is 1/8 inch wide or wider
- The crack has grown visibly over a period of weeks or months
- The window no longer opens, closes, or latches properly
- Cracks appear at multiple windows in a consistent pattern
- There are corresponding cracks or damage on the exterior at the same location
- Stair-step cracks are visible in exterior brick or block above the window
- Other symptoms are present: sloping floors, sticking doors, gaps at trim or baseboards
- The crack has returned multiple times after repair with no seasonal explanation
For framing-related concerns, a general contractor with structural experience can usually provide a useful assessment. For anything suggesting foundation movement or load-bearing issues, a structural engineer is the appropriate professional, not just a contractor opinion. The assessment cost is small compared to the cost of a structural problem that got worse while hidden behind fresh paint.
How to Repair Drywall Cracks Around Windows
Tools and Materials
- Utility knife
- 6-inch and 10-inch drywall knives
- All-purpose joint compound
- Setting-type compound (Durabond or similar) for wider or recurring cracks
- Paper tape
- Fine-grit sandpaper (120 to 150 grit)
- Drywall primer
- Paintable flexible caulk for recurring movement-related cracks
- Fiberglass mesh tape (optional, for high-stress corner locations paired with setting compound)
A note on paper tape versus mesh: paper tape is the better choice for crack repair at window corners. It has higher tensile strength, lies flatter, and handles stress better than mesh over these locations. Mesh tape can work if it’s paired with setting compound for the base coat, but for most homeowners doing a standard repair, paper tape with all-purpose compound is the right combination.
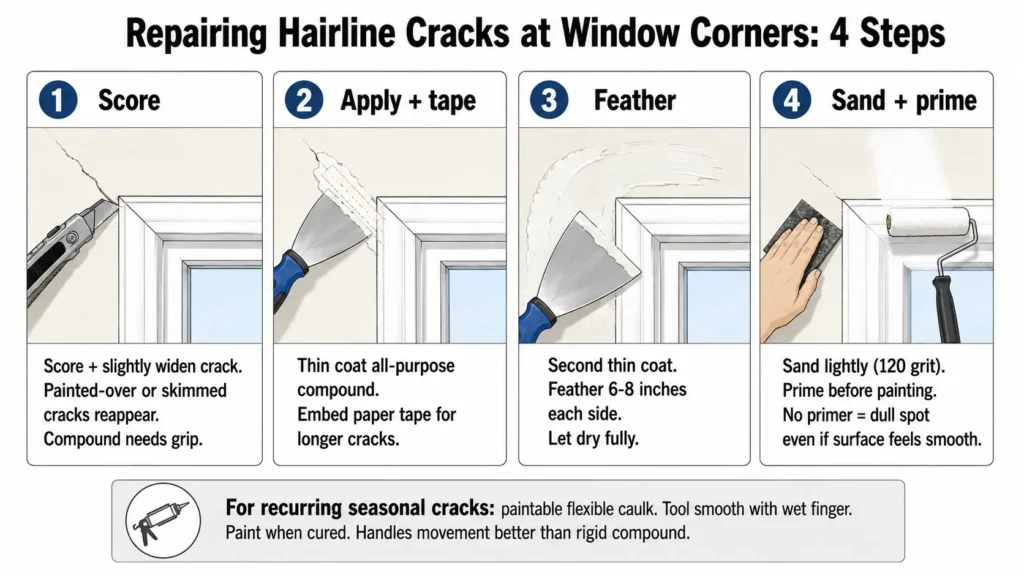
Repairing Hairline Cracks at Window Corners
Step 1: Score and slightly widen the crack with a utility knife. A crack that’s painted over or skimmed without being opened first will reappear quickly because the compound has nothing to grip.
Step 2: Apply a thin coat of all-purpose joint compound, working it fully into the crack. For cracks longer than a few inches, embed a strip of paper tape over the compound while it’s still wet.
Step 3: Once the first coat is fully dry, apply a second thin finish coat and feather it 6 to 8 inches on each side of the crack.
Step 4: Sand lightly with 120-grit paper once dry. Prime the repaired area before painting. Skipping primer causes the paint to absorb unevenly over new compound and the repair will show through as a dull spot even when the surface feels smooth.
For stable hairline cracks that tend to recur with seasonal movement: paintable flexible caulk applied into the crack, tooled smooth with a wet finger, and painted once cured is a simpler and more durable approach. It handles minor movement better than rigid compound without requiring the full tape-and-coat process.
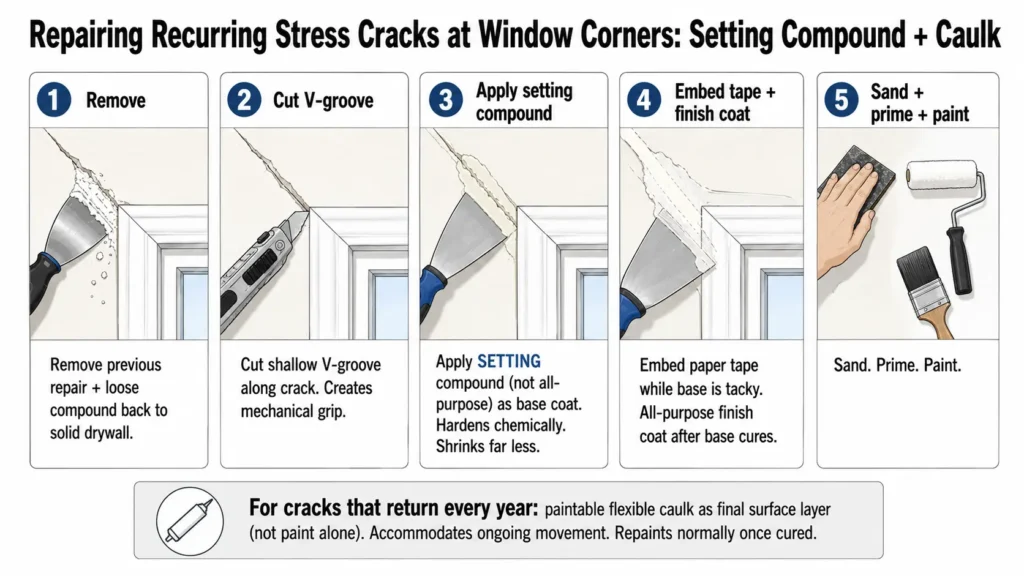
Repairing Recurring Stress Cracks
If a crack has returned after a previous repair, rigid compound alone is unlikely to hold long-term at a location subject to ongoing movement.
Step 1: Remove any previous repair material and loose compound back to solid drywall. Don’t skim over old repairs that haven’t fully bonded.
Step 2: Cut a shallow V-groove along the crack with a utility knife. This creates mechanical grip for the new material rather than leaving a tight hairline that compound can’t fill properly.
Step 3: Apply setting-type compound as a base coat, working it into the groove. Setting compound hardens through a chemical reaction rather than just drying, which means it shrinks far less and is significantly harder than all-purpose once cured.
Step 4: While the setting compound is still slightly tacky, embed paper tape. Apply a thin all-purpose finish coat once the base has fully cured.
Step 5: Sand, prime, and paint.
For corners where the crack consistently returns year after year: apply paintable flexible caulk as the final surface layer rather than paint alone. It accommodates minor ongoing movement without cracking and can be repainted normally once cured.
Repairing Wider Cracks (Confirmed Stable, 1/8 Inch or Less)
Only proceed with this repair after confirming the crack is stable, not growing, and not associated with structural symptoms.
Step 1: Undercut the crack edges with a utility knife to create a mechanical lock for the fill material. This gives the compound something to grip rather than just sitting on a flat surface edge.
Step 2: Fill in layers using setting-type compound. All-purpose compound shrinks too much in deeper fills and will crack again before the repair is even painted. Allow each layer to cure before adding the next. Do not try to fill a wide crack in a single pass.
Step 3: Once filled to near-flush, apply paper tape and two finish coats of all-purpose compound. Feather each coat wider than the last.
Step 4: Sand thoroughly, prime, and paint.
Do not attempt this repair on a crack that is still growing or that is wider than 1/8 inch without professional input on the cause first.
Dealing with Cracks That Keep Coming Back
A repair that returns quickly is telling you something useful: the movement causing the crack is still happening. Before doing another repair, figure out what kind of movement you’re dealing with.
If the crack opens in winter and closes or tightens in summer, it’s driven by seasonal wood movement. Rigid compound cannot accommodate that cycling. Paintable flexible caulk is the more durable long-term approach at these locations. It won’t eliminate the visual crack entirely but it will hold through seasonal movement without re-cracking the way rigid compound does.
If the crack is progressive, meaning it keeps getting wider and doesn’t close back up seasonally, stop repairing and get a structural assessment. The surface repair is not the problem. The source of the movement is.
In some older homes, a hairline crack at a specific window corner simply recurs every few years regardless of repair quality. For these locations, treating it as a periodic maintenance task with flexible caulk every few years is a more realistic approach than expecting a one-time permanent fix.
Preventing Window Cracks in New Work
If you’re doing a renovation or finishing new construction, a few installation decisions reduce the likelihood of window corner cracks showing up later.
Avoid butting drywall seams directly at window corners. Proper drywall layout planning keeps seams away from high-stress areas. Running a sheet so the seam falls 6 to 8 inches away from the corner reduces stress concentration at the most vulnerable point. A seam right at the corner gives the crack a ready-made path, especially when dealing with butt joints versus tapered joints.
Use backing blocks or corner bead at all window corner returns during installation. Unsupported drywall at these corners is more prone to cracking under the stress that concentrates there.
Apply compound in thin coats and allow adequate drying time between them. Thick single-coat applications shrink more aggressively and crack more reliably than multiple thin coats, particularly at corners under stress.
Prime before painting without exception. Unprimed compound absorbs paint unevenly, and the surface tension during drying can contribute to fine cracking that looks like a finishing defect.
In spaces with significant seasonal humidity swings, whole-home humidification reduces the magnitude of wood movement throughout the structure and lowers the frequency of settling-related cracks at window openings.
FAQ
Are cracks around windows normal?
Hairline diagonal cracks at window corners are very common and usually normal. They’re caused by settling, seasonal wood movement, or stress concentration at the rough opening corners. They become a concern when they are wide (over 1/8 inch), growing, present at multiple windows in a consistent pattern, or accompanied by windows that stick or other structural symptoms.
Why do cracks keep coming back around windows?
Usually because the movement causing the crack is still happening. If a repair returns quickly, the wall is still moving at that location. Rigid joint compound cannot accommodate ongoing movement. For seasonally recurring cracks, paintable flexible caulk handles movement better than rigid compound. For progressive cracks that keep widening, the underlying cause needs professional assessment before any further repair.
Do cracks around windows mean foundation problems?
Not necessarily, but it is one possibility. Most window cracks are caused by normal settling or seasonal wood movement, not foundation issues. Foundation-related cracks tend to be wider, grow over time, appear in consistent patterns at multiple windows, and come with other symptoms like sticking doors, sloping floors, or gaps at baseboards. If those symptoms are present alongside the cracks, get a structural assessment before attempting repair.
How do I know if a window crack is structural?
Width, growth, and associated symptoms are the key indicators. A crack wider than 1/8 inch, one that has grown noticeably over a short period, or one accompanied by a window that no longer closes properly, exterior cracking at the same location, or other wall and floor symptoms is worth having a professional assess before any repair work starts.
What is the best way to fix cracks around windows?
For stable hairline cracks, all-purpose joint compound with paper tape followed by primer and paint. For recurring cracks at corners with ongoing seasonal movement, paintable flexible caulk holds up better than rigid compound over time. For wider stable cracks, setting-type compound for base fills followed by standard finish coats and primer. In all cases, prime the repaired area before painting.
Should I use caulk or joint compound to fix window cracks?
It depends on the crack behavior. Rigid joint compound is the right choice for a stable crack where you need a hard, sandable surface that blends seamlessly with the surrounding drywall. Paintable flexible caulk is the better choice for locations with ongoing seasonal movement where rigid compound would simply crack again the next heating season. For most window corner cracks that recur seasonally, flexible caulk is the more durable long-term maintenance approach.
Conclusion
Most cracks around windows are cosmetic. They’re a predictable result of stress concentration at rough opening corners, seasonal wood movement, or normal settling, and they’re fixable with standard materials and proper technique. The ones worth taking seriously are wide, actively growing, patterned across multiple openings, or accompanied by other structural symptoms. Those deserve a professional assessment before any repair work starts.
The most common reason window crack repairs fail is using rigid compound in a location that continues to move. Match the material to the behavior. Stable cracks get standard compound and tape. Recurring movement cracks get flexible caulk. Get that distinction right, prime before painting every time, and most repairs hold the way they’re supposed to.
For a broader look at diagnosing and repairing all types of drywall cracks, see the complete drywall crack repair guide.


Elena Hart is the founder and lead writer of Better Home Pro. She writes about drywall, home repair, and practical DIY home improvement topics, focusing on clear, useful information that helps homeowners make better decisions. Her work combines firsthand experience, manufacturer documentation, industry resources, and careful research to create content that is accurate, practical, and easy to understand. Through Better Home Pro, Elena aims to simplify complex home improvement topics and provide guidance that is genuinely helpful to homeowners and DIYers.









No Comments