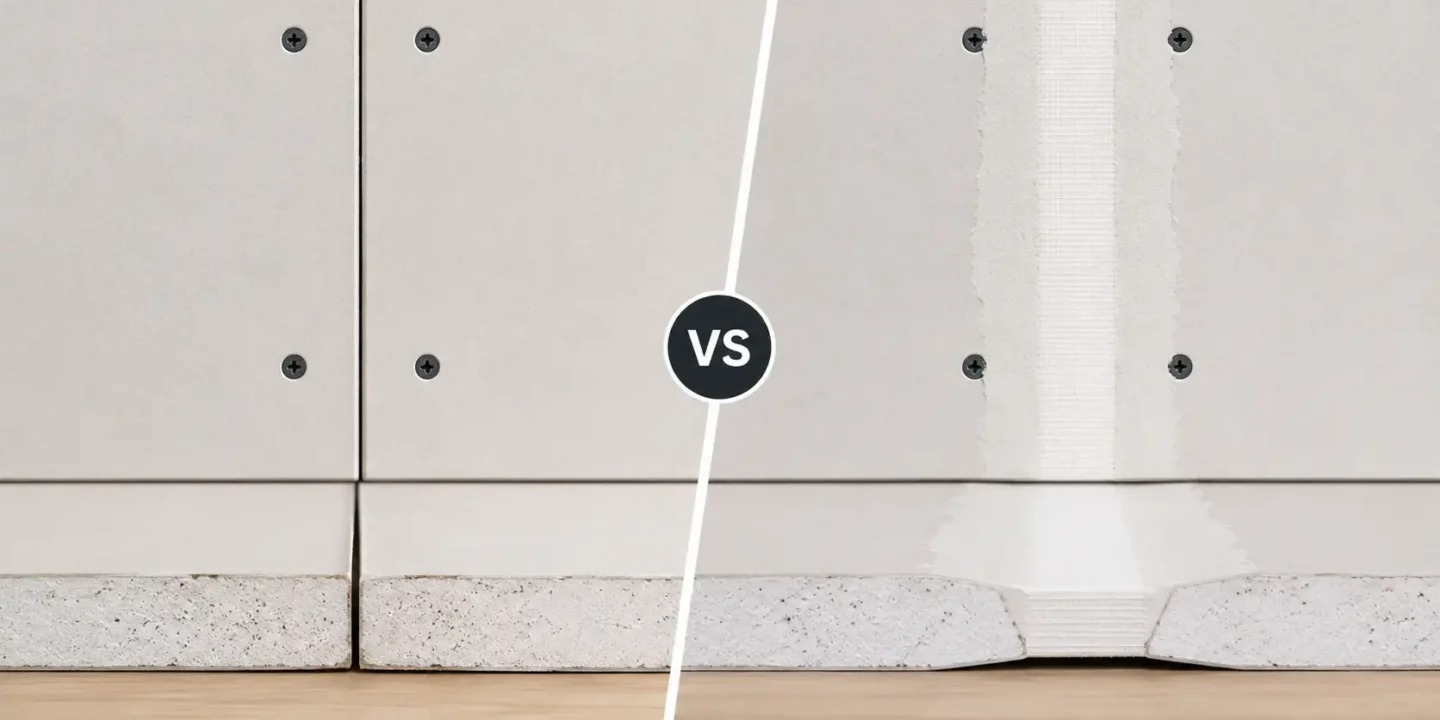

You finish hanging the drywall. You tape every seam. You apply compound, sand it smooth, and roll on two coats of paint.
Then you turn on a lamp.
And there it is. One seam, running straight up the wall, still visible.
Most people assume they made a mistake with the tape or the mud. Sometimes that’s true. But often, the real issue has nothing to do with technique. It comes down to the type of joint you were working with in the first place.
There are two fundamentally different seam types in drywall: tapered joints and butt joints. They don’t behave the same way, they don’t finish the same way, and they definitely don’t hide the same way under paint.
Understanding the difference between them will save you a lot of frustration. More importantly, it’ll help you figure out why that seam is still showing, and what you can actually do about it.
Key Takeaways
- Tapered joints have a factory recess. Butt joints don’t. That one difference controls everything about how hard each seam is to finish.
- Compound on a butt joint sits above the wall surface, not flush with it. That raised area is why it shows under paint.
- Butt joints need feathering 12 to 16 inches on each side. Try to finish them narrow and they will show.
- Side lighting exposes poorly finished butt joints even when they look fine under overhead light. Always check your work under raking light before painting.
- Butt joints are often unavoidable. The goal is to minimize them with a smart layout, then finish them correctly when they appear.
Butt Joints vs Tapered Joints at a Glance
| Feature | Butt Joint | Tapered Joint |
| Location | End-to-end cuts | Long factory edges |
| Difficulty Level | High | Moderate |
| Mud Thickness | Thicker buildup required | Thin, sits recessed |
| Visibility Risk | High | Low |
| Sanding Requirements | More aggressive | More forgiving |
| Finishing Difficulty | Harder | Easier |
Need the short version?
Tapered joints are designed to hide drywall seams. Butt joints are not. And that’s why one is dramatically easier to finish than the other.
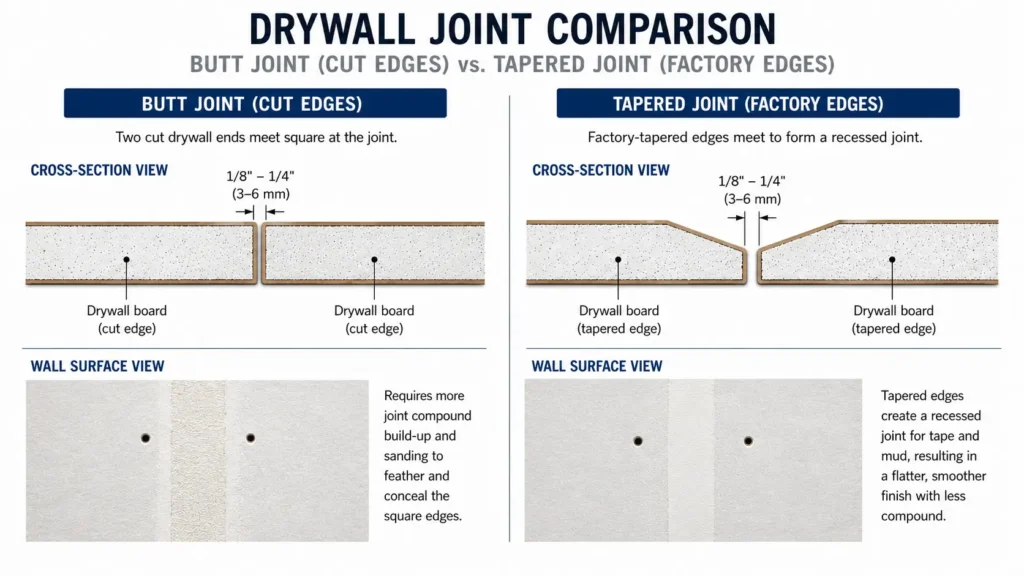
What Is a Butt Joint?
A butt joint forms where two cut ends of drywall meet. These are the short ends of a sheet, the ones you create when you score and snap the panel to fit a wall.
The problem is that the cut end has no taper. It’s a flat, blunt edge. When two of those flat edges meet side by side, the tape and compound have nowhere to sit except on top of the surface.
That creates a raised area above the surrounding drywall. Even if you apply compound carefully and sand it down, you’re fighting an uphill battle. Literally. The center of the joint sits higher than the rest of the wall.
That’s exactly what makes butt joints challenging.

What Is a Tapered Joint?
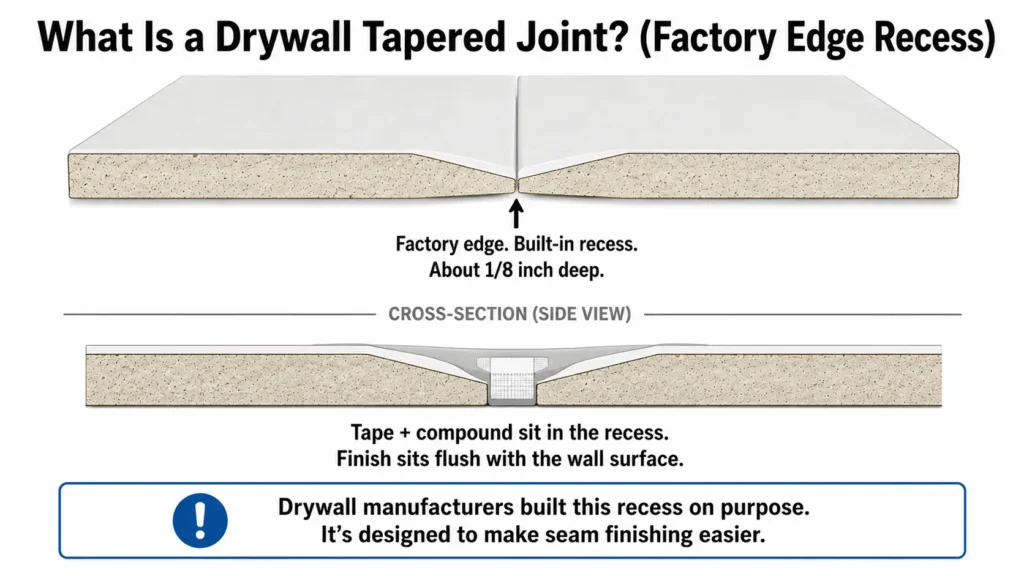
A tapered joint forms where two factory edges of drywall meet. These are the long sides of a standard drywall sheet, and they’re manufactured with a slight recess built in.
That recess is intentional. It creates a shallow channel along the seam where tape and joint compound can sit without building up above the wall surface. The tape goes into the recess. The compound fills its level. When done correctly, the finished surface sits flush with the rest of the panel.
The depth of the taper is subtle, usually around 1/8 inch. But that small detail makes a significant difference in how the finished joint looks.
In other words, drywall manufacturers already planned for this seam.
Why Butt Joints Are Harder to Finish
Here’s where most DIYers get frustrated.
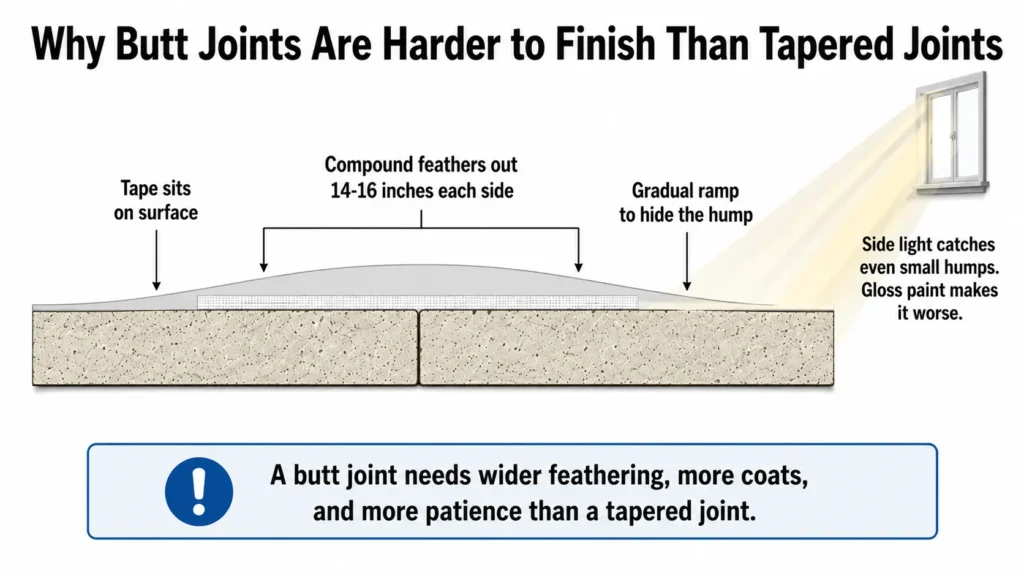
Because there’s no recess at a butt joint, any tape and compound you apply will sit proud of the surface. To make it invisible, you have to feather the compound out wide enough that the gradual rise and fall becomes undetectable to the eye, much like creating a smooth skim-coated surface.
That means spreading joint compound across a much larger area than most people expect. A well-finished butt joint might be feathered out 14 to 16 inches on each side or more. You’re not just filling a seam. You’re creating a very gradual ramp that the eye reads as flat.
That takes more coats, more drying time, and more careful sanding.
There’s also the lighting problem. Even a slight hump across a butt joint catches side light from windows or lamps and throws a subtle shadow. A seam that looks perfect under overhead light can become obvious under raking light from the side. Gloss or semi-gloss paint makes this even worse because reflective surfaces amplify surface irregularities.
Getting a butt joint truly invisible requires patience and often more skill than a tapered joint demands.
Why Tapered Joints Are Easier to Hide
The difference comes down to one simple detail.
The recess.
Because the factory edges create a shallow valley at the seam, the tape and compound can sit below the plane of the surrounding drywall. Instead of building up, you’re filling in. As long as you apply compound in thin, controlled coats and feather the edges smoothly, the finished joint ends up flush with the rest of the wall.
There’s less buildup, less sanding, and fewer opportunities for a ridge or hump to form. The feathering distance is more forgiving as well. A tapered joint can disappear with careful finishing across a reasonable width, whereas a butt joint demands much wider feathering just to get close.
That’s why professionals prefer tapered joints whenever possible.
Which Joint Is More Likely to Show After Painting?
This is the question most homeowners actually care about.
The honest answer is that butt joints are far more likely to remain visible after painting. The reasons stack up quickly.
The raised seam is the main culprit. Paint doesn’t fill surface irregularities. It follows the contour of whatever is beneath it. If the butt joint wasn’t feathered out wide enough, or if the compound was built up too heavily in the center, the slight hump will still be there under the paint.
Side lighting is the real test. Raking light from a window or a lamp positioned at an angle to the wall is the harshest possible condition for any drywall seam. It’s the test most homeowners don’t think about until the furniture is moved in and the room is lit the way it will actually be used.
Gloss paint compounds the problem. This is one reason higher drywall finish levels are often recommended in critical lighting conditions
Higher-sheen finishes reflect light more intensely and make surface irregularities more visible. Flat or matte paint is much more forgiving, which is why it remains a common choice for ceilings and walls in older homes where imperfect joints are a reality.
Even tapered joints can show if they were finished poorly, especially when new drywall hasn’t been properly primed before painting . But starting from a raised surface, as you do with a butt joint, means you’re already working with less margin for error.
How Professionals Hide Butt Joints
Experienced finishers have a few techniques that make butt joints manageable. None of them are shortcuts, but they do work.
Wide feathering. This is the most important technique, and using the right drywall taping knife size makes a significant difference. Professional finishers feather compound 12 to 16 inches or more on each side of a butt joint. The goal is a transition so gradual the eye reads the wall as flat. Trying to hide a butt joint in 6 inches of compound won’t work.
Thin coats in stages. Butt joints need at least three coats of compound, sometimes four. Each coat goes on thin, gets feathered wide, dries completely, and gets lightly sanded before the next coat. Stacking wet coats or rushing the drying time causes cracking and buildup.
Back-blocking. This is a technique used during installation, not finishing. A back-block is a piece of drywall attached behind the seam from inside the wall cavity. It slightly recesses the joint, mimicking the effect of a tapered edge. It’s extra work during hanging, but it significantly reduces the finishing challenge.
The butt board technique. Some installers use a purpose-built device or a strip of drywall positioned behind the seam to push the edges slightly inward and create a shallow recess before finishing begins. Similar to back-blocking in concept, it gives the finisher something to work with instead of fighting a completely flat surface.
Careful sanding. Butt joints need to be sanded differently than tapered joints, while also managing drywall dust exposure. The goal isn’t to sand the center down aggressively. It’s to feather the edges so there’s no detectable transition. Over-sanding the center exposes the tape and creates a different problem entirely.

Common Mistakes When Finishing Butt Joints
Most visible butt joints come down to a few repeatable errors.
- Applying too much compound in the center and not feathering wide enough
- Feathering only 4 to 6 inches instead of 12 to 16 inches per side
- Rushing the drying process between coats and trapping moisture
- Sanding aggressively across the center, thinning or tearing the tape
- Using gloss or semi-gloss paint on walls with imperfect butt joints
- Expecting the joint to look acceptable after only two coats of compound
- Not checking the finished joint under side lighting before painting
Can You Avoid Butt Joints Entirely?
Sometimes. But not always.
In a standard room with 8-foot ceilings, standard 4×8 drywall sheets run from floor to ceiling with no butt joint on the vertical seams. The long factory edges meet, and you’re working with tapered joints throughout. This is the ideal scenario.
Problems arise when the wall is taller than a single sheet, when the room dimensions create unavoidable offcuts, or when you’re working on a ceiling. Ceilings are notorious for butt joints because sheets are run perpendicular to the joists, and the short ends inevitably meet somewhere along the span.
Longer drywall sheets help. Many suppliers carry 10-foot, 12-foot, and even longer panels. Using them reduces the number of butt joints in a space, though the sheets are heavier and harder to handle, especially overhead.
Strategic layout planning can minimize butt joints but rarely eliminates them entirely. The goal is to push them to less visible areas wherever possible: inside closets, above eye level, or in spaces that won’t receive raking light.
Butt Joints vs Tapered Joints: Which Is Better?
Most professionals prefer tapered joints. The factory taper exists for a reason, and it makes finishing dramatically more predictable.
But the question is mostly academic, because you don’t always get to choose. Room dimensions, ceiling applications, sheet sizes, and even your drywall hanging direction can influence how many butt joints end up in a room. The real skill is knowing how to handle them properly when they appear.
Understanding how to finish a butt joint correctly is a core drywall skill. Professionals who have spent years finishing walls tend to say that they fear a badly placed butt joint more than they fear inside corners or inside angles. That’s not because butt joints are impossible to finish. It’s because they demand more precision, more patience, and more awareness of lighting conditions than tapered joints do.
Final Verdict
Tapered joints are easier to finish, easier to hide, and more forgiving when lighting conditions change.
Butt joints require more effort, more coats, wider feathering, and a better understanding of how light interacts with subtle surface irregularities.
But butt joints don’t have to ruin a wall. Finished correctly, with wide feathering, thin coats, and patience, they can become nearly invisible. The key is understanding why they behave differently in the first place, and adjusting your technique accordingly instead of treating them the same as a tapered joint.
If a seam is still showing after you paint, don’t assume the technique was wrong. Ask first what type of joint you were working with. The answer will tell you a lot.
Frequently Asked Questions
Why are butt joints harder to finish?
Because the cut ends of drywall have no factory taper, there’s no recess for the tape and compound to sit in. Everything applied to a butt joint sits above the surrounding surface, creating a raised area that needs to be feathered out across a wide span to become undetectable.
Can butt joints be invisible?
Yes, but it requires more work than finishing a tapered joint. Wide feathering, multiple thin coats, careful sanding, and the right lighting conditions during inspection all play a role. Back-blocking during installation also helps significantly.
How wide should a butt joint be feathered?
Most experienced finishers feather at least 12 inches on each side of the seam, and often up to 16 inches. The wider the feathering, the more gradual the transition, and the less visible the joint becomes under side lighting.
Are tapered joints stronger?
Not structurally. Both joint types rely on tape embedded in compound to connect the panels, and the tape provides the tensile strength in either case. The taper affects how the finished surface looks, not how well the joint holds.
Should butt joints be avoided?
Where layout allows it, yes. Minimizing butt joints reduces finishing time and improves results. But they’re often unavoidable, particularly on ceilings and in rooms where sheet dimensions don’t work out cleanly. Using longer drywall panels and planning the layout carefully can reduce their frequency without eliminating them entirely.

Elena Hart is the founder and lead writer of Better Home Pro. She writes about drywall, home repair, and practical DIY home improvement topics, focusing on clear, useful information that helps homeowners make better decisions. Her work combines firsthand experience, manufacturer documentation, industry resources, and careful research to create content that is accurate, practical, and easy to understand. Through Better Home Pro, Elena aims to simplify complex home improvement topics and provide guidance that is genuinely helpful to homeowners and DIYers.


No Comments