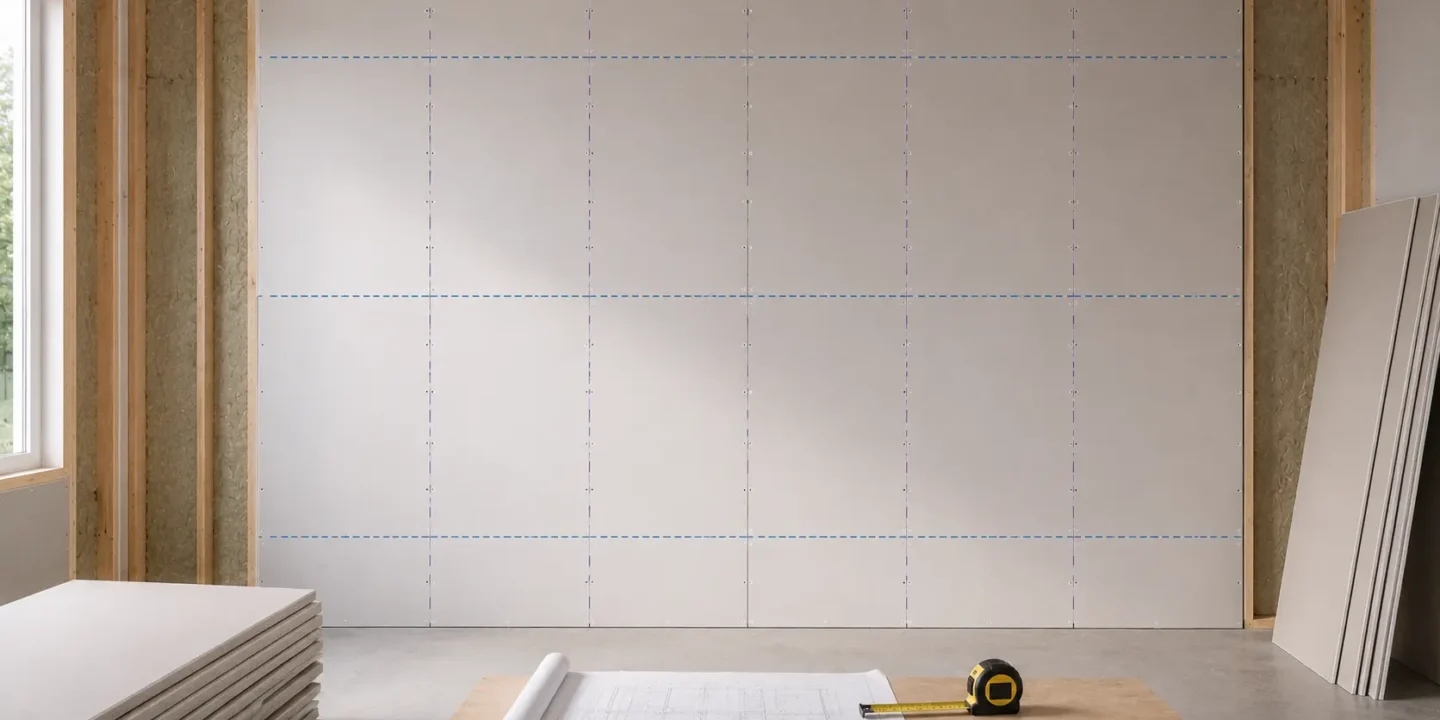

Good drywall work starts before the first panel goes up. Most of the problems that show up after painting, including visible seams, cracks at door corners, and patches that never quite disappear, trace back to decisions made during layout. Or, more accurately, to layout that never really happened.
Drywall layout is the planning step where you decide where every seam lands, how sheets meet the framing, how you handle doors and windows, and how you minimize wasted material. Done right, it reduces finishing time, improves the final appearance, and prevents a lot of callbacks.
This guide covers the four core decisions: seam placement, framing alignment, opening management, and waste control. Whether you are a DIYer tackling a room or a contractor running a crew, working through these decisions before hanging drywall saves real time and money on the back end.
Key Takeaways
- Plan Before Hanging: Drywall layout decisions determine seam visibility, crack risk, finishing labor, and material waste.
- Keep Seams Supported: Every seam should land on framing, blocking, or backing to prevent future cracking.
- Protect Opening Corners: Never place seams at door or window corners; bridge openings with full sheets and cut them out afterward.
- Prioritize Fewer Seams: Longer panels and strategic layouts often save more labor than minimizing material scraps.
- Ceilings Drive Layout: Plan and hang ceilings first, stagger seams, and account for lighting before finalizing panel placement.
What Drywall Layout Means
Layout is the planned arrangement of gypsum board panels across walls and ceilings before installation begins. It is not just deciding how many sheets to order. It involves choosing panel size and orientation, mapping where each seam will fall, confirming that seams land on framing members, planning how openings will be cut, and accounting for waste.
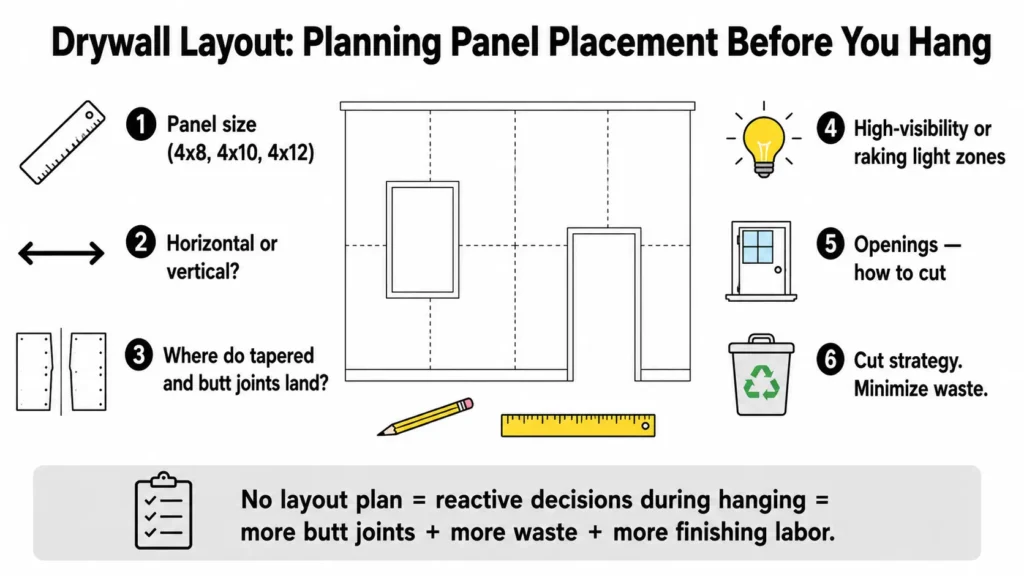
A good layout plan answers these questions:
- What size panels (4×8, 4×10, and 4×12 drywall sheets) work best for each surface?
- Should panels run horizontal or vertical on each wall?
- Where will tapered edges meet, and where will butt ends land?
- Which seams are in high-visibility, high-stress, or critical lighting zones?
- How will each door and window opening be handled?
- What is the cut strategy for minimizing waste while keeping offcuts usable?
Without a clear answer to these questions, you end up making reactive decisions during installation, which usually means more butt joints, more waste, and more finishing labor than necessary.
The Golden Rules of Drywall Layout
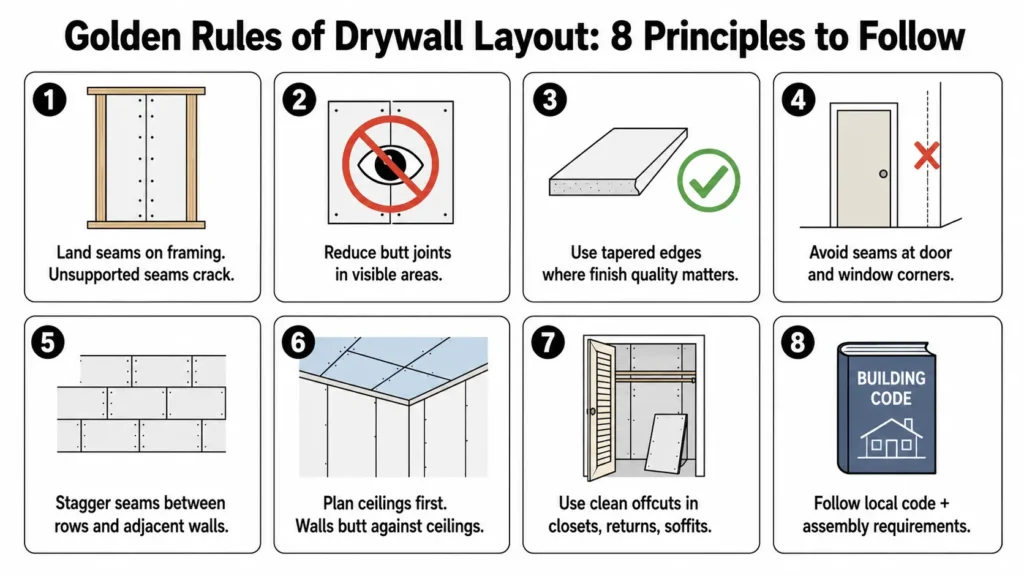
These principles hold across most residential and light commercial work. There are assemblies, codes, and conditions that modify them, which is covered in later sections, but as a baseline:
- Land seams on framing members whenever possible. Unsupported seams crack.
- Reduce butt joints in visible areas. Tapered edges finish flatter and with less labor.
- Use tapered edges where finish quality matters. Save butt ends for areas that will be hidden or minimally inspected.
- Avoid seams at door and window corners. Corner stress cracks at these points are predictable and preventable.
- Stagger seams between rows and between adjacent walls and ceilings. Aligning seams creates a continuous weak line.
- Plan ceilings before walls. Ceiling panels go up first, and wall panels butt against them, so ceiling layout drives wall layout.
- Use clean offcuts in closets, returns, and soffits. Save full sheets for main wall fields.
- Follow local code, the applicable assembly requirements, and the manufacturer’s installation instructions. This is especially important for fire-rated, sound-rated, moisture-resistant, and ceiling applications where drywall thickness requirements vary.
Understand Studs, Joists, and Backing Before You Layout Sheets
Before sketching a layout, verify the framing. This sounds obvious, but skipping the inspection step is one of the most common reasons for layout problems.
Studs and joists on center
Most residential wood framing places studs at 16 inches on center, though 24-inch spacing is also common, particularly in newer construction and certain engineered systems. Standard 4×8 sheets work with both spacings because the sheet edges land on stud centers when panels start from a corner or a seam lined up with a stud. If your framing is irregular, misaligned, or damaged, your layout needs to account for that.
Joists for ceilings follow the same logic. Panel direction relative to framing direction affects both appearance and structural performance. USG gypsum panel installation guidelines address perpendicular and parallel application, and those distinctions matter especially for ceilings.
Blocking and backing
Not all framing automatically provides backing at every seam location. Inside corners, horizontal seams on walls, and seams near ceiling edges often require added blocking or backing to give fasteners and panel edges proper support. Plan for this before panels go up, not after.
Bowed and twisted framing
A bowed stud or a joist that crowns in the wrong direction affects the entire panel field. Check the framing plane with a long straightedge or a string line. Any framing member that sits high or low needs to be corrected before panels go on. A stud that throws a panel out of plane will telegraph through the finish regardless of how well the joint is taped.
Furring channels
In basement and commercial applications, furring channels are often used instead of or in addition to wood framing. Layout logic is the same, but channel spacing and fastening schedules are specific to the assembly. Verify the engineered design.
Pre-hang checklist
Before laying out any surface, run through this:
- Mark all stud and joist centers clearly
- Check the framing plane for high spots and low spots
- Confirm backing exists at all planned seam locations, and add blocking where needed
- Verify rough openings for doors and windows are complete
- Confirm electrical boxes, plumbing penetrations, and HVAC register locations are roughed in
Horizontal vs Vertical Drywall Layout
The question of horizontal versus vertical installation comes up on almost every residential drywall installation project, and the answer depends on the specific application, the framing, and the code requirements for that assembly.
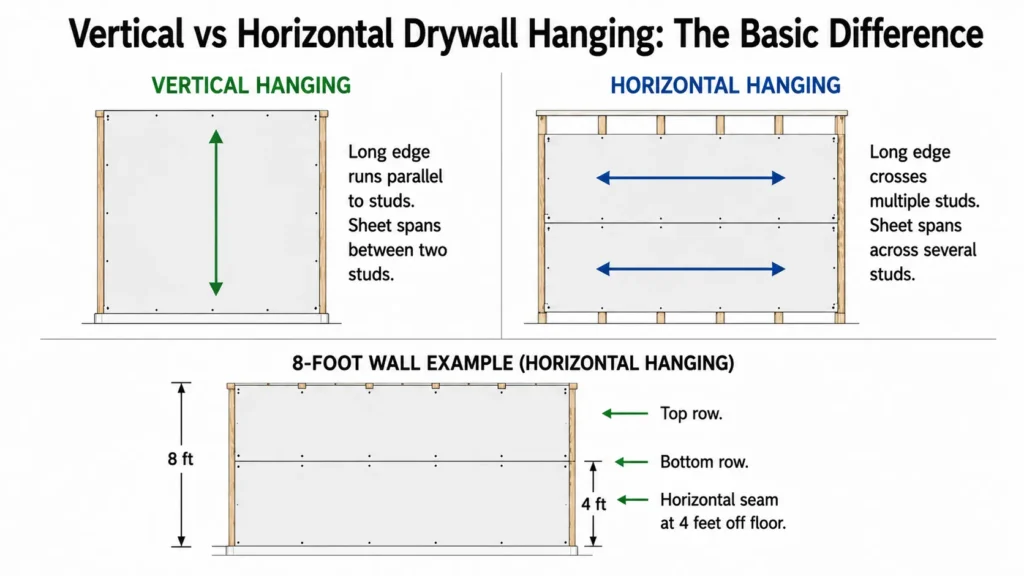
Horizontal layout
On standard 8-foot residential walls, running 4×8 panels horizontally means the long edges (tapered edges) run parallel to the floor. The horizontal seam falls somewhere around 48 to 54 inches up the wall depending on where you start. This keeps both long seams in the lower and upper fields as tapered joints, which finish flatter than butt joints and are less visible.
Horizontal layout also creates a continuous tapered seam across the full wall length. That seam is easier to feather and blend than a series of vertical butt joints. In residential work, horizontal is often preferred in finished living spaces for this reason.
Vertical layout
Running panels vertically places the long edges from floor to ceiling. On an 8-foot wall, no horizontal seam is needed. On walls taller than 8 feet, vertical layout may require cutting down panels, which creates more waste. However, vertical drywall installation can be the right choice in certain conditions:
- Walls taller than the available panel length, where horizontal layout would produce multiple rows and more seams
- Fire-rated assemblies where the manufacturer or code specifies vertical application
- Commercial applications with 9 or 10-foot framing and long panels
- Situations where framing spacing matches panel width precisely
The honest answer is that neither orientation is universally better. The right choice depends on ceiling height, panel availability, the assembly type, and the code requirements in your jurisdiction. Always verify with manufacturer installation instructions and the applicable fire or sound assembly when those are factors.
How to Place Drywall Seams
Seam placement is where most layout decisions concentrate. A well-placed seam is structurally supported, in a low-visibility zone, and oriented to use tapered edges. A poorly placed seam is at a corner stress point, unsupported, using butt ends in a high-light area.
Tapered joints vs butt joints
Factory-made drywall panels have tapered edges along the long dimension. The taper creates a recessed channel when two panels are placed edge to edge, and that recess is designed to be filled with joint compound and tape. When finished correctly, a tapered joint sits flush with the panel face and nearly disappears.
Butt ends are the cut ends of the panel, or the factory short ends, which have no taper. When two butt ends meet, the joint sits proud of the surface. Finishing a butt joint flat requires feathering compound across a much wider area, which increases both difficulty and the chance of visible shadowing in raking light.
Whenever possible, use tapered-edge joints in finished areas where higher drywall finish levels are expected. Reserve butt joints for areas that are concealed, in low-light locations, or where the finish level requirements are lower.
Staggered joints
Seams in adjacent rows should not align. Staggering joints by at least one stud bay prevents a continuous line of weakness running across a wall or ceiling. The same principle applies between walls and ceilings: if a ceiling seam runs close to a wall seam, the combined weakness and potential for cracking increases.
Four-corner intersections
Four panel corners meeting at one point is a known problem area. The joint compound at that intersection tends to crack as the panels expand and contract slightly. Wherever possible, offset seams so that no more than two corners meet at any one point.
Seams under critical lighting
Critical lighting refers to conditions where light rakes across a surface at a low angle, making any surface irregularity visible. Window walls, wall surfaces lit by recessed or angled fixtures, and accent-lit features all qualify. In these zones, butt joints and misaligned seams will show through paint. Plan tapered seams in these areas and keep surface flatness tolerances tight.
The Gypsum Association uses “joint photographing” to describe visible shadowing or banding at joint locations after finish and paint. It can result from raised butt joints, over-crowned compound, or surface irregularities at seams. Layout that minimizes butt joints in critical lighting areas reduces the risk significantly.
Seam risk summary
| Seam Location | Risk Level | Notes |
| Tapered edge, flat wall, low light | Low | Best condition for visible areas |
| Tapered edge, horizontal, high-light wall | Low-Medium | Good with proper finishing |
| Butt joint, concealed or low-light area | Medium | Acceptable in secondary spaces |
| Butt joint, main field, raking or natural light | High | Avoid in finished living areas |
| Any joint at door or window corner | High | Plan to bridge openings |
| Unsupported seam, no framing backing | Very High | Never acceptable; will crack |
| Four corners meeting at one point | High | Offset to avoid |
Drywall Layout Around Doors and Windows
This section deserves careful attention because it is where DIY and contractor work most commonly diverges from best practice. Most of the cracks that appear above door and window corners are directly caused by poor seam placement during layout.
The stress point problem
Door and window openings create stress concentrations in the wall system. The framing around openings includes headers, king studs, jack studs (sometimes called trimmer studs), and cripple studs. This framing carries load and transfers it to the foundation. Even in non-structural partitions, seasonal movement and settlement create stress that concentrates at opening corners.
If a drywall seam lands exactly at the corner of a door or window, that seam sits directly in a stress concentration zone. Cracking is predictable. It may take months or years, but it almost always happens.
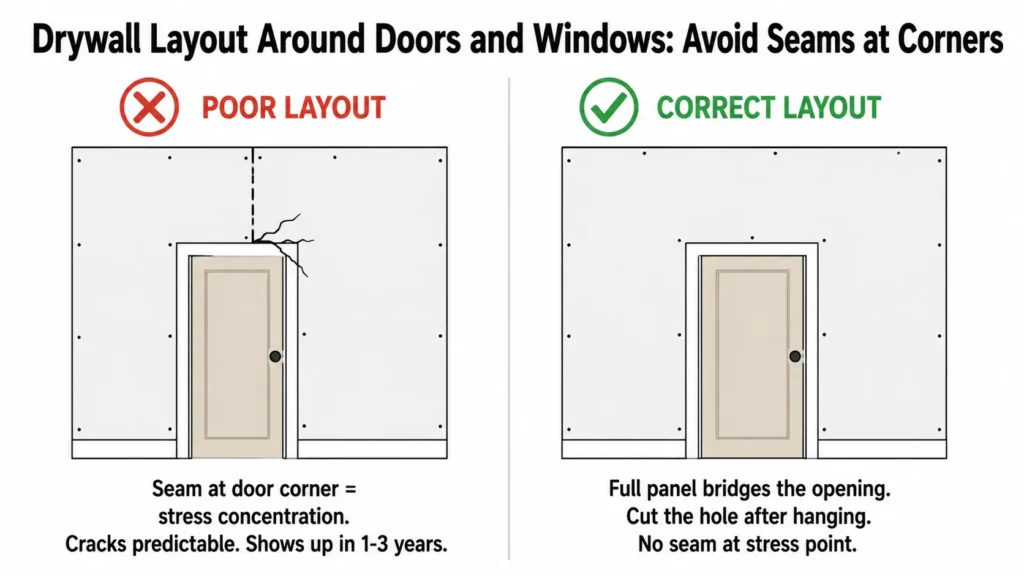
Bridge openings with full sheets
The correct approach is to use a full-width panel that bridges across the opening and cut the opening out of the installed panel. This keeps the field panel continuous across the corner of the opening, so there is no seam at the stress point.
For a standard door opening, a horizontal panel above the door should extend past both sides of the rough opening by at least one stud bay if possible. The panel is then cut to reveal the opening. The seam, if there is one, falls out on the framing somewhere away from the corner.
Backing around openings
Headers, trimmers, and cripple studs create a lot of framing around openings, but not all of it lines up cleanly for drywall backing. Check that every panel edge around the opening lands on solid framing or added blocking. A seam that hits the trimmer stud on one side may have no backing on the other side of the opening.
Avoid narrow strips
A narrow strip of drywall beside a window or above a door is a weak point. If the strip is less than about 6 to 8 inches wide, it has limited fastening area, flexes more than a full panel field, and is prone to cracking at its edges. Where possible, plan the layout so you are not left with thin strips in these locations. If a strip is unavoidable, make sure it is fully backed and properly fastened.
Plan for trim, but do not rely on it
Window and door casing covers a few inches around the rough opening, which means ragged cuts and imperfect edges in those areas are not visible after trim installation. That is useful, and you do not need to achieve perfect cuts right to the edge of the jamb. However, relying on trim to hide poor seam placement or cracked joints is a mistake. If the seam is in a stress zone, it will crack eventually, and that crack will show through trim in many cases.
Visual reference: seam placement around a door
Poor layout: Seam lands exactly at door corner, with panel edge directly at the corner of the rough opening. Stress cracks here almost always appear within 1 to 3 years.
Better layout: Full panel bridges the opening. The panel is cut to reveal the door, and any seam falls out on the flat wall, away from the corner.
Ceiling Drywall Layout
Ceilings are the highest-visibility surface in most rooms. Natural light from windows, artificial light from fixtures, and the overhead angle all make ceiling seams and surface irregularities more visible than on walls. Layout for ceilings deserves at least as much thought as wall layout, usually more.
Ceiling first, walls second
Always complete ceiling drywall before hanging wall panels. Wall panels butt up against the ceiling panels and help support them at the perimeter. If you hang walls first, you lose that support detail and complicate the ceiling installation unnecessarily.
Panel direction relative to joists
On wood-framed ceilings, run panels perpendicular to the joists unless the assembly specifications require otherwise. Perpendicular application distributes fastening across more framing members and reduces the effect of any single joist being slightly out of plane. Check the Gypsum Association’s standards and your local code for fastening schedules and perpendicular vs. parallel requirements.
Sag resistance
Ceiling panels sag under their own weight between fasteners if the framing spacing is wide, the panel is too thin, or the fastening schedule is inadequate. For 16-inch joist spacing, 1/2-inch panels are typically acceptable. For 24-inch spacing, 5/8-inch panels are generally recommended. Verify the specific panel type and manufacturer specs before installing.
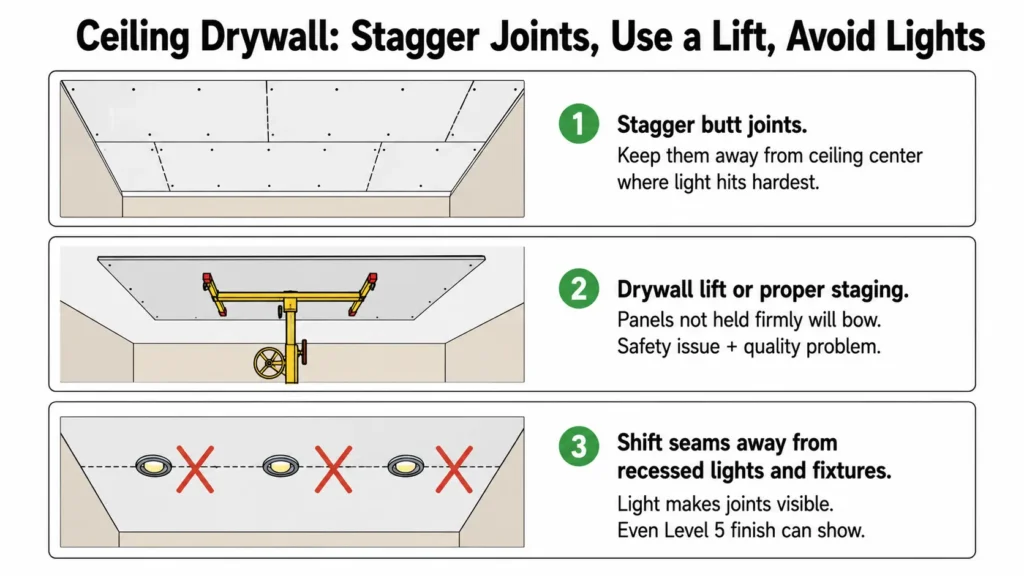
Stagger butt joints
Ceiling butt joints are especially visible. Stagger them between rows so they are not aligned across the room, and keep them away from the center of the ceiling where they get the most direct overhead light.
Use a lift or proper staging
Ceiling installation without a drywall lift or proper staging creates safety issues and installation quality problems and should follow OSHA material handling safety guidance. Panels that are not held firmly in place during fastening may bow, making the seams harder to close and increasing the chance of fastener problems.
Lighting and seam placement
Before planning ceiling seam locations, think about where recessed fixtures and light bars will be positioned. Running a seam directly through a recessed fixture zone, or parallel to a row of recessed lights at close range, can make joint photographing visible even at finish Level 5. Shift seams away from fixture positions where possible.
How to Calculate Drywall Sheets and Waste
There are two ways to estimate drywall quantities: the square footage method and the wall-by-wall planning method. Both have their place, but relying only on square footage leads to underestimates and surprises.
Square footage method
This gives a fast approximation and works well for early budgeting.
- Wall area = wall length x wall height
- Ceiling area = room length x room width
- Total area = sum of all surfaces
- Sheet area = sheet length x sheet width (e.g., 4×8 = 32 sq ft)
- Sheet count = total area divided by sheet area
- Add 10% waste for simple rooms, 12 to 15% for rooms with many openings, angles, or complex shapes
Whether to subtract windows and doors depends on usage. For a quick budget estimate, leaving them in gives a reasonable buffer. For a tight estimate, subtract openings larger than about 8 square feet, because smaller openings are often bridged by a full sheet that gets cut anyway.
Wall-by-wall planning method
For accurate ordering, plan each wall individually using actual sheet dimensions or a drywall sheet calculator.
This reveals:
- Where seams fall and whether they land on framing
- How many butt joints are unavoidable
- Which offcuts from one wall can be used on another
- Whether longer sheets (4×10 or 4×12) reduce total seams and waste
Square footage alone will not tell you that a 9-foot wall run with 8-foot sheets produces one awkward 12-inch strip that wastes most of a panel. Wall-by-wall planning catches that before you are cutting.
Sheet size selection
| Sheet Length | Best Use Case |
| 8 feet | Standard 8-foot ceilings, most residential walls, easy handling |
| 10 feet | 9-foot ceilings, taller walls, reduces horizontal seams |
| 12 feet | Long wall runs, 10-foot ceilings, reduces seam count significantly |
| 16 feet | Commercial and production work, large open framing, requires equipment |
Longer sheets reduce seam count and often reduce waste, but they are heavier, harder to maneuver, and require more crew. Factor in handling conditions before specifying.
Waste-Reducing Layout Strategy
Waste reduction in drywall has two dimensions: material waste and labor waste. Optimizing one sometimes increases the other, and the most expensive waste is often the finishing labor added by poor layout decisions, not the scrap material itself.
Prioritize fewer seams over fewer scraps
An extra seam in a visible area might cost you an hour of finishing labor per linear foot when you account for taping, multiple coats, sanding, and priming. A scrap panel costs a fraction of that. If using a longer sheet eliminates two butt joints in a high-light area, the labor savings typically outweigh the material cost.
Practical waste hierarchy
- Choose longer panels where handling allows, to reduce total seam count
- Match sheet length to wall run length to eliminate narrow strips
- Use full sheets in main visible fields; save offcuts for secondary areas
- Plan cut sequences so that offcuts from one wall are usable elsewhere
- Cut openings from full installed sheets rather than pre-cutting whenever practical
- Sort clean offcuts by size for use in closets, soffits, knee walls, and return walls
- Plan cutout sequences so the largest pieces come from the most-needed dimensions
Gypsum as a C&D material
Gypsum board is one of the major components in construction and demolition material streams. The EPA’s guidance on sustainable management of construction and demolition materials recognizes source reduction as the highest priority, ahead of recycling, because preventing waste before it is generated is more efficient than processing it afterward. Planning layout to minimize offcuts serves both project cost and environmental goals. Where local recycling markets exist for clean gypsum, sorting scraps for recycling is a reasonable secondary step.
Avoiding false economy
Over-optimizing material waste while adding seams, thin strips, or unsupported edges is a common mistake. You may save one sheet of drywall and add four hours of finishing work. Think about waste in terms of total project cost, not just material cost.
Common Drywall Layout Mistakes
These are the errors that show up repeatedly in both DIY and contractor work:
Floating seams with no backing
Any seam without solid framing or blocking behind it will eventually crack under normal structural movement. This is not a question of if but when. Add backing before panels go up.
Seams aligned with door and window corners
Already covered in detail, but worth repeating because it is so common. Bridge openings with full sheets and cut the opening out.
Too many butt joints in high-light areas
A room with multiple butt joints on the wall that faces the windows is going to show every one of them in certain light conditions, regardless of how well they are finished. Move butt joints to low-visibility surfaces during layout.
Scraps in the center of main walls
An offcut in the middle of a main wall field is a finishing problem and an aesthetic problem. Offcuts belong in corners, closets, and concealed spaces.
Forgetting ceiling layout before wall layout
Hanging walls first and then figuring out the ceiling creates avoidable complications. Plan and hang ceilings first.
Not marking studs before panels cover them
Once panels are up, studs disappear. Mark stud centers on the floor and ceiling plate before hanging, and use a chalk line to transfer marks to the panel face after installation. Some installers also run a pencil mark on the floor at every stud bay before the first panel goes up.
Ignoring fire-rated or sound-rated assembly requirements
Fire-rated and sound-rated assemblies have specific panel types, thicknesses, fastening schedules, and sometimes orientation requirements. Using the wrong panel or applying it incorrectly can void the assembly rating. Always verify the tested assembly design and follow it exactly.
Over-optimizing waste while increasing finishing labor
Using scraps and short offcuts everywhere to avoid ordering one more sheet is false economy. The finishing labor cost on added seams almost always exceeds the material savings.
Drywall Layout Checklist
Use this before hanging begins. Print or save it for the job.
✅ Want to print this checklist for your next project? Download the free
Drywall Layout Checklist PDF
.
Measurement and Framing
Openings and Penetrations
Sheet Plan
Waste and Cut Plan
Special Requirements
Final Check Before Hanging
Frequently Asked Questions
Should drywall be hung horizontal or vertical?
It depends on the wall height, the assembly requirements, and the framing. On standard 8-foot residential walls, horizontal installation keeps tapered seams in the main field and is common in finished living areas. Vertical installation works well for fire-rated assemblies that specify it, taller walls with suitable panel lengths, and some commercial conditions. There is no single correct answer for every situation. Check the assembly requirements and manufacturer instructions.
Do drywall seams have to be on studs?
Yes. Every seam needs solid backing from a framing member, blocking, or furring. Unsupported seams will crack under normal movement and settlement. There are no shortcuts here.
Can drywall seams go above doors?
A seam directly above a door corner is one of the most reliable ways to produce a crack. The correct approach is to bridge the opening with a full panel and cut the opening out. The seam, if any, should fall out on the flat wall away from the corner of the rough opening.
How much drywall waste should I plan for?
A 10% waste factor works for simple rectangular rooms with few openings. For rooms with many windows, doors, angles, vaulted ceilings, or complex framing, plan 12 to 15%. For complex custom work, do a wall-by-wall layout and add 10% on top of the calculated quantity.
Should ceilings or walls be drywalled first?
Ceilings first. Wall panels butt against the ceiling and support its perimeter, which simplifies installation and improves the fit. Hanging walls before ceilings creates unnecessary complications.
What is the difference between butt joints and tapered joints?
Tapered joints use the factory-tapered edges of the panel. Two tapered edges placed together create a recessed channel that is designed to accept tape and joint compound. When finished, a tapered joint sits flush with the panel face. Butt joints use the cut ends or factory short ends of the panel, which have no taper. A butt joint sits proud of the surface and requires more compound spread over a wider area to feather flat. Tapered joints are significantly easier to finish to a high quality.
Can I use small drywall scraps?
Scraps can be used in low-visibility, concealed locations: inside closets, behind built-ins, in soffits, and in utility spaces. They should not be used in the main field of finished walls or ceilings, particularly in areas with natural or raking light. Any scrap piece must still have proper backing at all edges.
Do I subtract windows and doors when estimating drywall?
For a rough budget estimate, leaving openings in gives a reasonable material buffer because panels often bridge them anyway. For a precise order, subtract large openings over about 8 square feet and add a 10 to 15% waste factor. The most accurate approach is a wall-by-wall layout that maps each panel rather than relying on pure square footage calculations.

Elena Hart is the founder and lead writer of Better Home Pro. She writes about drywall, home repair, and practical DIY home improvement topics, focusing on clear, useful information that helps homeowners make better decisions. Her work combines firsthand experience, manufacturer documentation, industry resources, and careful research to create content that is accurate, practical, and easy to understand. Through Better Home Pro, Elena aims to simplify complex home improvement topics and provide guidance that is genuinely helpful to homeowners and DIYers.


No Comments