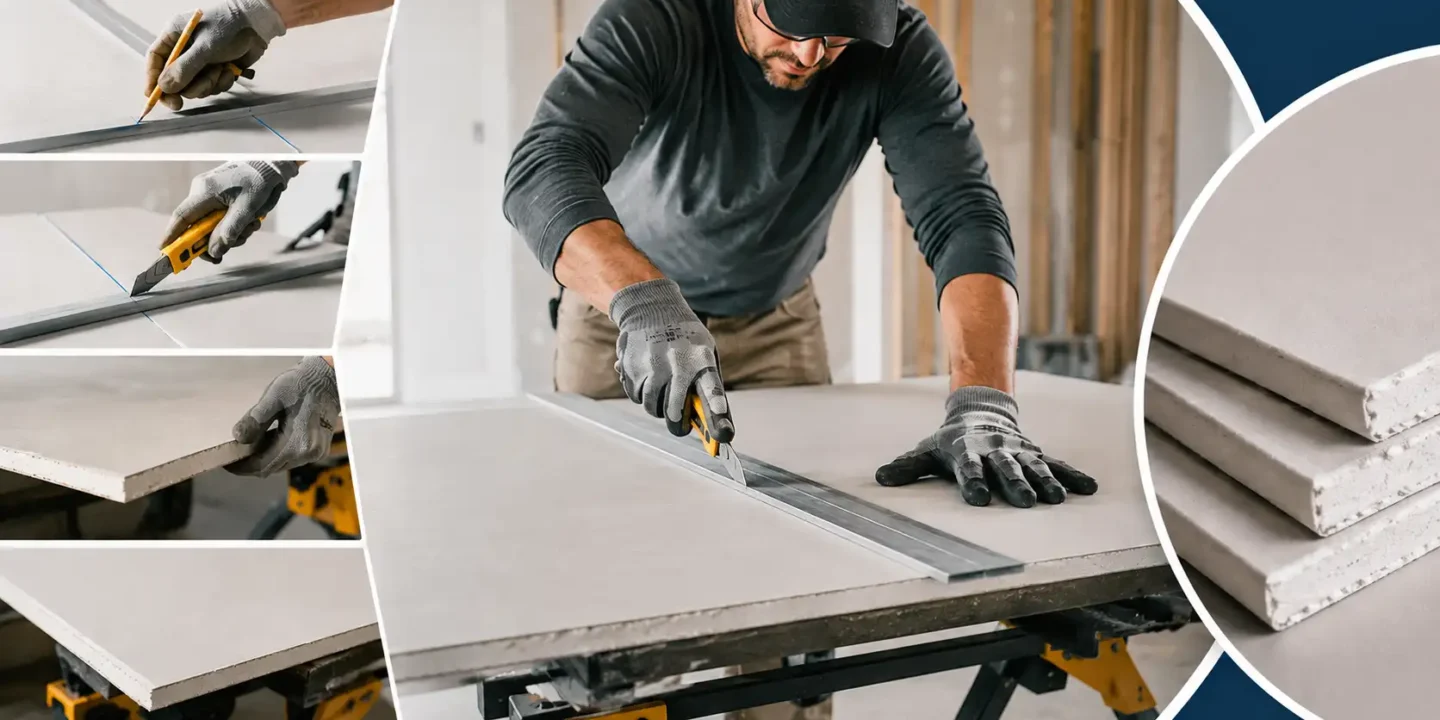

The first thing to understand about cutting drywall is that you’re not actually cutting through it. You’re scoring the drywall paper face and using the gypsum core’s brittleness to create a controlled fracture along the cut line. Once that clicks, most cutting problems become solvable. Panels break, crumble, or snap in the wrong place almost always because of one of five specific, fixable mistakes — and most articles don’t tell you which one you’re making.
The five failure modes are: a blade that’s too dull, snapping in the wrong direction, insufficient support under the panel, thin strips that don’t have enough mass to snap cleanly, and L-cuts attempted as a single snap. Each has a direct fix. This guide maps each one to its root cause and tells you exactly what to do about it.
The 5 Failure Modes: Diagnose Yours and Fix It Directly
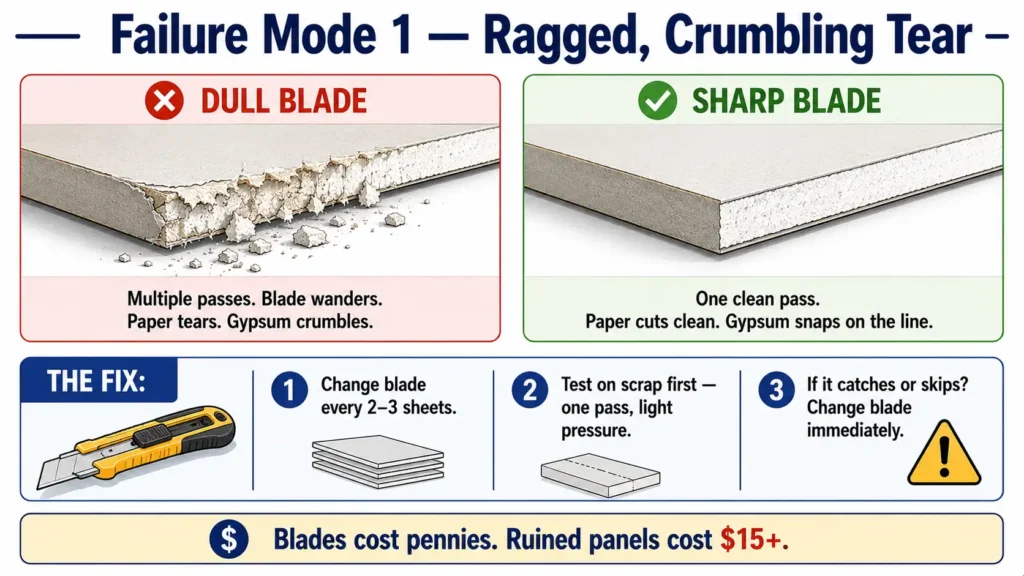
Failure Mode 1: Ragged, Crumbling Tear Instead of a Clean Snap
Root cause: The blade is dull. A dull utility knife forces multiple uneven score passes that damage the paper surface instead of creating a clean fracture plane. That leaves a partial paper tear, which causes the gypsum to crumble rather than fracture along a defined plane.
Direct fix: Change the blade. Blades cost pennies and gypsum dulls them fast. A fresh blade scores cleanly in a single firm pass. Professionals change blades every two or three sheets — that’s not excessive, it’s just how quickly gypsum destroys a cutting edge.
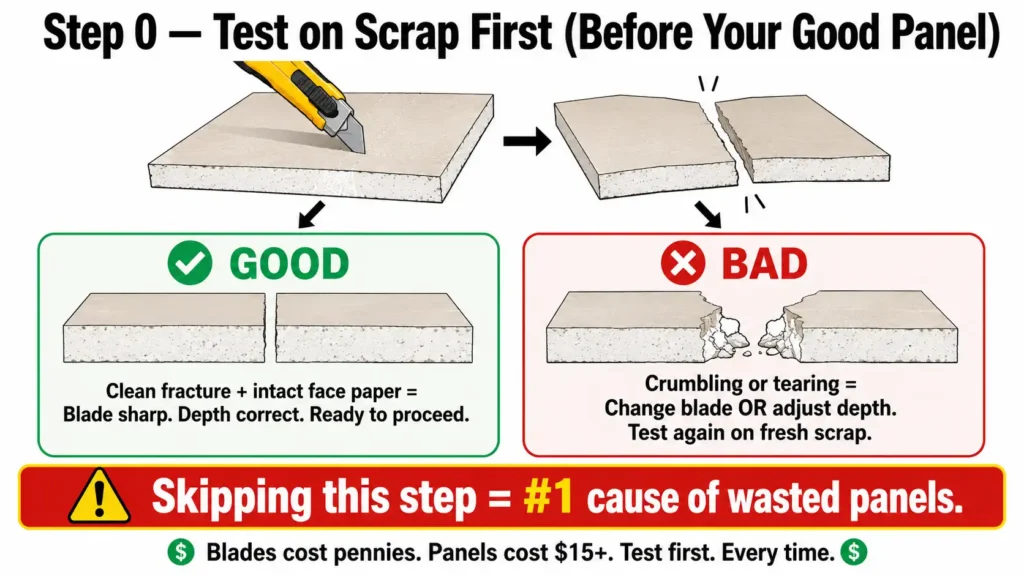
Before scoring your good panel, test the blade on a scrap piece. One pass, light pressure. If it catches or skips, change the blade immediately. A 30-second scrap test prevents ruining a panel that costs $15 or more.
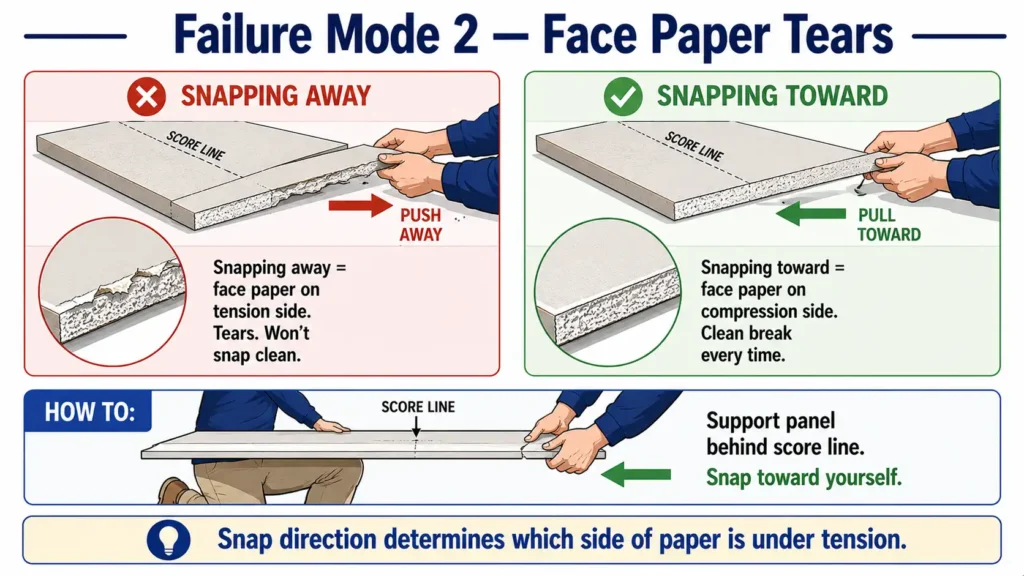
Failure Mode 2: Face Paper Tears Instead of a Clean Fracture
Root cause: You’re snapping the panel away from yourself instead of toward yourself. When you snap away, the face paper ends up on the tension side of the break. It tears irregularly rather than fracturing cleanly along the score line.
Direct fix: Always snap toward yourself. Support the panel with your knee or the work surface edge directly behind the score line. Apply a firm, controlled snap pulling the offcut toward your body. The face paper, already scored by the blade, separates cleanly every time.
This is one of those things that seems minor until you understand the mechanics. The snap direction actually determines which side of the paper is under tension during the break.
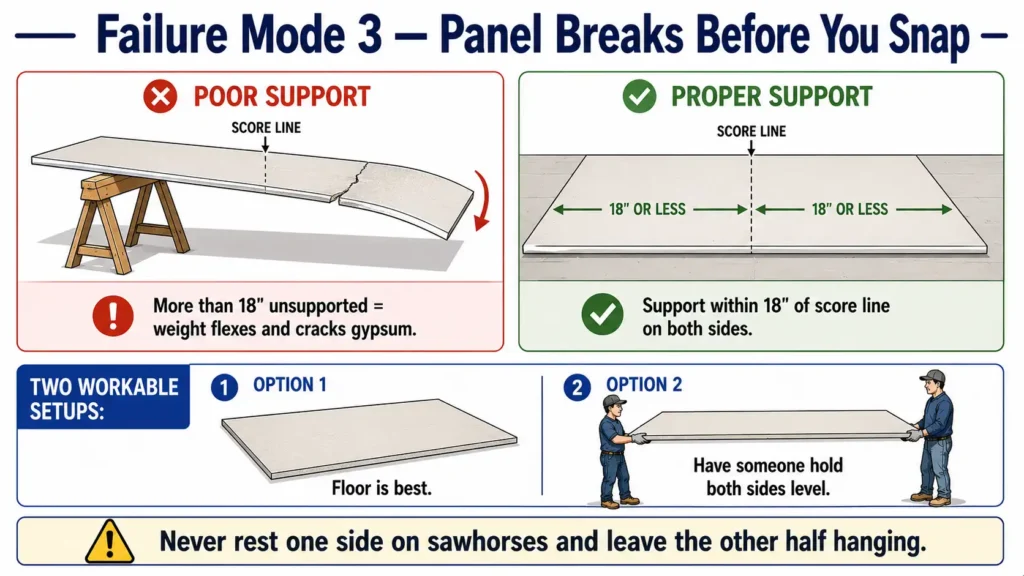
Failure Mode 3: Panel Breaks Mid-Sheet Before You Even Snap It
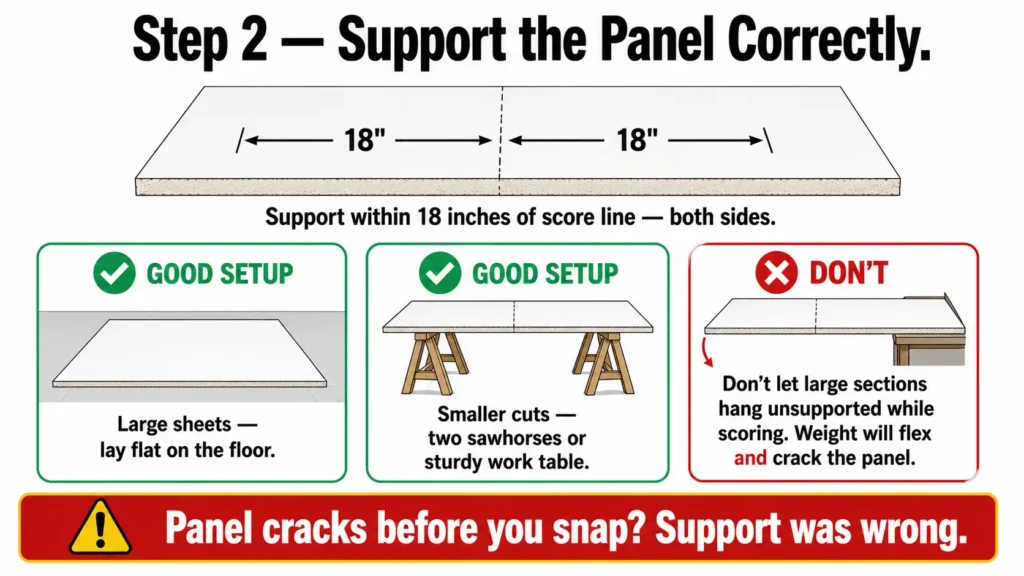
Root cause: The panel isn’t supported properly while you score. If more than 18 inches of drywall is hanging unsupported off the edge of a work surface, the panel’s own weight creates enough flex to crack the gypsum core before the controlled snap even happens.
Direct fix: Support the panel within 18 inches of the score line on both sides. For large sheets, the floor is the best work surface. For cuts near the middle of a large sheet, have someone hold both sides level while you score and snap. Never rest one side of a large sheet on sawhorses and leave the other half hanging.
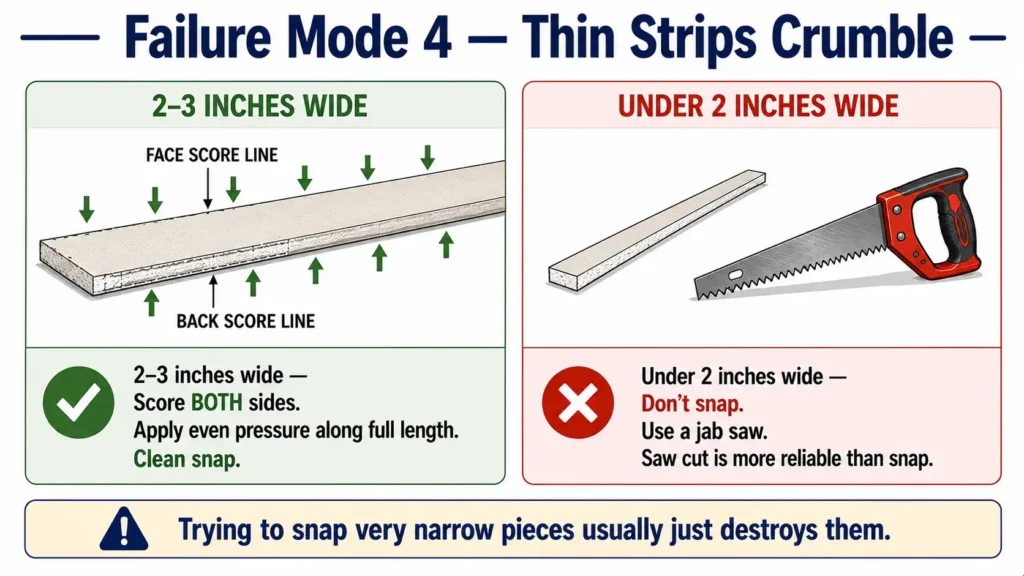
Failure Mode 4: Thin Strips Crumble Instead of Snapping
Root cause: Narrow strips under about 3 inches wide don’t have enough mass to snap cleanly. The gypsum fractures unpredictably rather than along the score line.
Direct fix: Two options depending on width. For strips between 2 and 3 inches, score both the face and the back of the panel, then apply simultaneous even pressure along the full length of the strip. For strips under 2 inches wide, use a jab saw instead because extremely narrow drywall strips do not fracture predictably during a standard snap cut . A clean saw cut is simply more reliable than a snap for very narrow pieces. Trying to snap something that narrow usually just destroys it.
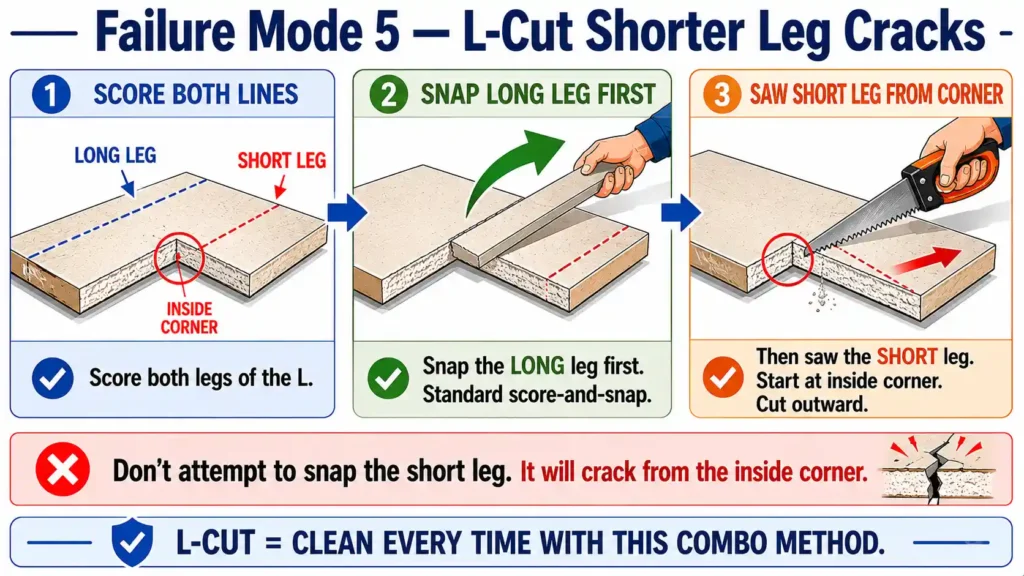
Failure Mode 5: L-Cut Shorter Leg Cracks Unpredictably
Root cause: Attempting to snap both legs of an L-cut at the same time. The shorter leg doesn’t have enough panel mass on the offcut side to snap cleanly, and it cracks from the inside corner outward, ruining the piece.
Direct fix: Score both lines of the L-cut. Snap the long leg first using the standard score-and-snap method. Then use a jab saw to complete the short leg so the inside corner does not crack outward unpredictably. Don’t attempt to snap the short leg at all. This combination method gives a clean result every time.
The Correct Score-and-Snap Technique, Step by Step
Cutting drywall cleanly is about process discipline as much as technique. Each step matters.
Step 0: Test on scrap first. Before scoring your good panel, score a scrap piece with the same blade and check the snap result. Clean fracture with intact face paper means your blade is sharp, depth is correct, and you’re ready to proceed. Crumbling or tearing means change the blade or adjust depth. Skipping this step is the single most common cause of wasted panels.
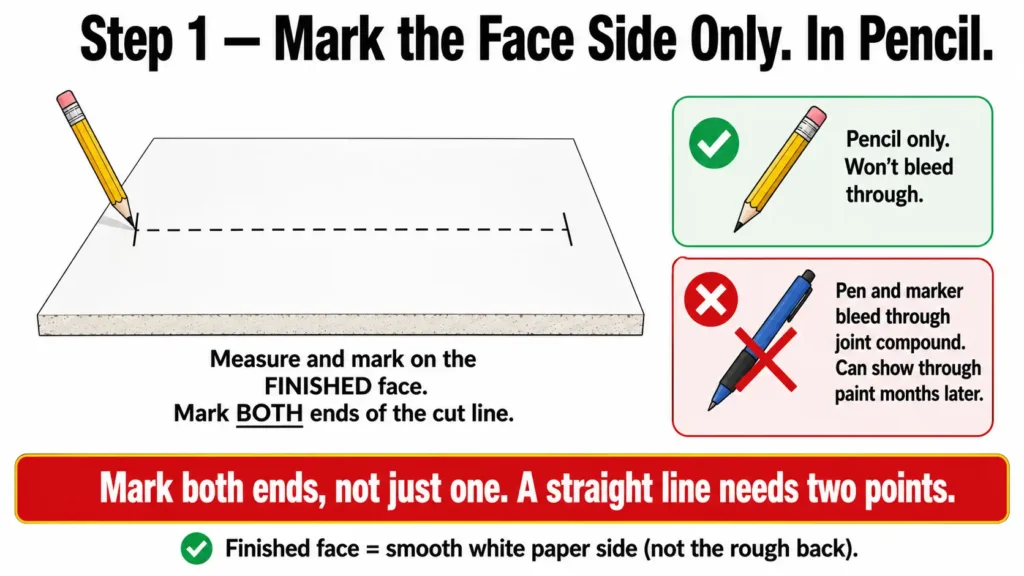
Step 1: Mark the face side only, in pencil. Always measure and mark on the finished (white, smooth paper) face side. Use pencil only. Pen and marker bleed through joint compound and can show through paint, sometimes months after finishing. Mark both ends of the cut line, not just one end.
Step 2: Set up support correctly. The panel must be supported within 18 inches of the score line on both sides. For large sheets, lay the panel flat on the floor. For smaller cuts, two sawhorses or a sturdy work table work well. Don’t let large sections hang unsupported while scoring.
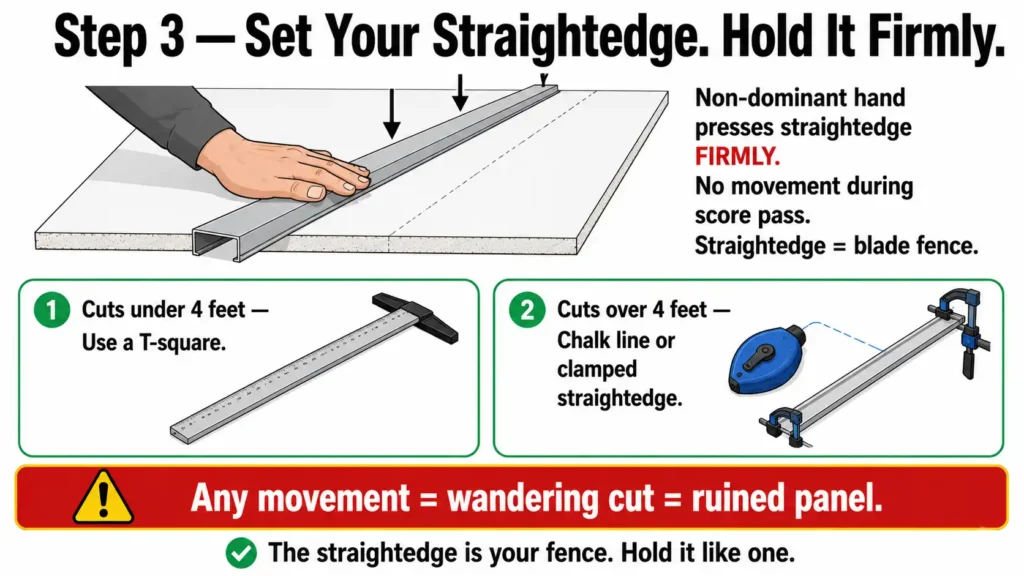
Step 3: Set your straightedge and hold it firmly. Use a T-square for cuts under 4 feet. For longer cuts, use a chalk line or a clamped straightedge. Your non-dominant hand presses the straightedge down firmly against the panel with no movement during the score pass. The straightedge acts as a cutting guide that keeps the score line perfectly aligned across the drywall surface.
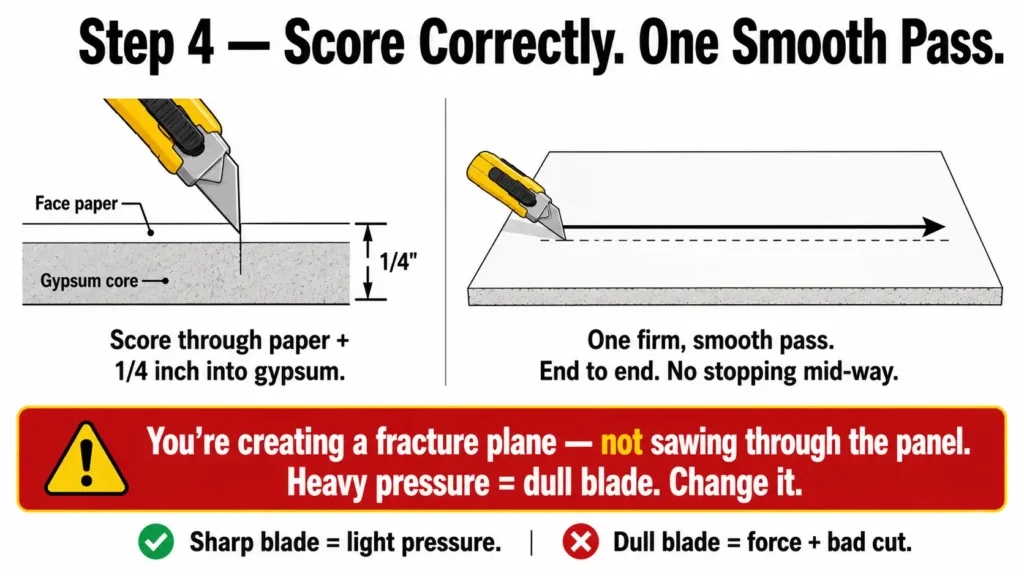
Step 4: Score through the paper and about 1/4 inch into the gypsum. One firm, smooth pass from end to end. You’re cutting through the face paper and creating a fracture plane in the gypsum core, not sawing through the panel. You shouldn’t need heavy pressure with a sharp blade. If you’re pressing hard to get the blade to cut, change the blade.
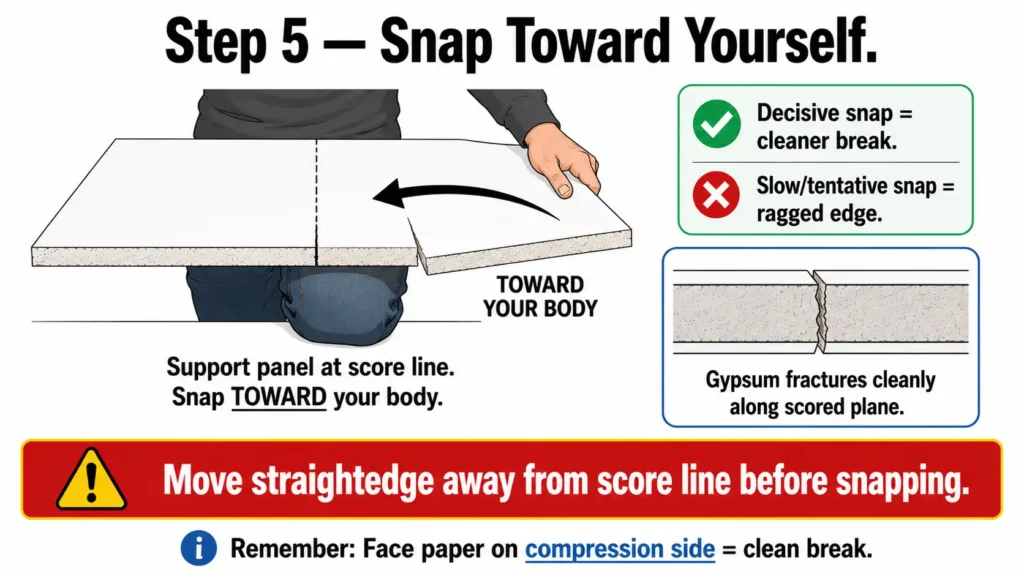
Step 5: Snap toward yourself. Move the straightedge away from the score line. Support the panel at the score line with your knee or the work surface edge. Apply a firm, controlled snap pulling the offcut toward your body. The gypsum fractures cleanly along the scored plane. A decisive snap produces a cleaner break than a slow or tentative one.
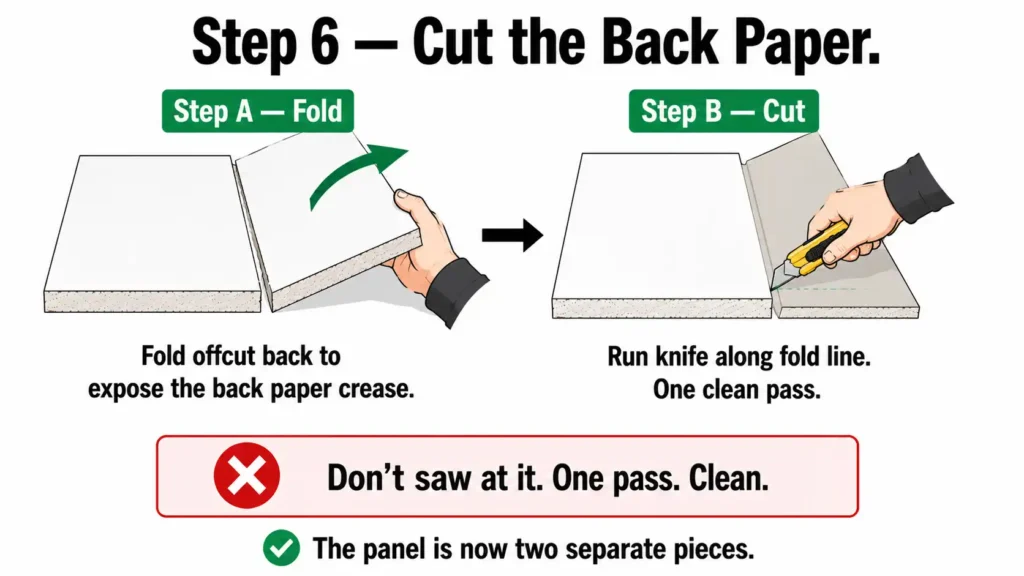
Step 6: Cut the back paper. Fold the offcut back to expose the back paper crease. Run your utility knife along the fold line in one clean pass. Don’t saw at it.
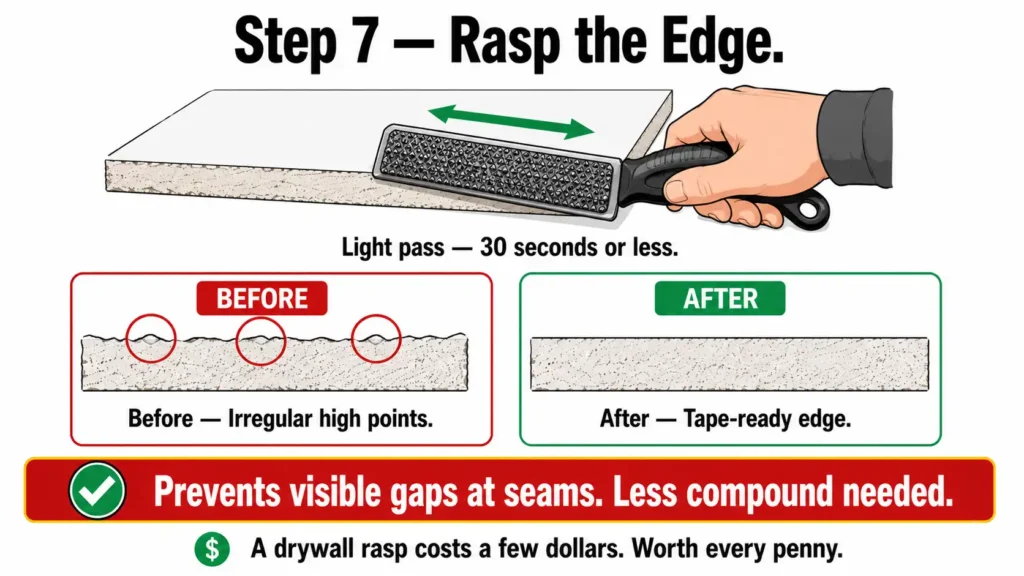
Step 7: Rasp the edge. A drywall rasp run lightly along the cut edge knocks off irregular high points in under 30 seconds. This produces a tape-ready edge and prevents visible gaps at seams that require excess compound to fill.
Measurement Accuracy: Techniques That Prevent the Wrong Cut
Getting the cut location right matters as much as the cut itself. A perfectly executed cut in the wrong place is still a ruined panel.
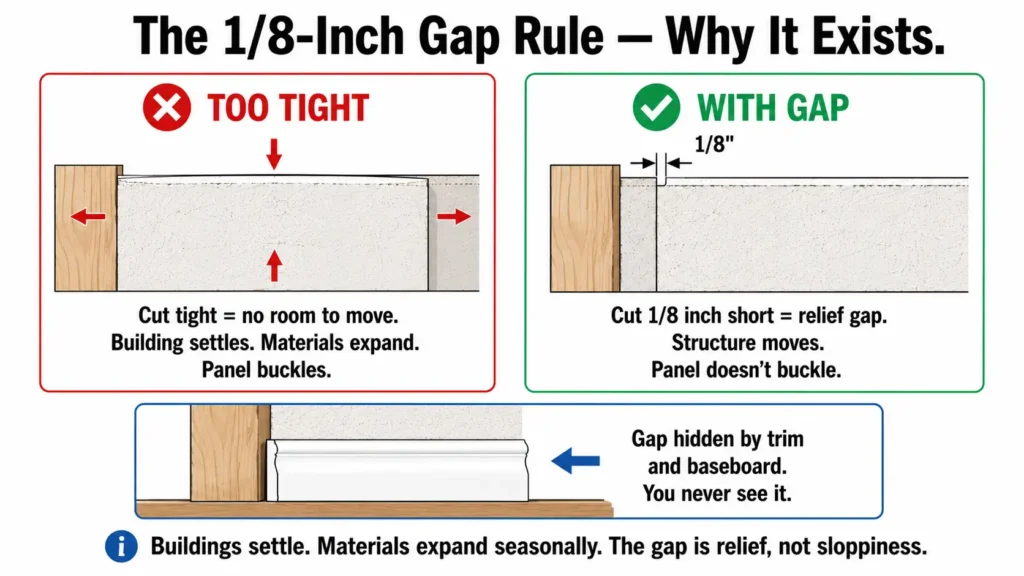
The 1/8-inch gap rule and why it exists. Mark panels about 1/8 inch shorter than your actual measurement to leave a small gap between the drywall and adjacent surfaces. This isn’t sloppiness. Buildings settle and materials expand seasonally. Panels cut too tightly against framing eventually buckle once seasonal expansion and structural movement begin stressing the drywall edges. The 1/8-inch gap provides relief, and it gets hidden by trim and baseboard anyway. Bob Vila mentions this rule but rarely explains the reason behind it.
Mark both ends of the cut line. Marking only one end and freehand-connecting the rest introduces angle error. Mark both ends, then connect them with a T-square or straightedge before scoring.
The lipstick transfer technique for electrical boxes. This is the most useful practical trick in drywall work and deserves more attention than it gets. Coat the outer edges of the electrical box with lipstick or chalk. Position the drywall panel in its installed location and press it firmly against the box. The lipstick or chalk transfers a perfect outline of the box directly onto the back of the panel. No measuring required. No transposing errors. No wondering whether you measured from the right reference point.
When a homeowner does this for the first time and cuts a perfect outlet hole without any traditional measuring, it tends to be one of those moments that actually sticks. The method is significantly more accurate than measuring the box location and transferring it by hand, which introduces errors at every step.
Mark the waste side with an X. After marking your cut line, immediately mark the waste side with a large X in pencil. The extremely common mistake of cutting the good piece instead of the waste piece costs panels and time. The X takes two seconds.
Scribe technique for irregular walls. For panels that need to fit against an irregular surface like stone, brick, or an uneven corner, hold the panel in approximate position and drag a compass along the irregular surface. The pencil leg traces the profile onto the panel face. Cutting along the traced scribe line creates a tighter fit against irregular wall surfaces and reduces visible finishing gaps later.
Quick Reference: Right Method for Every Cut Type
| Cut Type | Best Method |
| Straight full-length rip or width cut | Score-and-snap |
| Short rip cut (under 12 inches) | Score-and-snap with T-square |
| Square opening (outlet box, access panel) | Jab saw, plunge technique |
| Round hole (pipe, recessed light, exhaust fan) | Bi-metal hole saw or adjustable circle cutter |
| L-cut around door frame or window sill | Score-and-snap long leg, jab saw for short leg |
| Curved or arched opening | Jab saw with short strokes, rasp to smooth |
| Thin strip under 3 inches wide | Score both sides, or jab saw |
| Large sheet, cut near middle of panel | Score-and-snap with panel flat on floor, both sides supported |
For jab saw technique, including plunge cuts for electrical boxes and the correct way to cut L-cuts without cracking the corner, see the drywall saw guide.
Panel Condition: Why Damp or Damaged Panels Crumble Before You Even Start
If you’ve corrected your technique and panels are still crumbling, the problem might be the panels themselves.
The moisture problem. Drywall stored in damp conditions absorbs moisture into the gypsum core. Moisture-compromised drywall cores lose structural integrity and crumble instead of snapping cleanly along the score line. No amount of technique correction will fix a wet panel. If you’re storing panels in a garage, basement, or outside under a tarp, check them before cutting.
How to identify moisture-compromised panels. Press firmly with your fingertip at various points across the face. The panel should feel completely rigid. Any softness or give indicates moisture saturation. Discolouration, sagging, or panels that feel noticeably heavier than expected are also signs of damage. Compromised panels should be discarded. They’ll produce poor results when hung and finished regardless of how well you cut them.
Correct storage. Store panels flat on a level surface, since warped panels cut and hang poorly. Keep them off the floor on 2×4 spacers to allow air circulation. If you’re using a garage, stack them against an interior wall away from doors where temperature and humidity fluctuate most.
Cold weather cutting. Gypsum becomes noticeably more brittle below 40 degrees Fahrenheit. Snaps are less predictable and fractures are harder to control. If you’re doing winter work, bring panels into a heated space before cutting where possible.
5 Cutting Mistakes That Waste Panels and Time
Not testing on scrap first. Thirty seconds on a scrap piece confirms blade sharpness, score depth, and snap behaviour before you commit to a full panel. Skipping it is the most preventable source of ruined sheets.
Marking with pen or marker. Ink and marker dyes can bleed through drywall compound and eventually telegraph through paint finishes. Always use pencil.
Snapping away from yourself. The face paper tears rather than fracturing along the score when you snap the wrong direction. Always snap toward your body. The physics work in your favour and the result is far more consistent.
Trying to score all the way through the panel. Scoring all the way through requires multiple passes that tend to wander off-line and create a ragged edge. Score through the paper and approximately 1/4 inch into the gypsum. The snap handles the rest.
Hanging without rasping the edge. Rough cut edges create visible gaps at seams that require excess compound to fill. Twenty seconds with a drywall rasp produces a tape-ready edge and saves time during finishing.
FAQ
Why does my drywall keep breaking when I cut it?
The most common causes are a dull blade, insufficient support under the panel during scoring, or snapping in the wrong direction. Work through the five failure modes above to identify which one applies to your situation. A fresh blade, panel supported on both sides within 18 inches of the score line, and snapping toward yourself resolves most breaking problems.
How do you snap drywall without breaking it?
Score firmly through the face paper and about 1/4 inch into the gypsum in a single pass. Support the panel at the score line with your knee or the work surface edge, then apply a firm, decisive snap pulling the offcut toward your body. Hesitating or applying uneven pressure causes irregular breaks.
Can you cut drywall with a utility knife?
Yes, and for straight cuts it’s the preferred method. A sharp utility knife scores the face paper cleanly, and the score-and-snap technique handles the rest. You only need a saw for cutouts, L-cuts (short leg), thin strips under 2 inches, and irregular or curved shapes.
Why is my drywall crumbling when I cut it?
Either the blade is too dull to cut through the paper cleanly, leaving a partial tear that causes the gypsum to fracture unpredictably, or the panels have absorbed moisture from storage in a damp location. Test a fresh blade on a scrap piece first. If crumbling continues with a new blade, press firmly on the panel face to check for softness, which indicates moisture damage.
How do you cut a thin strip of drywall?
For strips between 2 and 3 inches, score both the face and the back of the panel, then apply even pressure along the full length simultaneously. For strips under 2 inches, a jab saw gives more reliable results than a snap. Narrow strips simply don’t have enough mass to fracture cleanly along a single-side score line.
How do I make a clean straight cut in drywall?
Start with a sharp blade and test it on scrap. Mark both ends of your cut line in pencil. Use a drywall T-square or clamped straightedge to maintain a perfectly aligned score line across the panel. One firm, smooth pass from end to end. Support the panel on both sides within 18 inches of the score line, then snap toward yourself. Rasp the cut edge before hanging.
Conclusion
Most breaking problems trace back to one of five causes. Find the one that matches what you’re experiencing and fix that specific thing rather than changing everything at once.
The scrap piece test before every cut is the single most useful habit to develop. It takes 30 seconds and catches blade and technique problems before they cost you a full panel.
Fresh blade, correct snap direction, panel supported on both sides: those three things together handle the majority of cutting problems most people run into.

Elena Hart is the founder and lead writer of Better Home Pro. She writes about drywall, home repair, and practical DIY home improvement topics, focusing on clear, useful information that helps homeowners make better decisions. Her work combines firsthand experience, manufacturer documentation, industry resources, and careful research to create content that is accurate, practical, and easy to understand. Through Better Home Pro, Elena aims to simplify complex home improvement topics and provide guidance that is genuinely helpful to homeowners and DIYers.


No Comments