
Most DIYers hang drywall vertically because it seems like the logical approach. The sheet is taller than it is wide, the wall is taller than it is wide, so vertical feels natural. Professional drywall hangers almost always go horizontal, and the reasons behind that default are worth understanding before you start lifting sheets.
The direction drywall is hung affects where seams fall, what type of joints you’re creating, how difficult the finishing work is, and how the wall performs structurally. None of these are minor considerations. They show up during installation, during taping and finishing, and after paint when raking light hits the wall at an angle and reveals everything that wasn’t done quite right.
This article covers the practical case for each direction, which applications favor one over the other, and how to make the decision for a specific project. The short answer is that horizontal is better in most residential situations, but vertical has legitimate uses, and understanding the reasoning matters more than following a rule.
Key Takeaways
- Horizontal Is Standard: Most residential walls benefit from horizontal hanging due to fewer exposed seams and easier finishing.
- Better Seam Placement: Horizontal installation creates more tapered joints and reduces visible seam patterns after painting.
- Stronger Wall Assembly: Crossing more studs improves racking resistance and overall wall performance.
- Vertical Has Uses: Tall walls, narrow spaces, and certain fire-rated assemblies may favor vertical installation.
- Match Method to Layout: Choose the direction that minimizes seams, avoids filler strips, and fits the wall height.
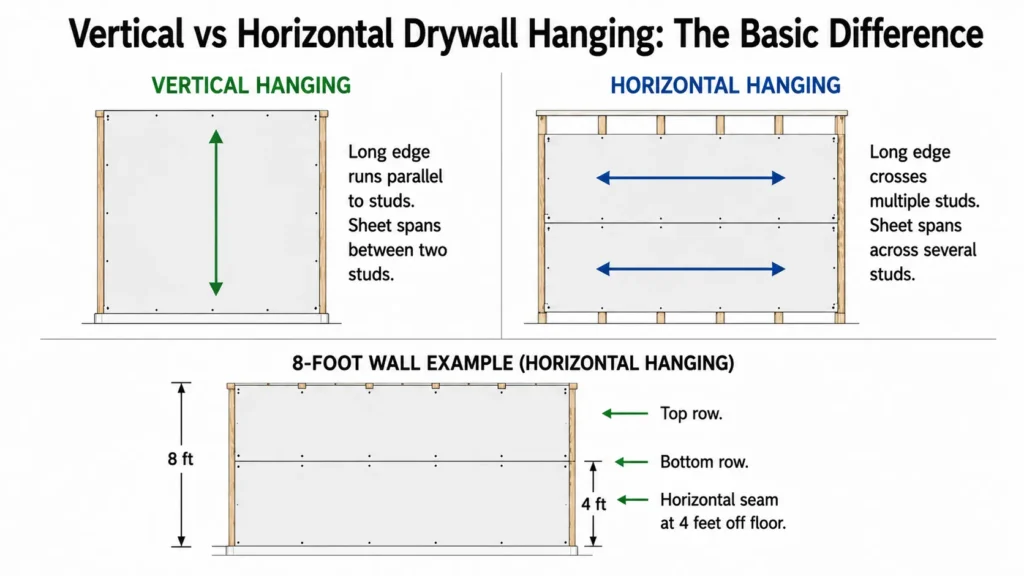
The Basic Difference
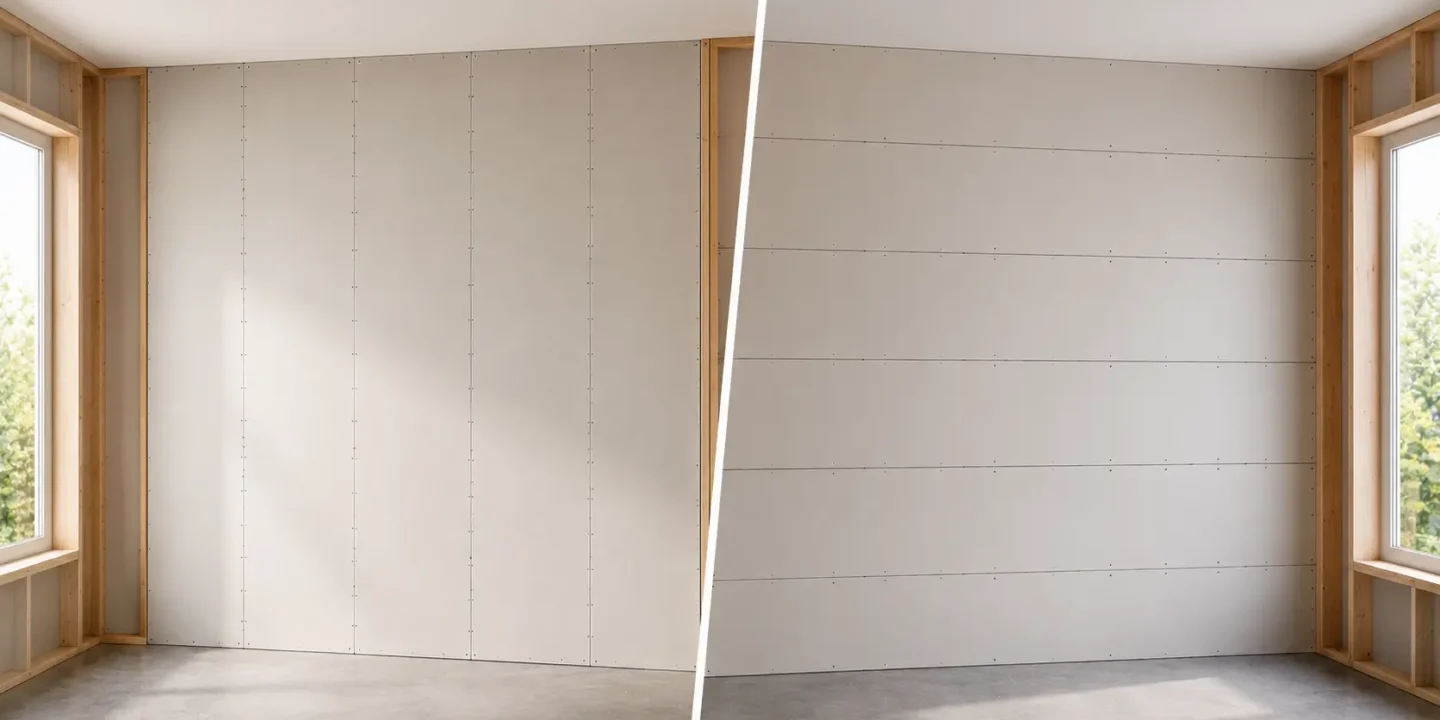
Vertical hanging means the sheets run floor to ceiling with the long dimension going up. The 4-foot width spans horizontally across studs, and the 8, 9, or 10-foot length runs parallel to the stud lines.
Horizontal hanging means the sheets run across the wall with the long dimension going sideways. The length spans across multiple studs, and the 4-foot width covers roughly half the wall height per row.
On a standard 8-foot wall hung horizontally, two rows of 4×8 sheets cover the full height: one row along the top half and one along the bottom, with a horizontal seam sitting at roughly 4 feet off the floor.
The structural implication is worth noting immediately: horizontal hanging means the long edge of each sheet crosses more studs. Vertical hanging means the long edge runs parallel to a single stud line. That difference has real consequences for how the wall performs, which is covered in the next section.
The Case for Hanging Drywall Horizontally
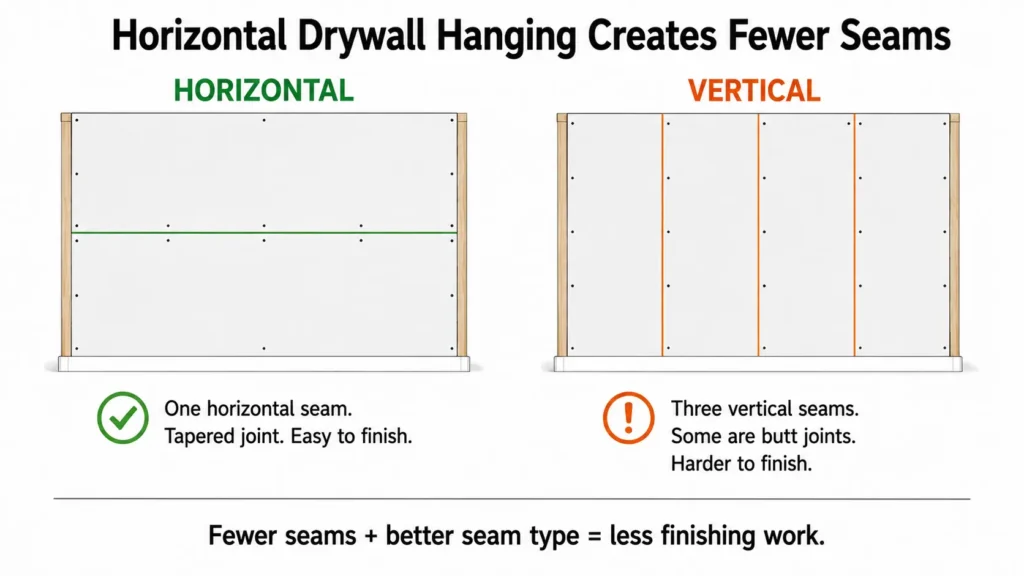
Fewer and Better Seams
Hanging horizontally on a standard 8-foot wall with 4×8 sheets produces one horizontal seam running across the wall at mid-height, plus vertical seams at the ends of sheets. Both the top and bottom rows use the tapered long edges of the sheets, which means that horizontal mid-wall seam is a tapered joint. It finishes cleanly, sits below the surface plane, and behaves predictably through multiple coats of compound.
Hanging vertically produces vertical seams at every 4-foot interval along the wall. Some of those are tapered edge joints, but depending on sheet layout, butt joints end up in the mix as well.
Understanding exactly why butt joints are harder to finish is worth reviewing in the butt joint vs tapered joint guide before you commit to a hanging direction, because it directly affects how much finishing labor your choice creates.
Horizontal hanging produces fewer total exposed seams on most standard wall lengths, and the seams it does produce are the easier type to finish.
Structural Advantage
Each horizontally hung sheet crosses every stud in its run rather than spanning between just two adjacent studs. This distributes loads across more framing members and makes the wall more resistant to racking, which is lateral movement or deflection under load.
The IRC recognizes horizontal hanging as contributing to wall bracing in certain International Residential Code wall bracing provisions. In areas with seismic or high-wind design requirements, this distinction matters more than in a standard interior bedroom wall, but horizontal hanging is consistently the stronger configuration across the board.
For most residential projects the structural difference between the two orientations won’t determine whether a wall stands or falls, but horizontal is the stronger choice at no additional cost.
Better Seam Placement
Horizontal hanging places the long tapered seams at 48 inches off the floor and at the ceiling line, both relatively low-visibility positions under normal lighting. The horizontal seam at mid-wall runs across the wall at eye level, but since it’s a tapered joint, it finishes flush and tends to stay that way.
Vertical seams fall at regular 4-foot intervals across the wall. That regularity makes them more visually noticeable if finishing isn’t perfect. Under raking light from a nearby window, any slight crown or ridge at a vertical seam running the full height of the wall is hard to miss. The same finishing quality on a horizontal installation tends to look cleaner because the seam pattern is less repetitive and the tapered joint geometry works in your favor.
Understanding drywall finish levels matters here too. In any room getting semi-gloss paint or strong side lighting, seam placement and joint type directly affect how much finishing work is required and how good the result looks.
Ergonomic Advantage During Installation
The top row goes up first, tight to the ceiling. A drywall lift or a deadman brace holds the sheet in position while it’s fastened. Once the top row is secured, the bottom row slides in underneath, resting against the top row with the weight supported during fastening. Working the horizontal seam at mid-wall for taping and finishing happens at a comfortable standing height with no ladder repositioning for most of the run.
Vertical installation requires working the full sheet height from floor to ceiling during both hanging and finishing. That means more ladder movement during taping, more awkward angles for feathering compound near the ceiling, and generally more physical effort to get clean results. The ergonomic case for horizontal isn’t dramatic, but over a full room or a full house it adds up.
The Case for Hanging Drywall Vertically
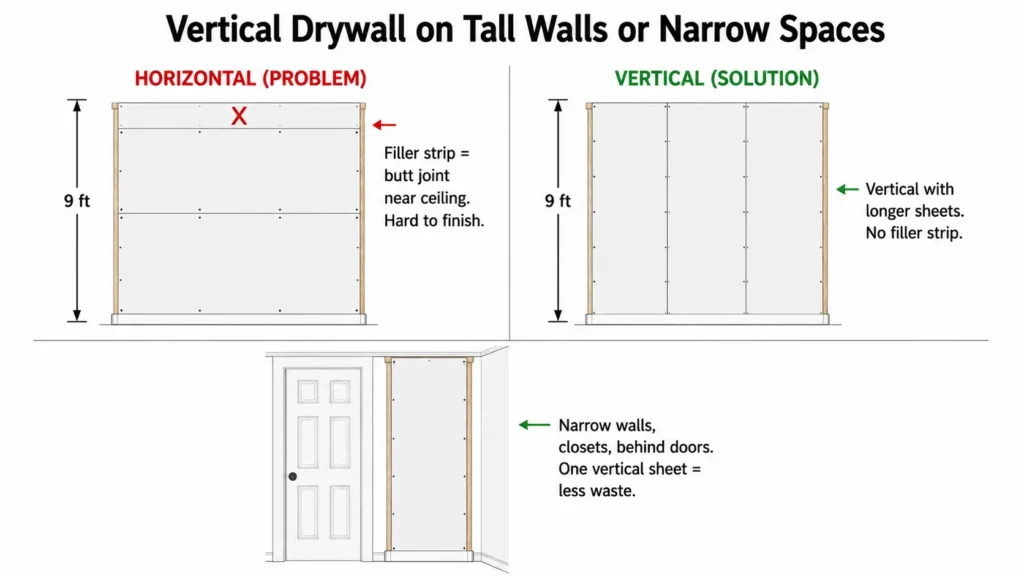
Walls Taller Than 8 Feet
On 9-foot or 10-foot walls, horizontal hanging with standard 4×8 sheets leaves a gap at the top that needs a filler strip. That filler strip creates a butt joint near the ceiling where finishing is already harder, not easier. Using longer sheets solves the problem: 4×10 for 9-foot walls, 4×12 for 10-foot walls. The drywall sizes guide covers how to match sheet length to ceiling height to avoid this situation entirely.
If longer sheets aren’t available or practical for the project, vertical hanging with standard 4×8 sheets on 8-foot walls avoids the filler strip problem cleanly. The sheet length matches the wall height, no gap, no extra seam. On taller walls where the sheet length matches the ceiling height exactly, vertical is a legitimate choice even from a finishing standpoint.
Narrow Spaces and Specific Layouts
Around windows, doors, and narrow wall sections, vertical hanging sometimes allows cleaner sheet placement with less cutting waste. A narrow wall section under 4 feet wide may be better served by a single vertical sheet than by trying to fit horizontal rows into an awkward space. Utility rooms, closets, and areas behind doors are often reasonable candidates for vertical installation where finishing quality matters less and simplicity matters more.
Commercial and Code-Specific Applications
Some fire-rated wall assemblies require vertical installation as part of the tested assembly specification. That’s not a preference, it’s a requirement. If the assembly spec calls for vertical, that’s what goes up. Hanging direction in a fire-rated assembly isn’t a field judgment call.
In tall commercial spaces where wall heights exceed typical residential dimensions, vertical hanging sometimes makes more practical sense for managing sheet layout and controlling waste. Some commercial assembly types also specify vertical orientation for reasons specific to the tested configuration.
Single-Person Installation Without Proper Equipment
Horizontal installation of the top row requires a drywall lift, a solid deadman brace, or a capable second person. Holding a 54 to 70-pound sheet tight to the ceiling while fastening it cleanly is genuinely difficult without one of those options. Vertical sheets can be tilted into position and fastened without the overhead hold problem.
If the choice is between poorly positioned horizontal sheets installed without proper support and clean vertical sheets installed correctly, the cleaner installation is the better wall regardless of direction. Getting the right equipment for the job before starting is worth the cost for any horizontal installation involving more than a few sheets.
How Seam Placement Differs Between the Two Directions
On a standard 8-foot wall hung horizontally: one horizontal tapered seam at 48 inches, vertical seams at sheet ends (spaced 8 or 12 feet apart on longer walls), and butt joints only where sheet ends meet within the same row. These butt joints should be staggered between the top and bottom rows so upper and lower butt joints don’t align vertically. Aligned butt joints create a continuous weak point in the wall and concentrate finishing difficulty in one spot.
On an 8-foot wall hung vertically: vertical tapered seams at every 4-foot interval, with butt joints at the top and bottom of each sheet where the ends meet ceiling and floor framing. Those top and bottom butt joints are typically covered by ceiling finish and base trim, which removes them from the finishing equation entirely.
The horizontal method has fewer exposed seams requiring finish work on most standard wall lengths. The vertical method hides its butt joints behind trim but creates more tapered seams across the face of the wall, which need to be finished consistently to avoid a pattern that telegraphs through paint.
The finishing implications connect directly to how joint compound is applied and built up across multiple coats. More seams means more passes, more sanding, and more opportunities for inconsistency to show up after paint.
What the Codes and Standards Say
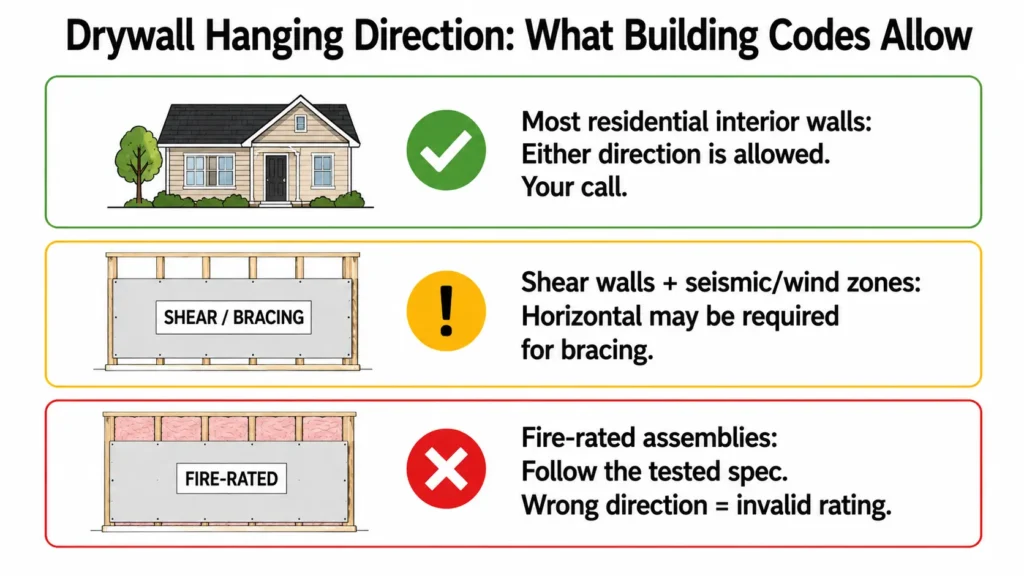
The IRC does not mandate hanging direction for most standard residential interior wall applications. Both orientations are generally code-compliant, and the choice is left to the installer in most cases.
The exceptions matter. Horizontal hanging is recognized as contributing to wall bracing in shear wall applications, which affects how walls are counted for lateral force resistance in wind and seismic design zones. If a project involves engineered shear walls, the hanging direction may be part of the structural specification.
Fire-rated assemblies are the other exception. The assembly rating is based on testing a specific configuration, and that configuration includes hanging direction. If the assembly spec requires vertical installation, that requirement must be followed to maintain the fire rating. Using the wrong direction invalidates the tested assembly.
Specialty products like acoustic panels and some moisture-resistant boards occasionally have manufacturer-specified installation orientations. For standard gypsum board on standard residential interior walls outside fire-rated assemblies, the direction is your call.
Horizontal vs Vertical: Side-by-Side Comparison
| Factor | Horizontal | Vertical |
| Seam type at long edges | Tapered (better) | Tapered |
| Butt joint location | Wall field (staggered) | Top and bottom (hidden by trim) |
| Total exposed seams | Fewer on standard walls | More on standard walls |
| Structural contribution | Better racking resistance | Adequate for most uses |
| Finishing difficulty | Lower overall | Higher on standard walls |
| Best ceiling height | 8 ft with 4×8, longer sheets for taller | Any height with matched sheet length |
| Equipment needed | Lift or deadman for top row | Less equipment needed |
| Professional standard | Yes | Situational |
| Code compliance | Yes (most applications) | Yes (most applications) |
| Ideal for tall walls | Use longer sheets | Works well with matched length |
The table reflects a consistent pattern: horizontal is the professional default for good reasons. Fewer exposed seams, better structural contribution, more forgiving finishing conditions. That said, vertical is not a mistake in the right situation. Walls where the sheet length matches ceiling height exactly, tight spaces where horizontal handling is impractical, and assembly specifications that require it are all legitimate reasons to go vertical. The reasoning should drive the decision, not habit.
Frequently Asked Questions
Should drywall be hung vertically or horizontally?
Horizontally in most residential applications. It produces fewer exposed seams, places tapered edges where they create the best finishing conditions, and contributes to wall bracing. Vertical hanging is appropriate where the sheet length matches the wall height exactly, in certain commercial configurations, and where specific fire-rated assembly requirements dictate it.
Why do professionals hang drywall horizontally?
Horizontal hanging places the tapered long edges of the sheet at mid-wall height where they’re easy to tape and finish at a comfortable working position. It also crosses more studs per sheet, which improves structural performance against racking. The result is fewer seams, cleaner finishing conditions, and a stronger wall on standard residential applications.
Does it matter which direction you hang drywall?
Yes, practically speaking. Direction affects where seams fall, what joint types you’re creating, how difficult the finishing work is, and how the wall performs structurally. Horizontal is better for most standard walls. The difference shows up most clearly during finishing and after painting, particularly when any light source hits the wall at a low angle.
Can you hang drywall vertically on 8-foot walls?
Yes, and it works cleanly when the sheet length matches the ceiling height exactly. The vertical seams fall at 4-foot intervals and are tapered joints. The disadvantage is more total exposed seams on most wall lengths and less structural contribution compared to horizontal installation. For a full room, the added finishing work adds up.
Where do butt joints fall when drywall is hung horizontally?
Butt joints fall where the ends of sheets meet within the same horizontal row. These should be staggered between the top and bottom rows so that upper and lower butt joints don’t align vertically. Staggering distributes the joints, prevents a continuous weak point in the wall, and makes each butt joint easier to finish independently. Proper drywall installation technique covers staggering requirements in detail.
Do I need a drywall lift to hang sheets horizontally?
For the top row, yes in most practical situations. Holding a sheet tight to the ceiling while fastening it is very difficult without a lift, a well-built deadman brace, or a second person. Bottom row sheets are easier since they rest against the top row and can be shimmed slightly off the floor. A rented lift is worth it for any horizontal installation with more than a few sheets, and it pays for itself quickly in time saved and back strain avoided.
Conclusion
Horizontal is the professional standard for good reasons. Fewer seams, better seam placement, stronger wall, easier finishing. On standard 8-foot residential walls it is consistently the better approach, and the finishing quality difference becomes clear after paint goes on.
Vertical has its place: walls where the sheet length matches the ceiling height exactly, tight or irregular spaces where horizontal handling is impractical, and assembly specifications that require it. Those are real situations, not edge cases.
If you’re hanging drywall for the first time on 8-foot walls, go horizontal. Rent or build a deadman brace for the top row, stagger your butt joints between the upper and lower rows, and you’ll have a wall that finishes cleaner and holds up better than a vertical installation done out of habit.

Elena Hart is the founder and lead writer of Better Home Pro. She writes about drywall, home repair, and practical DIY home improvement topics, focusing on clear, useful information that helps homeowners make better decisions. Her work combines firsthand experience, manufacturer documentation, industry resources, and careful research to create content that is accurate, practical, and easy to understand. Through Better Home Pro, Elena aims to simplify complex home improvement topics and provide guidance that is genuinely helpful to homeowners and DIYers.


No Comments