
You can sand drywall with an orbital sander. The real question is whether you should, and the answer depends less on the tool than on the surface you’re working on and how much experience you have reading drywall compound as it comes off.
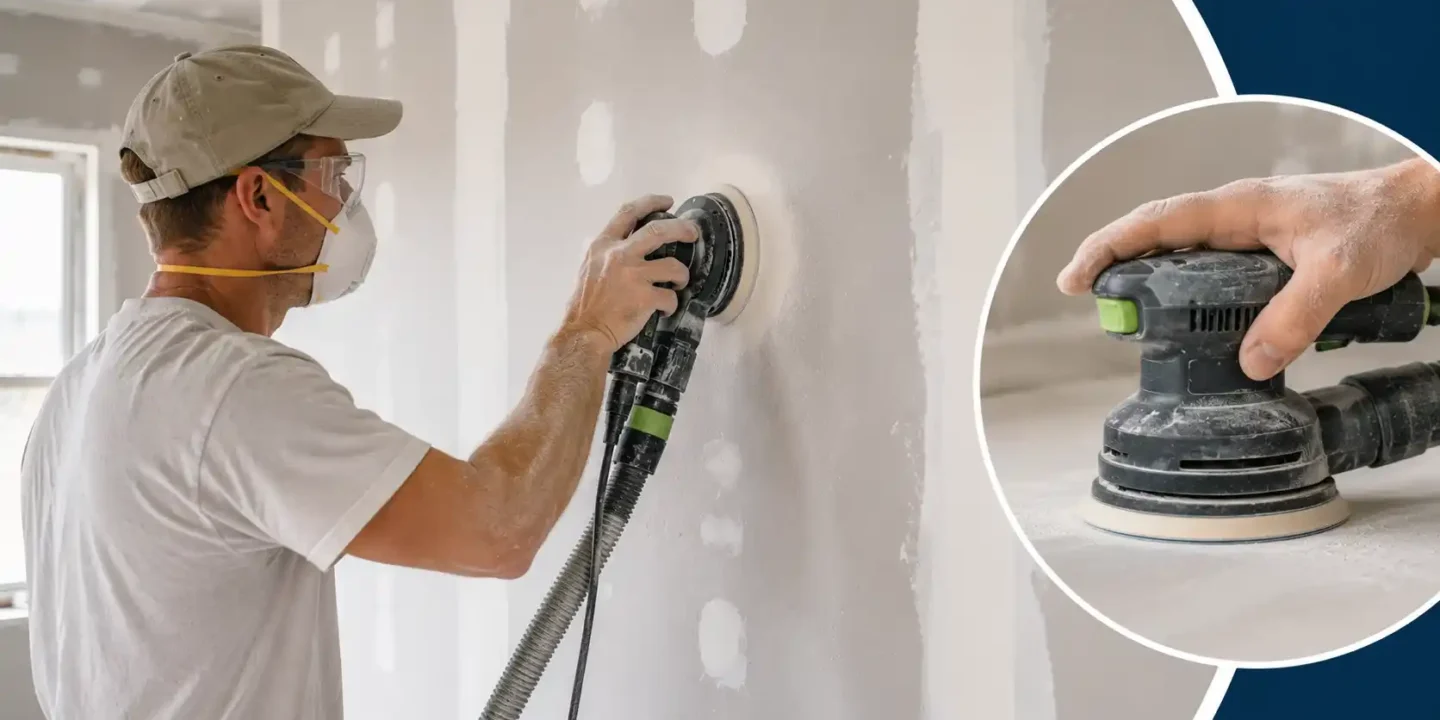
Orbital sanders remove material fast. On wood, that’s usually the point. On drywall, speed is often the problem. Joint compound is soft, the paper face underneath it is easy to damage, and mistakes that feel minor during sanding show up clearly under paint. An orbital sander doesn’t make drywall finishing easier. It makes it faster in the right situations and messier in the wrong ones.
Most readers asking this question already own an orbital sander and are trying to avoid hand sanding an entire room. That’s a reasonable goal. This article explains where an orbital sander actually helps, where it causes problems, and what to watch for if you decide to use one.
Key Takeaways
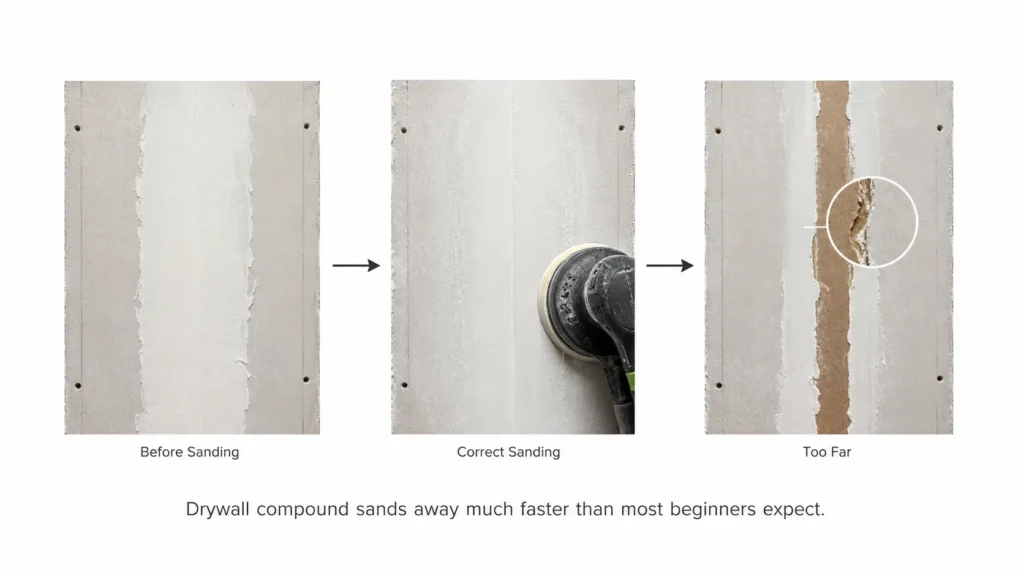
- Orbital sanders work on drywall but remove material faster than most beginners expect, making over-sanding a common and paint-revealing mistake.
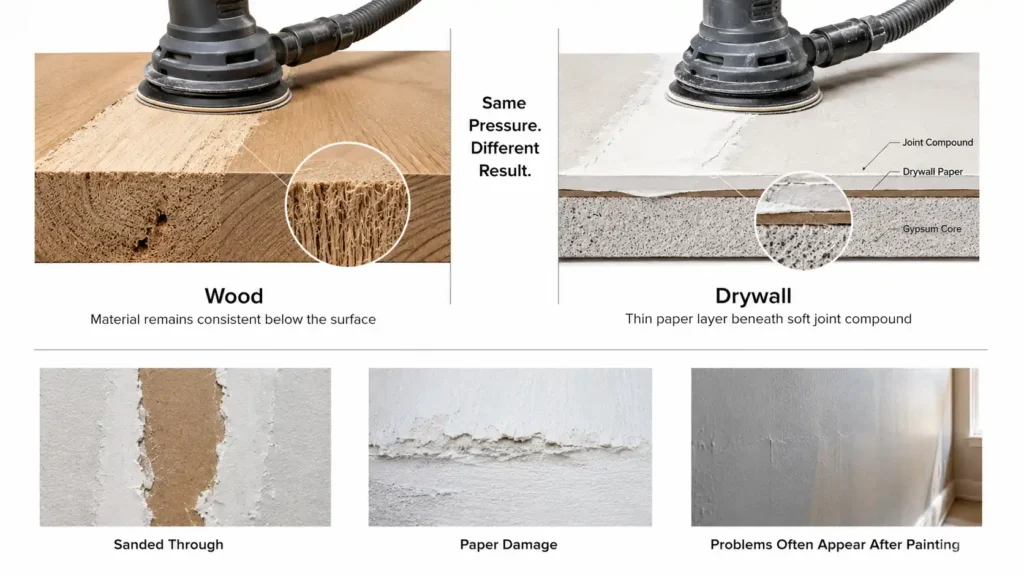
- Joint compound is far softer than wood. The technique that works on a hardwood floor will damage a taped drywall joint.
- Orbital sanders perform best on large, flat skim-coated surfaces. For corners, small repairs, and feathered edges, hand sanding gives you more control.
- Dust generation is the biggest practical drawback. Without vacuum extraction, fine drywall dust spreads through an entire house and takes days to settle.
- A vacuum-connected drywall sander handles most of what an orbital sander can do on walls, with better dust control and a longer reach that reduces ladder time.
Can You Sand Drywall With an Orbital Sander?
Yes, and it’s done regularly. Orbital sanders aren’t off-limits for drywall, and there are situations where they’re genuinely useful. But they’re not a straightforward swap for hand sanding, and they’re not forgiving of inattention.
The core issue is material hardness. Joint compound sands much faster than wood, and an orbital sander doesn’t give you a lot of feedback as it cuts through a coat. You can go from a slightly heavy coat of compound to a sanded-through paper face in a few extra seconds of contact. That’s not a recoverable mistake without additional compound and another drying cycle.
For experienced finishers who know how compound feels and sounds as it sands down, an orbital sander is a usable tool on the right surfaces. For first-time drywall finishers, it’s a tool that makes it easier to create problems than to avoid them.
Why Drywall Behaves Differently Than Wood
This matters because most people’s experience with orbital sanders comes from wood surfaces, and the habits that work on wood don’t transfer directly to drywall.
Wood is dense. You can sand aggressively, change direction, and apply pressure without worrying much about cutting through the material. Drywall compound is essentially dried calcium sulfate, and it’s soft enough that moderate sander pressure removes it quickly. The paper face of the drywall panel beneath it is thin and offers almost no resistance once you’re through the compound layer.
Damaged paper doesn’t just look rough. It raises and bubbles under paint, creates texture inconsistencies that catch light across a wall, and requires skim coating to fix properly. These aren’t problems you’ll necessarily see in bare drywall. They show up after the first coat of paint, which is exactly when you least want to discover them.
Joint compound also doesn’t sand uniformly the way wood does. Areas where the compound is thicker and areas where it’s thin respond differently to the same sander pressure. Maintaining an even surface requires constant awareness of where you are relative to the substrate.
Where Orbital Sanders Actually Work Well
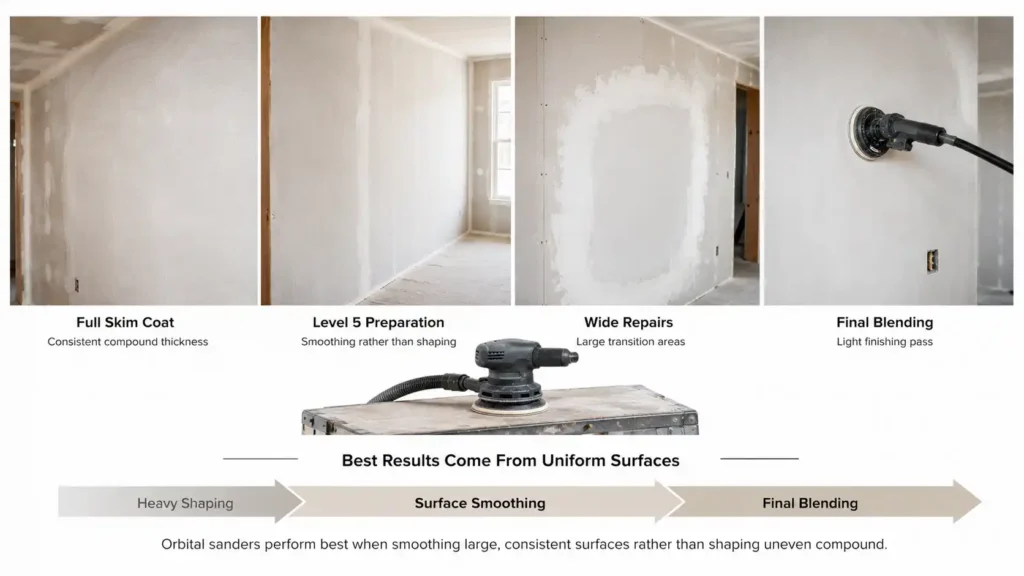
Large, flat, skim-coated walls are the best application for an orbital sander on drywall. When the entire surface has been skim coated, the compound layer is relatively consistent, there are no abrupt transitions between thick joint areas and bare board, and the sander can move freely across the surface without encountering the geometry changes that cause trouble.
Level 5 finish preparation benefits from machine sanding for the same reason. You’re working with a uniform thin coat across the whole wall, and the goal is smoothing rather than shaping. An orbital sander covers ground faster than hand sanding and produces a reasonably consistent result on flat planes.
Broad feathered repairs, where compound has been spread across a large area and the goal is blending the edges into the surrounding surface, are another situation where controlled orbital sanding makes sense. The key word is broad. Tight repairs with sharp compound edges are a different problem.
Final blending passes on large surfaces, where the heavy work is done and you’re smoothing rather than removing, are also where an orbital sander earns its place. Light contact, consistent movement, and the right grit produce a finish that’s faster to achieve than hand sanding alone.
Common Problems Orbital Sanders Cause on Drywall
Swirl marks are the most frequent complaint.These sanding defects become especially noticeable on smooth walls and lighter texture finishes where imperfections are not easily hidden. Orbital sanders leave circular patterns in soft compound, and on drywall these patterns telegraph through paint, especially with any angled light across the wall. They’re caused by too much pressure, a worn sanding disc, or moving the sander too slowly across the surface.
Paper burn-through happens when the sander stays in one area too long or pressure is applied over a thin compound section. Once the paper face is torn or raised, the repair requires skim coating over the damaged area and waiting for it to dry before sanding again.
Edge gouging occurs around the perimeter of sanded joints, where the edge of the sanding pad catches the transition between compound and bare board. The result is a visible groove that reads as a shadow line after painting.
Uneven surfaces develop when the sander removes compound faster in some areas than others, often because the operator was moving at inconsistent speed or applying more pressure on one side. These surfaces feel smooth but show waviness under raking light.
All of these problems share something in common: they’re invisible until the wall is painted. That’s what makes orbital sander mistakes on drywall particularly frustrating. You can finish a room, think it looks fine, prime it, and discover the swirl marks and edge grooves on the first coat.
Dust Generation: The Practical Problem Most People Underestimate
Drywall dust is fine, airborne for a long time, and extremely difficult to contain without active extraction. An orbital sander without vacuum collection turns a drywall finishing job into a whole-house contamination event. The dust gets into HVAC systems, settles on every surface in adjacent rooms, and takes days to fully come down even with no air movement.
Beyond the cleanup problem, drywall dust is a respiratory concern with extended exposure, particularly in enclosed rooms with poor ventilation. Working in a dusty room without a proper respirator is worth avoiding, not just inconvenient.
A vacuum-connected sander changes the equation significantly. Most modern orbital sanders accept a dust collection port, and connecting a shop vac with a HEPA filter captures a substantial portion of the dust at the source. It doesn’t eliminate all of it, but it reduces the airborne load enough to make machine sanding in an occupied or partially occupied home considerably more manageable.
If you’re going to use an orbital sander on drywall, using it without dust extraction is the choice that will cost you the most time in cleanup, and potentially in HVAC filter replacement and surface cleaning throughout the house.
Orbital Sander vs Dedicated Drywall Sander
While both tools can sand drywall compound, they are designed for very different purposes. The table below highlights the practical differences in dust control, reach, ease of use, and overall performance when sanding drywall.
| Feature | Orbital Sander | Dedicated Drywall Sander |
|---|---|---|
| Primary Purpose | General-purpose sander for wood, paint, and drywall | Specifically designed for sanding drywall compound |
| Dust Collection | May support a vacuum attachment, but not fully optimized for drywall dust | Built around direct vacuum connection and better dust extraction |
| Reach | Short reach; often requires a ladder for ceilings and upper walls | Long extension handle reduces ladder use |
| Sanding Head | Smaller round pad | Larger, flatter sanding head for more consistent wall and ceiling finishes |
| Risk of Surface Damage | Easier to create low spots, gouges, or over-sand drywall | Swiveling head helps reduce gouging and uneven sanding |
| Ease of Use | Requires more care and experience | More beginner-friendly with a gentler learning curve |
| Cost | Often already owned by homeowners | Usually an additional $100 to $250 purchase |
| Best For | Small drywall projects or occasional use | Large drywall areas, ceiling sanding, and repeated drywall work |
When Hand Sanding Is the Better Choice
Inside corners cannot be effectively machine sanded without damaging one of the two planes. This is a hand sanding job, always. A folded sanding sponge or a corner sanding block gives you the control that no powered sander can match in a 90-degree joint.
Small repairs, including nail pops, small patches, and spot texture repairs, don’t benefit from power sanding. The surface area is too small for an orbital sander to operate efficiently, and the risk of over-sanding around the repair edges is high.
Final touch-up work, where you’re addressing specific spots rather than covering ground, is better done by hand. You can feel the surface with a hand tool in a way that a powered sander doesn’t allow.
Feathered edges on repairs need careful attention that hand sanding provides more reliably. The transition from compound to bare board is where machine sanders cause the most edge damage.
Most experienced finishers use both methods in the same room. Machine sanding covers the large flat areas efficiently. Hand sanding handles the corners, transitions, and detail work. The combination is faster overall than either method alone.
Tips for Using an Orbital Sander on Drywall Without Creating New Problems
Choosing the right grit for drywall sanding matters more than most DIYers realize. Use 120-grit for most compound sanding work. Coarser grits remove material faster than most people expect and increase swirl mark visibility. Finer grits for final passes.
Keep the sander moving at all times. Pausing in one spot, even briefly, removes more material than surrounding areas and creates a visible low spot.
Use minimal pressure. The weight of the sander is usually sufficient. Pressing down actively increases the risk of paper damage and swirl marks.
Check your progress frequently by holding a work light at a low angle across the surface. Raking light reveals surface problems that direct lighting hides completely. If you’re not checking this way, you won’t know you’ve created a problem until after primer.
Connect to a vacuum with a fine dust filter before you start. The time saved by not cleaning up the rest of the house is more valuable than the inconvenience of running a hose.
Should You Use an Orbital Sander for Drywall?
For experienced DIYers working on large flat surfaces or skim-coated walls, an orbital sander with proper dust extraction is a legitimate time saver. The technique is learnable, the results are good enough for most residential work, and the speed advantage over hand sanding is real on big surfaces.
For first-time drywall finishers, the tool introduces more ways to create problems than it solves. Learning to read compound as it sands, understanding how much pressure is too much, and recognizing when to stop are skills that develop with hand sanding first. Jumping to a power sander before developing that feel tends to produce walls that need additional coats and rework before they’re ready to paint.
For small repairs, corners, and any area requiring precision, hand sanding is the right tool regardless of experience level.
If you’re somewhere in the middle, a reasonable approach is using hand sanding for the first pass to develop a feel for the compound on that specific project, then bringing in the orbital sander for the final smoothing pass on large open areas where the risk of over-sanding is lower.

Elena Hart is the founder and lead writer of Better Home Pro. She writes about drywall, home repair, and practical DIY home improvement topics, focusing on clear, useful information that helps homeowners make better decisions. Her work combines firsthand experience, manufacturer documentation, industry resources, and careful research to create content that is accurate, practical, and easy to understand. Through Better Home Pro, Elena aims to simplify complex home improvement topics and provide guidance that is genuinely helpful to homeowners and DIYers.


No Comments