
You tried to pull it out. Now there’s a crumbling crater in your drywall and the anchor is still in there, laughing at you.
After patching dozens of blown-out drywall holes, I’ve learned that brute force is the worst approach you can take. The anchor was designed to resist pulling. Fighting that design head-on almost always ends badly. The good news: there are smarter methods, and the right one depends entirely on what type of anchor you’re dealing with and what drywall tools you have nearby.
Here is a breakdown of every scenario, from the easy fix to the nightmare metal bolt situation.
Key Takeaways
- Identify First: Match the removal method to the anchor type; plastic, molly, and toggle anchors require different approaches.
- Push, Don’t Pull: Standard plastic anchors are often easiest to remove by pushing them into the wall cavity.
- Twist Before Pulling: Breaking the anchor’s grip with pliers reduces drywall damage and prevents blowouts.
- Molly Bolts Differ: Remove or drill off the collar first, then push the remaining anchor body into the wall.
- Patch Properly: Slightly recess the hole, apply lightweight spackle, then sand and paint for an invisible repair.
First: Figure Out What You’re Dealing With
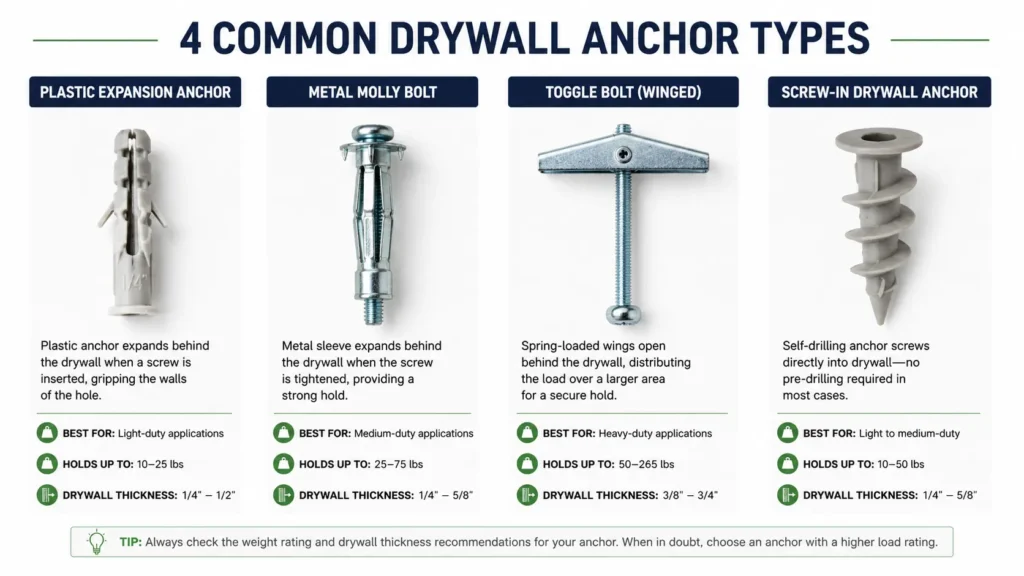
Before grabbing any tool, identify your drywall anchor type. The method that works on a plastic expansion anchor will absolutely fail on a metal molly bolt, and vice versa.
Plastic expansion anchor: A ribbed or winged plastic sleeve, usually white or nylon. The most common type.
Metal molly bolt: A metal sleeve with a collar that flares out behind the wall when tightened. Has a visible metal rim flush with the wall surface.
Toggle bolt: A bolt with spring-loaded metal wings that open behind the wall. Often leaves a slightly larger hole.
Got it? Good. Now pick your method below.
Method 1: Push It Through (The Best Kept Secret)
Best for: Standard plastic expansion anchors
Tools needed: Flathead screwdriver, hammer
Here is the thing nobody tells you: you do not always have to pull it out. For most plastic anchors, pushing it into the wall cavity is faster, cleaner, and leaves a much smaller hole to patch.
Steps:
- Remove any screw from the anchor first.
- Place the tip of a flathead screwdriver directly against the center of the anchor.
- Tap the handle of the screwdriver gently with a hammer.
- The anchor will compress and slide through into the wall cavity.
- What you are left with is a small, clean hole, not a ragged blowout.

What about leaving it in the wall? The anchor sitting in the cavity is completely fine structurally and does not affect typical International Residential Code wall assembly requirements. Just do not try to paint over a protruding anchor without pushing it in first. It looks terrible and the paint will peel around it.
Method 2: The Needle-Nose Pliers Twist (For Stubborn Plastic Anchors)
Best for: Plastic anchors that need to come out the front
Tools needed: Needle-nose pliers
Do not just grab the edge and yank. The anchor will tear through the drywall paper before it releases. The trick is to break the grip first.
Steps:
- Insert one jaw of the needle-nose pliers into the center hole of the anchor.
- Hook the other jaw over the outer rim of the anchor.
- Squeeze the pliers to grip both the inside and outside of the anchor collar.
- Twist back and forth slightly to break the friction hold the ribs have on the drywall.
- Once you feel it loosen, pull straight out with steady, even pressure.
The twisting motion is the key step most people skip. Without it, you are just tearing.

Method 3: The Screw-and-Pull Trick (For Flush Anchors with Nothing to Grab)
Best for: Plastic anchors that sit completely flush or slightly recessed
Tools needed: Screw (slightly larger than the anchor hole), hammer or pliers
When the anchor is totally flush and you cannot get any purchase on it, create a handle.
Steps:
- Thread a screw into the anchor by hand. Go about halfway in, enough that the screw bites into the plastic firmly.
- Stop before the screw expands the anchor fully against the drywall. If you go too far, you are making it harder to pull.
- Grip the screw head with the claw of a hammer or with pliers.
- Pull straight out. The screw will drag the anchor with it.
The screw acts as a handle. Simple, and it works almost every time on standard plastic anchors.

Method 4: Metal Molly Bolts (The Wall Destroyer if You Get This Wrong)
Best for: Metal molly bolt anchors
Tools needed: Flathead screwdriver or drill, hammer
This is where most people lose the battle. A molly bolt has a metal flange that has flared open behind the drywall. You cannot pull it forward without that flange tearing through the drywall from behind. You have to deal with the collar at the front first.
Option A (Preferred): Pry off the collar
- Slide a flathead screwdriver under the metal collar at the wall surface.
- Pry up and work around the circumference until the collar pops off.
- Once the collar is removed, push the rest of the anchor body into the wall cavity with a screwdriver and hammer.
Option B: Drill off the faceplate
- Use a drill bit that is slightly larger than the anchor’s outer diameter while following OSHA eye and dust protection recommendations.
- Drill directly over the anchor face until the collar is gone.
- Push the remaining anchor body into the wall cavity.
Yes, this leaves a slightly larger hole. But it is a clean, round hole that is easy to patch, not a ragged tear.

Method 5: Toggle Bolts
Best for: Toggle bolt anchors
Tools needed: Screwdriver
This one is actually easy. Just unscrew the bolt. The metal toggle wings will detach and fall into the wall cavity. This is completely normal and expected. You do not need to retrieve them. The hole left behind is larger than a standard anchor hole, so you may need a drywall patch rather than just spackle, depending on the size.

The Spinning Anchor Problem
You are turning the screw and the anchor is just spinning in the wall. Nothing is moving. This is one of the most frustrating scenarios and it happens when the anchor has lost its friction grip on the drywall.
The fix:
- Slide a flathead screwdriver or a putty knife under the outer lip of the anchor to apply outward pressure against the wall surface.
- While maintaining that pressure, try unscrewing again.
- The outward force stops the spinning by giving the anchor something to push against.
Alternatively, grip the rim of the anchor firmly with needle-nose pliers to hold it still while you work the screw out.
What if the screw is stuck inside the spinning anchor? This happens when the screw is cross-threaded or stripped. In this case, stop trying to unscrew it. Switch to the push-it-through method. Place your screwdriver against the screw head (or the anchor face) and tap it into the wall cavity. Done.
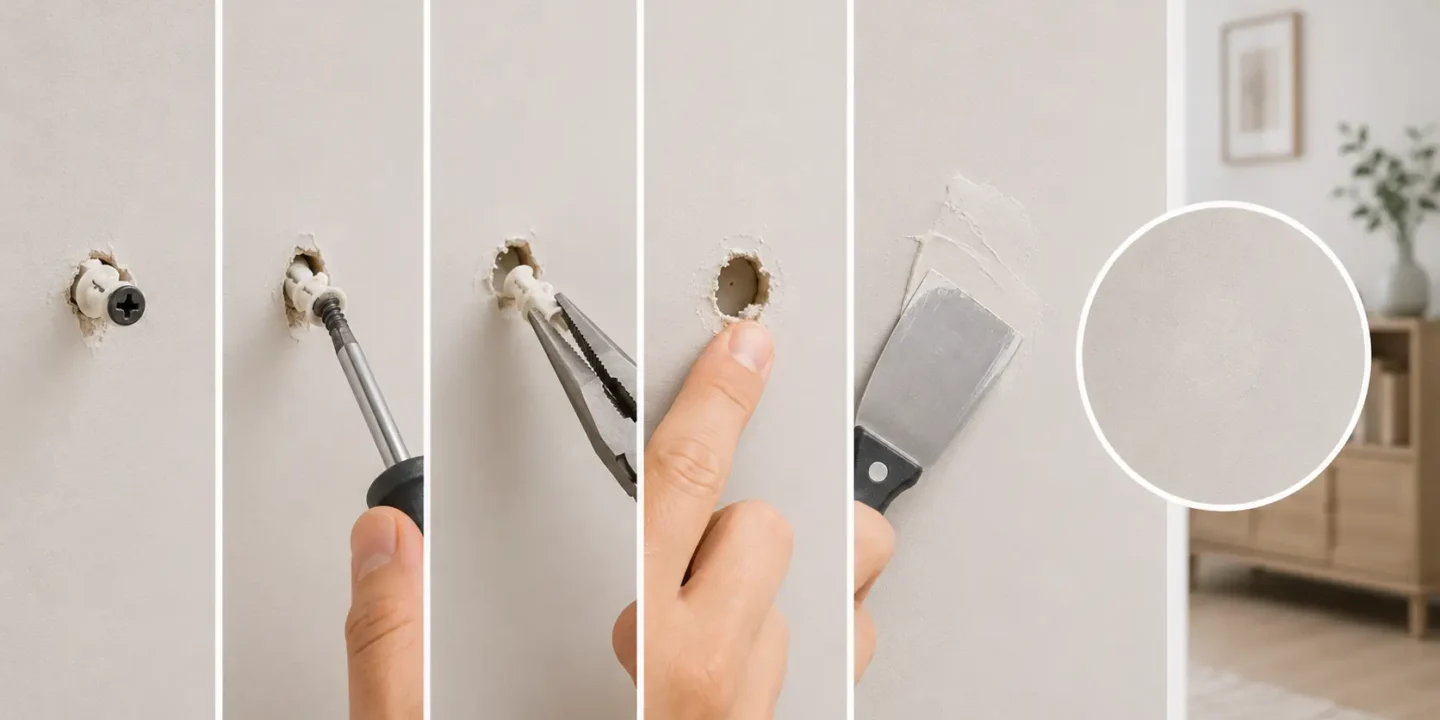
Patching the Hole (3 Steps, No Fuss)
Anchor is out. Now you have a hole, probably smaller than you feared.
- Tap the edges inward using the handle of a screwdriver, a technique consistent with Gypsum Association drywall repair recommendations. Press around the rim of the hole to create a slight divot. This gives the spackle something to grip and prevents it from popping out later.
- Apply lightweight spackle with a putty knife. Overfill slightly, as it will shrink as it dries. Feather the edges smooth.
- Sand lightly once fully dry (usually 2 to 4 hours for lightweight spackle). Wipe the dust, prime if needed, and paint.

For holes left by large toggle bolts, use a self-adhesive drywall patch before applying spackle following ASTM C840 gypsum board repair and finishing standards. The patch gives the compound something to adhere to over the gap.
Quick Reference: Which Method for Which Anchor
| Anchor Type | Best Method |
| Standard plastic (easy access) | Push It Through |
| Standard plastic (stubborn) | Needle-Nose Pliers Twist |
| Flush plastic with nothing to grab | Screw-and-Pull Trick |
| Metal molly bolt | Pry collar, then push through |
| Toggle bolt | Just unscrew it |
| Any anchor that is spinning | Flathead pressure + pliers |
The key principle across all of these: work with the anchor’s design, not against it. Plastic anchors were not meant to be pulled forward through drywall. Give them another exit route and the wall stays intact.

Elena Hart is the founder and lead writer of Better Home Pro. She writes about drywall, home repair, and practical DIY home improvement topics, focusing on clear, useful information that helps homeowners make better decisions. Her work combines firsthand experience, manufacturer documentation, industry resources, and careful research to create content that is accurate, practical, and easy to understand. Through Better Home Pro, Elena aims to simplify complex home improvement topics and provide guidance that is genuinely helpful to homeowners and DIYers.


No Comments