
Torn drywall paper looks like a minor surface problem. It’s not. The paper face of drywall isn’t just a cosmetic layer. It’s structural to how the panel holds together and how the surface accepts compound and paint. When that paper is torn, peeled, or fuzzy from over-sanding or wallpaper removal, the exposed material behaves completely differently than intact drywall does.
The repair process itself isn’t complicated. What causes most failures is skipping the preparation step before any compound goes on. Exposed paper fibers absorb moisture from joint compound and primer unevenly, which causes the fibers to raise, the compound to bubble, and paint to blister over the repair. Sealing the damaged area before doing anything else is what separates a repair that holds from one that fails twice.
Key Takeaways
- Torn drywall paper exposes absorbent fibers that react badly to joint compound and paint applied directly over them, causing bubbling and adhesion failure.
- Sealing the damaged area with a drywall-specific primer or PVA sealer before applying any compound is the step most failed DIY repairs skip.
- Loose, delaminated, or fuzzy paper must be addressed before sealing. Anything that isn’t bonded to the gypsum core needs to come off first.
- Painting directly over torn drywall paper, even with a coat of primer, almost always produces bubbling or uneven texture that shows through the finish.
- Large areas of paper delamination, water-damaged gypsum, or crumbling core material are signs that patching won’t hold long-term and panel replacement is the better path.
What Happens When Drywall Paper Tears
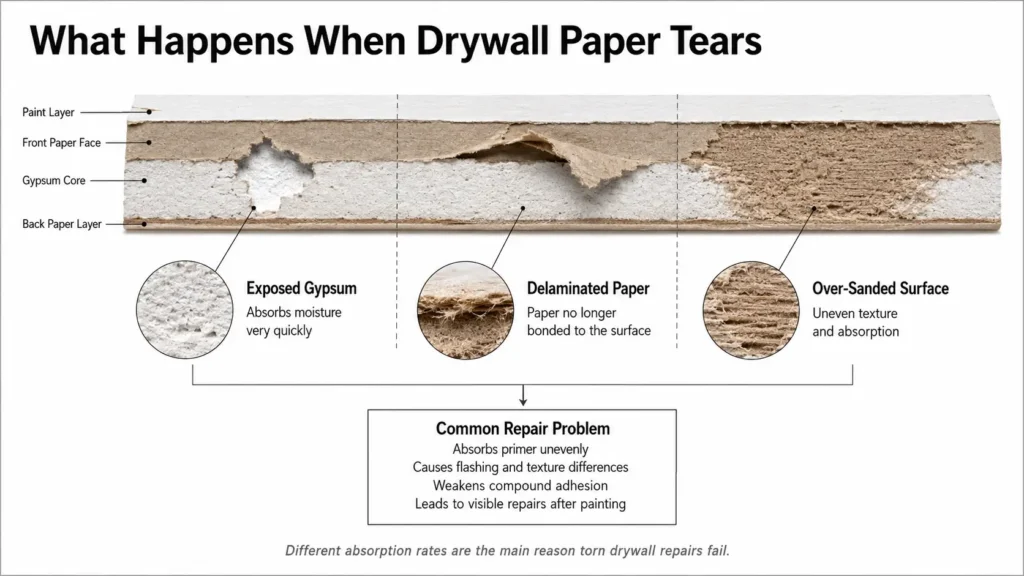
Drywall is a gypsum core sandwiched between two layers of paper. The paper on the front face isn’t just protective covering. It holds the gypsum together, gives the panel its tensile strength, and provides the surface that joint compound and paint bond to. Without intact paper, you’re working with a surface that doesn’t behave the way drywall is supposed to.
When the paper tears, a few things can happen depending on how the damage occurred. A clean tear exposes the raw gypsum core, which is chalky, porous, and highly absorbent. A peeled or delaminated area leaves behind fuzzy brown paper fibers that are partially attached to the surface. Over-sanding creates a similar result, grinding through the paper face and leaving a roughened, fibrous area that looks slightly different in sheen and texture than the surrounding intact paper.
All of these conditions create the same underlying problem: a surface that absorbs moisture at a different rate than the intact drywall around it. That difference in absorption is what drives most repair failures.
Why Torn Paper Causes Repair Problems
Joint compound contains water. When you apply compound over intact drywall paper, the paper absorbs a small, consistent amount of moisture and the compound adheres and dries relatively evenly. When you apply compound over torn or exposed paper fibers, those fibers absorb moisture aggressively and unevenly. The fibers swell as they absorb water from the compound, push upward through the wet compound surface, and create bubbles or raised areas that harden in place as everything dries.
The result looks like the compound bubbled or blistered during application. In a sense it did, but the cause was the paper beneath it, not the compound itself or how it was applied.
Paint causes a similar problem if applied directly over unsealed torn paper. Latex paint contains enough water to activate the same fiber-swelling process. You can prime and paint a torn paper area and watch it blister as the paint dries, with no obvious explanation for why a properly primed wall is producing bubbles.
This is why the sealing step matters so much. It locks down the paper fibers before any moisture-bearing product touches them.
Common Causes of Torn Drywall Paper
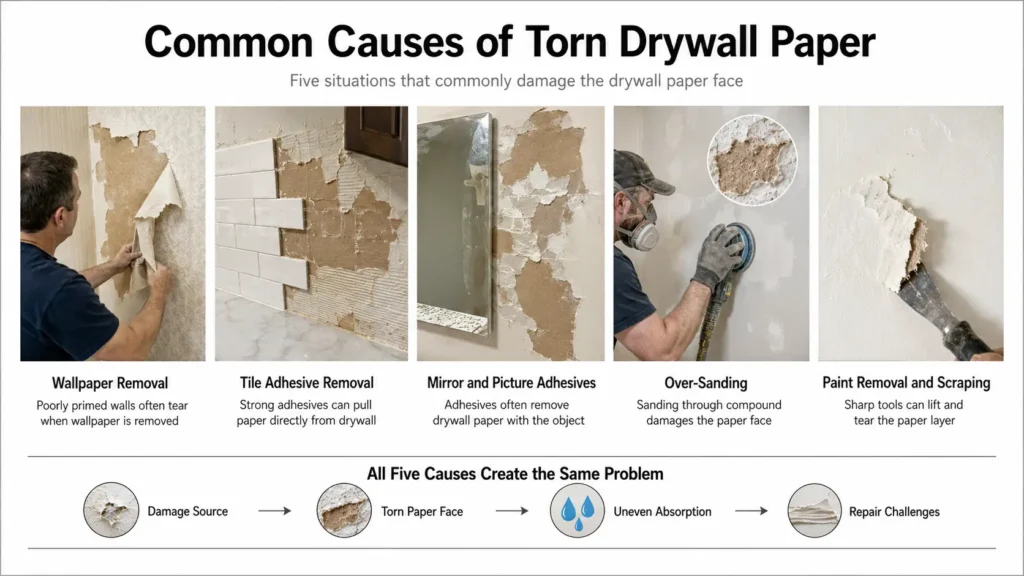
Wallpaper removal is probably the most common source of widespread paper damage. Drywall that was never properly primed before wallpaper was hung bonds directly with the paper face. Pulling the wallpaper off pulls the drywall face with it, leaving behind large areas of exposed gypsum and torn fibers across entire walls. This is a particularly frustrating situation because the damage is extensive and shows up in patches rather than one clean area.
Removing tile backsplashes frequently causes similar damage. The adhesive behind tile grips the paper face strongly, and removing the tile either pulls the paper entirely or leaves adhesive residue embedded in torn fibers.
Mirror and picture adhesives, including the foam tape and construction adhesive used to hang heavy mirrors, pull paper off the wall when removed, often in visible chunks.
Over-sanding during drywall finishing is another common cause, particularly when power sanders are used without enough awareness of how quickly they remove material. This is one of the biggest risks associated with sanding drywall with an orbital sander, where material can disappear much faster than many DIYers expect
Sanding through the compound and into the paper face leaves the surface looking slightly fuzzy or different in sheen, and that area will behave like torn paper under subsequent coats.
Aggressive scraping during old paint removal or during previous repair attempts can also damage the paper face if the scraper catches an edge and lifts the surface.
Should You Remove Loose Paper or Leave It?
Any paper that isn’t firmly bonded to the gypsum core needs to come off before repair. This is a step people sometimes skip because removing loose paper feels like making the damage worse, but leaving unstable material in place guarantees the repair will fail.
Run your hand across the damaged area or drag a putty knife lightly over the surface. Anything that lifts, peels, or moves isn’t adequately bonded. Remove it by carefully peeling back to where the paper is firmly attached to the gypsum. Use a utility knife to score the edge cleanly rather than tearing, which can extend the damage further.
Fuzzy fibers that are still attached but standing up should be flattened rather than removed. Pressing them down and sealing over them works. Pulling at them risks extending the tear.
What you want left behind before sealing is a surface where everything present is actually bonded. Loose material under a sealer is still loose material. It will fail, taking the sealer and everything above it with it.
Why Sealing Is the Most Important Step
Applying joint compound directly over torn drywall paper is the single most common reason these repairs fail. It feels like the logical next step, but the compound’s moisture content triggers the fiber-swelling problem before anything has a chance to bond properly.
The solution is a drywall-specific primer or PVA sealer applied to the damaged area before any compound goes on. These products penetrate the exposed fibers and gypsum, lock them in place, and create a surface that accepts compound the same way intact paper does. Once the sealer has dried fully, the surface behavior normalizes and subsequent coats of compound apply and dry without bubbling.
Gardz by Zinsser is the product most professionals reach for in this situation. It’s designed specifically for damaged and deteriorated drywall surfaces. Standard drywall primer can work on minor damage, but on larger areas of torn or fuzzy paper, a penetrating sealer like Gardz does a better job of stabilizing the fibers before compound goes on.
The sealer needs to dry completely before anything else happens. Applying compound over a still-tacky sealer can trap moisture and cause the same bubbling the sealer was supposed to prevent.
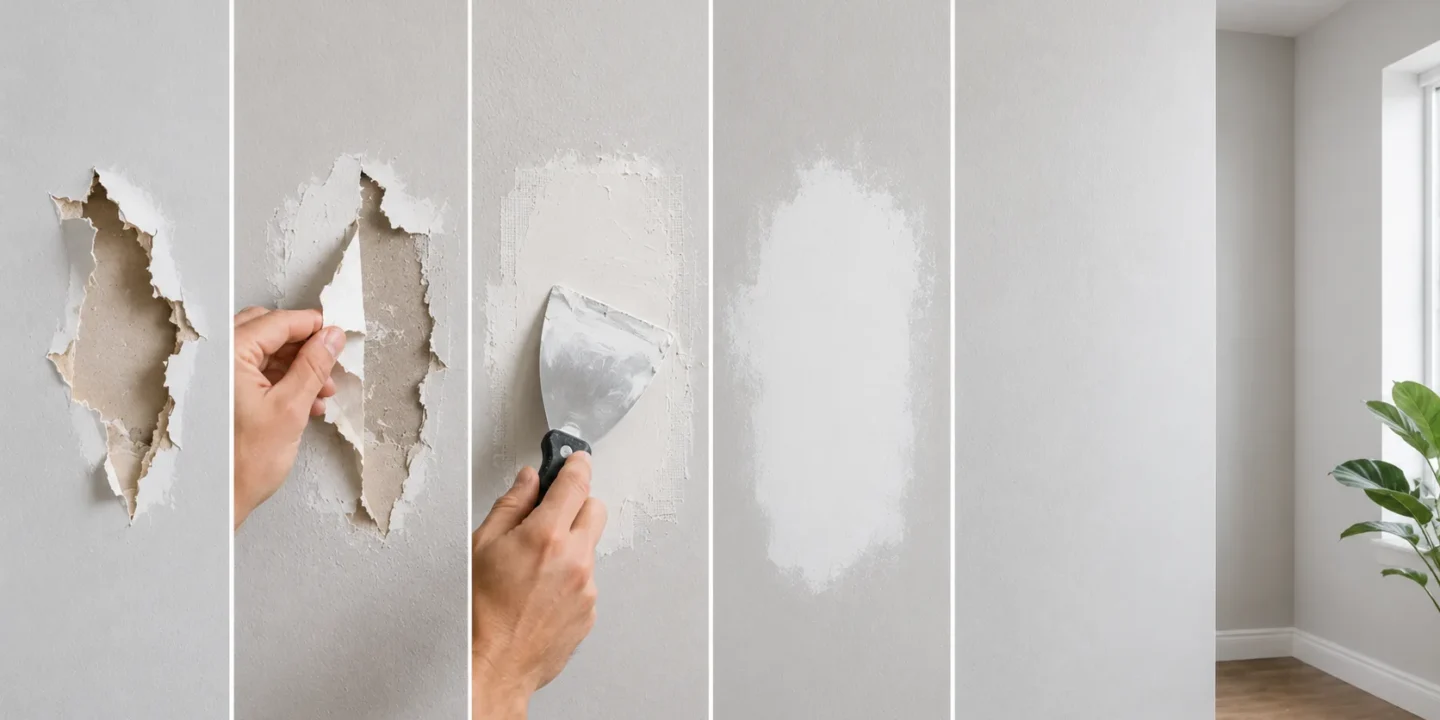
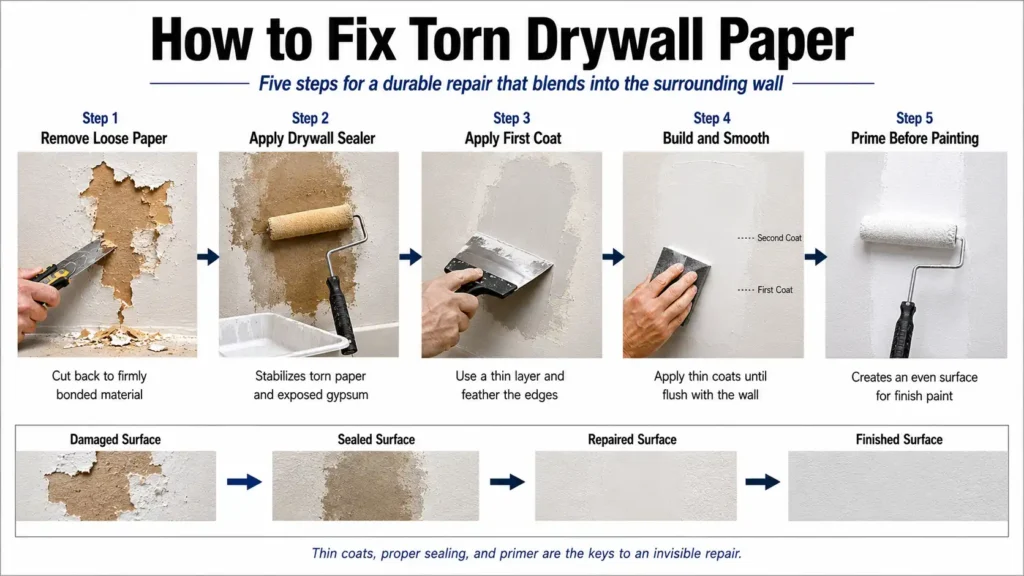
How to Fix Torn Drywall Paper
Step 1: Remove Loose Paper
Cut away any loose, peeling, or delaminated drywall paper until you reach material that is still firmly bonded to the wall. Use a utility knife to score the edges cleanly, then brush away dust, paper flakes, and loose gypsum.
Step 2: Seal the Damaged Area
Apply a penetrating drywall sealer, such as Gardz, over the damaged area and a few inches beyond the edges. Let it dry completely before adding compound. Drying usually takes an hour or more, depending on room temperature, airflow, and humidity.
Step 3: Apply the First Coat of Joint Compound
Once the sealer is dry, spread a thin coat of joint compound over the repair area. Feather the edges beyond the damaged section so the patch blends into the surrounding wall. Avoid thick coats because they shrink more and take longer to dry.
Step 4: Sand and Add More Coats
Let the first coat dry fully, then sand it lightly. Apply additional thin coats as needed until the repaired area is flush with the surrounding drywall. Sand lightly between coats for a smoother finish.
Step 5: Prime Before Painting
After the final coat has dried and been sanded smooth, apply drywall primer over the entire repair area. Primer helps reveal any remaining surface flaws and prepares the patched area for finish paint.
Common Repair Mistakes That Cause Bubbling or Blistering
Skipping the sealer is the leading cause of failed torn paper repairs. Compound over unsealed exposed fibers bubbles. It’s consistent and predictable, and the only fix after it happens is removing the failed compound, sealing properly, and starting the finishing process again.
Using too much water to thin compound is a problem specific to setting-type compounds, which some people thin aggressively to make them easier to apply. Wetter compound over absorbent damaged paper makes the fiber-swelling problem worse.
Applying compound too thick in a single coat causes shrinkage cracking and increases the chance of surface irregularities as the thick layer dries unevenly. Thin coats applied in multiple passes produce better results.
Painting too soon after the final compound coat is another common mistake. Compound that appears dry on the surface can still contain moisture internally, particularly in thicker sections. Paint applied over not-fully-dried compound traps moisture and can produce bubbling that’s indistinguishable from the fiber problem.
Leaving fuzzy or standing fibers without sealing them down, and then applying compound expecting it to flatten them, doesn’t work. The fibers push back through wet compound as it dries.
When the Damage Is Too Severe for a Simple Repair
Some torn paper damage is too extensive for patching to produce a durable result.
Large areas of complete paper delamination, where the paper face has separated from the gypsum across a significant portion of a wall, tend to produce repairs that look acceptable initially and then develop texture and adhesion problems over time as the unstable substrate underneath continues to shift.
Water-damaged drywall is a separate category entirely. If the paper tearing is the result of moisture exposure, the gypsum core underneath is often compromised as well. Wet or crumbling gypsum doesn’t hold compound or fasteners reliably, and sealing and patching over it produces a repair that looks right but lacks the structural integrity to last.
Repeated repair failures in the same area, where compound has been applied two or three times and the surface keeps bubbling or cracking, are a signal that something below the surface isn’t right. At that point, cutting out the damaged panel and replacing the section is faster and produces a better long-term result than another repair attempt.
Can You Paint Directly Over Torn Drywall Paper?
No. Not successfully, and not even with a coat of standard primer first.
The problem is moisture. Latex primer contains enough water to activate the same fiber-swelling response that joint compound causes over unsealed torn paper. You can apply primer carefully and watch it bubble over the damaged area as it dries. The primer didn’t fail. The preparation failed.
The correct sequence is sealer first, compound to fill and smooth, additional sealer or drywall primer over the finished repair, then paint. Skipping any of those steps and going directly to paint produces a result that will need to be redone.
How to Know the Repair Is Ready for Paint
Hold a work light at a low angle across the repaired surface and look for any variation in flatness. Raking light reveals waviness, high spots, and compound edges that direct lighting hides. Any surface variation visible at this stage will be visible through paint, so this is the moment to address it rather than after the first coat goes on.
The repair area should feel smooth and consistent under your hand, with no rough patches, raised fibers, or compound edges that catch your fingernail.
After priming, look at the surface again under raking light. Primer reveals surface texture more honestly than bare compound does. If the primed surface looks uniform and flat, it’s ready. If there are spots where the primer absorbed unevenly or the surface looks slightly different in texture from the surrounding wall, a skim coat over those areas and another primer coat will produce a better final result than proceeding directly to paint.

Elena Hart is the founder and lead writer of Better Home Pro. She writes about drywall, home repair, and practical DIY home improvement topics, focusing on clear, useful information that helps homeowners make better decisions. Her work combines firsthand experience, manufacturer documentation, industry resources, and careful research to create content that is accurate, practical, and easy to understand. Through Better Home Pro, Elena aims to simplify complex home improvement topics and provide guidance that is genuinely helpful to homeowners and DIYers.


No Comments