
Pick up the wrong joint compound and you’ll find out soon enough. Cracks appear after the mud dries. Coats take forever to sand. A patch you expected to finish in a day bleeds into the next. These aren’t beginner mistakes; they happen to experienced tradespeople who grabbed whatever was on the shelf without thinking it through.
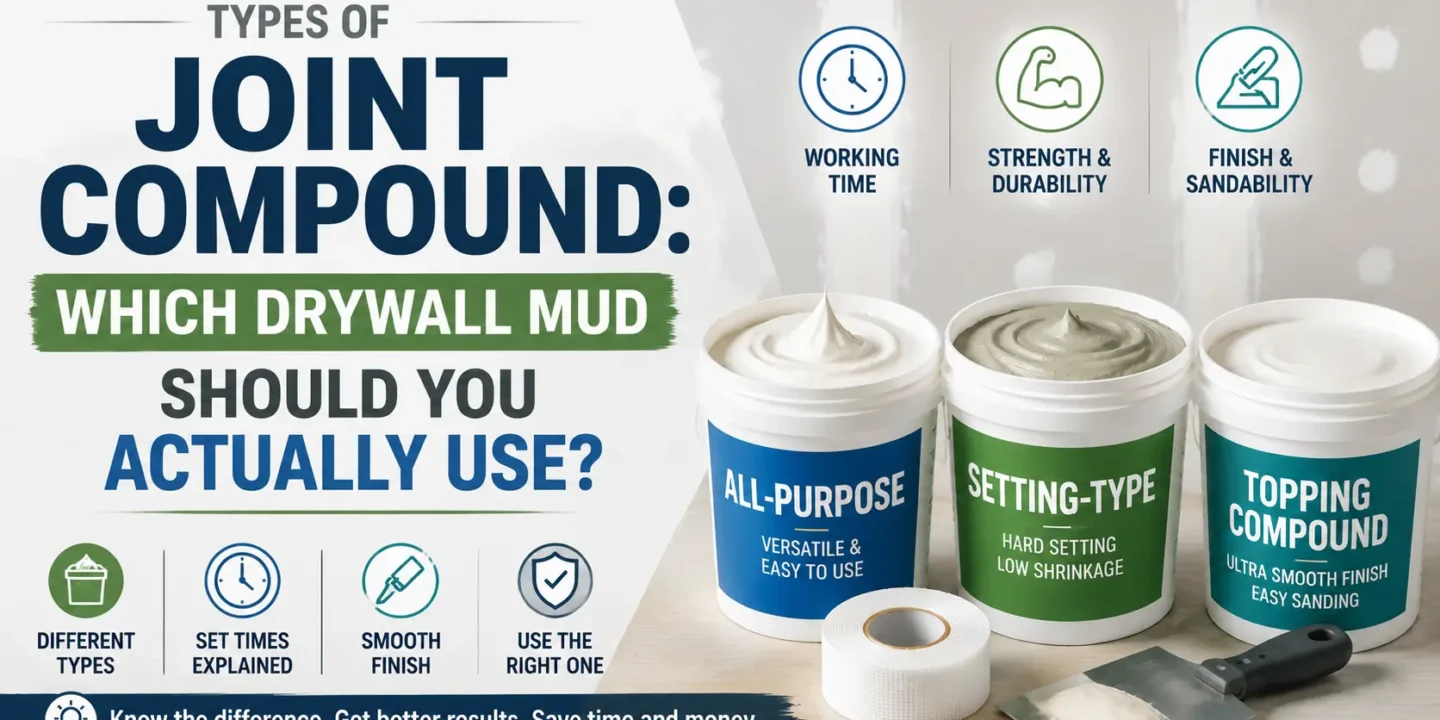
There are three main types of joint compound: all-purpose, setting-type, and topping compound. Each one behaves differently, dries differently, and excels at a specific stage of the work. This guide breaks down all three in detail so you know exactly which drywall mud belongs on which job.
Professional drywall contractors also evaluate VOC emissions, dust control, adhesion strength, and compatibility with Level 5 drywall finish standards before choosing a compound.
Related: Before you start mixing, make sure you have everything on our essential drywall tools list.
Key Takeaways
- All-purpose mud is the best choice for beginners because it stays workable longer and allows for easy sanding or re-wetting to fix mistakes.
- Setting-type compound, or hot mud, is essential for deep fills and large holes because it hardens chemically and won’t shrink or crack like air-dry mud.
- Use topping compound only for final finish coats to get a glass-smooth surface; it lacks the strength required to hold drywall tape in place.
- Lightweight all-purpose compound is the professional standard for finish work because it sands faster and produces significantly less airborne dust.
- Humidity and temperature dictate your timeline with pre-mixed mud, but setting compound hardens on schedule regardless of the environment.
- Joint compounds are commonly paired with fiberglass mesh tape, paper tape, corner bead, and drywall primer to complete a durable finishing system.
- Many contractors choose low-dust drywall compound formulations to improve indoor air quality and reduce cleanup time during remodeling projects.
What Is Joint Compound (Drywall Mud)?
Joint compound, also called drywall mud, is a gypsum-based paste used to embed tape, fill seams, cover fasteners, and create smooth surfaces on drywall. The basic formula hasn’t changed much over the decades: gypsum dust, water, and a set of binders and additives that control workability, adhesion, and dry time. Modern formulations may also include limestone, mica, latex polymers, and silica for improved flexibility, durability, and sanding performance.
“Joint compound” and “drywall mud” mean exactly the same thing. You’ll hear both terms used interchangeably on job sites and in hardware stores, and neither is more technically correct. What does matter is the specific type you’re buying, because the differences between them are substantial.
That said, joint compound is widely used in residential construction, commercial drywall systems, ceiling finishing, basement renovations, and fire-rated wall assemblies .

The Main Types of Joint Compound at a Glance
| Type | Dry/Set Time | Shrinkage | Best Use | Skill Level |
| All-Purpose | 24 hrs (air-dry) | Moderate | Taping, bedding, texture, repairs | Beginner-friendly |
| Lightweight All-Purpose | 24 hrs (air-dry) | Moderate | Same as all-purpose, easier sanding | Beginner-friendly |
| Setting Compound (Hot Mud) | 20–90 min (chemical set) | Very low | First coats, deep fills, problem surfaces | Intermediate–Pro |
| Topping Compound | 24 hrs (air-dry) | Low | Final finish coat(s) only | Intermediate |
| Taping Compound | 24 hrs (air-dry) | Low-moderate | Embedding tape on base coats | Intermediate |
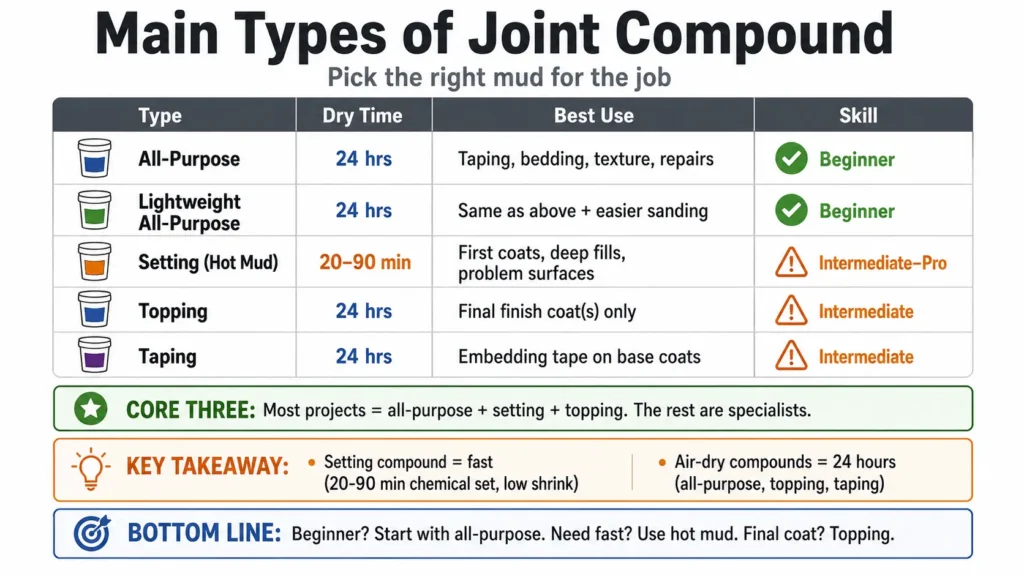
The three core types you’ll encounter on most projects are all-purpose, setting, and topping. The others are specialist products worth knowing about, but those three cover the vast majority of situations.
All-Purpose Joint Compound: The Everyday Workhorse
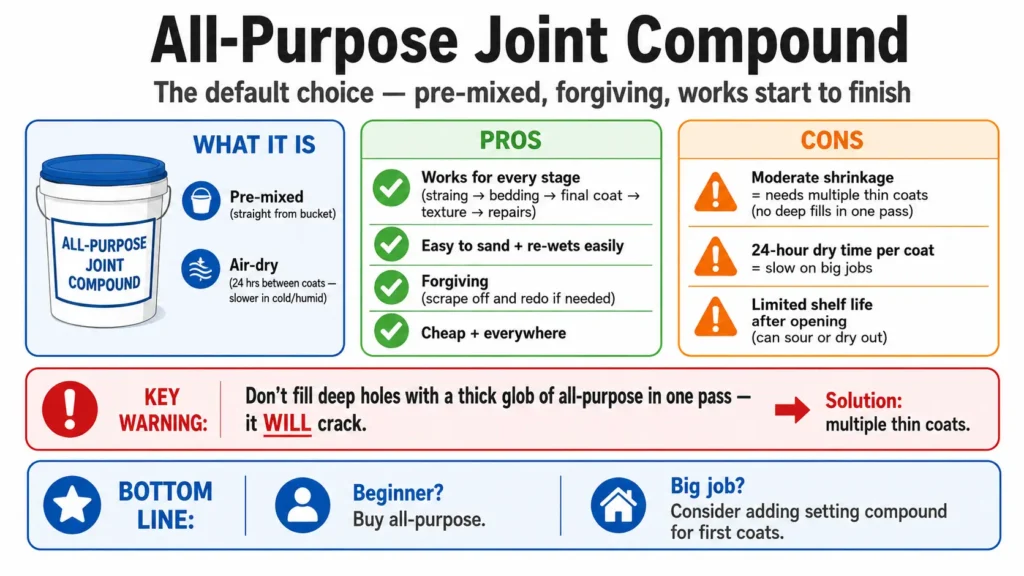
Walk into any hardware store and the pre-mixed buckets stacked near the drywall section are almost certainly all-purpose joint compound. It’s the default choice for a reason — it handles the full range of drywall tasks from first coat to last, it’s forgiving of technique, and it doesn’t require any mixing or timing precision.
All-purpose compound is pre-mixed and air-dry, meaning it cures through water evaporation rather than a chemical reaction. In normal indoor conditions, expect about 24 hours between coats. Humidity slows that down noticeably, and if you’re working in a cold garage or a poorly heated space, it can take significantly longer. Using box fans, dehumidifiers, and proper HVAC airflow can accelerate drying times and reduce moisture-related finishing problems.
The main tradeoff is shrinkage. As the water evaporates, the compound shrinks slightly. On base coats over taped seams, this is expected and manageable—you build up with multiple thin coats. But if you try to fill a deep hole with a thick glob of all-purpose in one pass, it will crack as it dries. If you notice cracks that aren’t related to your mud application, you should inspect for early signs of termites in drywall and ceiling to ensure the structural integrity of the wall isn’t being compromised from the inside out.
Pros:
- Works for every stage of drywall finishing: taping, bedding, second coat, texturing, minor repairs
- Pre-mixed straight out of the bucket — no guesswork
- Easy to sand, easy to re-wet if it partially dries on your pan
- Widely available, affordable, and familiar to work with
- Very forgiving if you need to scrape off and redo a section
- Compatible with most latex primers and interior paint systems
Cons:
- Moderate shrinkage means more coats compared to setting compound
- 24-hour dry time per coat adds up on larger jobs
- Not ideal for very deep fills in a single application
- Shelf life after opening is limited; it can sour or dry out if not sealed properly
- Excessive sanding can release fine drywall dust particles that require respirators or dust extraction systems
When to Use All-Purpose Compound
- Embedding paper or mesh tape on new drywall seams
- Second and third finish coats over taped joints
- Covering screw and nail dimples
- Texturing walls and ceilings (orange peel, knockdown, skip trowel)
- Patching small to medium holes and dings
- General touch-up work throughout a home
All-purpose compound is the right call for most DIY repairs and for anyone doing a room renovation without tight scheduling pressure. It’s also the safest bet for beginners — if something looks wrong, you can scrape it back, let it dry, and try again.
Lightweight vs. Standard All-Purpose: What’s the Difference?
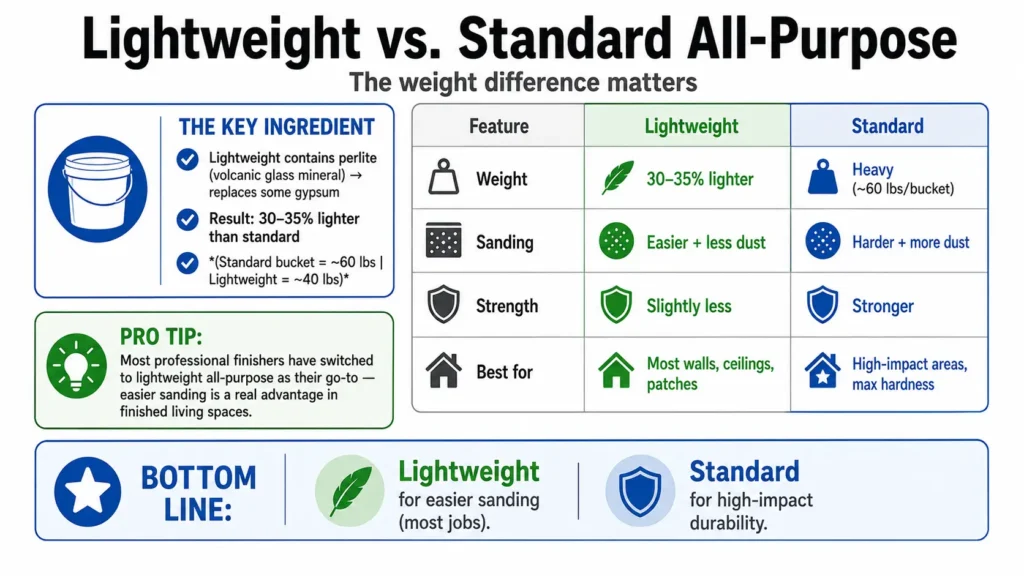
Lightweight joint compound contains perlite — a volcanic glass mineral — which replaces some of the gypsum and significantly reduces the weight of the product. A standard bucket of all-purpose drywall mud runs around 60 pounds; the lightweight version can be 30–35% lighter.
That weight reduction translates directly to easier sanding. Lightweight compound cuts faster with less effort and leaves less dust, which is a real advantage in a finished living space. Most professional drywall finishers have shifted to lightweight all-purpose as their go-to for exactly this reason. Furthermore, many lightweight formulas are designed to cause dust to clump and fall straight to the floor, helping to manage silica dust exposure during the renovation process.
The downside is slightly reduced strength and durability compared to standard weight. For most interior finishing applications — walls, ceilings, patches — this difference is negligible. If you’re working on high-impact areas or need maximum hardness, standard weight or a setting compound is the better call.
Setting-Type Joint Compound: Fast, Hard, and Unforgiving
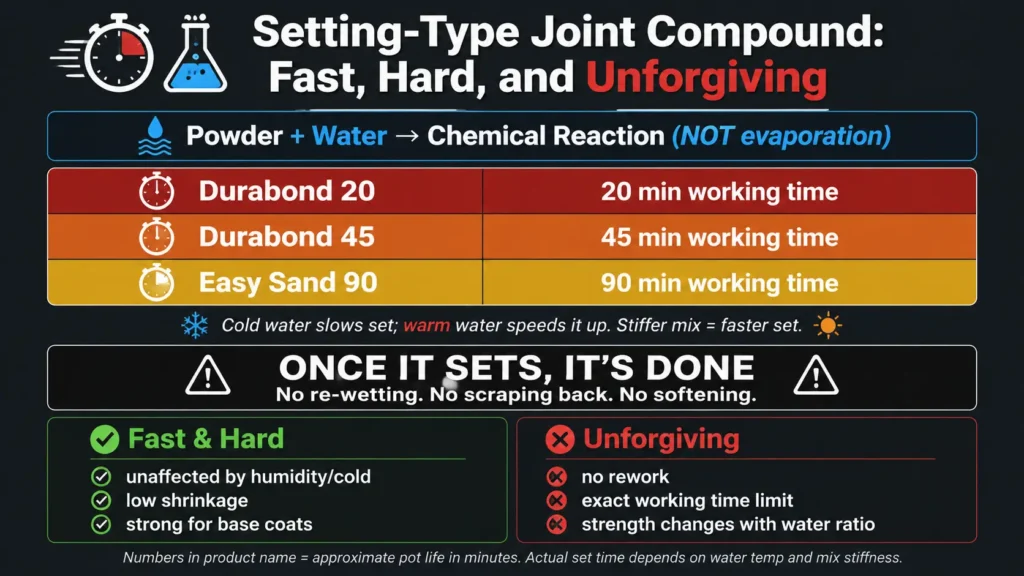
Setting compound operates on entirely different chemistry than pre-mixed products. It’s a powder that, when mixed with water, undergoes a chemical reaction similar to plaster of Paris. It doesn’t cure by drying out — it hardens through a chemical process regardless of air circulation, temperature, or humidity.
The numbers in the product name tell you the pot life in minutes. Durabond 20 gives you roughly 20 minutes before it becomes unworkable. Durabond 45 offers about 45 minutes. Easy Sand 90 buys you up to 90 minutes. These are approximate — the actual set time shifts based on water temperature (cold water slows it, warm water accelerates it) and the ratio of water to powder. Mix it stiffer and it sets faster. Add more water and you extend the working time slightly, but you also sacrifice strength.
Popular brands like USG Sheetrock, CGC Synko, and CertainTeed offer multiple setting compounds tailored for repair work, commercial finishing, and high-humidity applications.
Once it sets, it’s done. You cannot re-wet setting compound, scrape it back, or soften it. Whatever shape it hardens in is the shape you’re dealing with. This is why the “unforgiving” label sticks.
Pros:
- Extremely low shrinkage — fills stay where you put them
- Multiple coats possible in a single day (use a 20 or 45-minute product)
- Sets in cold or humid conditions where air-dry products struggle
- Bonds aggressively to metal lath, bare masonry, and problem surfaces
- Final hardness far exceeds air-dry compounds — resistant to dents and damage
- Excellent choice for fire-rated drywall assemblies and high-impact wall systems
Cons:
- Much harder to sand than pre-mixed compound — often requires a belt sander or heavy abrasives
- No room for error
- Requires mixing every batch fresh; can’t be stored once mixed
- Powder can be messy to work with; incorrect ratios affect performance
- Short working times increase material waste if batches are mixed improperly
When to Use Setting Compound
- Filling large holes, damaged sections, or deep gouges in a single pass
- First coat over areas affected by water damage or staining (setting compound seals better)
- Repairs over metal lath or in areas that see moisture
- Any situation where you need same-day turnaround on multiple coats
- Heavy commercial or new construction work where speed matters
- Covering unusually wide or damaged seams before switching to finishing coats
Experienced drywall finishers often use setting compound for their first coat on new construction, then switch to lightweight all-purpose or topping for the second and third. This gets the build-up coats done quickly with minimal shrinkage, then transitions to an easier-sanding product for the finish work.
Beginners should use it with caution. The time pressure alone can cause rushed, sloppy work. If you’re not comfortable with the pace of a 20 or 45-minute product, start with Easy Sand 90 to give yourself more room.
Setting Compound vs. All-Purpose: Key Differences
| Feature | Setting Compound | All-Purpose |
| Cure mechanism | Chemical reaction | Water evaporation |
| Set/dry time | 20–90 min | ~24 hours |
| Shrinkage | Very low | Moderate |
| Sandability | Difficult | Easy |
| Re-workable? | No | Yes |
| Best for | Base coats, deep fills, speed | General finishing, texture, repairs |
| Skill level | Intermediate–Pro | Beginner-friendly |

The short version: if you need it fast and hard with minimal shrinkage, setting compound. If you need it forgiving and sandable, all-purpose.
Topping Compound: The Finish-Coat Specialist
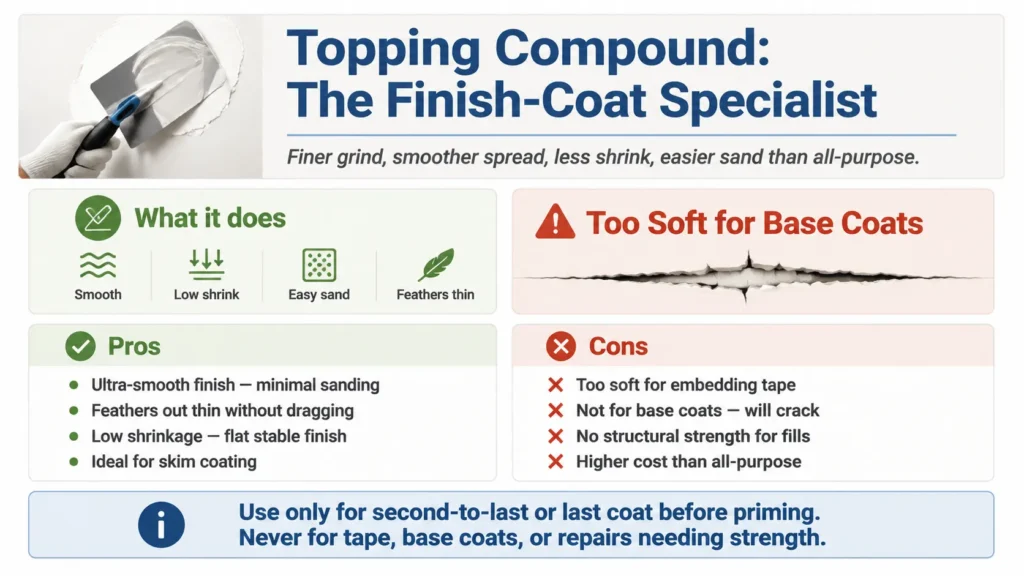
Topping compound is ground finer than standard all-purpose, which means it spreads more smoothly, shrinks less, and sands to a near-perfect surface. The whole point of the product is the final one or two coats before priming. Professional finishers frequently use topping mud during Level 4 and Level 5 drywall finishing to eliminate visible seams under critical lighting conditions.
It covers beautifully, feathers out thin without dragging, and sands down fast without much effort. The grit you get with even lightweight all-purpose on the last coat simply doesn’t exist with a good topping compound.
The catch is that topping compound is soft. That softness is exactly what makes it sand so easily, but it also means it’s too weak for base coats. If you use topping compound to embed tape on a seam, the joint will crack. It doesn’t have the binding strength for adhesion work or for filling roles. Use it only where it belongs: the second-to-last or last coat before you prime.
Pros:
- Ultra-smooth finish with minimal sanding effort
- Spreads thinly and feathers out at edges far better than all-purpose
- Low shrinkage means flat, stable finish coats
- Ideal for skim coating over existing surfaces
- Produces superior results beneath glossy paint finishes and decorative wall coatings
Cons:
- Too soft for embedding tape or base coats — will crack and fail
- Not suitable for repairs where the fill needs structural integrity
- Slightly higher cost than all-purpose, and a separate purchase if you don’t already have it
- Can dent more easily in high-traffic residential or commercial environments
Topping vs. All-Purpose for Finish Coats
For most DIY projects and general contractor work, all-purpose does a perfectly adequate job on finish coats. The difference between an all-purpose final coat and a topping compound final coat is real, but it’s subtle — the kind of thing a finisher notices more than a homeowner.
Where topping compound pays for itself is on smooth, paint-grade walls in spaces that will see direct or raking light: living rooms, hallways, open-plan spaces. In these situations, the superior surface quality is visible. For a utility room or a garage, it’s overkill.
If you’re working on a full-wall skim coating project, topping compound is worth the extra step. The sanding time saved usually offsets the cost of the additional product.
Which Joint Compound Should You Use? (Decision Guide)
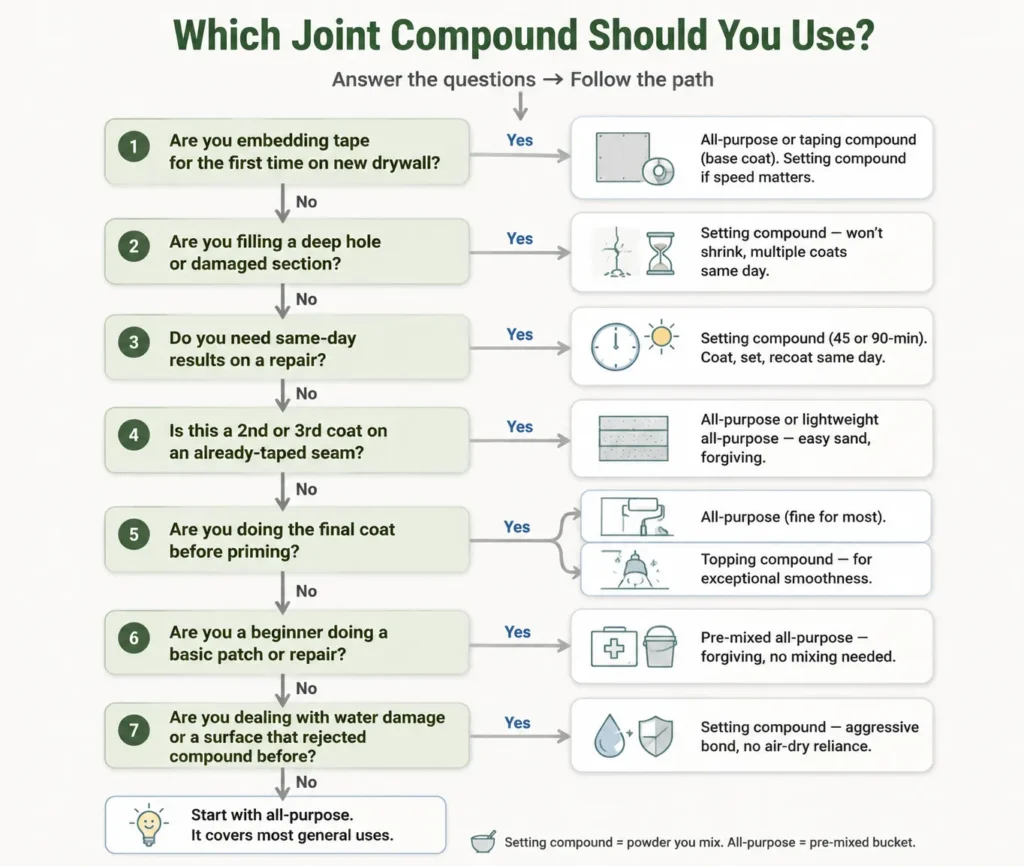
Work through these questions and the right choice becomes clear:
Are you embedding tape for the first time on new drywall? Use all-purpose or taping compound for the base coat. Setting compound works here too if you need speed.
Are you filling a deep hole or damaged section? Setting compound is the right call — it won’t shrink back, and you can get multiple fills done in one day. All-purpose will crack in thick applications.
Do you need same-day results on a repair? Setting compound (45 or 90-minute) lets you coat, set, and recoat multiple times before end of day.
Is this a second or third coat on an already-taped seam? All-purpose or lightweight all-purpose. Easy to sand, forgiving, and it’ll give you a solid surface.
Are you doing the final coat before priming? All-purpose works fine for most situations. Use topping compound if the surface quality needs to be exceptional — smooth walls in high-visibility spaces, skim-coat work.
Are you a beginner doing a basic patch or repair? Pre-mixed all-purpose. It gives you time to work, forgives mistakes, and doesn’t require mixing. Start there.
Are you dealing with a water-damaged area or a surface that rejected compound before? Setting compound bonds more aggressively and doesn’t rely on air drying, which makes it more reliable over problem substrates.
Pro Tips for Working with Joint Compound
Get the consistency right before you start. Fresh all-purpose straight from the bucket is usually a bit stiff. Add a small amount of water and mix thoroughly until it resembles smooth peanut butter — it should spread without dragging, but not run. Overwatered compound shrinks more and takes longer to dry.
Feather your edges. The most common finishing mistake is leaving raised edges at the border of each coat. Apply pressure to the outer edge of the knife as you stroke to taper the compound thin. Thick edges are what cause common drywall ridging causes and other visible imperfections that take forever to sand flat later in the project.
Three coats is the standard on new drywall. First coat embeds the tape. Second coat fills and levels. Third coat smooths and feathers. Trying to do it in two coats usually means heavier applications, which means more shrinkage and more sanding.
Don’t overwork the mud. Once you’ve applied a coat, leave it alone. Going back over partially dried compound tears the surface and creates ridges and marks. Apply it, smooth it, walk away. Additionally, keep an eye on your room’s environment; referring to a drywall moisture levels guide can help you determine if your space is too humid for the mud to cure properly, which often leads to bonding failure or mold growth behind the tape.
Store it properly. Pre-mixed compound exposed to air will skin over and eventually dry out. After each use, press plastic wrap directly against the surface before putting the lid on. Store it in a temperature-stable environment — freezing ruins the product permanently. For green building projects, look for buckets meeting UL GREENGUARD Gold certification, ensuring compound meets strict chemical emission limits for indoor air quality.
For setting compound, mix only what you can use. Start with smaller batches than you think you need until you understand how quickly you work. A bucket of hardened Durabond 20 is a waste of product and a disposal problem. Using the right setup also matters here because dedicated drywall finishing tools make mixing, application, and cleanup much easier once you start working with fast-setting products.
Frequently Asked Questions
Can you mix different types of joint compound?
Technically yes, but it’s generally not a good idea. Mixing all-purpose with setting compound, for example, alters the set time in unpredictable ways and can weaken the final result. If you’re switching between types, apply them in separate coats and let each coat fully set or dry before applying the next. The common professional approach — setting compound for base coats, all-purpose or topping for finish coats — works because the products are layered, not blended.
What is the difference between joint compound and spackle?
Spackle is a patching product designed for small repairs in drywall and plaster. It dries faster than joint compound, is sold in smaller quantities, and has a slightly different composition that makes it more suitable for tiny holes and nail pops. Joint compound is used for taping seams, larger repairs, and full drywall finishing. For a single nail hole, spackle works fine. For anything involving tape, covering seams, or texturing, you want joint compound.
How many coats of joint compound do you need?
For new drywall, three coats is the standard: one coat to embed tape, one to fill and level, and one finish coat before priming. For small repairs over existing painted drywall, two coats often suffice — one to fill and one to smooth. Thin coats consistently outperform thick ones; patience with additional thin coats produces better results than trying to rush with heavy applications.
Why is my joint compound cracking?
Cracking almost always comes down to one of three causes: the coat was applied too thickly, the compound dried too fast (high heat or direct airflow), or the wrong product was used for the application. Setting compound should be used for deep fills — all-purpose will crack in thick passes. If surface cracking is fine and widespread, suspect too-fast drying. If cracks follow the edges of the joint, check whether the tape was properly embedded with full contact.
How long does joint compound take to dry?
Pre-mixed all-purpose compound takes roughly 24 hours per coat under normal indoor conditions (around 70°F, moderate humidity). High humidity, cold temperatures, or poor air circulation can extend this to 48 hours or more. Setting-type compounds harden chemically in 20 to 90 minutes depending on the product. Note that setting and drying are different — setting compound hardens in minutes but may still contain residual moisture; similarly, all-purpose may feel dry on the surface before the interior is fully cured.
Conclusion
The three core types of joint compound — all-purpose, setting, and topping — each have a specific role. All-purpose handles the bulk of most projects from tape coat through finish. Setting compound solves time constraints and depth challenges that pre-mixed products can’t handle cleanly. Topping compound delivers a superior finish surface when the final coat quality genuinely matters.
Getting the types right doesn’t require memorizing a lot of chemistry. It mostly comes down to knowing what stage of the work you’re on and what you need the compound to do. Match the product to the task, work in thin coats, and the results speak for themselves.
If you’re ready to put this into practice, take a look at our guide to taping drywall for a full walkthrough of the process from hanging through finishing.

Elena Hart is the founder and lead writer of Better Home Pro. She writes about drywall, home repair, and practical DIY home improvement topics, focusing on clear, useful information that helps homeowners make better decisions. Her work combines firsthand experience, manufacturer documentation, industry resources, and careful research to create content that is accurate, practical, and easy to understand. Through Better Home Pro, Elena aims to simplify complex home improvement topics and provide guidance that is genuinely helpful to homeowners and DIYers.


No Comments