
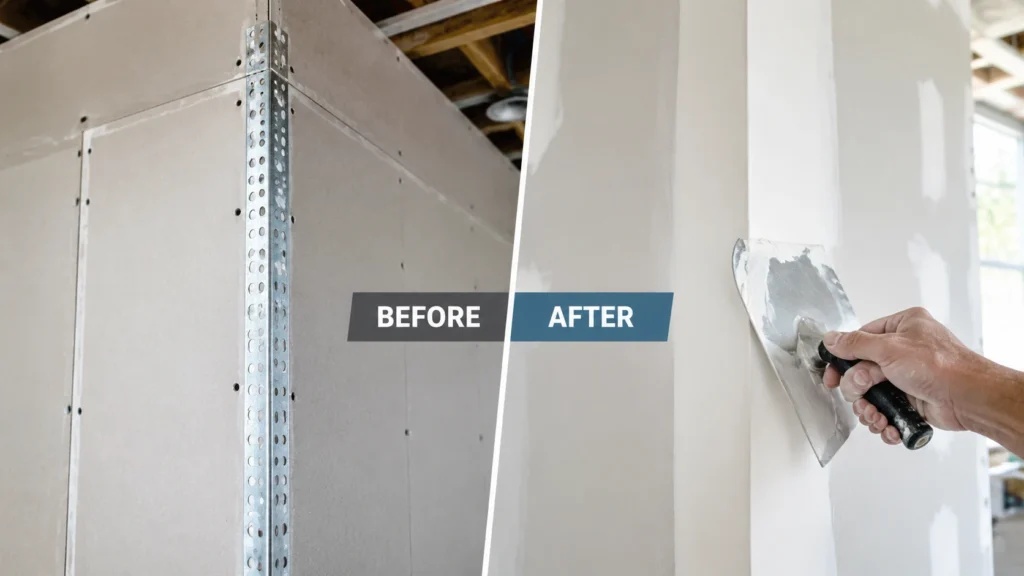
Corners are where drywall finishing reveals itself. A decent flat seam can be disguised with wide feathering and good lighting. A bad inside corner, whether lumpy, off-square, or shadowed, is visible from across the room. Getting corners right requires the right tool for the right project size, not just the right technique.
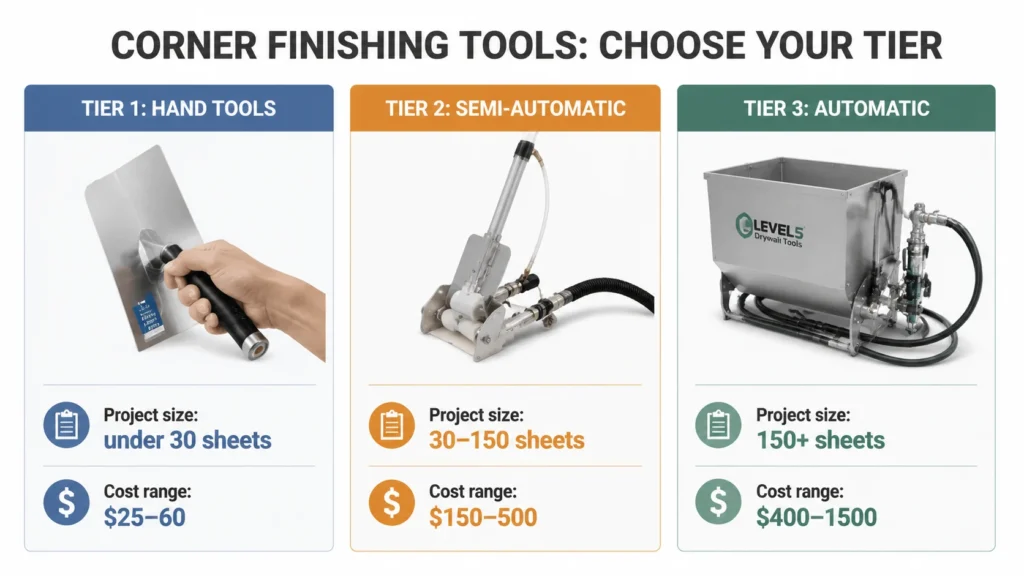
This guide organises corner tools into three tiers: hand tools for small projects (1 to 3 rooms), semi-automatic tools for medium projects (basements, full floors), and automatic tools for professional-volume work. These are genuinely different tool sets at completely different price points, and choosing the wrong tier wastes either money or time.
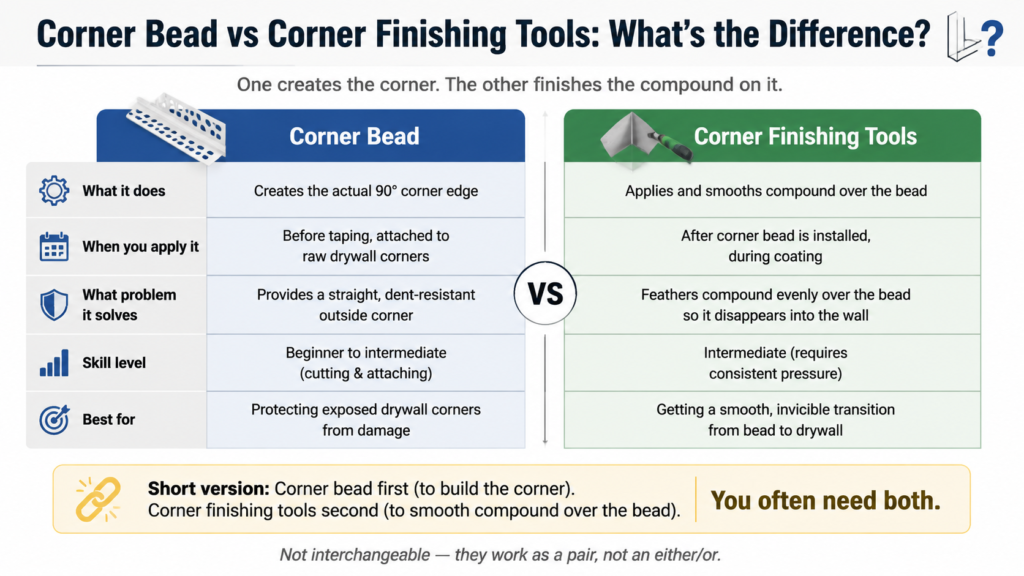
One more thing to clear up before we start: corner bead and corner finishing tools are two separate things. A lot of confusion starts here, and most guides skip over it entirely.
Key Takeaways
- Corner bead provides the structural foundation for a corner, while finishing tools apply and smooth the compound over that bead.
- Hand tools are sufficient for projects under 30 sheets, but semi-automatic rollers and flushers save significant time on larger renovations.
- Mixing compound to a thin, almost pourable consistency prevents the tool from dragging or tearing tape and ensures a smoother finish.
- Use one continuous stroke without pausing to avoid leaving visible marks in the mud that are difficult to sand out later.
- A corner flusher cleans the immediate angle, whereas an angle head feathers the mud wider to blend the corner into the flat wall surface.
Corner Bead vs Corner Finishing Tools: Two Different Things
Corner bead is the rigid or flexible strip that reinforces the corner itself. It gets installed over the drywall edge before any joint compound is applied. The four main types are:
- Metal bead is the traditional choice. It’s durable and holds a sharp corner, but it can rust if exposed to moisture and the metal edge can show through thin paint.
- Vinyl bead is flexible and won’t rust, making it better for humid areas. It does require a lighter hand when mudding.
- Paper-faced bead is easiest to finish over because there’s no metal edge to telegraph through the compound. It’s very popular for Level 5 work.
- Flexible bead is specifically designed for non-90 degree angles, archways, and rounded corners.
Corner bead is a structural component, not a finishing tool. It stabilises the corner so the compound has something solid to key against.
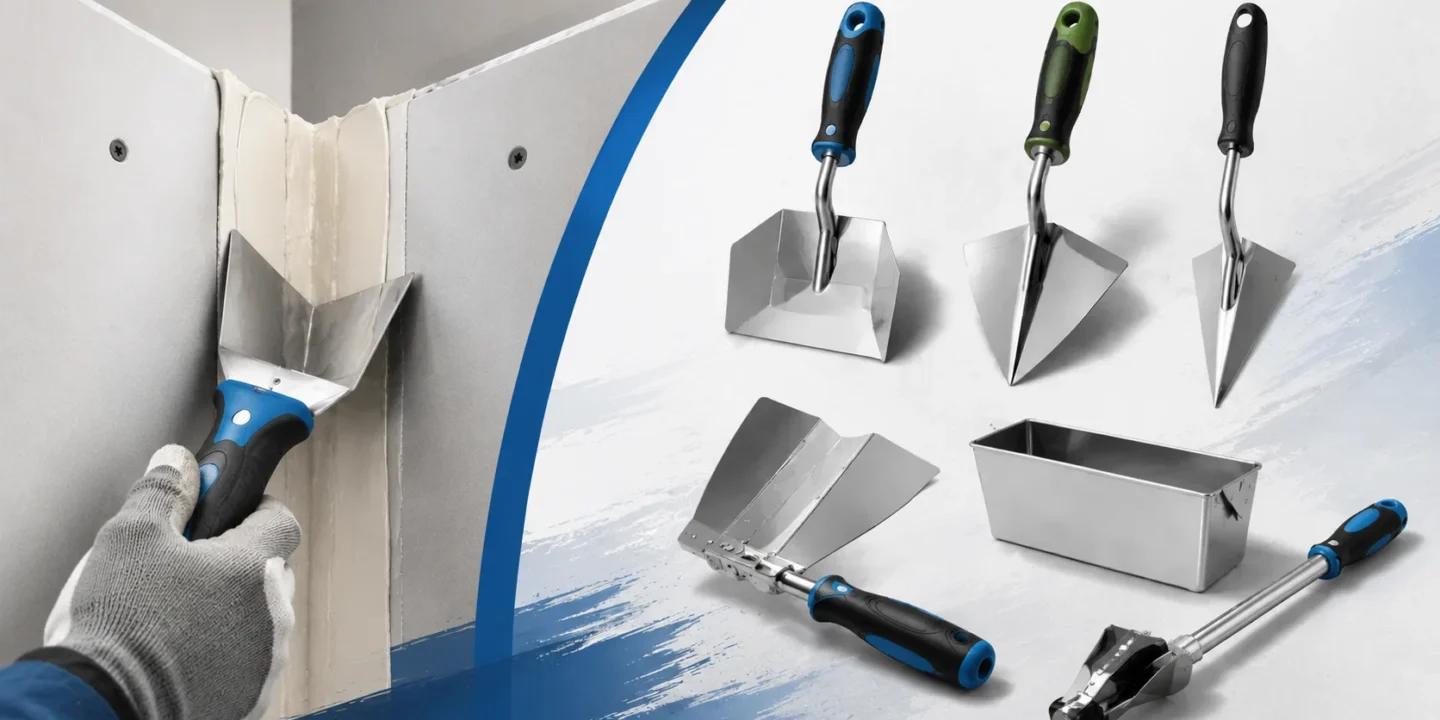
Corner finishing tools are what you use to apply and smooth joint compound over the corner bead after it’s set. Inside corner knives, outside corner knives, corner rollers, corner boxes: these are the tools this article covers.
The workflow is always sequential. Install corner bead first, let it set, then use your finishing tools to apply and feather the compound. These aren’t alternatives to each other. They’re separate steps.
If you’re just starting to build out your kit, checking an essential drywall tools list can help you ensure you have the right pans and knives to support these specialized corner tools.
The Three-Tier System
This is the core of the guide. The single most useful question when selecting corner tools isn’t “what’s the best brand?” It’s “what scale is my project?”
Tier 1: Hand Tools (1 to 3 Rooms, Under 30 Sheets)
Tools needed: Inside corner knife (3 to 4 inches) + outside corner knife (4 to 5 inches) + standard taping knives Total cost: $25 to $60
The inside corner knife is a right-angle flexible blade that applies and smooths compound to both sides of an inside corner in one pass. That’s the key benefit: both sides coated and feathered simultaneously. Most beginners default to the two-pass method, coating one side, letting it dry, then coating the other. That’s slower and produces an inconsistent corner line. A good inside corner knife makes that approach unnecessary from the start.
The outside corner knife uses the same right-angle geometry but is designed for the convex surface of an outside corner, over corner bead. One smooth stroke covers both faces evenly without overloading one side.
Hand tools are fully sufficient for any project under about 30 sheets, including single rooms, bathroom renovations, basement bedrooms, and patch repairs. The learning curve is real. Expect 2 to 3 rooms before your strokes get consistent and your corners stop showing ridges. But the tool cost is low and the quality ceiling is high once you develop the technique.
The limitation is speed. Each corner requires multiple passes across multiple drying cycles, and careful feathering by hand. For a full-house renovation, that time cost adds up very quickly.
Furthermore, improper drying or tool technique in corners is one of the most common drywall ridging causes and fixes you will have to deal with later if the joint isn’t handled correctly.
Tier 2: Semi-Automatic Tools (30 to 150 Sheets, Full Basement or Floor)
Tools needed: Corner roller + compound tube + corner flusher (or angle head) Total cost: $150 to $500
At this scale, the bottleneck shifts from technique to time. Semi-automatic tools don’t change how the compound behaves. They reduce how long it takes to apply it consistently across many corners.
A corner roller is a wheeled applicator that rolls compound into inside corners in one pass. It comes in two configurations. The 2-wheel version coats both sides simultaneously and is faster, but it requires significantly thinner compound consistency. A Drywall Talk professional specifically flags this: mix your mud thin, almost pourable, for roller application. Thick compound causes the wheels to drag and tear the tape. The 1-way version is more forgiving with compound consistency but requires two passes per corner.
Plastic applicators deliver more mud per pass and are better for first-coat fill. Wheeled applicators give more control for finish coats but require consistent pressure throughout the stroke.
A compound tube with corner attachment pulls compound directly from a bucket and delivers it to the corner through a shaped attachment, eliminating the step of loading compound onto a tool from a pan. Paired with a roller, this speeds up repeat corners significantly.
The difference between a corner flusher and an angle head is something most guides don’t explain clearly. Both tools are used after roller application to clean up and finish the compound, but they do different things.
A corner flusher smooths and removes excess compound from the corner itself. It seats into the corner and draws down the length of it, producing a clean, consistent angle and clearing excess mud that the roller pushed to the sides. For most DIYers stepping up to semi-automatic work, this is the right tool.
An angle head feathers the compound wider and flatter, blending the corner compound into the flat wall face. It’s a refinement step for finishers chasing Level 5 quality, not a first-coat tool, and not necessary for most residential finishing work.
The reason this confuses people is that both tools look similar and both get used after a roller application. The difference is in where they smooth: the corner flusher works at the corner itself, while the angle head works the transition from corner to wall.

When to move to Tier 2: a full basement (50 or more sheets), a whole-floor renovation, or any project where you’re finishing the same type of inside corner more than 10 to 15 times and the hand tool pace becomes genuinely frustrating.
Tier 3: Automatic Tools (150+ Sheets, Professional Volume)
Tools needed: Automatic corner box (3 to 4 inches) connected to a compound pump Total cost: $400 to $1,500 or more
An automatic corner box is pump-fed. It applies a precise, consistent layer of compound to inside corners in one continuous pass, with no reloading, no separate roller application, and no flusher needed for the first coat. The tool is pulled down the corner while the pump maintains steady compound pressure, producing a uniform coat at every corner regardless of operator fatigue.
The LEVEL5 3-inch Corner Box and Columbia corner boxes are the most consistently recommended professional tools on Drywall Talk. A homeowner tackling a 200-sheet basement project described a 3-inch corner finisher as “a vital tool!” at that scale, and at 200 sheets, that’s accurate. Experienced tapers report up to 300% faster corner work compared to hand tools.
At this tier, the real question is whether to rent or buy. Automatic taping tools including corner boxes are available for rent through Ames Taping Tools and similar trade suppliers. For a homeowner doing one large basement project, renting a 3-inch corner box with a pump, typically $50 to $100 for a weekend, is often more cost-effective than buying the full setup.
Which Tier for Your Project
| Project Type | Recommended Tier | Estimated Tool Cost |
| Patch repair (single corner) | Tier 1: inside corner knife + taping knife | $15 to $30 |
| Single bedroom or bathroom (10 to 25 sheets) | Tier 1: full hand tool set | $40 to $70 |
| Full bathroom with multiple inside corners | Tier 1: inside corner knife essential | $15 to $25 |
| Basement finishing (50 to 100 sheets) | Tier 2: corner roller + flusher | $150 to $300 |
| Whole floor renovation (100 to 200 sheets) | Tier 2 or rent Tier 3 | $200 to $400 or $50 to $100 rental |
| New construction or commercial (200+ sheets) | Tier 3: automatic corner box + pump | $500 to $1,500 |
A useful budget rule of thumb: spend 1 to 2% of your total project material cost on corner tools. If your drywall materials run $800, a $15 to $30 Tier 1 tool set is appropriate. If your project is $8,000 in materials, spending $200 to $300 on Tier 2 tools is well justified and pays back quickly in time savings.
Not sure how large your project is? Use the drywall sheet calculator to estimate sheet count before choosing a tool tier.
Inside Corner Technique: The Mud Consistency Rule and Single-Pass Method
The right tools help. The right technique makes them work.
The mud consistency rule: For corner tools specifically, whether hand knives or rollers, mix your compound significantly thinner than you would for flat seams. Aim for almost pourable. Thick compound drags the tool, leaves ridges, and tears the tape at the corner. Thin compound flows into the corner, fills it evenly, and produces a cleaner result in fewer passes. Keep a dedicated bucket of corner mud at this consistency and don’t pull from the same container you’re using for flat seams. The consistency requirements are genuinely different.
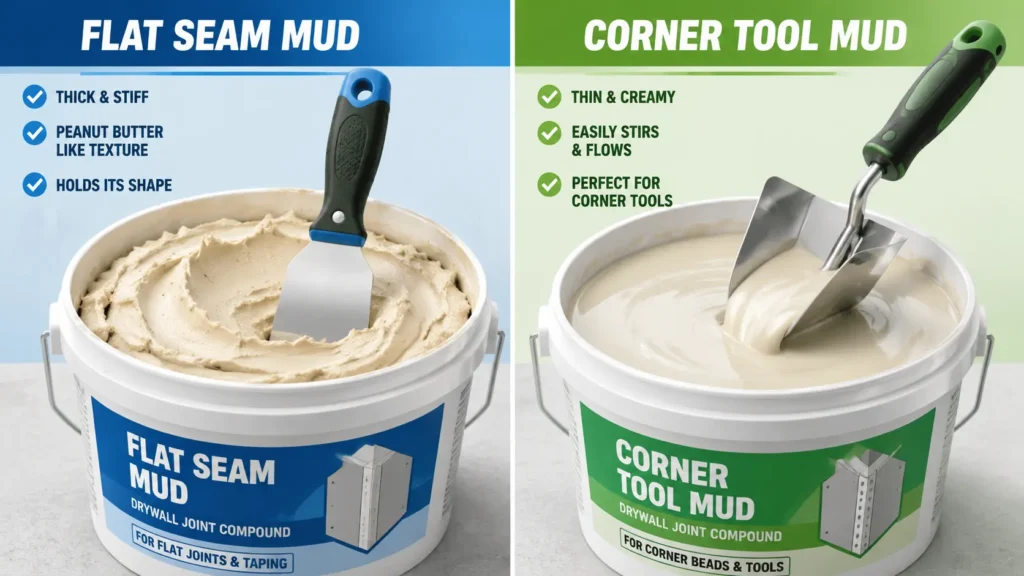
This specific guidance comes from experienced professionals on Drywall Talk forums and appears almost nowhere in product guides or mainstream tutorials. It’s the technique difference that separates clean corners from ones that need three remedial sanding passes.
Inside corner knife technique: Load compound onto the blade from your mud pan. Position the tool at the top of the corner at a shallow angle. Using theproper drywall taping knife size for the corner’s width, draw down in one smooth, continuous stroke with moderate pressure and consistent speed. Do not stop mid-stroke. A pause leaves a visible mark in the compound that’s difficult to remove without re-wetting.
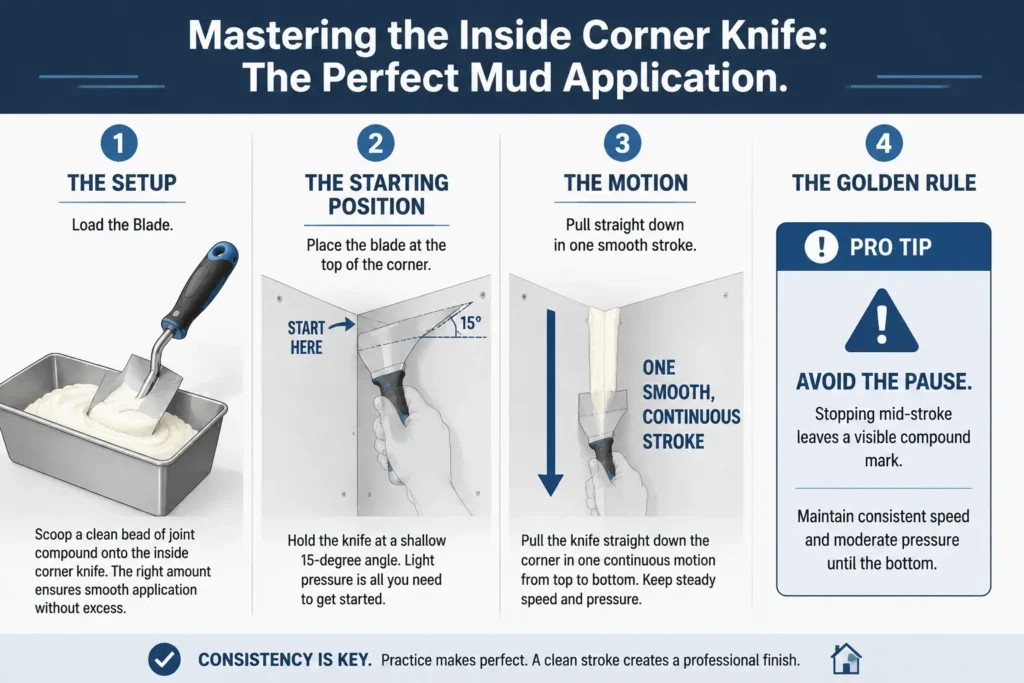
The wipe-down pass: After the compound sets but before it fully dries, what finishers call the “green stage” where it’s firm to the touch but not bone dry, draw the clean corner knife down the corner with light pressure. This smooths any ridges left by the application pass without removing material. This is the move that produces the crisp, shadow-free inside corner line.
Coat sequence:
- First coat fills the corner and embeds the tape
- Second coat (after full drying) feathers the edges
- Third coat with a slightly wider feather completes Level 5 quality
Rushing the drying between coats is the most common cause of cracking at inside corners. Each coat needs to be fully dry, not just surface-dry, before the next one goes on.
Specific Product Picks by Tier
Best Hand Inside Corner Tool: Hyde MAXXGRIP Inside Corner Knife (4 inch)
Flexible stainless blades with a MAXXGRIP handle that stays secure when your hands are coated in compound. The 4-inch blade is the practical sweet spot for standard 90-degree inside corners, giving enough coverage per stroke without becoming difficult to control in tighter spaces. Price: $18 to $28.
Limitation: Consistent pressure across the full stroke takes practice. Expect 2 to 3 rooms to develop reliable results.
Best Hand Outside Corner Tool: Goldblatt 5 inch Outside Corner Knife
Part of Goldblatt’s well-regarded drywall line. Stainless steel, comfortable grip, and produces a consistent convex corner profile over metal or vinyl bead. Available standalone ($15 to $25) or as part of a 2-piece corner set for around $35.
Limitation: Less effective on vinyl bead than metal. The flexibility of vinyl bead requires a lighter touch than the rigid angle of metal bead.
Best Semi-Automatic Upgrade: CanAm Tool 2.5 inch Corner Flusher
Rated 4.5 out of 5 and regularly recommended by budget-conscious professionals. Lightweight, durable, and produces a consistently smooth corner flush in one pass after roller application. A solid entry point into Tier 2 without committing to the full pump and tube setup. Price: $45 to $75.
Limitation: This tool finishes the corner; it doesn’t apply compound. You still need a corner roller or manual application for the mud itself.
Best Professional Corner Box: LEVEL5 3 inch Corner Box
Rated 4.8 out of 5 and the most consistently recommended professional corner box across Drywall Talk and contractor forums. High-capacity mud reservoir, adjustable pressure, and smooth operation over long corners. The homeowner doing 200 sheets who called it “a vital tool!” was right at that scale. Price: $200 to $350 standalone.
Limitation: Requires a compound pump to function. Budget $400 to $600 or more for the full setup. For a single project, rent before buying.
4 Corner Tool Mistakes That Ruin the Finish
1. Mud too thick for corner tools. Standard flat-seam compound consistency drags corner knives and rollers, leaves ridges, and tears tape. Mix a dedicated corner bucket significantly thinner, almost pourable, before starting any corner work. This one adjustment solves more corner problems than any tool upgrade.
2. Too much pressure on the inside corner knife. Excess force squeezes compound out of the corner and leaves ridges on both wall faces at the same time. Corner tools work with moderate, consistent pressure. Let the blade geometry do the work. Pressing harder doesn’t improve coverage; it just creates more cleanup.
3. Stopping mid-stroke. Any pause during a corner knife stroke leaves a mark in the compound that’s difficult to remove cleanly. Start above the corner and pull through in one continuous motion. For long corners, pace your speed so you finish the stroke before your arm fatigues and slows down.
4. Over-sanding inside corners. Inside corners are easy to over-sand because sandpaper contacts both wall faces at once and removes more material than expected. Use a folded sandpaper edge rather than a block, and sand each face independently with light strokes. A block sander on an inside corner almost always removes too much from one face, creating an angle that catches light.
Frequently Asked Questions
What tool do you use for inside drywall corners? For small projects under 30 sheets, an inside corner knife (typically 3 to 4 inches) is the standard tool. It applies compound to both faces of the corner simultaneously in one stroke. For larger projects, a corner roller with a corner flusher applies and smooths compound faster across many repeated corners.
What is a drywall corner finisher? “Drywall corner finisher” is a general term that covers any tool used to apply and smooth joint compound at corners. Inside corner knives, outside corner knives, corner rollers, corner flushers, and automatic corner boxes all fall under this category. The specific tool you need depends on your project size and whether you’re working inside or outside corners.
How do you finish drywall corners smoothly? Two things matter most: compound consistency and stroke technique. Mix your corner mud thinner than you would for flat seams, almost pourable. Apply with one smooth, uninterrupted stroke using an inside corner knife or roller. After the first coat sets to the green stage (firm but not fully dry), run a clean dry corner knife down the corner lightly to remove any ridges. Sand each wall face independently with a folded sandpaper edge rather than a sanding block.
Do I need a corner tool for drywall? For inside corners specifically, yes, or at minimum a pair of flat knives and a lot of patience. Without an inside corner knife, you’re coating one side of the corner at a time, waiting for it to dry, then coating the other side. A basic inside corner knife costs $15 to $25 and makes a real difference in both speed and result quality. For outside corners over metal bead, an outside corner knife is similarly worth it over a flat taping knife.
What is the difference between a corner flusher and an angle head? A corner flusher seats into the corner itself and draws out excess compound, smoothing and cleaning the corner angle directly. It’s the step that follows a roller application for most residential finishing work. An angle head feathers the compound from the corner outward onto the flat wall face, blending the corner into the surrounding surface. The angle head is a refinement step that produces a wider, flatter transition from corner to wall, which matters for Level 5 finishing. For most projects, a corner flusher is the right tool. An angle head is for finishers who want to go further.
What is the best inside corner tool for drywall? For hand tool work, the Hyde MAXXGRIP 4-inch Inside Corner Knife is a reliable choice with good grip for compound-slippery conditions. For semi-automatic finishing, the CanAm 2.5-inch Corner Flusher is a well-rated option that doesn’t require a full pump setup. For professional volume, the LEVEL5 3-inch Corner Box is consistently the top recommendation on contractor forums.
How do you use a drywall corner roller? Load the roller from your compound tube or pan. Starting at the top of the corner, roll down in one continuous pass at a consistent speed. Keep pressure even throughout the stroke. For a 2-way roller that coats both sides simultaneously, make sure your compound is mixed thin enough to flow freely. Thick mud will drag the roller and leave an uneven deposit. Follow up with a corner flusher to smooth and remove excess compound before it sets.
Conclusion
The right corner tool isn’t about brand; it’s about project scale. Under 30 sheets, a $25 to $60 hand tool set will do everything you need. Between 30 and 150 sheets, a corner roller and flusher ($150 to $300) will pay back in time savings within the first project. Over 150 sheets, rent or buy an automatic corner box. The productivity difference at that scale is not marginal.
Two technique points worth repeating: always mix corner mud thinner than flat-seam mud, and never stop mid-stroke. These two habits fix more corner problems than any tool switch.
One pro tip from LEVEL5’s professional blog: keep a 4-inch joint knife in your back pocket at all times during any corner work. Corners always need touch-ups, whether it’s a drip at the ceiling, a ridge at the base, or a spot where the roller loaded unevenly. Having that knife immediately accessible saves the walk back to the tool bucket dozens of times across a project, and clean corners depend on catching those small imperfections before they dry.

Elena Hart is the founder and lead writer of Better Home Pro. She writes about drywall, home repair, and practical DIY home improvement topics, focusing on clear, useful information that helps homeowners make better decisions. Her work combines firsthand experience, manufacturer documentation, industry resources, and careful research to create content that is accurate, practical, and easy to understand. Through Better Home Pro, Elena aims to simplify complex home improvement topics and provide guidance that is genuinely helpful to homeowners and DIYers.


No Comments