
A drill works for drywall when hanging fewer than 10–15 sheets, using wood studs, and using a dimpler bit. Beyond that, a dedicated screw gun becomes worthwhile because it improves speed, consistency, and reduces damaged panels.
Most articles push the screw gun as an automatic upgrade or leave readers unclear about which tool to choose.
There are three situations where a drill fails on drywall: metal studs, where standard drill RPM is too low to drive screws reliably through steel; ceiling installation, where fatigue and inconsistent depth overhead quickly cause problems; and large projects, where checking screw depth every few inches slows work. Outside those situations, a drill with a dimpler bit is a practical option.
Choosing the right equipment depends entirely on your project type and scale. While this guide helps you decide between a dedicated screw gun and a dimpler bit, you can view the full breakdown of must-have gear in our essential drywall tools list to make sure your toolbox is fully prepared
Key Takeaways
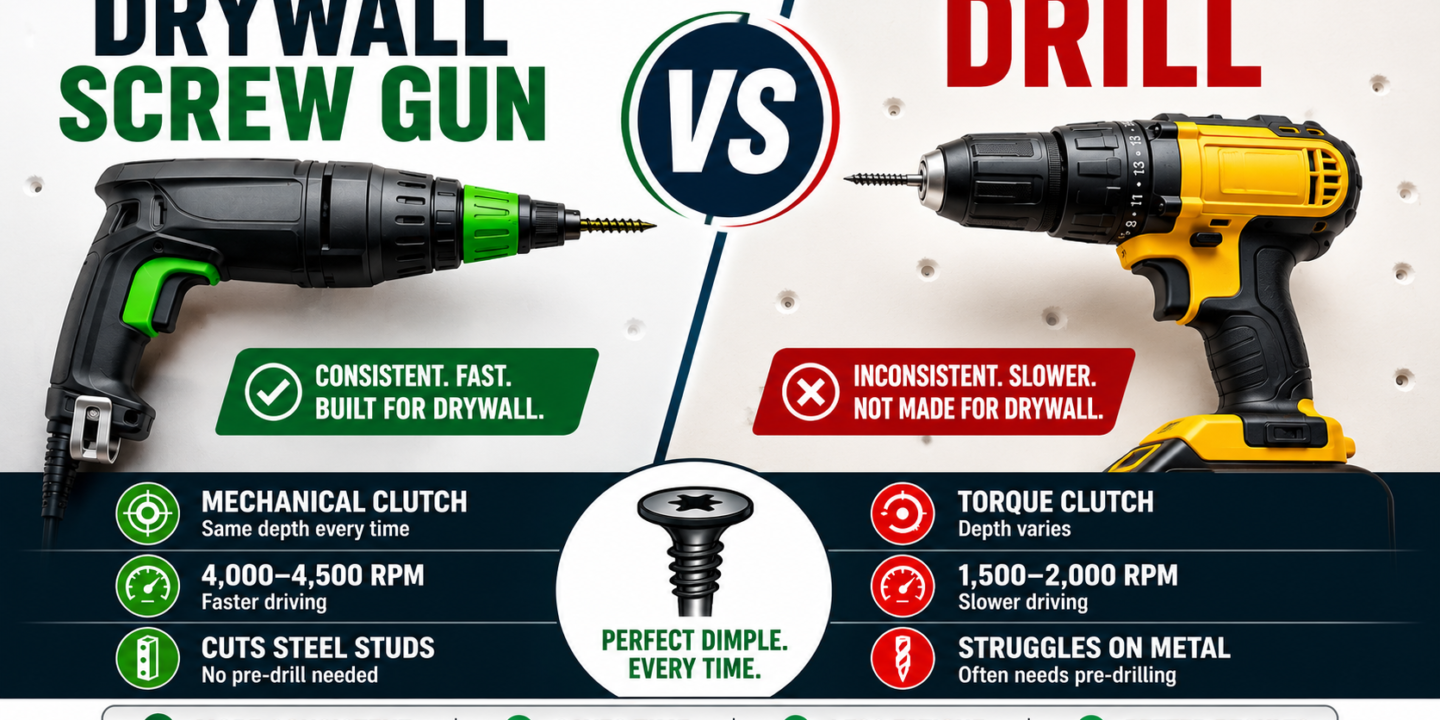
- A standard drill is adequate for small repairs, but its torque-based clutch is inconsistent on soft gypsum. A dedicated screw gun uses a mechanical nose cone that stops through surface contact, which is the most reliable way to ensure consistent screw depth without tearing the paper.
- Metal studs are a clear threshold for tool choice because standard drills lack the 4,000+ RPM necessary to cut through steel cleanly, causing stripped screws and damaged panels.
- An impact driver is often the wrong tool for drywall because its rotational bursts are too aggressive, frequently overdriving screws and causing screw pops that appear after painting.
- If you are hanging fewer than 15 sheets on wood studs, a $10 dimpler bit is a practical option because it provides the depth-limiting benefits of a professional gun without the cost of a new power tool.
- For projects exceeding 30 sheets, switching to a collated screw system is a productivity improvement that can double installation speed by eliminating the manual loading of thousands of individual fasteners.
How Each Tool Actually Works (and Why the Mechanism Matters for Drywall)
Most tool comparisons stop at specs. RPM numbers, clutch settings, weight. That’s not particularly useful unless you understand what those numbers mean in the context of driving screws into gypsum board. The mechanism is what matters.
Standard Drill / Driver
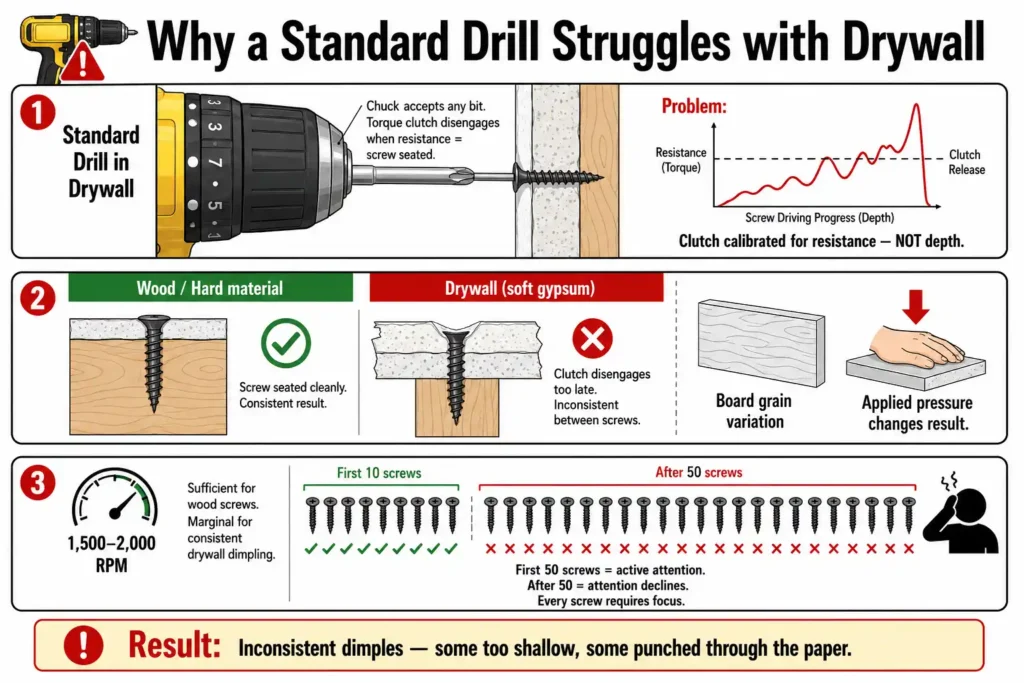
A standard drill uses a chuck that accepts any bit and uses a torque clutch for depth control. The clutch disengages when it senses enough rotational resistance because resistance signals the screw is fully seated.
Drywall creates a problem because gypsum is soft. The clutch is calibrated for resistance, not depth. On soft gypsum, it often disengages too late or inconsistently between screws, depending on applied pressure and board grain variation. Typical RPM is 1,500–2,000. That is sufficient for wood screws but marginal in maintaining consistent drywall dimpling across a full panel. Every screw requires active attention. After the first 50, attention declines.
Drywall Screw Gun
A dedicated screw gun has no chuck. It uses a fixed nose cone with an adjustable depth collar. The clutch disengages mechanically when the nose cone contacts the drywall surface, not when it detects torque.
Every screw seats at the same depth, regardless of applied pressure or gypsum density variation. Operator inconsistency is eliminated.
RPM on a screw gun reaches 4,000–4,500. That high speed allows screw guns to work on metal studs where drills struggle. The higher rotational speed provides enough force to cut through steel framing without pre-drilling.
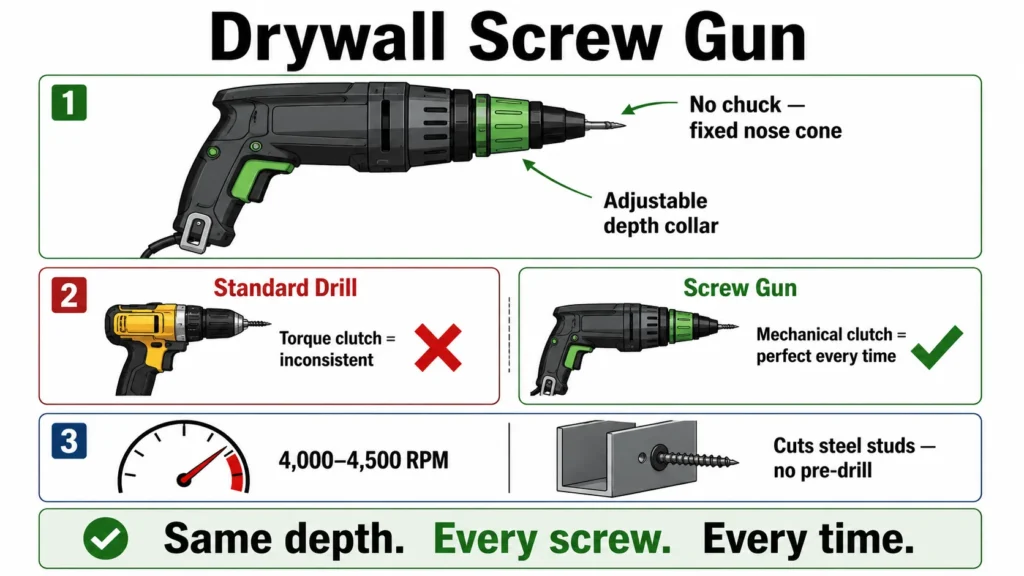
The key difference in plain terms: A drill stops when it feels resistance. A screw gun stops when it touches the wall. For drywall, where every screw needs to seat within about half a millimeter of the same depth to avoid paper tears and screw pops, the screw gun’s nose-cone mechanism is fundamentally better suited to the job. GA-216, the industry standard referenced in the International Building Code, defines proper screw seating as slightly below the panel surface without breaking the face paper
Screw depth that’s even slightly inconsistent causes real problems downstream. Too deep and you tear the paper face, reducing holding strength significantly. Too shallow and the screw head creates a bump under the joint compound that’s visible in the finished surface. The Gypsum Association’s fastener guidance is explicit that overdriven, undersized, or incorrectly spaced fasteners can compromise both finish quality and fire-resistance ratings.
Project-Type Decision Matrix: The Right Tool for Every Scenario
This is the section most articles avoid because giving a concrete answer means taking a position. Here’s the position.
| Project Type | Best Tool |
| Single patch repair or 1–5 sheets | Drill + dimpler bit |
| 1-room renovation, wood studs, 10–20 sheets | Either works — screw gun preferred |
| Whole house or multi-room, 20+ sheets, wood studs | Screw gun — clear winner |
| Any project with metal studs | Screw gun required |
| Ceiling installation, any quantity | Screw gun strongly preferred |
| You own an impact driver, wondering if it works | See Section 3 — possible with caution |
| Contractor-scale, 50+ sheets | Collated screw gun |
The sheet-count rule of thumb: Under 15 sheets on wood studs, a drill with a dimpler bit is adequate. Over 15 sheets, any metal studs, or any ceiling work, a screw gun pays for itself.
A few of these rows deserve more explanation than a table cell allows.
Metal studs. This isn’t a preference, it’s a mechanical limitation. Standard drill RPM is insufficient to reliably drive screws through steel framing without the screw binding or walking. A screw gun at 4,000+ RPM cuts through cleanly. If you’re working on a commercial build, a steel-frame basement, or any application with metal framing, the drill is the wrong tool regardless of project size. You’ll strip screws, waste time, and likely damage panels.
Ceilings. Hanging drywall overhead is significantly more fatiguing than wall work under any circumstances. Add manual depth-checking every few inches and the fatigue compounds. A lightweight screw gun held overhead is meaningfully easier to manage than a heavier drill, and the consistent depth from the nose cone is even more valuable when you can’t see the screw face as clearly. Nobody writes about the ceiling fatigue factor, but it’s the reason experienced drywallers won’t touch ceiling work with a standard drill if they have any choice.
The 10–15 sheet threshold. Below that number, the time savings from a screw gun don’t clearly outweigh the cost of purchasing one (assuming you already own a drill). Above it, the time savings start to add up quickly — and on a project with metal studs or ceiling work, the threshold effectively drops to zero.
Can You Use an Impact Driver for Drywall?
This is the question half your readers actually have, and every competing article either ignores it or handles it in a single dismissive sentence. It deserves a real answer.
Many homeowners already own an impact driver for deck work, lag bolts, or general construction. It’s a reasonable tool to own. The question is whether it negates the need for a screw gun on drywall jobs.
Short answer: no, not reliably. Here’s why.
How an Impact Driver Works Differently
Impact drivers use rotational bursts, or impacts, to drive fasteners rather than continuous torque. That burst mechanism is used for high-resistance applications where continuous torque would stall the motor: lag bolts, long deck screws, and structural fasteners. For those uses, it performs well.
For drywall, those same bursts send screws through the paper face and into the gypsum unpredictably fast. The burst arrives before the operator can react. The result is chronically overdriven screws, torn paper faces, reduced holding strength at the screw point, and a higher rate of screw pops after the tape and mud dry. This is the reason professionals rarely use impact drivers for hanging drywall.
When an Impact Driver Can Work
There are conditions where an impact driver becomes more manageable on drywall. Some Milwaukee M18 and DeWalt ATOMIC models include a specific drywall mode or a low-speed setting that reduces the burst intensity. Combined with a dimpler bit to set maximum depth, you get a more controllable result. The technique has to be deliberate — you’re actively fighting the tool’s natural tendency to overdrive. It’s not set-and-forget the way a screw gun is.
If you have 4–5 screws to drive on a quick repair and your only power tool is an impact driver, it can get the job done. For full-room installation, the overdriving problem compounds across hundreds of screws. You’ll spend more time patching torn paper faces than you saved by not buying a screw gun.
Where Impact Drivers Actually Belong on a Drywall Job
Keep the impact driver on the job site — just use it for the right tasks. Driving structural screws into framing, lag bolts, anchoring plates, anything that isn’t going into drywall face. That’s exactly the application it’s designed for. On large projects, you’ll use both tools, just not interchangeably.
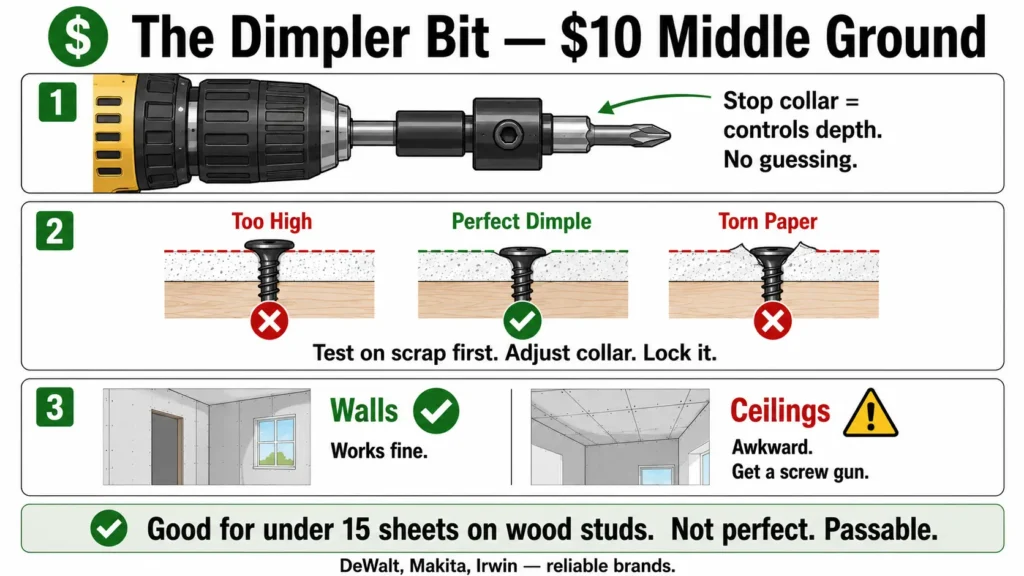
The Dimpler Bit: The $10 Middle-Ground Solution
If you’re hanging fewer than 15 sheets on wood studs and already own a drill, the dimpler bit is the most honest answer to the screw gun question. It’s a depth-limiting screw setter with a stop collar — the collar contacts the drywall surface and physically prevents the screw from going deeper than the set depth. Cost runs $5–$15 depending on brand and quality.
It converts a standard drill into a passable drywall driver for small projects. Not perfect. Passable.
How to Set It Correctly
Drive a test screw into a scrap piece of drywall first. Check the dimple — the screw head should sit just below the paper surface, paper face intact with no tearing. Adjust the collar in or out until the dimple looks right, then lock it. Drive three more test screws to confirm consistency before committing to a panel. That extra two minutes of setup prevents a wall of inconsistent screw depth.
Drill settings with a dimpler: use your highest clutch torque setting. The collar is doing the depth control now, so you want the drill driving freely without the torque clutch interrupting partway through. Low RPM setting gives you more reaction time and reduces overdriving risk.
Its Real Limitation
The dimpler adds length to the drill-bit assembly, which makes the tool more awkward overhead. Ceiling work with a dimpler becomes genuinely cumbersome — the added length throws off balance and makes controlling the tool harder when your arms are extended above your head. For wall work on small projects, it’s a practical solution. For ceilings, the argument for a dedicated screw gun gets much stronger.
It also doesn’t solve the individual screw loading issue. You’re still picking up and placing each screw by hand. On 5 sheets, that’s fine. On 20 sheets, it wears on you.
Reliable options worth knowing: DeWalt DW2014, Makita B-35974, and Irwin 1838625 are consistently stocked at most hardware stores and hold up to regular use without the collar slipping mid-job — which cheaper versions tend to do.
Collated Screw Gun: When the Upgrade Actually Makes Sense
The collated screw gun is presented as a luxury item or omitted from comparisons entirely. It is a practical productivity multiplier at the right project scale.
What Collated Means
Screws come pre-loaded on a plastic strip that feeds automatically through the gun, similar in concept to a nail gun. You drive one screw, the next one advances into position automatically. You never stop to pick up and place individual screws.
On large projects, manual screw loading accounts for 30–40% of total installation time. Experienced drywallers working with collated systems routinely report 2–3x faster sheet installation compared to single-feed screw guns on full-room jobs. That’s not marketing copy — it’s the mechanical reality of eliminating thousands of individual loading steps across a project.
The Tradeoffs
The collated attachment adds weight and bulk to the gun. Overhead ceiling work becomes slightly more fatiguing as a result. Strip screws cost more per unit than bulk loose screws. And loading the strip has a short learning curve — the first time takes longer than expected.
For a single bedroom, the setup overhead likely cancels out the time savings. For a full basement, a whole-floor renovation, or new construction, the math shifts decisively.
You Don’t Necessarily Need a New Gun
Collated attachment systems like the Grabber SuperDrive connect to standard screw guns from DeWalt, Milwaukee, and Makita without replacing the base tool. If you already own a single-feed screw gun and find yourself doing large projects regularly, the attachment is a significantly cheaper upgrade path than buying a dedicated collated gun from scratch.
The break-even point in project size: roughly 30 sheets. Under that, stick with single-feed. Over that, the collated system pays for itself in time on the first project.
4 Mistakes That Make a Drill Perform Badly on Drywall
These aren’t edge cases. They’re common enough that they’re worth naming directly, especially because each one is fixable before you start.
No dimpler bit. Driving drywall screws with a standard driver bit and relying on manual judgement for depth. Every screw becomes a decision. After 20 screws, fatigue starts influencing those decisions. The result across a full panel is a mix of proud heads and overdriven heads — both cause visible problems under joint compound. A dimpler bit costs $10 and solves this entirely for small projects.
Clutch set too low. The drill disengages before the screw is fully seated, leaving the head slightly proud of the surface. That creates a bump under the mud that telegraphs through to the finished wall. When using a dimpler bit, set the clutch to maximum and let the collar handle depth. The clutch should not be the limiting factor — the collar should be.
High-speed setting into gypsum. Soft gypsum offers minimal resistance. High RPM with no depth control means the screw is fully buried before you can react. Always use the low-speed, high-torque setting when driving drywall screws with a drill. More control, less chance of overdriving in the half-second between seated and destroyed.
Impact driver without adjusting technique. The burst torque mechanism overdrives screws into gypsum faster than an operator can respond, even experienced ones. Torn paper, reduced holding strength, and screw pops follow. If the impact driver is your only option, use drywall mode or the lowest speed setting, and pair it with a dimpler bit. Don’t assume your normal driving technique transfers.
Cost Comparison: Does a Screw Gun Actually Pay for Itself?
Vague budget advice is useless. Here are actual numbers.
Drill + dimpler bit: Assuming you already own a drill, the additional cost is a dimpler bit at $5–$15. Total: $15 maximum. This is a practical option for users handling occasional small projects.
Entry-level corded screw gun: $25–$40 for Porter-Cable and DeWalt corded options. Viable for occasional DIY use when mobility is unimportant. Cord length limits efficient movement, especially on large projects.
Mid-range cordless screw gun: $80–$150 for options like the DeWalt DCF620 20V or Milwaukee 2866-20 M18. This is the practical range for serious DIYers. If you already own the 20V or M18 battery platform from other tools, the tool-only price often drops to $50–$80. This reduces total cost because you purchase just the driver.
Collated screw gun (full kit): $150–$300 depending on platform and included accessories. Justified at 30+ sheets. Excessive for smaller projects.
Break-Even Calculation
On a 20-sheet room, a screw gun typically saves 45–60 minutes compared to a drill. No manual depth checks, faster driving, and fewer corrections. At $20 per hour, an $80 screw gun breaks even on the first project. On the second project, it produces net savings. For anyone completing more than one room renovation, the purchase is financially justified.
Limitation
If you are repairing 3–5 sheets and have no additional drywall work planned, buying a screw gun is hard to justify. The drill-and-dimpler combination suits that use case.
FAQ
Can I use a regular drill to hang drywall?
Yes, with conditions. A standard drill works adequately for small projects — under 15 sheets on wood studs — especially when paired with a dimpler bit for depth control. For metal studs, ceiling work, or projects over 20 sheets, the drill’s torque-clutch mechanism and lower RPM make it a poor fit. You’ll spend more time correcting inconsistent depth than you would have spent buying the right tool.
What is the difference between a screw gun and a drill?
The core difference is how each tool controls depth. A drill uses a torque clutch that disengages when it senses resistance — inconsistent on soft gypsum. A screw gun uses a nose-cone collar that disengages mechanically when it contacts the drywall surface, producing the same depth on every single screw regardless of operator pressure. Screw guns also run at 4,000–4,500 RPM versus a drill’s 1,500–2,000 RPM, which matters particularly on metal studs.
Can I use an impact driver for drywall screws?
Technically yes, but practically it’s a poor choice for full installation. The burst torque mechanism overdrives screws into gypsum before the operator can react, resulting in torn paper faces and future screw pops. Some impact drivers with a specific drywall mode or low-speed setting are more manageable when paired with a dimpler bit. For 3–5 screws on a quick patch, it can work. For room-scale installation, it’s the wrong tool for the job.
Do I need a drywall screw gun?
Not always. Under 15 sheets on wood studs, a drill with a dimpler bit is adequate and significantly cheaper if you already own a drill. But for metal studs, any ceiling work, or projects over 15–20 sheets, the screw gun’s consistent depth control and higher RPM genuinely change the quality and speed of the job. It’s not about the tool being “better” in the abstract — it’s about the specific mechanical requirements of those scenarios.
What RPM is needed for drywall screws?
For wood studs, 1,500–2,000 RPM (standard drill range) is sufficient if depth is controlled by other means. For metal studs, you need 4,000+ RPM to drive screws through steel reliably without binding. This is one of the main reasons a standard drill cannot substitute for a screw gun on metal-stud framing — the RPM gap is significant and not compensable by technique.
What is a dimpler bit for drywall?
A dimpler bit is a depth-limiting screw setter with an adjustable stop collar. The collar contacts the drywall surface and physically prevents the screw from seating deeper than the set depth. It converts a standard drill into a workable drywall driver for small projects, eliminating the need for manual depth judgement on each screw. Cost runs $5–$15. It’s a practical solution for 1–15 sheets on wood studs; less practical for ceiling work due to the added length it puts on the drill.
Is a collated screw gun worth it?
At 30+ sheets, yes, clearly. Collated guns feed screws automatically from a strip, eliminating the individual loading step that accounts for 30–40% of total hang time on large projects. Under 30 sheets, the setup overhead likely offsets the time savings. For contractors and anyone doing whole-house work regularly, the productivity difference is substantial and the purchase pays back quickly.
The Bottom Line
The sheet-count rule holds up in practice: under 15 sheets on wood studs, a drill with a dimpler bit gets the job done. Over 15 sheets, any metal studs, or any ceiling work — a dedicated screw gun is the right tool, not an upgrade for its own sake.
The three non-negotiables where you should not attempt to substitute a drill: metal stud framing, ceiling installation, and projects over 20 sheets. In those situations, the screw gun’s nose-cone depth mechanism and higher RPM aren’t preferences, they’re functional requirements.
Impact drivers: leave them for structural fasteners and framing work where burst torque is an asset. For drywall face screws, the burst mechanism works against you.
If you’re planning a full room hang, understanding how screw depth relates to the quality of your finished wall is worth doing before you start. The difference between a screw seated correctly and one driven a millimeter too deep shows up at the very end of the job — in screw pops and in paint.

Elena Hart is the founder and lead writer of Better Home Pro. She writes about drywall, home repair, and practical DIY home improvement topics, focusing on clear, useful information that helps homeowners make better decisions. Her work combines firsthand experience, manufacturer documentation, industry resources, and careful research to create content that is accurate, practical, and easy to understand. Through Better Home Pro, Elena aims to simplify complex home improvement topics and provide guidance that is genuinely helpful to homeowners and DIYers.


No Comments