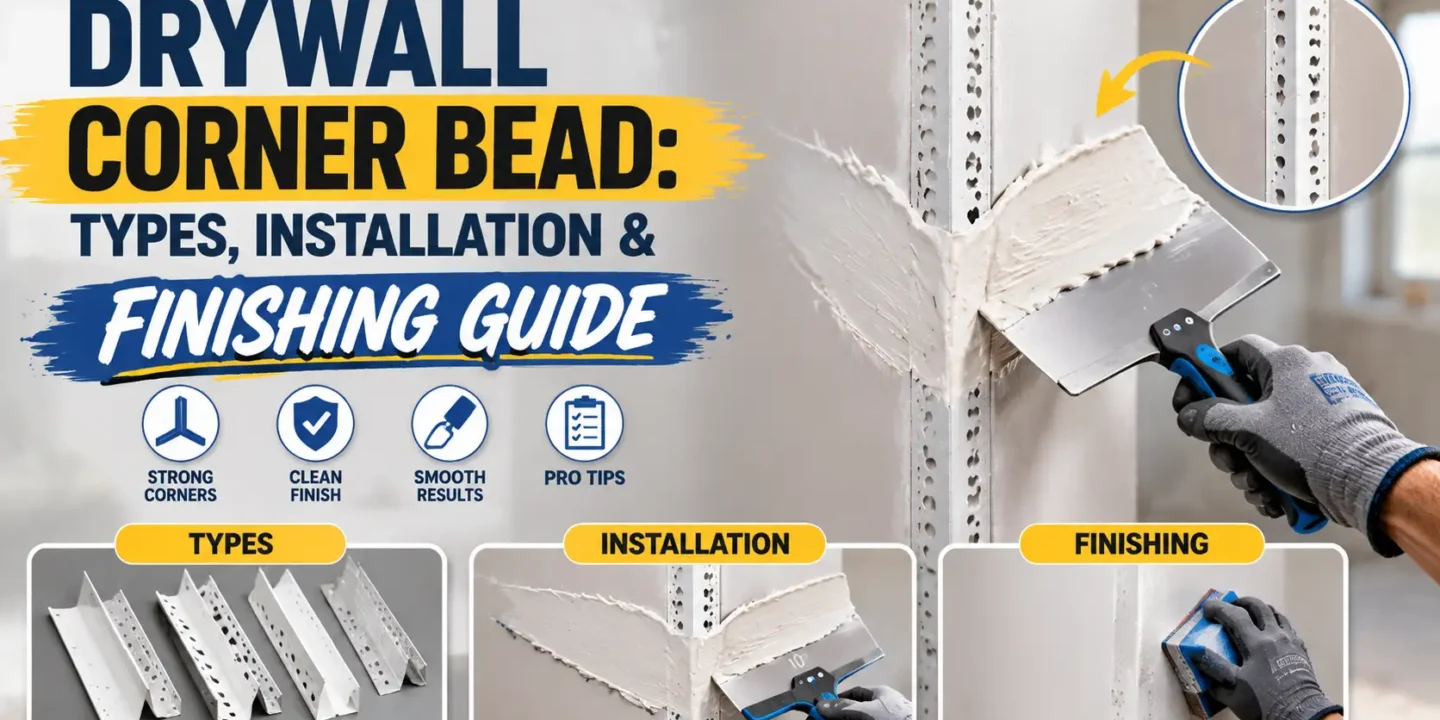

Anyone who has patched a corner or finished a new room knows how quickly an unprotected drywall edge can chip, crack, or crumble. Corner bead exists to solve that problem. It protects the vulnerable outside edges of drywall, gives you a straight line to mud against, and produces the clean, sharp corners you see in finished walls.
This guide covers everything you need to work with drywall corner bead: the different types available, how to install each one correctly, how to apply and sand joint compound for a smooth result, and how to fix the problems that come up along the way. Whether you are finishing a single room or working through an entire house, understanding which bead to use and how to apply it properly makes a real difference in the final quality.
Key Takeaways:
- Galvanized steel corner bead resists heavy traffic impacts on dry interior walls, but it will rust and bleed through paint in humid bathrooms.
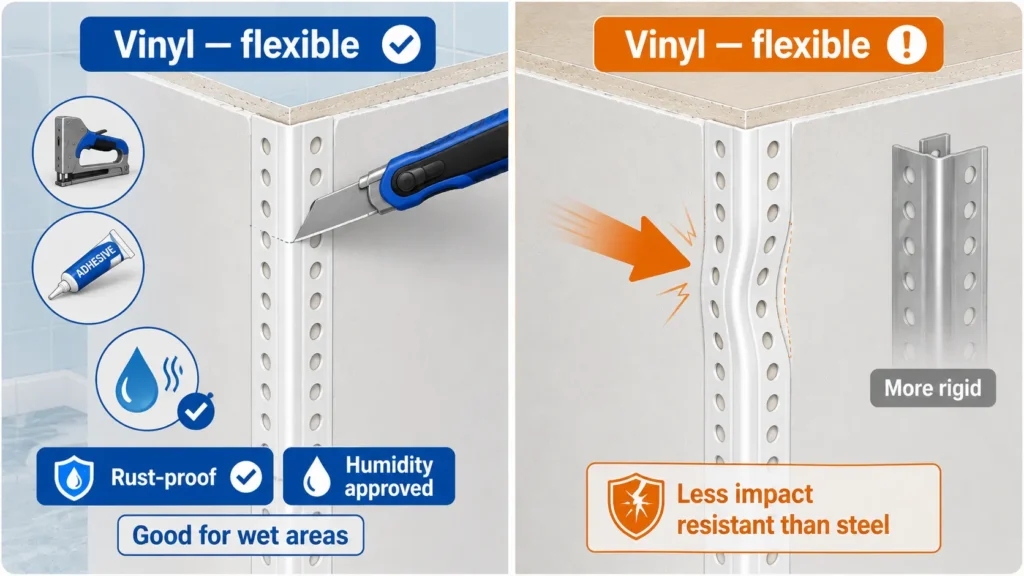
- Vinyl bead prevents rust in moisture-prone basements or laundry rooms and snaps cleanly with a utility knife without requiring tin snips.
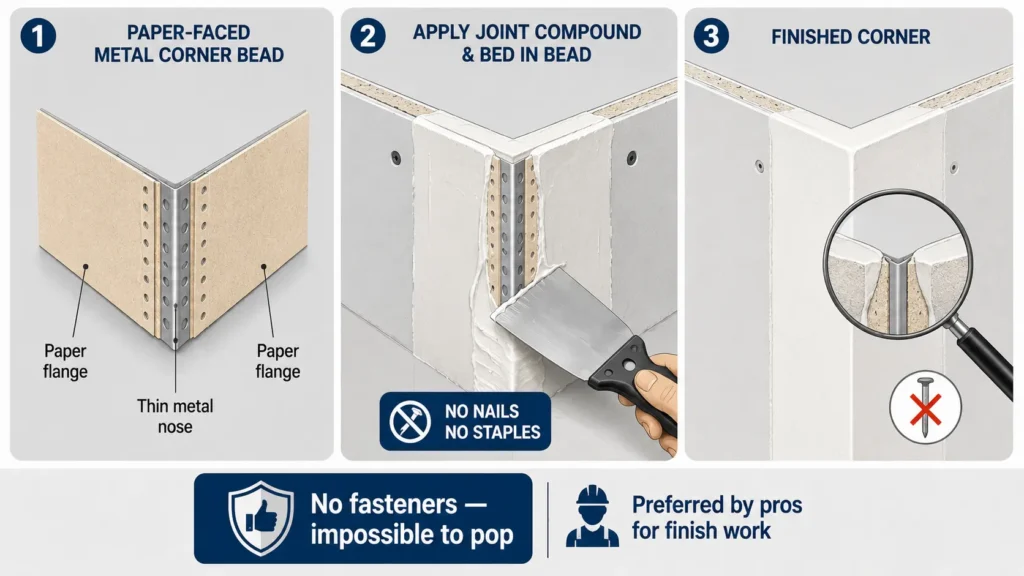
- Paper-faced metal bead eliminates future nail pops entirely because it embeds directly into joint compound rather than using mechanical fasteners.
- Sanding must run parallel to the nose of the bead because crossing it scores the edge and creates lines that show through finish paint.
- Bare joint compound absorbs paint unevenly, requiring a PVA drywall primer coat to stop flashing and reveal hidden surface imperfections.
What Is Drywall Corner Bead and Why Does It Matter?
What Problem Does Corner Bead Solve?
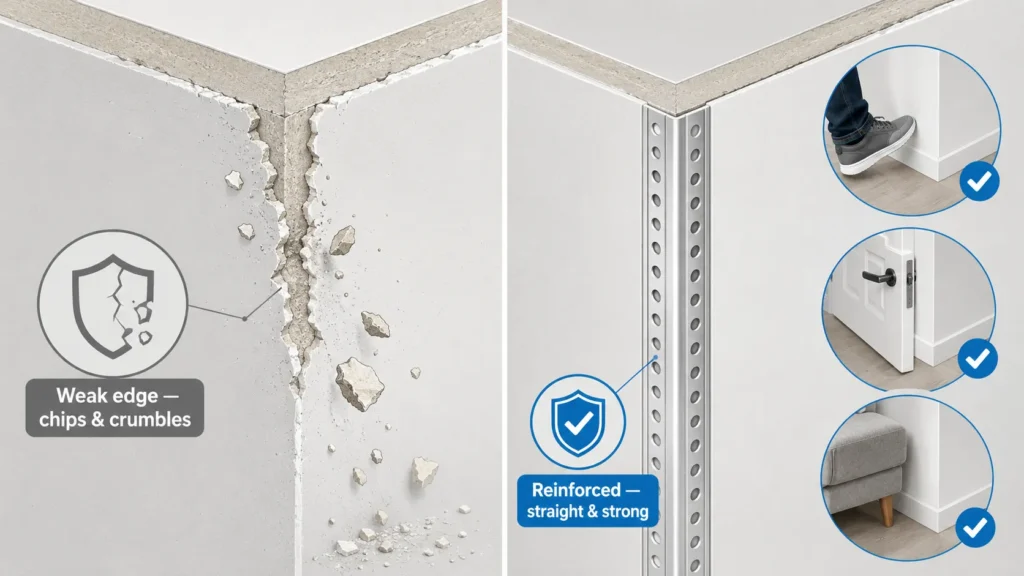
Drywall is strong across its face but fragile at its edges. Outside corners, where two sheets of drywall meet at a 90-degree angle or any other angle, are exposed to foot traffic, furniture, doors, and general wear. Without protection, those edges chip and crumble within months.
Corner bead reinforces the edge and gives it impact resistance. Beyond that, it creates a straight, consistent nose to mud against. Trying to feather joint compound to a clean corner without a bead underneath is difficult even for experienced tapers. The bead gives you a defined reference point that makes finishing far more manageable.
Where Is Corner Bead Used?
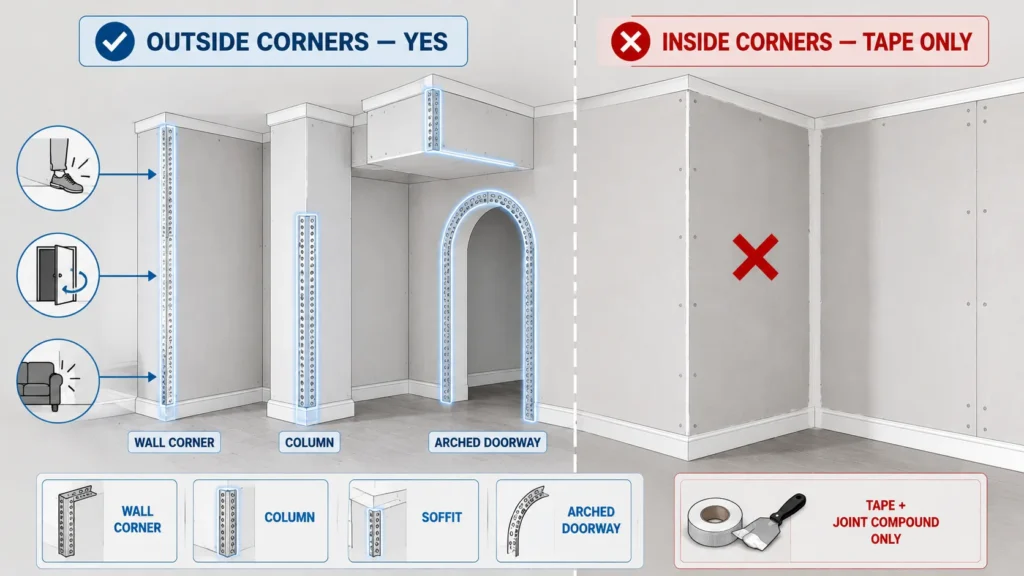
Corner bead is installed on outside (convex) corners only. These are the corners that stick out toward you, like the outside edge of a wall, a column, a soffit, or a door return. Inside (concave) corners, the ones that go into the wall, are handled differently using tape and joint compound without any bead.
Common applications include standard wall corners, archways, soffits, columns, window returns, and any framed boxed-out element in a room. Each of these situations may call for a different bead type depending on the angle and the presence of moisture or movement.
Types of Drywall Corner Bead: Which One Should You Use?
Choosing the right bead before you start saves you from repairs later. The options differ in material, fastening method, durability, and the type of corner they are designed for.
Metal Corner Bead (Galvanized Steel)
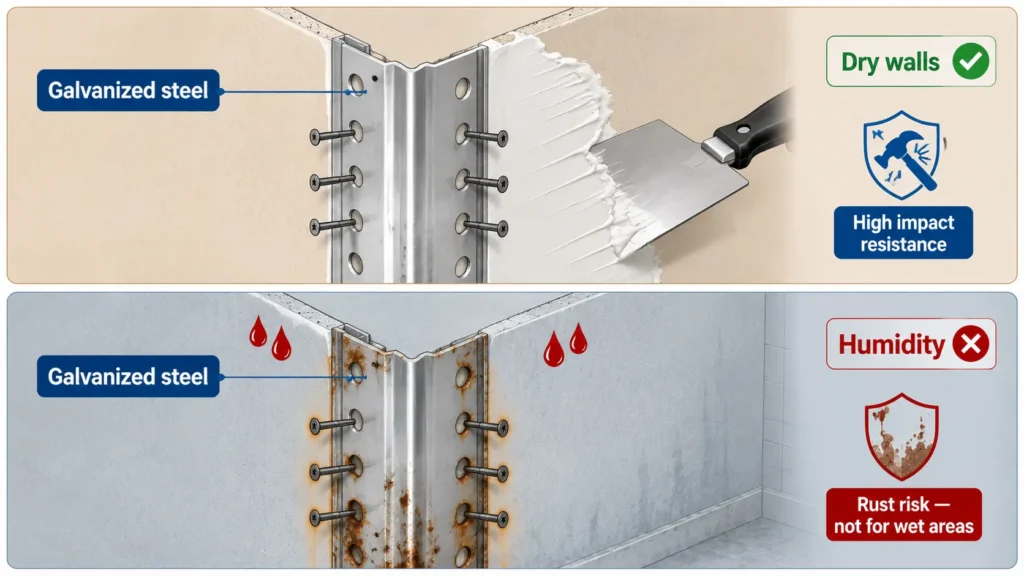
This is the most widely used corner bead in residential construction. It is rigid, durable, and straightforward to install. You nail or screw it through both flanges into the framing behind the drywall, then mud over it.
The main limitation is moisture. Galvanized steel will rust if it stays wet, and that rust will bleed through paint over time. In bathrooms, basements, or any area with humidity, metal bead is a poor choice unless you are confident moisture will never be an issue. For standard dry interior walls and high-traffic corners where impact resistance matters most, it remains a reliable option.
Vinyl (Plastic) Corner Bead
Vinyl bead is rust-proof, lighter than metal, and easier to cut with a utility knife. It is attached with staples or construction adhesive rather than nails. The tradeoff is impact resistance: vinyl is slightly more flexible than steel, which means it can deflect on hard hits rather than hold its shape.
For bathrooms, laundry rooms, basements, or any area where humidity is a factor, vinyl is the smarter call. It pairs naturally with the moisture-resistant drywall options commonly used in those same spaces. It is also a reasonable choice for DIYers who do not own tin snips.
Paper-Faced Metal Corner Bead
This type is a layer of metal with paper flanges on both sides. Instead of nailing it to the wall, you bed it in fresh joint compound the same way you would embed drywall tape. The paper bonds into the mud and creates a tight mechanical connection with no fasteners at all.
The result is stronger than nailed bead in most cases, and nail pops are impossible since there are no nails. Paper-faced bead is harder to dislodge over time and handles minor settling better than rigid-fastened options. Many experienced finishers prefer it for that reason, especially on finish-level work. It takes a bit more practice to install correctly, but the results are consistently good.
Flexible Corner Bead (Bullnose and Arch Bead)
Standard metal or vinyl bead cannot be bent without kinking. Flexible bead is made from vinyl or a mesh-backed material specifically designed to curve around archways, rounded walls, and other non-standard angles. You wet the vinyl version before bending it to make the material pliable enough to follow a tight curve without distortion.
This bead requires more careful fastening, especially on tight arches where staples need to be placed closer together to hold the curve in place before the mud dries.

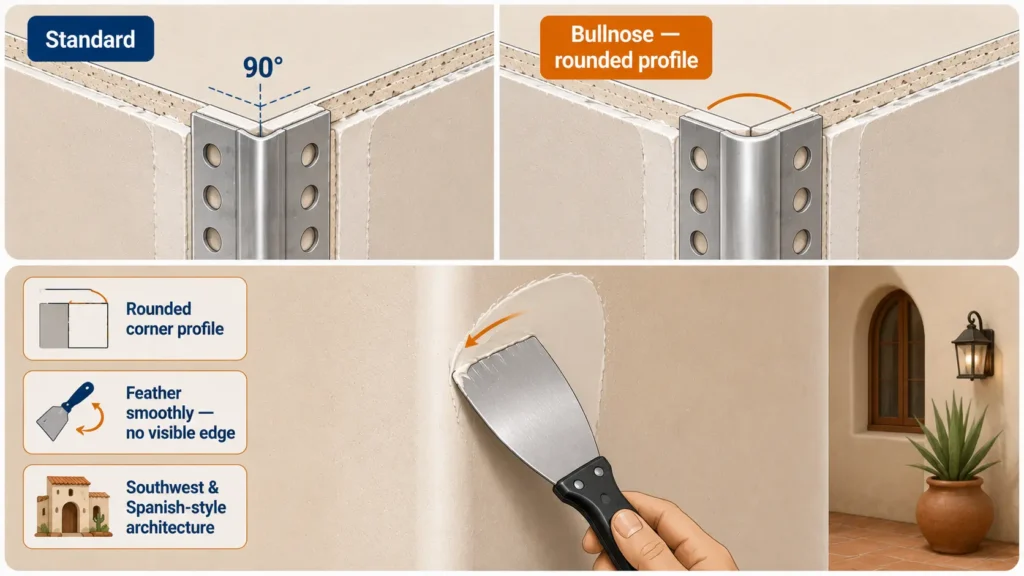
Bullnose Corner Bead
Bullnose bead produces a rounded corner profile instead of a sharp 90-degree nose. It is a stylistic choice as much as a functional one, associated with Southwest and Spanish-style architecture but used broadly in custom residential work. The finishing technique differs slightly from standard bead because you need to feather compound smoothly into the curved profile without creating a visible edge at the transition point.
L-Bead and U-Bead (Trim Bead)
These are not corner beads in the traditional sense but belong in the same category of drywall trim. L-bead caps an exposed drywall edge, such as where drywall meets a ceiling without a return, or along a door opening. U-bead wraps around an edge with material on both sides. Neither is used at a corner; they handle raw edge terminations instead.

Quick-Reference Comparison Table
| Type | Material | Fastening Method | Best For | Relative Skill Level |
| Metal (galvanized) | Steel | Nails, screws, or crimper | Dry interior walls, high-traffic | Beginner |
| Vinyl (plastic) | PVC | Staples or adhesive | Humid areas, DIY installs | Beginner |
| Paper-faced metal | Metal + paper | Embedded in mud | Finish work, no nail pops | Intermediate |
| Flexible / arch | Vinyl or mesh | Staples | Curved walls, archways | Intermediate |
| Bullnose | Vinyl or metal | Nails, staples | Rounded profile finish | Intermediate |
| L-bead / U-bead | Metal or vinyl | Nails, staples | Exposed edges, transitions | Beginner |
Tools and Materials You’ll Need Before You Start
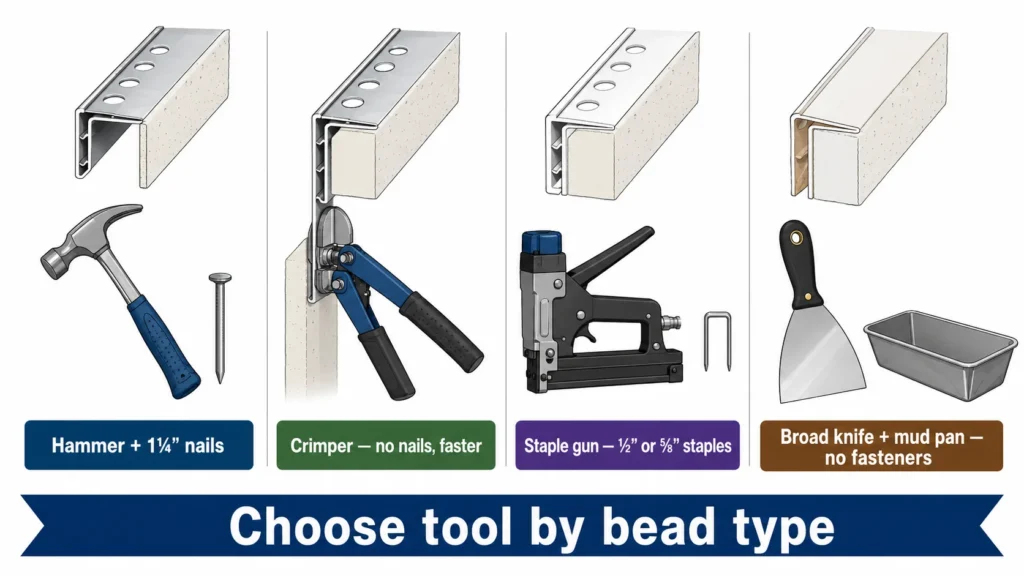
Fastening Tools by Bead Type
The tool you need depends on the bead type you are installing. If you are setting up for a larger project, reviewing the essential drywall tools before you start helps, since corner bead work is one part of a broader finishing job.
For bead installation specifically, here is what to have ready based on what you are using.
- Metal bead with nails: A standard hammer and 1-1/4″ drywall nails work fine. You can also use a screw gun with drywall screws for better holding power and fewer pops over time.
- Corner bead crimper: A crimper punches the metal flange into the drywall at regular intervals, eliminating nails entirely. It is faster on longer runs and removes the possibility of nail heads working loose under the mud. Worth buying if you are doing more than one room.
- Vinyl bead with staples: A hand staple gun or pneumatic stapler with 1/2″ or 5/8″ staples. Staples should be placed close enough that the flange sits flat with no gaps.
- Paper-faced bead: No mechanical fasteners needed. A broad knife and a mud pan are the primary tools.
Finishing Tools
Getting familiar with drywall taping knife sizes before you start makes the coating process much more straightforward. For bead work specifically, you need at least a 6-inch knife for the first coat, a 10-inch for the second, and a 12-inch for the finish coat.
A mud pan keeps compound clean and within reach. A sanding block gives you better pressure control than folded sandpaper, and a pole sander handles taller walls without the arm strain.
Materials Checklist
- Corner bead of your chosen type
- All-purpose joint compound for embedding and build coats (or setting-type compound if you need faster dry times)
- Topping compound for the final coat (sands more easily)
- Mesh tape for any repair work nearby
- Drywall primer for after mudding is complete
- 120-grit and 150-grit sanding sheets or sponge
How to Install Drywall Corner Bead: Step-by-Step
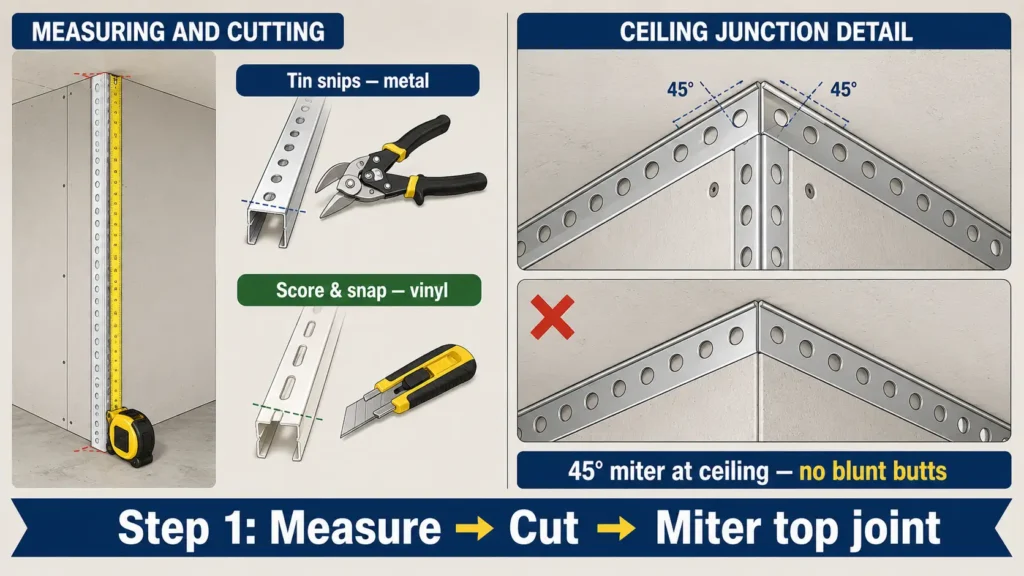
Step 1: Measure and Cut the Bead to Length
Measure the corner from floor to ceiling (or floor to the stopping point) and cut your bead accordingly. For metal bead, tin snips are the right tool. For vinyl, a utility knife scores and snaps cleanly.
Where two pieces of bead meet at the top of a corner (at a ceiling or soffit junction), cut each piece at a 45-degree miter so they meet neatly. Do not leave a blunt end butting up against another blunt end mid-run.
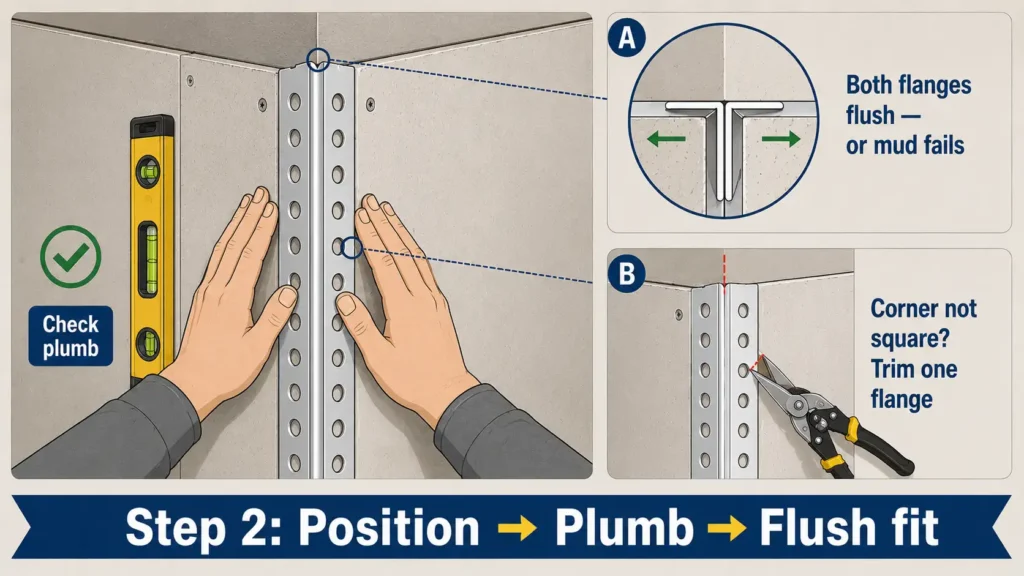
Step 2: Position the Bead on the Corner
Hold the bead with both flanges pressed flat against the drywall faces. The nose of the bead should sit right at the corner. Check it for plumb with a level. If the corner is slightly out of square, you may need to trim one flange slightly so both sides sit flush. A bead that is not flush on both faces will never mud out correctly.
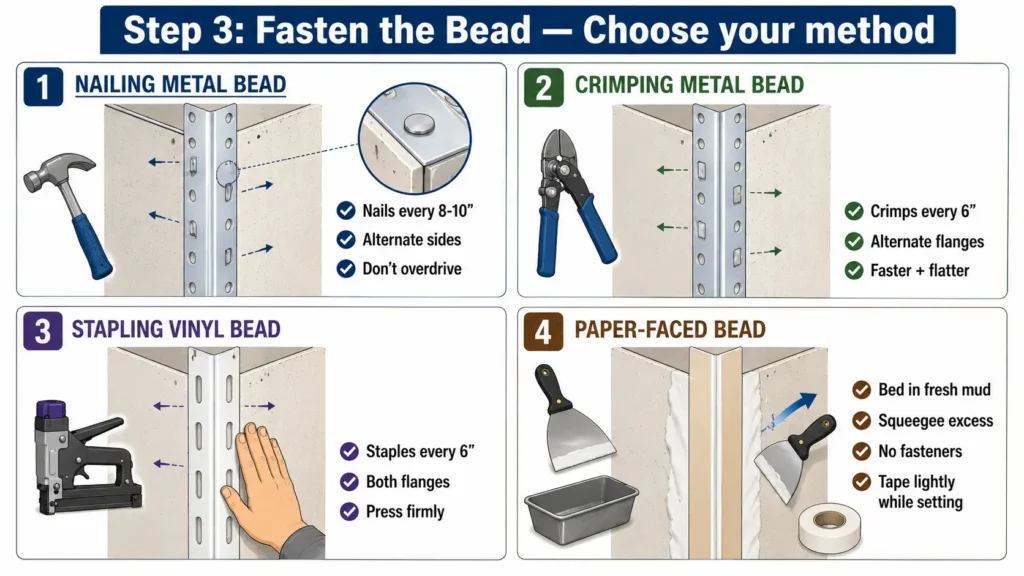
Step 3: Fasten the Bead
The method depends on what you are installing:
- Nailing metal bead: Drive nails every 8 to 10 inches, alternating sides so you work down both flanges as you go. Do not overdrive the nails; the head should sit just at the surface of the flange, not punched through it.
- Crimping: Place crimps every 6 inches, alternating flanges. Much faster than nailing and produces a flatter, more consistent flange.
- Stapling vinyl bead: Staples every 6 inches on both flanges, keeping the bead pressed firmly to the drywall as you go.
- Paper-faced bead: Apply a thin bed of fresh mud to both faces of the corner first, press the bead into the mud, and squeegee out the excess with a broad knife. Hold it in place until it tacks, or tape it lightly while it sets.
Step 4: Check for Straightness Before Mudding
Before you pick up a mud knife, sight down the nose of the bead from the floor. Any bow or deviation will be locked in once the mud goes on. Use a long level or a straightedge to catch high and low spots. If the bead needs correction, now is the time. Adjust the fasteners, add shims behind the flange, or start over with a fresh piece if needed.
How to Install Flexible Bead on Arches
Soak vinyl arch bead in warm water for a few minutes before bending. This makes the material pliable without cracking. Work from the center of the arch outward, stapling every 3 to 4 inches on tight curves. On inside curves where the flange has to compress, you may need to cut small notches in the flange edge to let it lay flat without buckling.
How to Install Paper-Faced Bead
Spread fresh all-purpose mud onto both faces of the corner with a 6-inch knife. Press the bead into the mud firmly, starting at the top and working down. Use a broad knife to squeegee excess mud out from under the flanges. The compound should be thin and even under the paper. Let it dry completely before applying your first finish coat.
How to Finish Drywall Corner Bead: Mudding and Sanding
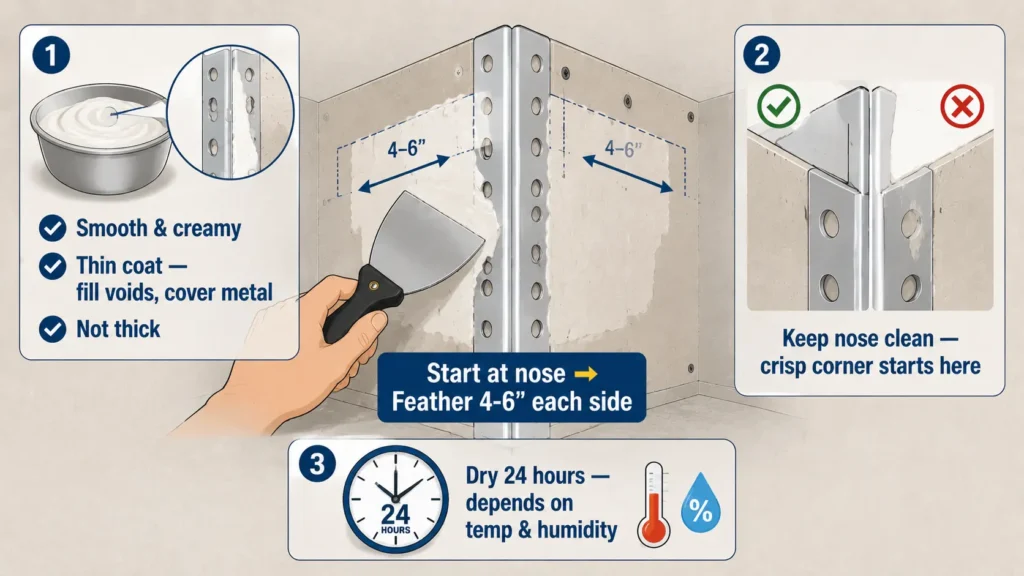
First Coat: Embedding Coat
Mix your all-purpose joint compound to a smooth, creamy consistency. Apply a thin coat over both flanges, starting at the nose and feathering out 4 to 6 inches to each side. The goal of this first coat is to cover the metal and fill any voids behind the flanges, not to build thickness. Keep the nose of the bead clean. Let it dry completely, which typically takes 24 hours depending on temperature and humidity.
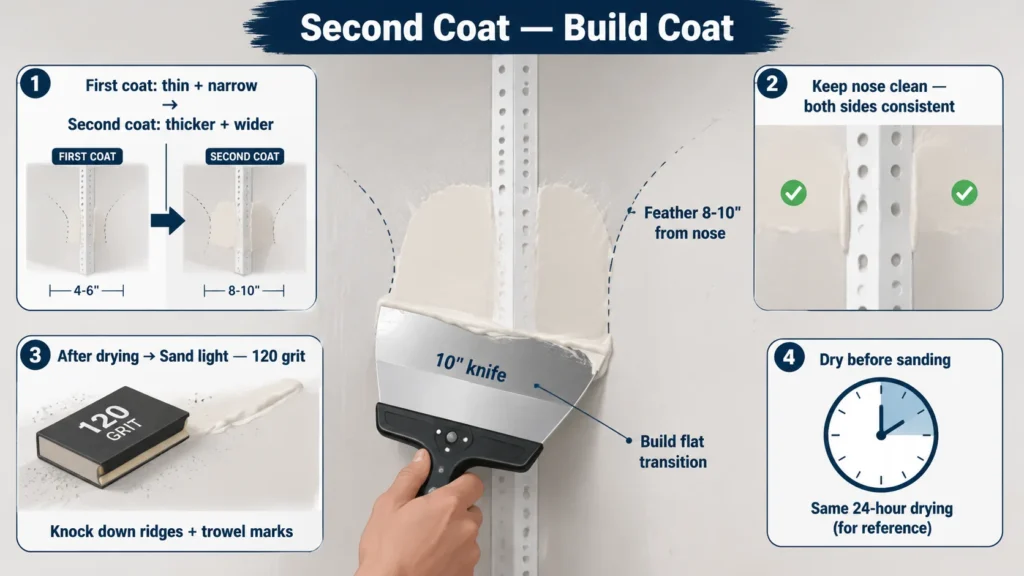
Second Coat: Build Coat
Switch to a 10-inch knife. Apply a slightly thicker coat and feather it out 8 to 10 inches from the nose. This coat builds the flat transition from the nose of the bead to the wall face. Keep checking that the nose stays clean and that your passes are consistent on both sides. After drying, sand lightly with 120 grit to knock down any ridges or trowel marks before the next coat.
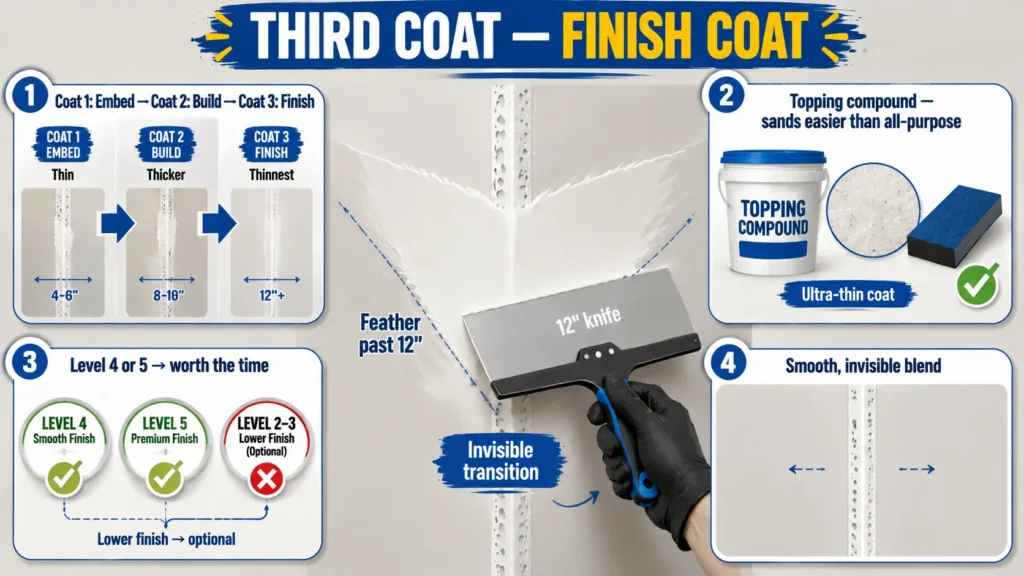
Third Coat: Finish Coat
Use a 12-inch knife and the thinnest mud you can apply while still covering. Topping compound is ideal for this coat because it sands more easily than all-purpose. Feather the edges out past 12 inches for a smooth, invisible transition. Some finishers skip this coat on lower-level finish work, but for Level 4 or Level 5 finish, it is worth the extra time.
Sanding Technique for Corners
Use a sanding block rather than folded sandpaper, which gives inconsistent pressure and can cut unevenly. Sand parallel to the nose, not across it. Sanding across the nose scores it and creates a visible line in the finished wall. Start with 120 grit to flatten ridges, then finish with 150 grit for a smoother surface. Be careful not to sand down to the metal; once you cut through the compound to the bead, you will see it through paint.
Priming Before Paint
Always prime over bare joint compound before painting. Unpainted mud absorbs the first coat of paint unevenly, leaving flat patches called flashing next to the painted areas. USG’s own technical documentation for its First Coat Primer confirms that finish painting problems over new drywall are caused by porosity and surface texture differences between the gypsum face paper and dried joint compound — the exact cause of flashing — and that PVA primer is specifically formulated to equalize those differences before paint is applied.
Pro tip: Trowel compound away from the nose, not toward it. Pulling the knife toward the nose lifts the bead edge and creates a ridge that shows under paint.
Common Corner Bead Problems and How to Fix Them
Corner Bead Cracking at the Nose
This usually comes from one of three things: house settling that puts stress on the corner, an impact that physically damaged the nose, or bead that was not fastened tightly enough to begin with. To repair it, cut through the cracked mud along both sides of the bead with a utility knife. Re-drive screws through the flanges (or add them if they were not there before), fill the crack with setting-type compound, and re-mud the area once it hardens.
Corner Bead Pulling Away From the Wall
If only one flange is fastened, the bead will eventually work loose on the other side. Moisture causing vinyl to expand and contract can cause the same problem. Fix it by adding fasteners along the loose flange and pressing the bead flat. If there is a significant gap behind the flange, inject a small amount of construction adhesive before refastening. Re-mud after the adhesive cures.
Nail Pops Behind Corner Bead
Nail pops happen when the framing wood dries out and the drywall pulls away slightly from the stud. The nail head pushes back through the compound. For future installs, use screws instead of nails. For existing pops, drive a screw through the flange near the popped nail, then dimple the nail slightly with a punch. Re-mud over both.
Rust Staining Through Paint
When galvanized metal bead was used in a bathroom or other humid space, you will eventually see rust bleeding through the paint as orange or brown staining. Cleaning the spot and painting over it does not solve the problem; you need to apply an oil-based stain-blocking primer first.
KILZ Original, a widely available oil-based primer, is specifically formulated to block rust stains, water stains, and other bleed-through problems that water-based primers cannot reliably seal. For a long-term fix, replace the metal bead with vinyl and repaint.
Wavy or Bowed Corner After Mudding
If you did not catch a bow in the bead before the first coat, you will see it clearly once the mud dries. A light skim coat of thicker build compound over the low spots, feathered wide on each side, usually corrects it. You may need two passes. The key is to make sure the bead was straight before you started, so check every time before applying mud.
Metal vs Vinyl Corner Bead: Which Is Better for Your Project?
Head-to-Head Comparison
| Metal (Galvanized Steel) | Vinyl (Plastic) | |
| Cost | Slightly lower | Slightly higher |
| Durability (impact) | Higher | Moderate |
| Moisture resistance | Poor | Excellent |
| Ease of cutting | Requires tin snips | Utility knife |
| Finish quality | Excellent | Very good |
| Best use case | Dry interiors, high-traffic | Humid areas, DIY |
When to Choose Metal Corner Bead
Metal is the better choice on dry interior walls where impact resistance is a priority. Hallways, living rooms, and any corner that regularly gets bumped by furniture or foot traffic benefit from the rigidity of steel. Professionals often prefer metal for its stiffness, which makes it easier to keep straight during installation.
When to Choose Vinyl Corner Bead
Vinyl belongs anywhere moisture is present. Bathrooms, basements, laundry rooms, and humid climates are all situations where galvanized steel will eventually rust. Vinyl is also a reasonable choice for DIYers who want easier cutting and do not have tin snips on hand. In areas with wood framing that may shift or settle over time, the slight flexibility of vinyl can actually reduce cracking.
When to Choose Paper-Faced Bead
Paper-faced bead is the right call for finish-level work where you want zero risk of nail pops or mechanical fastener failures showing through the paint later. It is also a strong choice for skim-coat finishes and Level 5 work. Many professional finishers use paper-faced bead exclusively on high-end projects because the bonded connection is simply more reliable over time.
Frequently Asked Questions About Drywall Corner Bead
Do you need corner bead on inside corners? No. Inside corners are finished with drywall tape and joint compound only. Corner bead is for outside (convex) corners where the edge is exposed. Using bead on an inside corner would prevent the surfaces from meeting and create a visible gap.
Can you mud over corner bead the same day you install it? With mechanical fasteners (nails, screws, staples), yes. There is nothing stopping you from applying mud right after fastening. With paper-faced bead, wait until the embedding coat has dried and hardened before adding finish coats on top.
How do I cut corner bead for an angle that is not 90 degrees? Measure the actual angle of the corner with an angle finder. Cut each piece of bead at half that angle so the two mitered pieces meet cleanly. For obtuse angles (greater than 90 degrees), standard bead often works with appropriate miter cuts. For very acute or irregular angles, flexible bead is a better starting point.
What is the difference between corner bead and J-bead? Corner bead wraps around an outside corner and protects the joint between two drywall faces. J-bead (also called J-trim or U-bead) caps a single exposed drywall edge where the sheet terminates without meeting another surface. They serve different purposes and are not interchangeable.
Can I use construction adhesive instead of nails for corner bead? You can, and some installers do, especially on vinyl bead. Adhesive alone is slower and requires the bead to be held in place while it cures. A combination of a few staples to hold position plus a bead of adhesive behind the flanges gives a solid result. Adhesive-only installation is not common for metal bead.
How do I finish a corner bead on an arch or curved wall? Use flexible arch bead rather than standard bead. Wet the vinyl before bending, staple every 3 to 4 inches to maintain the curve, and apply your mud coats the same way as a straight corner. Keep coat thicknesses consistent on both sides of the arch so the finished profile looks symmetrical.
How many inches should I feather mud out from corner bead? Start at 4 to 6 inches on the first coat, 8 to 10 inches on the second, and 12 or more inches on the third coat. The goal is to create a gradual taper that becomes invisible on the finished wall. Stopping too short on any coat creates a visible ridge.
Corner Bead Tips from the Pros: What Most DIY Guides Miss
Run bead past openings and cut flush; never butt two pieces mid-run. A common mistake is cutting corner bead and butting the ends together in the middle of a corner run. Every joint is a potential crack point. Run one continuous piece whenever possible, and where you have to stop, terminate at a door or window opening by running past the edge and trimming flush.
Use a mud hawk instead of a pan for corner work. A hawk keeps a larger amount of compound within easy reach and lets you load your knife without stepping back to a pan on the floor. On vertical corners especially, a hawk speeds up the process and keeps the mud from skinning over.
On new construction, wait for framing to dry before taping. Green lumber shrinks as it dries. If you install and tape corners within days of rough framing, the wood movement will crack bead over the next few months. Thirty days is a reasonable minimum; longer is better in humid climates.
Tint your primer before priming. Adding a small amount of gray colorant to white PVA primer makes imperfections along the corner nose much easier to spot. Under flat white primer, small ridges and dips can disappear until you see them under raking light after the paint goes on. Gray-tinted primer catches them at the right stage.
For archways, cut relief notches before bending. Tracing the arch onto the bead flange and cutting small notches every 2 inches before bending gives you a cleaner curve than soaking alone. The notches let the flange compress evenly without buckling. This is especially useful on tighter radius arches where vinyl wants to fold rather than curve.

Elena Hart is the founder and lead writer of Better Home Pro. She writes about drywall, home repair, and practical DIY home improvement topics, focusing on clear, useful information that helps homeowners make better decisions. Her work combines firsthand experience, manufacturer documentation, industry resources, and careful research to create content that is accurate, practical, and easy to understand. Through Better Home Pro, Elena aims to simplify complex home improvement topics and provide guidance that is genuinely helpful to homeowners and DIYers.


No Comments