

If you’ve spent any time finishing drywall or painting ceilings, you already know how quickly ladders become the bottleneck. You move them constantly, lose your place, lose your rhythm. Drywall stilts solve that problem by keeping you elevated and mobile at the same time. But they come with a real learning curve, legitimate safety considerations, and a price tag that deserves some honest scrutiny before you commit.
This guide covers what drywall stilts actually are, whether they’re worth buying or renting, how to use them safely, and how they compare to other options you might already have on the job site.
Key Takeaways:
- Stilts save significant time on long taping runs, but you should stick to ladders for small patch jobs or tight corners.
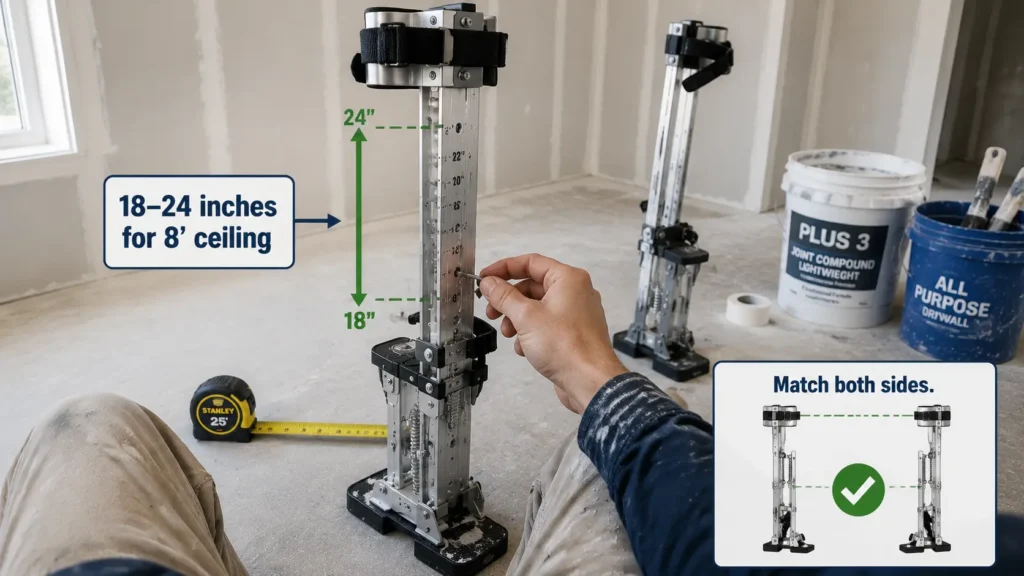
- Set stilt height between 18 and 24 inches for standard 8-foot ceilings to maintain a comfortable reach without sacrificing stability.
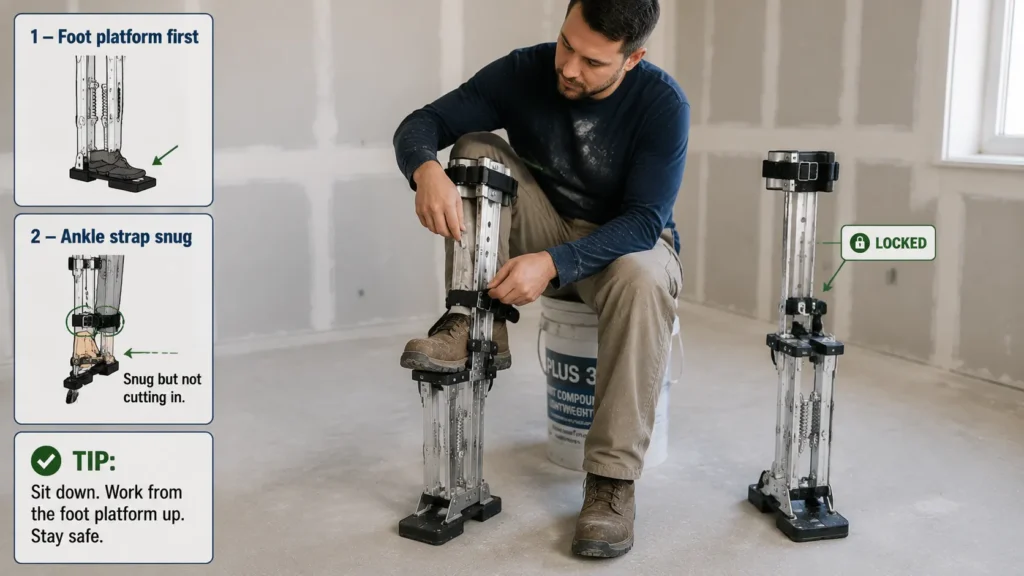
- Sit down to secure straps and always tighten the foot platform first before moving up to the ankle cuff to ensure a stable fit.
- Avoid using stilts on stairs, sloped surfaces, or any floor with debris, as these are the leading causes of preventable ankle injuries.
- Choose professional-grade aluminum stilts with articulating ankle joints if you plan to work in them daily to reduce long-term muscle fatigue.
What Are Drywall Stilts and How Do They Work?
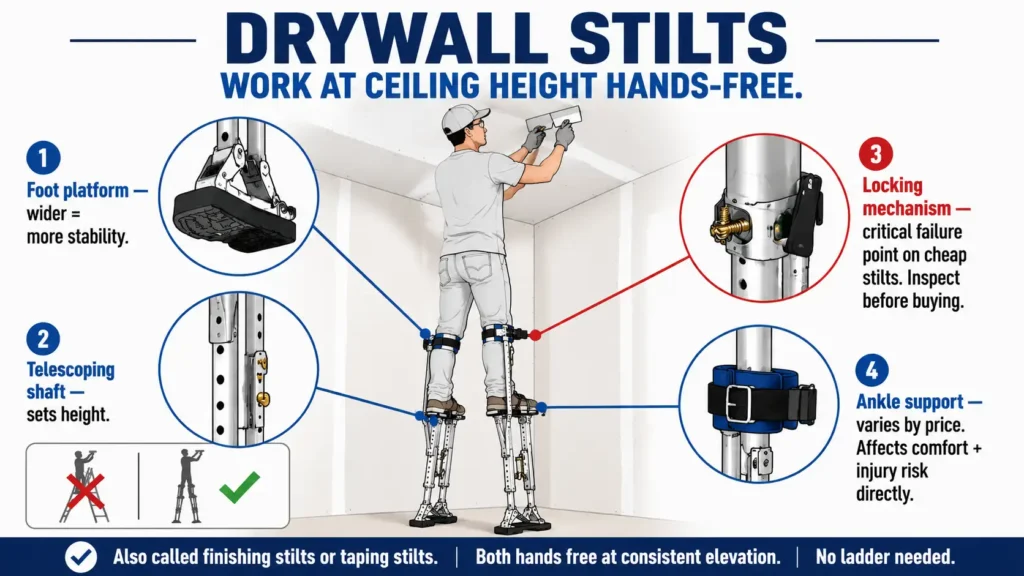
Drywall stilts are wearable platforms that strap onto your feet and lower legs, raising you off the ground so you can work at ceiling height without constantly repositioning a ladder or scaffolding. They’re considered one of the most practical items on any essential drywall tools list because they allow finishers to move freely while keeping both hands available for taping, mudding, or sanding overhead surfaces.
They’re also called finishing stilts or taping stilts, depending on who you ask. The function is the same regardless of what name gets used.
Key Components of Drywall Stilts
Understanding the parts helps when you’re comparing models or troubleshooting fit problems:
- Foot platform: The base you stand on, typically with a rubber sole or grip material. Wider platforms offer more stability.
- Telescoping shaft: The vertical section that determines height. Most quality stilts use a ratcheting or pin-lock system to set and hold the height.
- Locking mechanism: The hardware that secures the shaft at your chosen height. This is a critical failure point on cheap stilts, so it deserves close inspection before you buy.
- Ankle support: Straps or a rigid cuff system that holds your ankle and lower leg in place. The quality of ankle support varies significantly across price ranges and directly affects both comfort and injury risk.
Types of Drywall Stilts
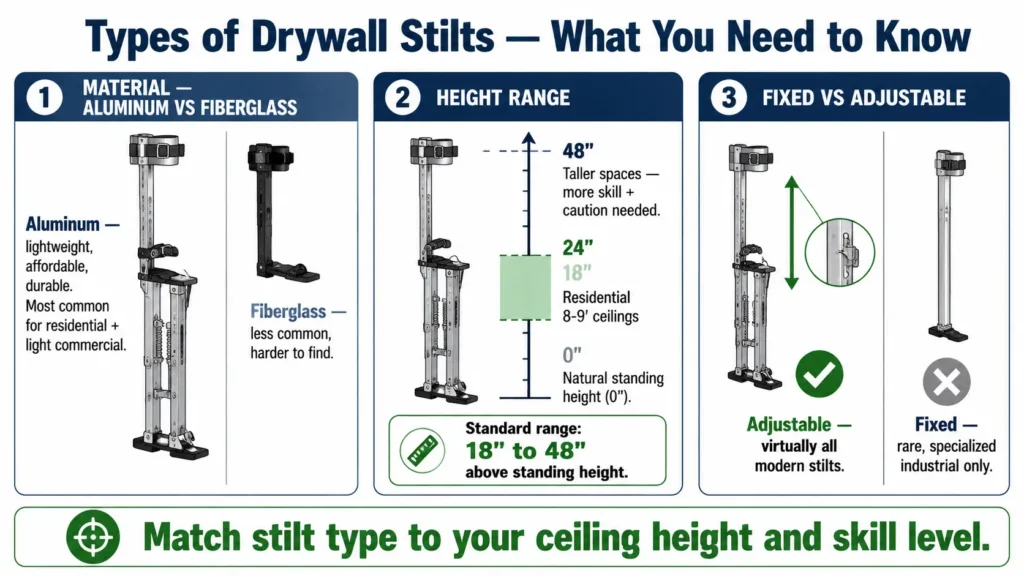
Aluminum vs. fiberglass: Aluminum is by far the most common material. It’s lightweight, affordable, and durable enough for most residential and light commercial use. Fiberglass stilts exist but are less common and harder to find at local suppliers.
Height range: Most standard stilts adjust from 18 inches to 48 inches above your natural standing height. For residential work, the 18 to 24-inch range covers the majority of standard 8 and 9-foot ceilings. Higher settings are used for taller spaces but require more skill and more caution.
Fixed vs. adjustable: Virtually all modern stilts sold for drywall work are adjustable. Fixed-height versions are rare and mostly used in specialized industrial contexts.
Are Drywall Stilts Worth It? Honest Pros and Cons
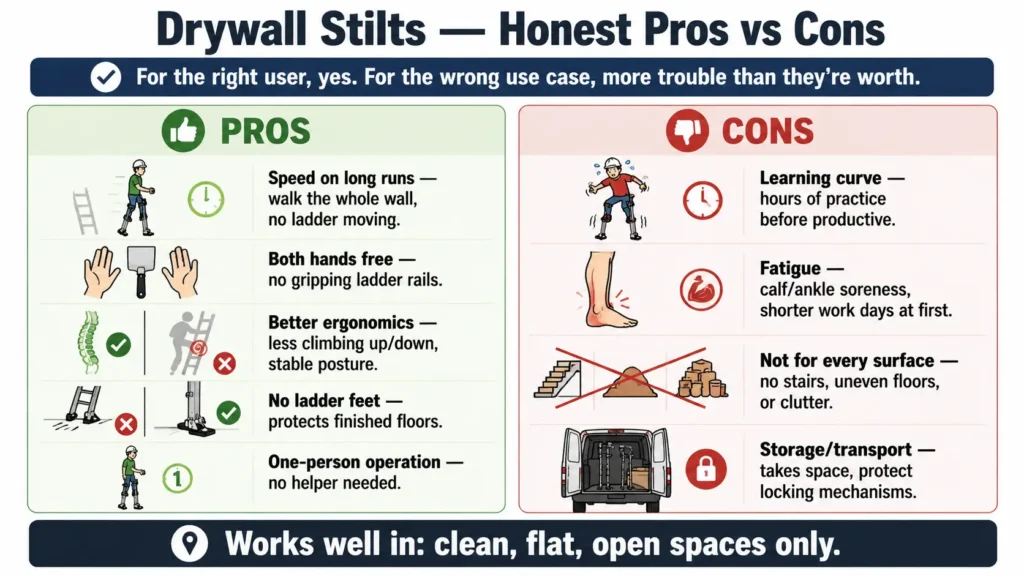
This is the question most people actually want answered before they spend money. The short version: for the right user, yes. For the wrong use case, they’re more trouble than they’re worth.
Advantages of Using Drywall Stilts
Speed on long runs. Moving a ladder every few feet kills momentum on taping and finishing work. With stilts, you walk the length of a wall or ceiling in one pass. On a large room, this saves meaningful time.
Both hands stay free. You’re not gripping a ladder rail or repositioning yourself on a step. That matters a lot when you’re feathering a coat of mud or rolling paint overhead.
Better ergonomics than a ladder. This sounds counterintuitive, but repeatedly climbing up and down a ladder is surprisingly hard on your knees and lower back over a full day. Stilts keep you at a consistent height so your body stays in a more stable working posture.
Floor protection. No ladder feet scratching your subfloor or leaving marks on finished surfaces. A real consideration on renovation work where the floor is already done.
One-person operation. You don’t need someone to hold the ladder. On solo jobs, that independence is genuinely useful.
Disadvantages and Limitations
Learning curve. It takes time to feel comfortable walking on stilts, and even longer to feel confident working on them. Most people need several hours of practice before they’re productive, not just ambulatory.
Fatigue. Your calf and ankle muscles are doing work they’re not used to. Expect soreness the first few days, and expect your effective working time to be shorter than it would be on flat ground.
Not for every surface. Stairs are completely off-limits. Uneven floors, transitions between flooring types, and cluttered job sites all create fall risk. Stilts work well in clean, flat, open spaces.
Storage and transport. A pair of stilts takes up real space in a van or truck and needs to be stored properly so the locking mechanisms don’t take damage.
Who Benefits Most?
| User Type | Verdict |
| DIY homeowner with a single project | Rent, don’t buy |
| Occasional renovator (2-4 projects per year) | Rent or buy entry-level |
| Professional drywall taper or finisher | Buy a quality pair and amortize the cost |
| Painter doing regular ceiling work | Strong buy; they pay for themselves quickly |
| Contractor working varied job types | Worth owning; compare to scaffolding costs |
Drywall Stilts Safety: Rules You Must Know Before Stepping On
This section deserves serious attention. Stilts are one of those tools that feel manageable right up until they’re not. Most stilt injuries are preventable, and most happen because someone skipped the basics.
OSHA Regulations and Job-Site Rules
OSHA’s fall protection standards under 29 CFR 1926 apply to construction work at height, and stilts fall under this regulatory umbrella. The key practical points:
- On commercial job sites, employers are responsible for ensuring stilts are used safely, surfaces are appropriate, and workers are trained.
- OSHA does not issue a blanket prohibition on stilts but requires that workers using them are protected from fall hazards consistent with general fall protection requirements.
- Some general contractors and project managers ban stilts outright on their sites regardless of OSHA minimums. Know the rules before you show up.
On residential DIY work, OSHA doesn’t apply, but the underlying safety logic still does.
Common Drywall Stilt Accidents and Causes
Ankle rolls are the most frequent injury, usually caused by stepping on debris, transitioning over uneven flooring, or losing concentration at the end of a long workday. Wrist and shoulder injuries from catching a fall come second. Full falls resulting in more serious injury are less common but do happen, almost always on surfaces stilts shouldn’t be used on in the first place.
The pattern in most accidents: the surface condition was questionable, and someone decided it was “probably fine.” That decision is where most injuries begin.
Essential Safety Gear to Wear
- Ankle braces worn under the stilt straps add meaningful protection, especially for anyone with prior ankle injuries or during the early weeks of learning.
- Knee pads help if you use a kneeling or crouch-down approach to getting on and off stilts. They also matter if you go down.
- Closed-toe footwear with adequate ankle coverage. Do not use stilts in sandals, slip-ons, or soft shoes with no structure.
- Hard hat on any commercial or multi-trade job site where overhead hazards exist.
Surfaces and Conditions to Avoid
Be strict about this list. None of these are acceptable stilt surfaces:
- Wet or freshly mopped floors
- Carpeted stairs or any stairway
- Outdoor terrain, gravel, or grass
- Surfaces with electrical cords, scrap lumber, or tools scattered across them
- Transitional flooring where one surface is meaningfully higher than the adjacent one
A clean, flat, indoor surface is the baseline requirement. OSHA’s walking-working surfaces guidance specifically highlights slips, trips, and uneven surfaces as major causes of preventable fall injuries. Anything that deviates from a stable surface should make you reach for the ladder instead.
How to Use Drywall Stilts: Step-by-Step for Beginners
Step 1: Adjust Stilts to the Right Height
Measure your ceiling height. For a standard 8-foot ceiling, you generally want 18 to 24 inches of elevation, which puts your hands at a comfortable working height for taping and finishing. Standard residential ceiling dimensions are commonly referenced in the HUD Residential Rehabilitation Inspection Guide, which reflects the typical ceiling heights found in most homes. Don’t set stilts higher than your task actually requires, especially if you are working with heavier materials like specialized soundproof drywall panels that demand extra stability.
Set both stilts to the same height before putting them on. Sounds obvious, but asymmetric adjustment is a common beginner mistake.
Step 2: Put Them On and Strap In Correctly
Sit down to put stilts on. Standing on one leg while strapping the other is how people fall before they’ve even started working. Sit on a bucket, a step, or a low surface.
Start with the foot platform and work upward. Tighten the ankle strap firmly but not to the point of cutting circulation. The ankle cuff should feel snug, not constricting. Once both stilts are strapped, double-check that all locking mechanisms are fully engaged before you stand.
Step 3: First Steps and How to Walk Safely
Stand up using a wall or solid surface for support on your first few attempts. Walk flat-footed with a slightly wider-than-normal stance. Resist the urge to walk on your toes; the foot platform is meant to contact the ground fully with each step.
Take short steps initially. You’ll naturally find your rhythm, but rushing it leads to ankle rolls. Having a spotter for your first hour is not a bad idea, especially in a professional setting.

Step 4: Working on Stilts
Once you’re mobile, actual work on stilts is mostly about remembering your reach limits. Leaning too far to the side or reaching behind your body’s center of gravity is where trouble starts. Move your feet before you overreach. This is the same principle as ladder safety, just applied while you’re walking.
Take rest breaks. Calf fatigue builds without you noticing, and tired legs mean slower reaction time. A 10-minute break every 45 to 60 minutes keeps you sharper and reduces injury risk.

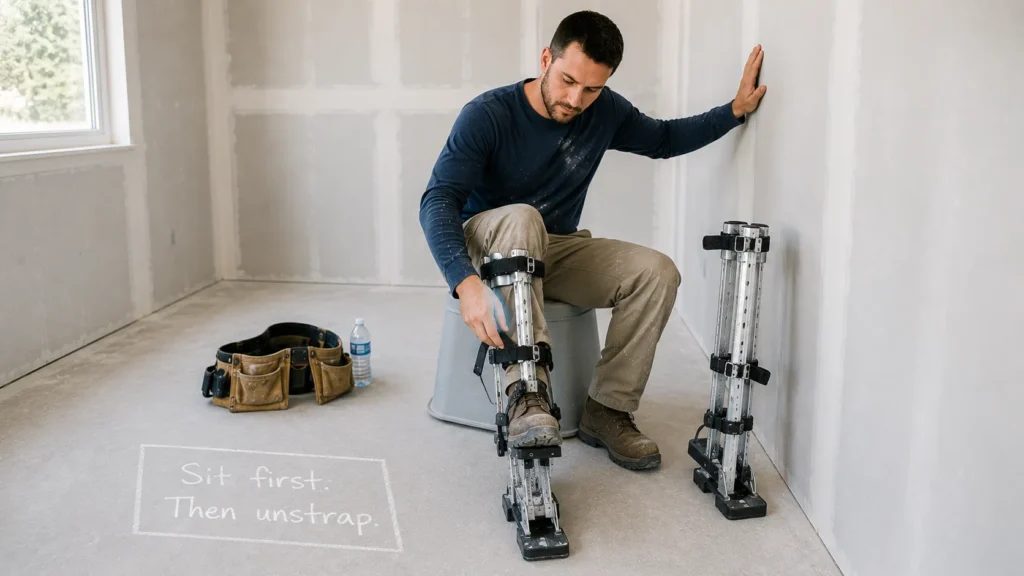
Step 5: Taking Stilts Off Safely
Lower yourself to the ground using a wall or solid support. Sit down before removing any straps. The same logic as putting them on: don’t try to balance on one stilt while unstrapping the other.
How to Choose the Best Drywall Stilts: Buying Guide
Height Range
For most residential jobs, stilts that adjust from 18 to 48 inches cover everything you’ll encounter. If you’re doing strictly standard ceiling work, even a 24-inch maximum is sufficient. Only buy for greater height range if your actual projects require it; the higher the range, the more important build quality becomes.
Weight Capacity and Frame Material
Most aluminum stilts are rated for 225 to 300 lbs. Check the manufacturer’s stated capacity and stay within it. Exceeding weight ratings stresses the locking mechanisms and the ankle support hardware, both of which can fail in ways that cause falls.
Steel-frame stilts exist at the heavy-duty end of the market and can handle higher loads, but they’re noticeably heavier to walk in. Unless you have a specific reason to need the additional capacity, aluminum is the practical choice for most users.
Ankle Support Quality
This is the most important factor for injury prevention and comfort, and it’s the feature that separates entry-level stilts from professional-grade ones. An articulating ankle joint allows natural forward-backward movement, which reduces strain during a full workday. Rigid ankle supports are more stable but more fatiguing.
Padding quality matters more than it looks at the store. Thin padding compresses quickly and stops protecting after a few hours of use. Look for dense foam or molded support structures rather than thin wrap padding.
Price Ranges: Budget vs. Professional Grade
Entry-level ($60 to $120): Functional for occasional use. Locking mechanisms and ankle support are serviceable but not built for daily professional use. Fine for a DIY homeowner who needs stilts for one or two projects a year.
Mid-range ($120 to $200): Better ankle support, more robust hardware, longer lifespan. A reasonable buy for someone who uses stilts regularly but not daily.
Professional grade ($200 to $300+): Built for daily professional use. Better weight distribution, articulating ankle joints, and hardware that holds up under heavy rotation. If you’re a taper or finisher working on stilts several days a week, this is the tier worth spending on.
Drywall Stilts vs Alternatives: Ladders, Scaffolding, and Lifts
Drywall Stilts vs Step Ladders
Step ladders are more stable on any given spot and require no skill to use safely. Stilts win decisively on mobility, especially for long runs of ceiling work where moving a ladder repeatedly would take real time.
For spot fixes, a single-patch repair, or work in a tight corner, a step ladder is the better tool. Stilts are worth it when you need to cover distance.
Drywall Stilts vs Baker Scaffolding
Baker scaffolding (rolling scaffold towers) offers a wider, more stable working platform and doesn’t require any skill to use safely. Multiple workers can operate from the same scaffold. Setup takes 5 to 10 minutes per unit, and the equipment is bulky to transport and store.
For large open rooms or commercial spaces, scaffolding often makes more sense than stilts. For a single residential room or a job where you’re moving between spaces frequently, stilts are faster to deploy and less to manage. This is particularly true when you are working with standard panels rather than heavy masonry backer materials, as a quick look at cement board vs drywall shows that traditional gypsum projects are far better suited for the mobility that stilts provide.
When to Rent a Lift Instead
For ceilings above 12 feet, particularly vaulted, cathedral, or two-story spaces, a drywall lift, scissor lift, or boom lift becomes the appropriate tool. Stilts max out around 48 inches of elevation, and working at that height on a standard residential project is already toward the upper limit of practical use. Commercial projects with high ceilings simply require powered access equipment.
Lift rental costs money, but it’s the right tradeoff when the ceiling height genuinely requires it.
Frequently Asked Questions About Drywall Stilts
Are drywall stilts legal on commercial job sites?
Stilts are not banned under federal OSHA regulations, but they must be used in compliance with fall protection standards. Many general contractors impose their own site-specific rules that do prohibit stilts. Always confirm with the GC or site supervisor before using them on a commercial project.
How long does it take to learn to walk on drywall stilts?
Most people can walk comfortably within an hour or two of practice. Walking productively while working typically takes a few days of actual job-site use. Full confidence, including working near obstacles and on longer shifts, usually develops over two to four weeks of regular use.
Can I use drywall stilts on carpet?
On flat, clean carpet in good condition, stilts are generally usable, though the surface provides less traction than hard flooring. Carpeted stairs are a firm no. Any soft surface that can shift or buckle under foot pressure increases fall risk.
What is the maximum height for drywall stilts?
Most commercial stilts max out at 48 inches of added elevation. Given that the average person stands between 5’6″ and 6′, this means a practical working height of roughly 9.5 to 10.5 feet. For anything above that, powered access equipment is the correct solution.
Do drywall stilts damage hardwood floors?
Quality stilts have rubber-soled foot platforms that don’t mark or scratch hardwood under normal use. The risk comes from pivoting or dragging your feet rather than stepping cleanly. On finished hardwood, take clean steps, avoid sharp pivots, and inspect the rubber soles for embedded grit before working on any finished floor.
Are drywall stilts good for painting ceilings?
Yes, ceiling painting is one of the strongest use cases for stilts, particularly for rolling large areas. The mobility advantage is significant, and the ergonomics are considerably better than working from a step ladder for extended periods. The same safety rules apply regardless of the task.
Final Verdict: Should You Buy Drywall Stilts?
The answer depends almost entirely on how much you’ll actually use them.
DIY homeowner with one project: Rent. A good pair of stilts rents for $20 to $40 per day at most tool rental locations. There’s no financial justification for buying a pair for a single job.
Regular renovator doing several projects a year: An entry-level or mid-range pair makes sense. You’ll recoup the cost within a project or two, and the time savings on ceiling work are real.
Professional taper, finisher, or painter: Buy quality. A $200 to $300 professional pair will last years of daily use, protect your ankles, and reduce the kind of fatigue that accumulates over a long career. This is a tool that earns its cost back on the first few jobs.
Whatever you decide, start with the safety section before you step onto any pair for the first time. Stilts are not inherently dangerous, but like any tool that puts you off the ground, they deserve some preparation and respect before you put them to work.

Elena Hart is the founder and lead writer of Better Home Pro. She writes about drywall, home repair, and practical DIY home improvement topics, focusing on clear, useful information that helps homeowners make better decisions. Her work combines firsthand experience, manufacturer documentation, industry resources, and careful research to create content that is accurate, practical, and easy to understand. Through Better Home Pro, Elena aims to simplify complex home improvement topics and provide guidance that is genuinely helpful to homeowners and DIYers.


No Comments