
Using the wrong drywall screw is one of the most common causes of screw pops, and most homeowners don’t realize the mistake until months later when the wall starts pushing back. The right screw comes down to three decisions: thread type (coarse or fine), length (based on drywall thickness), and coating (based on your room’s moisture level).
Get all three right, and your drywall stays flat and tight through years of seasonal wood movement. Get even one wrong, and you’re either re-driving fasteners or chasing rust stains through your finished walls.
This guide covers each decision in plain English, with a full size chart by drywall thickness, a coating guide for wet areas, a project-type matrix, and screw spacing by code.
If you are just starting out, make sure you have the right gear by checking out our essential drywall tools list.
Key Takeaways:
- Match your screw thread to the framing material: use coarse threads for wood studs and fine threads for metal studs to prevent screw pops.
- Standard 1/2 inch drywall requires 1-1/4 inch screws to achieve the 3/4 inch wood penetration depth needed for a secure, code-compliant hold.
- Use ceramic or zinc-coated screws in bathrooms and basements; standard black phosphate fasteners rust quickly when exposed to moisture or humidity.
- Never use standard phosphate screws with pressure-treated lumber, as the wood preservatives cause a chemical reaction that triggers rapid corrosion.
- Avoid overdriving screws through the paper face; if the paper tears, the fastener loses its structural grip and must be moved to a new spot.
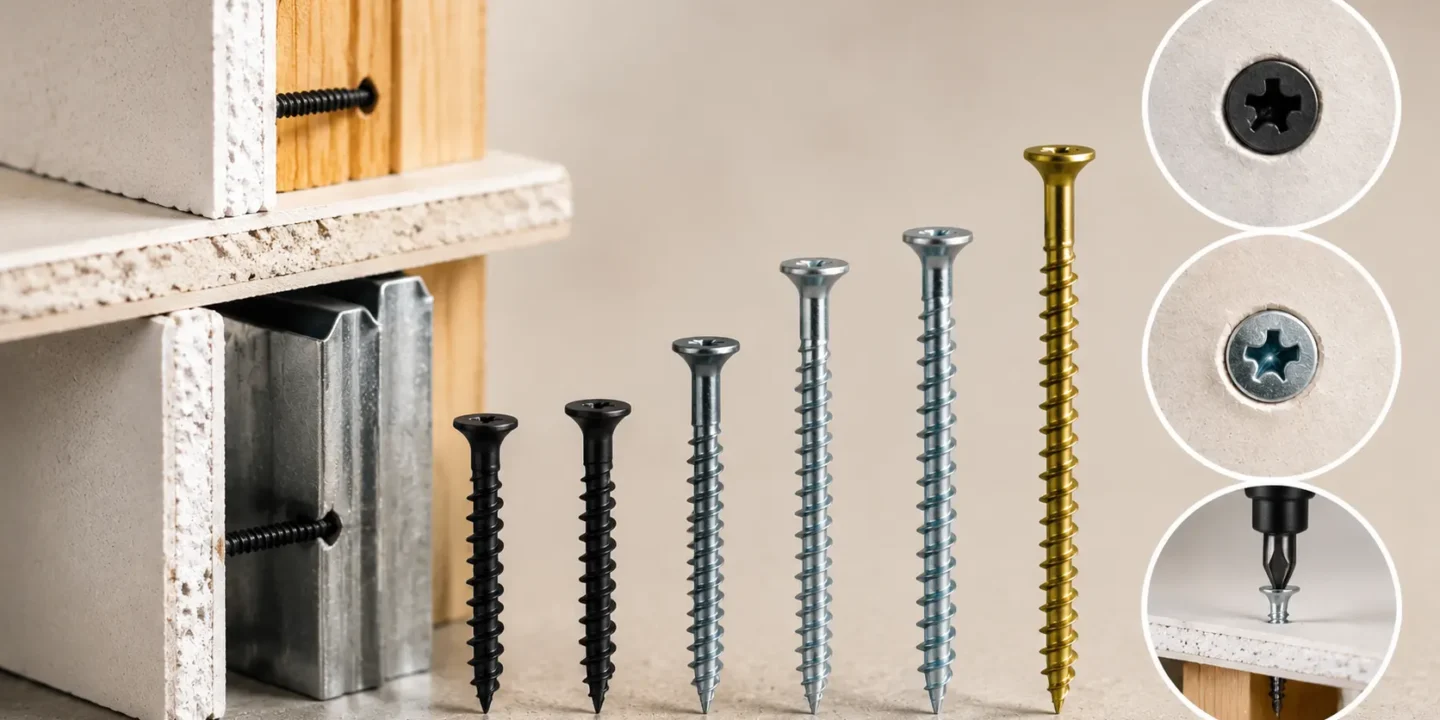
What Makes Drywall Screws Different
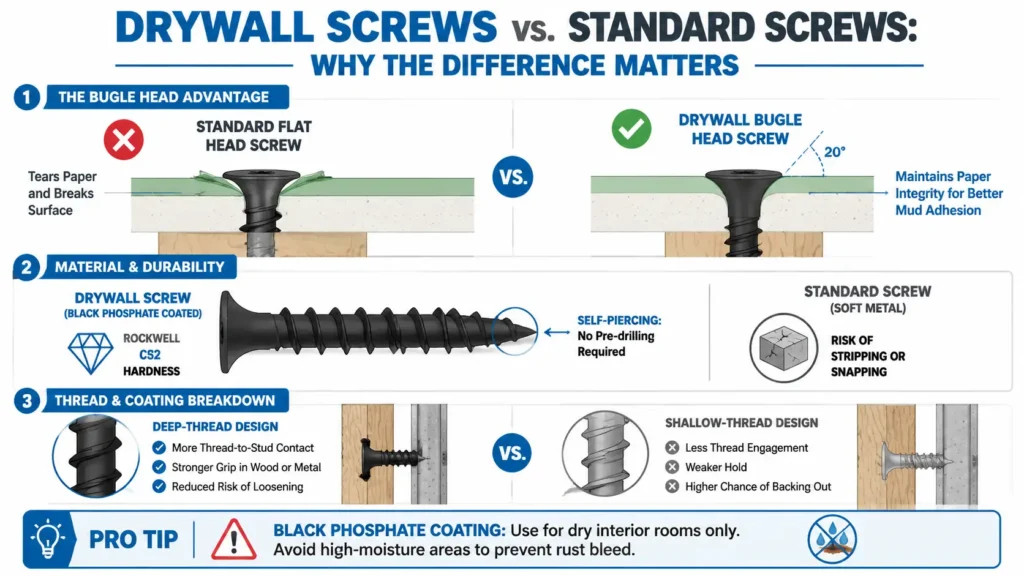
The first question most homeowners ask is whether they can just use regular screws. The short answer is no, and the reason matters if you want the finish work to hold.
A standard flat-head screw tears the paper facing on the drywall board. That tearing destroys the compound adhesion at that fastener point, which means you’ll never get a clean, flush fill over the head regardless of how many coats you apply. Drywall screws use a bugle head with a 20 to 22 degree cone angle that automatically sinks into the gypsum surface after installation. The geometry disperses the clamping pressure and keeps the paper intact, which is exactly what joint compound needs to bond and cure cleanly.
Beyond the head shape, drywall screws are heat-treated to Rockwell C52 hardness. That level of hardness lets the sharp point penetrate gypsum cleanly without pre-drilling, and it holds up under the torque of a screw gun without stripping. Standard screws are softer, which means they either strip under load or snap under torque.
The thread design is also deeper than a standard wood screw, giving the fastener significantly more grip in wood or metal framing. And the standard black phosphate coating reduces driving friction, though it’s only appropriate for dry interior environments, which is something a lot of homeowners discover too late.
Thread Types: Coarse vs Fine
This is the single decision that matters most, and it has one rule: match the thread to the framing material. There are no exceptions.
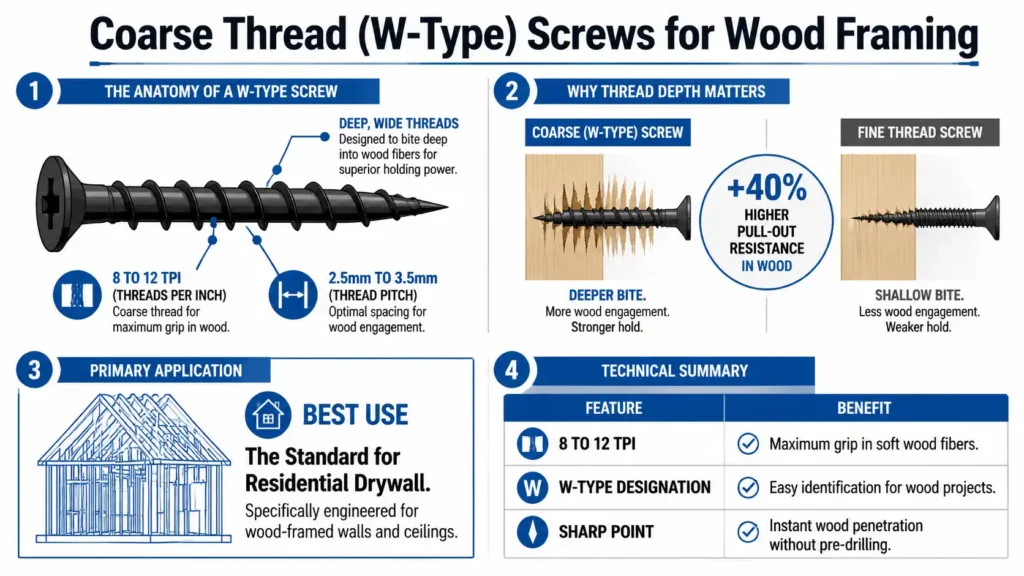
Coarse Thread (W-Type) — Wood Studs Only
Coarse thread screws have wide, deep threads at 8 to 12 TPI (threads per inch) designed specifically to bite into wood fiber. The thread pitch runs 2.5 to 3.5mm, which gives them roughly 40% higher pull-out resistance in wood compared to fine thread screws. The “W” in W-type stands for wood, which makes the application obvious.
This is the correct screw for the vast majority of residential drywall work. If your home has wood-framed walls and you’re buying drywall screws without any other specific requirements, coarse thread is what you want.
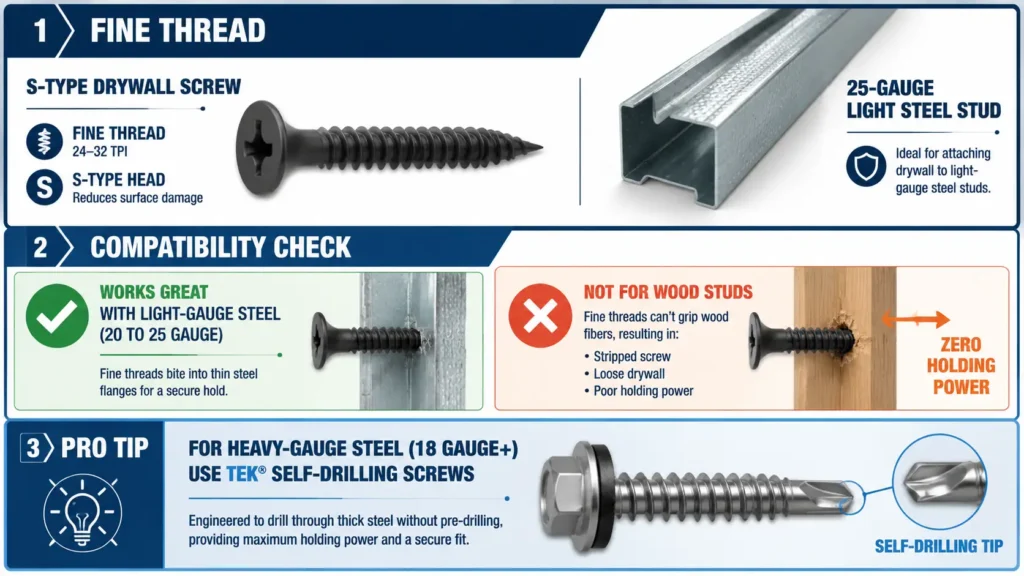
Fine Thread (S-Type) — Metal Studs Only
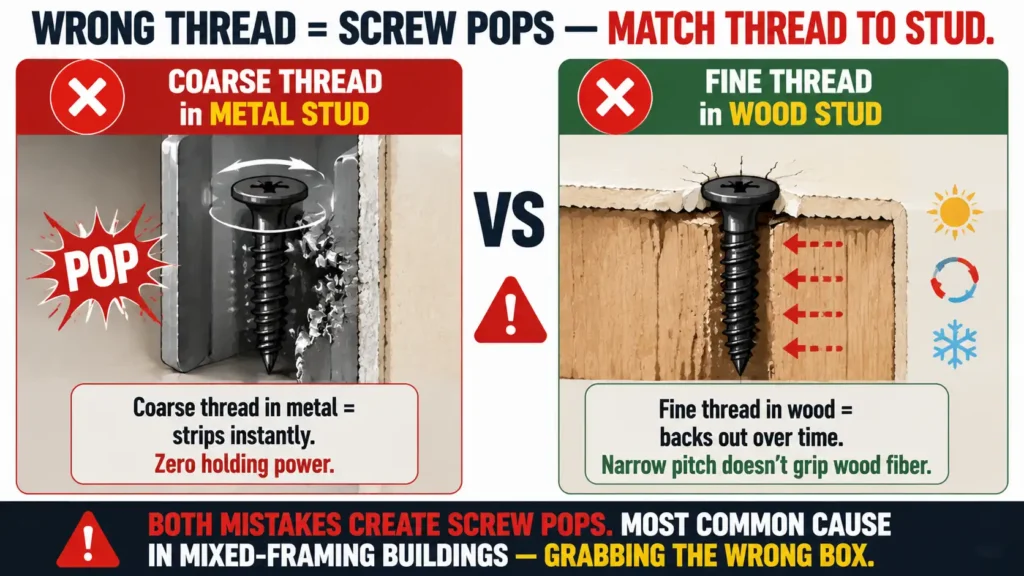
Fine thread screws run 24 to 32 TPI with a sharp self-piercing point designed for light-gauge steel framing, specifically 20 to 25 gauge. The dense thread pattern engages the thin steel without stripping, which is exactly what a coarse thread screw fails to do.
If you use coarse thread on metal studs, the threads strip instantly and you have zero holding power. If you use fine thread on wood studs, the fastener backs out over time because the thread pitch doesn’t grip wood fiber adequately. The consequence in both cases is screw pops or drywall ridging that can ruin a professional paint job.
One additional note on metal studs: if you’re working with heavy-gauge steel (18 gauge and thicker), a standard sharp-point fine thread screw will deflect rather than penetrate. For heavier steel, you need a self-drilling tip (Tek screw) that can bite through the thicker flange.
Hi-Lo Dual Thread — Mixed Framing, High Volume
Hi-Lo screws use alternating high and low threads. The high thread cuts into the material while the low thread removes waste, which results in about 50% faster driving than conventional coarse thread with comparable holding strength. This is primarily a contractor product used in high-volume mixed-structure buildings, not a standard homeowner purchase.

Trim Head — Decorative Finish Work
Trim head screws have a head diameter roughly 30% smaller than a standard bugle head, which makes them nearly invisible after installation. They’re used for solid wood trim and hidden inspection ports where the goal is minimal visual presence. These are not appropriate for structural drywall hanging. The reduced head area means reduced holding force against the paper face, which defeats the purpose of the bugle head geometry.

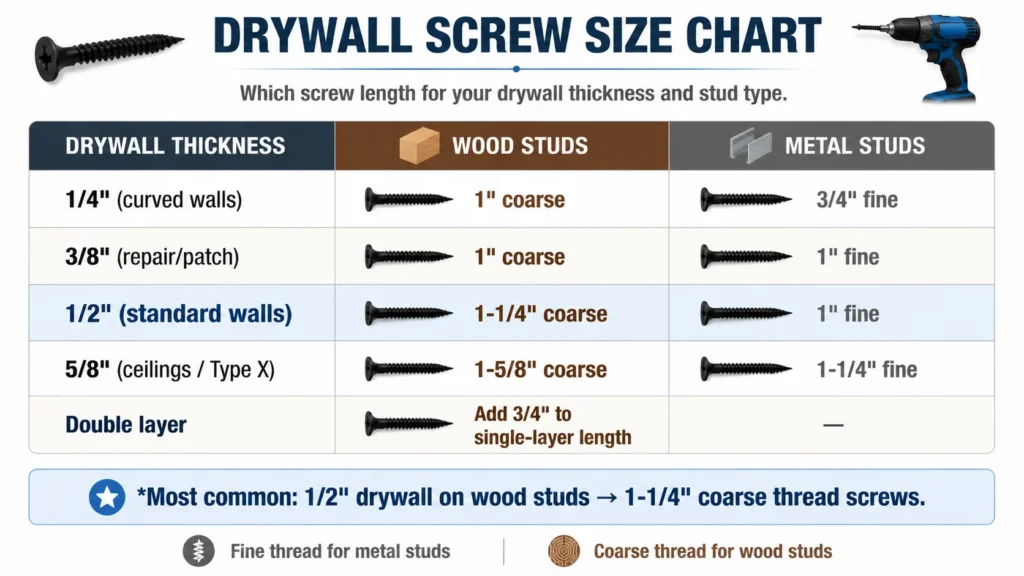
Drywall Screw Size Chart
Length selection comes down to a simple principle: the screw needs to reach the framing with enough thread engagement to resist pull-out over time. When determining what size drywall screws for 5/8 drywall are appropriate, you generally need 1-5/8 inch length to account for the extra thickness and weight of the panel. For wood framing, that means approximately 3/4 inch of penetration into the stud.
| Drywall Thickness | Wood Studs | Metal Studs | Notes |
| 1/4″ (curved walls) | 1″ coarse | 3/4″ fine | Metal: supplementary use only, minimal penetration |
| 3/8″ (repair/patch) | 1″ coarse | 1″ fine | — |
| 1/2″ (standard walls) | 1-1/4″ coarse | 1″ fine | Most common combination in residential work |
| 5/8″ (ceilings/Type X) | 1-5/8″ coarse | 1-1/4″ fine | Extra length for gravity load on ceilings |
| Double layer | Add 3/4″ to single-layer length | — | Must penetrate 1/2″ into second layer minimum |
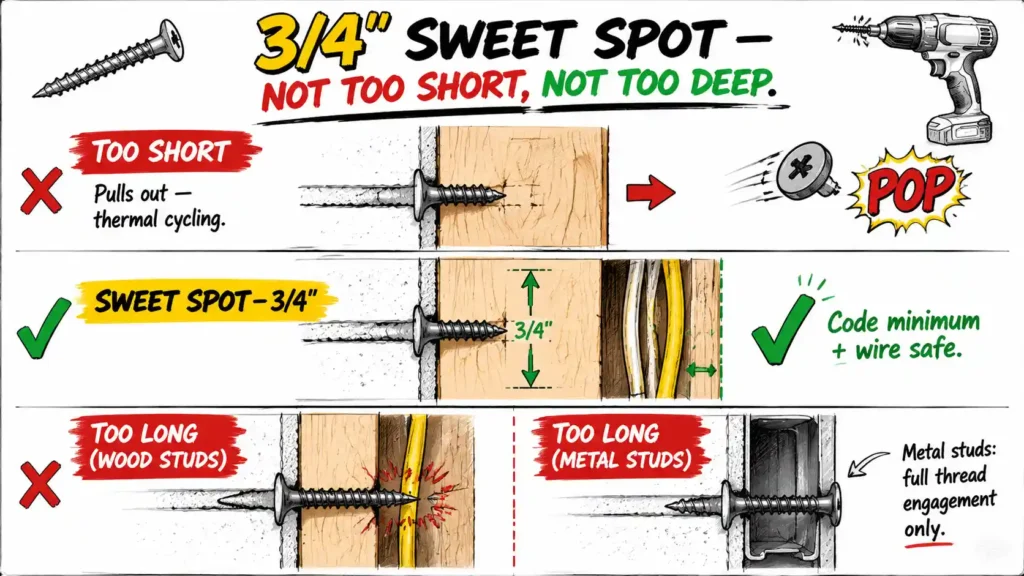
Why 3/4″ Penetration Into Wood Is the Sweet Spot
The 1-1/4″ screw provides approximately 3/4 inch of penetration into the stud after passing through 1/2 inch of drywall. That 3/4 inch is the minimum required by building codes for adequate withdrawal resistance, which is the force needed to resist a screw pulling back out under load.
There’s a practical reason the sweet spot stops there as well. Electrical wires are typically buried deeper in the stud, so 3/4 inch of penetration keeps the screw tip well clear of wiring. Screws that are too short feel secure initially but pull out under thermal cycling and seasonal wood movement. That cycle of expansion and contraction is the primary cause of screw pops in new builds, particularly in homes that experience significant temperature swings between seasons.
For metal studs, depth isn’t the measure. The screw simply needs complete thread engagement through the steel flange. Once the threads are fully through the metal, you have full holding power.
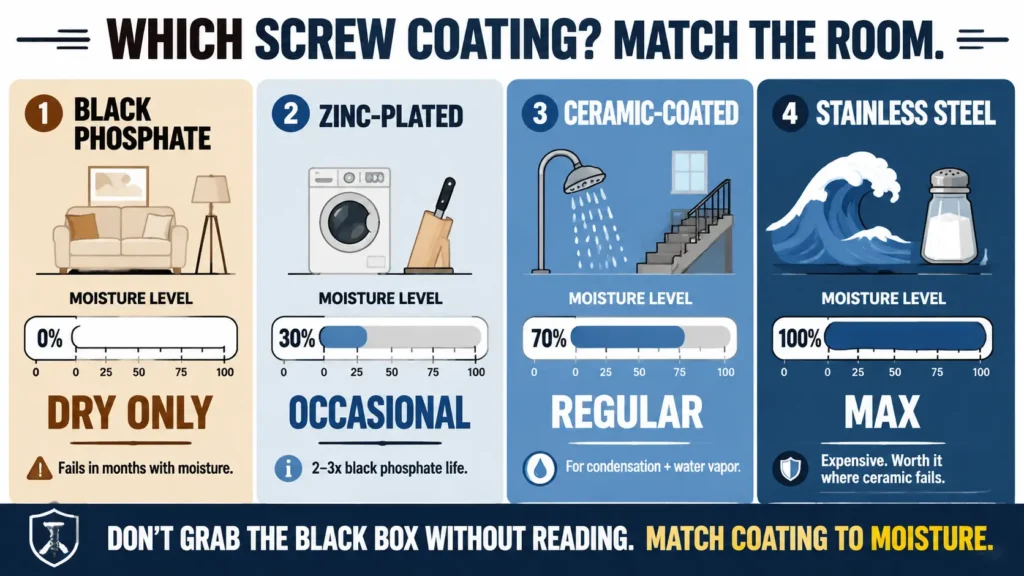
Coating Guide
Standard black phosphate drywall screws are designed for dry interior applications only. Living rooms, bedrooms, hallways, and any room where moisture is never a factor. That’s the full scope of their appropriate use.
For kitchens, bathrooms, basements, and any framing near pressure-treated lumber, the coating becomes a critical selection point. These areas often require specialized boards, such as moisture-resistant green board drywall, which must be paired with ceramic or zinc-coated screws to prevent the fasteners from corroding in high-humidity environments.
Black Phosphate (Standard)
Dry indoor rooms only. The coating reduces driving friction and provides minimal corrosion resistance. It fails within months in any environment where moisture is present. This is the default screw in every box at the hardware store, which means it’s also the screw most people grab without reading the label.
Zinc-Plated (Galvanized)
Two to three times the lifespan of black phosphate in moderate moisture environments. Appropriate for kitchens, laundry rooms, and basements with controlled humidity. A reasonable step-up when moisture is occasional rather than persistent.
Ceramic-Coated
Premium corrosion resistance for environments where moisture is a regular presence. Bathrooms, high-humidity basements, and exterior soffits are the primary applications. This is the right choice for any room where you’d expect condensation or water vapor exposure over time.
Stainless Steel
Maximum corrosion resistance for coastal environments, extreme moisture, or high salt-fog applications. Significantly more expensive than ceramic-coated options. Worth it where ceramic isn’t enough, not worth the cost where it is.
The Pressure-Treated Lumber Warning
This is a failure mode that catches a lot of homeowners in basements and garages, and almost no consumer guide explains it clearly.
Standard black phosphate screws corrode rapidly when they come into contact with pressure-treated lumber. The reason is chemical: pressure-treated wood uses ACQ (alkaline copper quaternary) as its preservative, and ACQ reacts chemically with standard steel fastener coatings. According to the American Wood Council, the model building codes require corrosion-resistant fasteners when used with ACQ-treated lumber, specifically because ACQ exhibits higher corrosion rates against standard steel than the older CCA-treated wood it replaced
Any drywall near pressure-treated framing, which is common in basements and garages where code requires it, requires hot-dipped galvanized or stainless steel screws at minimum. This applies to the studs, the bottom plate, and any other treated framing the screw comes near.
Project Decision Matrix
| Project Type | Screw Specification |
| Standard 1/2″ wall, wood studs | 1-1/4″ coarse thread, black phosphate |
| 5/8″ ceiling, wood joists | 1-5/8″ coarse thread, black phosphate |
| 1/2″ wall, metal studs (20-25 gauge) | 1″ fine thread, sharp point, black phosphate |
| 1/2″ wall, metal studs (18 gauge and heavier) | 1-1/4″ fine thread, self-drilling tip |
| Bathroom walls | Same length as stud type, ceramic-coated finish |
| Basement walls (wood or metal) | Same thread type, zinc or ceramic coating |
| Double layer 1/2″ drywall, wood studs | 2″ coarse thread (penetrate 1/2″ into second layer) |
| 5/8″ Type X fire-rated, wood studs | 1-5/8″ coarse; verify against rated assembly specification |
| Near pressure-treated lumber (basement/garage) | Hot-dipped galvanized or stainless; standard coating corrodes from ACQ reaction |
Before purchasing screws, it’s worth calculating your total drywall material requirements. Our Drywall Sheet Calculator estimates how many panels your room needs, helping you budget for both drywall sheets and the correct quantity of screws.
Screw Spacing by Code
The IRC (International Residential Code) sets maximum spacing for drywall fasteners, and the requirements differ between walls and ceilings for a specific reason most articles never mention. IRC Section R702.3.5 specifies the fastener type, spacing, and application requirements for gypsum board installation across walls and ceilings, and is the governing code document behind the spacing figures in the table above.
| Location | Field (Middle of Panel) | Edges (Along Panel Edges) |
| Walls | 16″ on center | 8″ on center |
| Ceilings | 12″ on center | 8″ on center |
Why Ceilings Need Closer Spacing
Every ceiling screw is under permanent tensile load. The panel wants to fall. Unlike a wall panel that leans against the framing and relies on screws mainly for lateral stability, every ceiling fastener is actively resisting gravity at all times.
Closer spacing distributes that load across more fasteners, which prevents two failure modes: progressive panel sag from individual fasteners slowly pulling through the gypsum, and cumulative load concentration on any single fastener. Walls don’t carry gravity load the same way, so the wider 16 inch spacing is adequate.
Practical tip: snap chalk lines at stud locations before hanging panels. Drive screws to the chalk line without measuring every fastener individually. It keeps spacing consistent across large panels and speeds up the work considerably.
If you are working alone, using a drywall lift guide can help hold the panels in place so you can focus on driving your screws accurately.
Correct Depth and Common Mistakes
What Correct Depth Looks Like
The screw head should sit slightly countersunk below the paper surface. You’ll see a small visible dimple. The paper should be intact. That’s the only depth that allows clean compound filling and maximum holding strength. Anything shallower and the head protrudes. Anything deeper and you’ve compromised the paper.
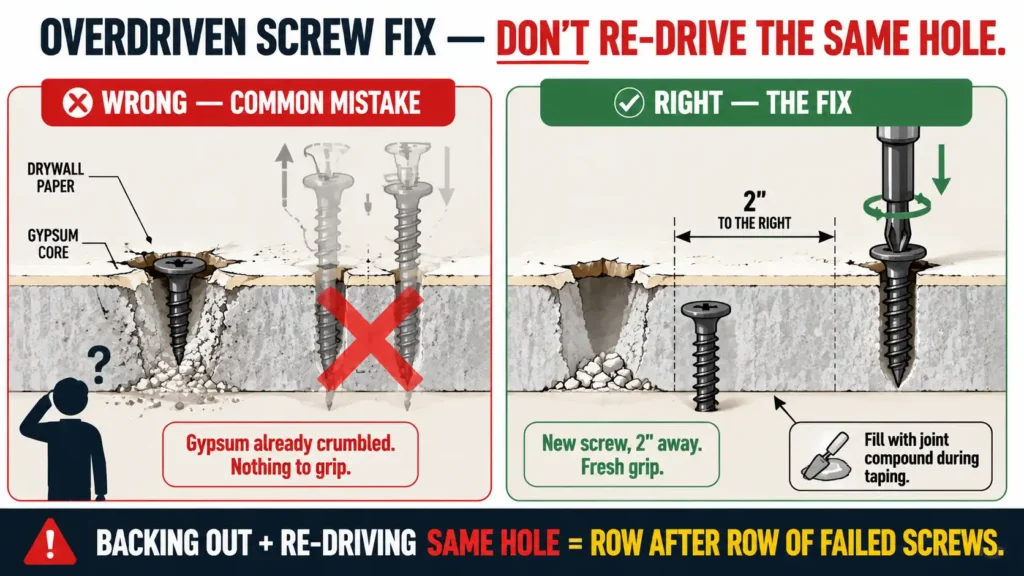
Mistake 1: Overdriven Screws
When you overdrive a screw, the head tears through the paper facing into the gypsum. The screw is now set in crumbled material with no structural grip.
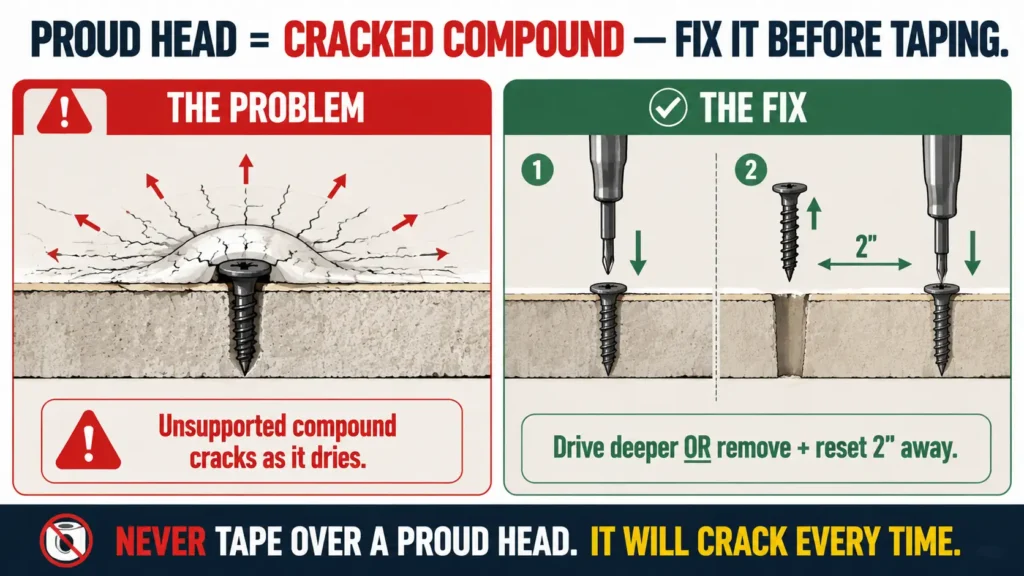
The protocol most homeowners get wrong: Do not back the screw out and try to drive it again in the same hole. The gypsum around that hole is already crumbled. There’s nothing left for the threads to grip, and re-driving will only make it worse.
The correct protocol: Remove the screw completely, then drive a new screw two inches away from the failed location. The new location has undamaged gypsum, which gives the threads solid material to grip. The original hole gets filled with joint compound during taping.
This is counter-intuitive enough that it causes real problems when people don’t know it. A homeowner who backs out and re-drives across an entire panel ends up with row after row of failed fasteners.
To avoid this, many pros choose a drywall screw gun vs a drill because the dedicated tool features a depth-sensitive nosepiece that prevents overdriving the screw in the first place.
Mistake 2: Shallow (Proud) Head
A head that protrudes above the surface creates a bump under compound. The compound applied over it cracks as it dries because it’s unsupported on the edges. Drive the screw deeper or remove it and reset.
Mistake 3: Wrong Thread for the Stud Type
Coarse thread in metal studs strips instantly and provides zero holding power. Fine thread in wood backs out gradually because the narrow thread pitch doesn’t engage wood fiber adequately. Both mistakes create screw pops. This is one of the most common causes of screw pops in new construction, particularly in mixed-framing buildings where someone grabbed the wrong box.
FAQ
What size drywall screws do I need for 1/2″ drywall?
For 1/2 inch drywall on wood studs, use 1-1/4 inch coarse thread screws. That length puts approximately 3/4 inch of penetration into the stud, which is the code minimum for adequate withdrawal resistance. For metal studs, use 1 inch fine thread screws, which is enough to fully engage the steel flange without excess length.
Can I use regular screws instead of drywall screws?
No, and the failure mode is specific. A standard flat-head screw tears the paper facing on the drywall rather than sitting flush in a countersunk dimple. Once the paper tears, joint compound can’t bond cleanly at that point, and the fastener is visible through every coat of mud. Regular screws also have insufficient thread depth for reliable grip in framing under load, and standard coatings rust in any moisture-present environment. Drywall screws exist because the application requires all three differences: bugle head geometry, thread depth, and appropriate hardness.
What is the difference between coarse and fine thread drywall screws?
Coarse thread (W-type) screws have wide, deep threads at 8 to 12 TPI designed to grip wood fiber. Fine thread (S-type) screws have dense threads at 24 to 32 TPI with a self-piercing point for light-gauge steel framing. Using coarse thread on metal studs strips the screw and leaves zero holding power. Using fine thread on wood backing causes the screw to back out over time. Match thread to framing material without exception.
How far apart should drywall screws be?
For walls: 16 inches on center in the field (middle of the panel), 8 inches on center along panel edges. For ceilings: 12 inches on center in the field, 8 inches along edges. Ceiling spacing is tighter because every fastener is under continuous gravity load rather than lateral load.
What type of drywall screw is best for metal studs?
For light-gauge steel (20 to 25 gauge), use fine thread (S-type) screws with a sharp self-piercing point. For heavy-gauge steel (18 gauge and thicker), use fine thread screws with a self-drilling tip (Tek screw). Standard sharp-point screws deflect on heavier steel rather than penetrating cleanly.
Do drywall screws rust?
Standard black phosphate drywall screws rust in any moisture-present environment, including bathrooms, basements, and anywhere near pressure-treated lumber. For kitchens and laundry rooms, use zinc-plated screws. For bathrooms and high-humidity areas, use ceramic-coated screws. For coastal or extreme moisture environments, use stainless steel. For any drywall near pressure-treated framing, use hot-dipped galvanized or stainless at minimum because ACQ wood preservative chemically corrodes the standard phosphate coating.
How deep should drywall screws be set?
The head should sit just below the paper surface, creating a small dimple without tearing the paper. This is the only depth that allows clean compound adhesion and maximum holding strength. If the head is proud (sticking up), drive it slightly deeper or remove and reset. If the head has torn through the paper, remove the screw entirely and drive a new one two inches away from the original hole.
Conclusion
Three decisions cover every residential drywall project: thread type, length, and coating, in that order.
Thread type first because it’s the most consequential: coarse thread for wood studs, fine thread for metal studs, no exceptions. Length second, because penetration depth determines whether the screw holds through seasonal movement or becomes a pop six months later. Coating third, because the right screw in the wrong environment fails regardless of everything else.
For 90% of homeowners, the one-sentence version is this: 1-1/4 inch coarse thread black phosphate screws for standard 1/2 inch drywall on wood studs. Upgrade the coating to zinc or ceramic for any room with moisture.
Get those three decisions right before you start hanging, and the fasteners will never be the reason you’re back on the ladder.

Elena Hart is the founder and lead writer of Better Home Pro. She writes about drywall, home repair, and practical DIY home improvement topics, focusing on clear, useful information that helps homeowners make better decisions. Her work combines firsthand experience, manufacturer documentation, industry resources, and careful research to create content that is accurate, practical, and easy to understand. Through Better Home Pro, Elena aims to simplify complex home improvement topics and provide guidance that is genuinely helpful to homeowners and DIYers.


No Comments