
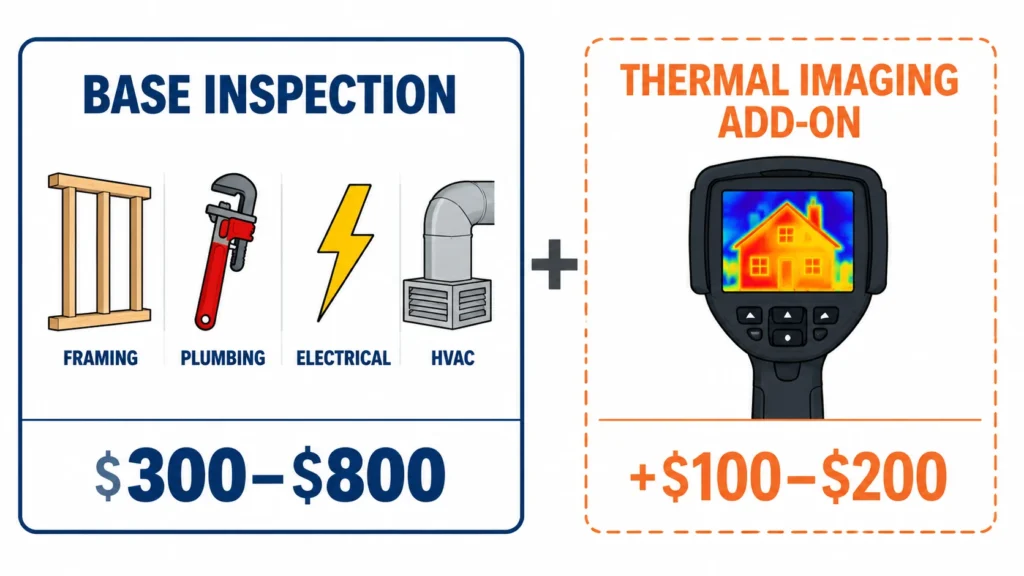
A pre-drywall inspection typically costs between $300 and $800, and sometimes more for large custom homes or inspectors who bring specialized tools like thermal imaging cameras. Most homeowners building a standard single-family home in a mid-cost market pay somewhere in the $350 to $500 range.
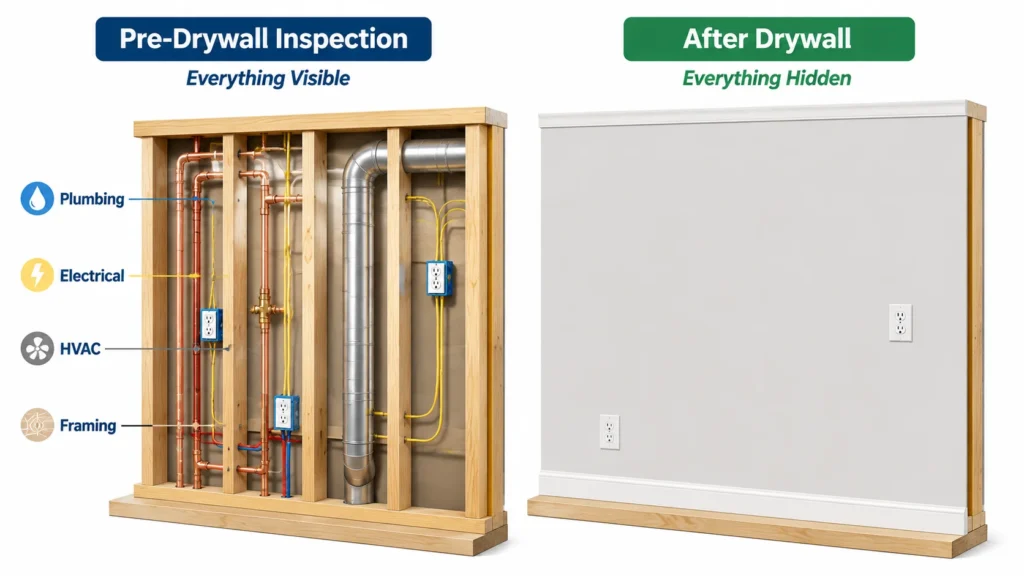
The inspection happens after framing, plumbing, electrical, and HVAC rough-ins are complete but before insulation and drywall go up. That window is narrow and deliberate. Once the walls close, everything behind them becomes inaccessible without tearing things open. A pre-drywall inspection is specifically designed to catch problems while they’re still easy to see and fix.
Key Takeaways:
- Pre-drywall inspections typically cost $300 to $800, with most standard single-family homes falling in the $350 to $500 range.
- Home square footage drives the base cost, while tight crawlspaces, complex rooflines, and multi-story layouts increase inspection time and fees.
- Third-party inspections find hidden framing and mechanical errors that fast-moving subcontractors skip and quick municipal code checks miss.
- Fixing rough-in errors costs very little while walls are open, avoiding expensive wall demolition, patching, and painting later.
- Thermal imaging adds $100 to $200 but catches hidden insulation gaps, air sealing failures, and window flashing leaks before drywall goes up.
What Is a Pre-Drywall Inspection?
A pre-drywall inspection is a third-party review of your home’s structural framing and mechanical rough-ins at a specific point in the construction process. The inspector comes in after the trades have finished their rough work but before anyone installs insulation or hangs drywall.
That timing is what makes it different from every other inspection in the homebuilding process. At this stage, the interior of your walls is completely open. An inspector can physically see the framing, the plumbing pipes, the electrical wiring, the HVAC ductwork, the window and door flashing, and the structural connections. Nothing is hidden yet.
This is not the same as your municipality’s code inspection. Local building inspectors are checking for code compliance and they’re doing it quickly across many properties. A third-party pre-drywall inspector is working specifically for you, spending more time, documenting findings with photos, and looking at details that a code inspection doesn’t always catch.
Average Pre-Drywall Inspection Cost
Pricing varies based on home size, location, and what the inspection includes. Here’s a realistic breakdown:
Smaller homes (under 1,500 sq ft): $300 to $400 in most markets. Straightforward layout, accessible framing, shorter inspection time.
Mid-size homes (1,500 to 3,000 sq ft): $400 to $600. This covers most production and semi-custom builds. Two-story homes sit toward the higher end of this range because of attic access, stairwell framing, and increased mechanical complexity.
Large or custom homes (3,000 sq ft+): $600 to $800 or more. More square footage, more mechanical systems, more time. Some inspectors charge by the hour for very large custom builds rather than quoting a flat fee.
Add-on services: Thermal imaging typically adds $100 to $200. Some inspectors include it in their base price; others offer it separately. For new construction, thermal imaging can detect heat loss at window installations, moisture intrusion at flashing points, and insulation gaps before drywall covers them.
These ranges reflect general national averages. Markets like California, New York, and the Pacific Northwest tend to run higher. Rural markets and lower cost-of-living areas often come in at the lower end.
What Affects the Cost?
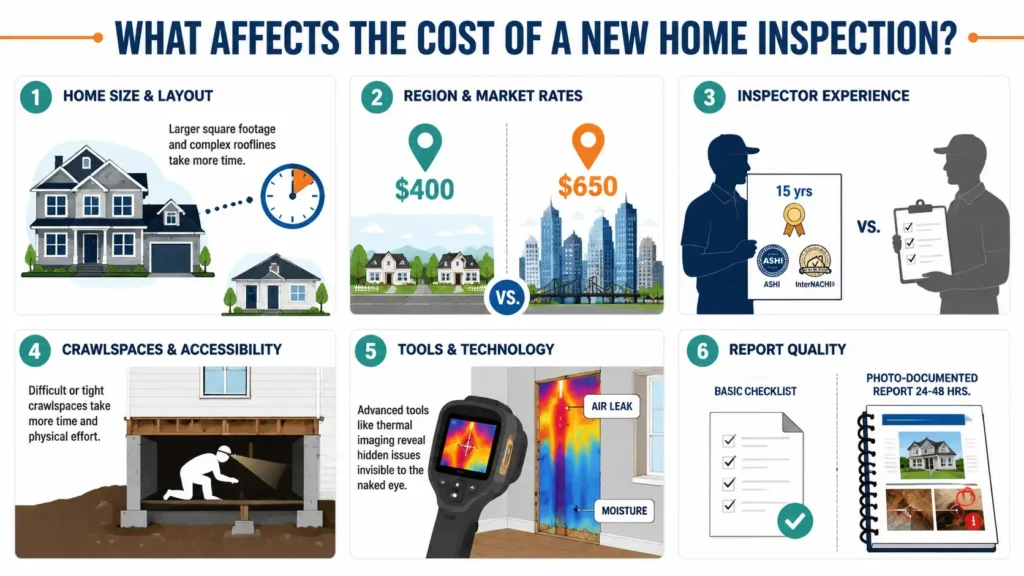
Home size and layout. Square footage is the biggest driver. A 4,000 sq ft custom home with a finished basement, three floors, and complex rooflines takes significantly longer to inspect than a ranch-style 1,800 sq ft build. Inspectors factor in the time required, not just the floor area.
Region and local market rates. Inspector pricing reflects the local economy. A $400 inspection in suburban Ohio might cost $650 for the same scope of work in the San Francisco Bay Area. When comparing quotes, compare them to local averages rather than national ones.
Inspector experience and certification. A certified inspector with 15 years of new construction experience charges more than someone new to the trade. Certifications from organizations like the American Society of Home Inspectors (ASHI) or the International Association of Certified Home Inspectors (InterNACHI) signal training and standards. That experience tends to show up in the quality of findings and the detail of the report.
Crawlspaces, attics, and accessibility. Tight crawlspaces and difficult attic access add time and physical effort. Many inspectors factor this into their quote, especially for homes with limited access points or complex foundation configurations.
Tools and technology. Thermal imaging cameras, moisture meters, and gas detection equipment cost money to own and operate. Inspectors who use them routinely often charge more, and for good reason. Thermal imaging at the pre-drywall stage can identify air sealing failures and moisture problems that won’t show up visually until much later.
Report quality. A written report with photos and documented findings takes time to produce. Some budget inspectors offer a verbal walkthrough and a basic checklist. Most quality inspectors deliver a photo-documented report within 24 to 48 hours. That documentation matters if you need to go back to your builder with specific issues.
What Inspectors Actually Look For Before Drywall
This stage offers access that no other inspection provides. A good pre-drywall inspector is checking:
Framing. Missing blocking, improper notching of joists, framing that doesn’t match the structural plans, inadequate header sizing at door and window openings. These issues are easy to correct before drywall and expensive to address afterward.
Structural connectors and fasteners. Hurricane ties, joist hangers, hold-downs, and shear wall connections. In many production builds, trades move fast and occasionally skip connectors. An inspector looking at this stage catches missing hardware before it becomes a structural concern.
Electrical rough-in. Junction box placement, wire routing, proper grounding, breaker panel labeling, and whether rough-in work appears consistent with the electrical plan. Inspectors aren’t code officials, but they can flag concerns that warrant a closer look or a conversation with your builder.
Plumbing. Pipe routing, drain slope, venting configuration, and any signs of leaks at connections. Pre-drywall is the only time anyone can look at your plumbing lines without equipment or demolition.
HVAC rough-in. Duct routing, duct seal quality, return air sizing, and equipment placement. Poorly sealed ductwork inside unconditioned spaces is one of the most common efficiency problems in new construction, and it’s almost impossible to address once walls are closed.
Window and door flashing. Water intrusion at window and door openings is one of the leading causes of moisture damage in newer homes. Flashing installation at this stage is visible and verifiable. Problems here are straightforward to fix before drywall goes up and costly to discover years later through water staining or rot.
Insulation preparation. Some inspectors review blocking, draftstopping, and fire blocking requirements that need to be in place before insulation is installed.
Is a Pre-Drywall Inspection Worth It?
For most homeowners building a new home, yes. The reasoning is practical rather than alarmist.
Builders, even reputable ones, are managing subcontractors across multiple projects simultaneously. Subcontractors work fast. Municipal inspectors are stretched thin and check for code compliance, not thoroughness. An independent inspector working specifically for you spends more time and looks at more details than either of those checks provides.
The cost of fixing most issues found during a pre-drywall inspection is low because everything is accessible. A missing joist hanger takes a few minutes and a few dollars to install. A flashing correction takes an hour. These same corrections after drywall installation involve opening walls, patching, painting, and sometimes contractor disputes about who is responsible.
One real scenario that comes up regularly: inspectors find HVAC ducts that weren’t sealed at the joints before insulation covered them. The homeowner never knows. Over the years, the house is harder to heat and cool than it should be, utility bills are higher than expected, and the source of the problem requires invasive investigation to locate. The pre-drywall inspection that would have caught it costs $400 to $500. The diagnosis and repair years later costs considerably more.
The inspection is not a guarantee against all future problems. It’s a reasonable safeguard at the one moment when your entire home’s mechanical and structural systems are fully visible.
Common Situations Where Homeowners Skip It
Some homeowners pass on pre-drywall inspections and have reasonable explanations for doing so.
Production builders with established quality programs. Large national builders sometimes have internal quality control processes and third-party inspections built into their construction process. If your builder can document what those checks include, skipping an independent inspection is a more defensible decision.
Budget constraints. On a tight construction budget, $400 to $600 feels significant. Some homeowners weigh that cost against the final walkthrough inspection and prioritize one over the other. The tradeoff is that final inspections can only identify what’s visible, which at that stage is very little of what was installed.
Relying on builder warranties. Most production builders offer structural warranties and workmanship warranties. If issues surface later, those warranties provide some recourse. The limitation is that discovering a warrantable issue after drywall still requires opening walls and going through a repair process. Prevention is simpler than warranty claims.
If you do skip it, schedule a thorough final walkthrough inspection before closing and review what your builder’s warranty actually covers.
Questions to Ask Before Hiring a Pre-Drywall Inspector
Before booking, ask:
- Are you licensed or certified through ASHI, InterNACHI, or a state licensing program?
- How much of your work is new construction versus existing homes?
- What does your report include? Do you provide photos?
- How soon after the inspection will I receive the report?
- Have you worked with my builder or in this development before?
- Will you communicate directly with my builder if I choose to share findings?
- Do you include thermal imaging, or is that an add-on?
The answers tell you quickly whether the inspector has genuine new construction experience or primarily does resale home inspections. New construction and resale inspections involve different knowledge sets. An inspector who spends most of their time on older existing homes may not have the same familiarity with framing standards, rough-in expectations, and new construction trade practices.
Frequently Asked Questions
Does homeowner’s insurance or my builder cover the cost? No. Pre-drywall inspections are typically paid out of pocket by the buyer. Some buyers’ agents recommend them as a standard step; a few include partial reimbursement as a negotiated concession. Your builder won’t pay for an inspection you commission independently.
Can I attend the inspection? Yes, and most inspectors encourage it. Walking through with the inspector as they work gives you direct context for what they’re finding and why it matters. It also gives you a chance to ask questions in the moment rather than interpreting a written report later.
Is this different from the final home inspection? Significantly. A final inspection happens when the home is essentially complete. Walls are closed, mechanical systems are covered, and the inspector is limited to what’s visible and accessible. The pre-drywall inspection is specifically valuable because nothing is covered yet. The two inspections complement each other rather than substitute for one another.
When exactly should it be scheduled? Coordinate with your builder or construction manager to find out when framing and all rough-ins are confirmed complete but before insulation is scheduled. In most builds, this window is a few days to a week. Communicate early so you have time to hire an inspector and get them on the schedule without delaying your construction timeline.

Elena Hart is an interior writer and decorator who knows how to make a home look great on any budget. She has spent the last 10 years helping people turn complicated design trends into easy DIY projects. Her writing has been featured in big lifestyle magazines. When she isn't writing, Elena is busy working on her own mid-century modern house, hunting for thrifted gems and testing out bold wallpapers.


No Comments