
For most drywall sanding, use 120 to 150 grit sandpaper or sanding screen. Use 120 grit to smooth dried joint compound after the first or second coat, and 150 grit for final feathering and prep before primer. Use 180 to 220 grit only for very light touch-ups where the surface is already mostly flat. Avoid 80 grit for standard drywall work because it is too aggressive for soft compound and can scratch deeply or tear the drywall paper face.
That covers the majority of situations. The sections below explain why each grit works the way it does, and when the recommendation changes.
Key Takeaways:
- For general drywall sanding, use 120 grit to level dried joint compound between coats and 150 grit for the final pass before priming.
- Coarser grits like 80 grit scratch soft joint compound too deeply and easily rip the drywall paper face, creating extra repair work.
- Finely textured 180 to 220 grit papers cannot flatten ridges efficiently and should only be saved for minor touch-ups or blending painted patches.
- Lightweight joint compounds sand down much faster than all-purpose mud, requiring lighter pressure with your 120 or 150 grit paper.
- Sanding screens resist clogging better than standard sandpaper on large areas, but the mesh cuts more aggressively under the same pressure.
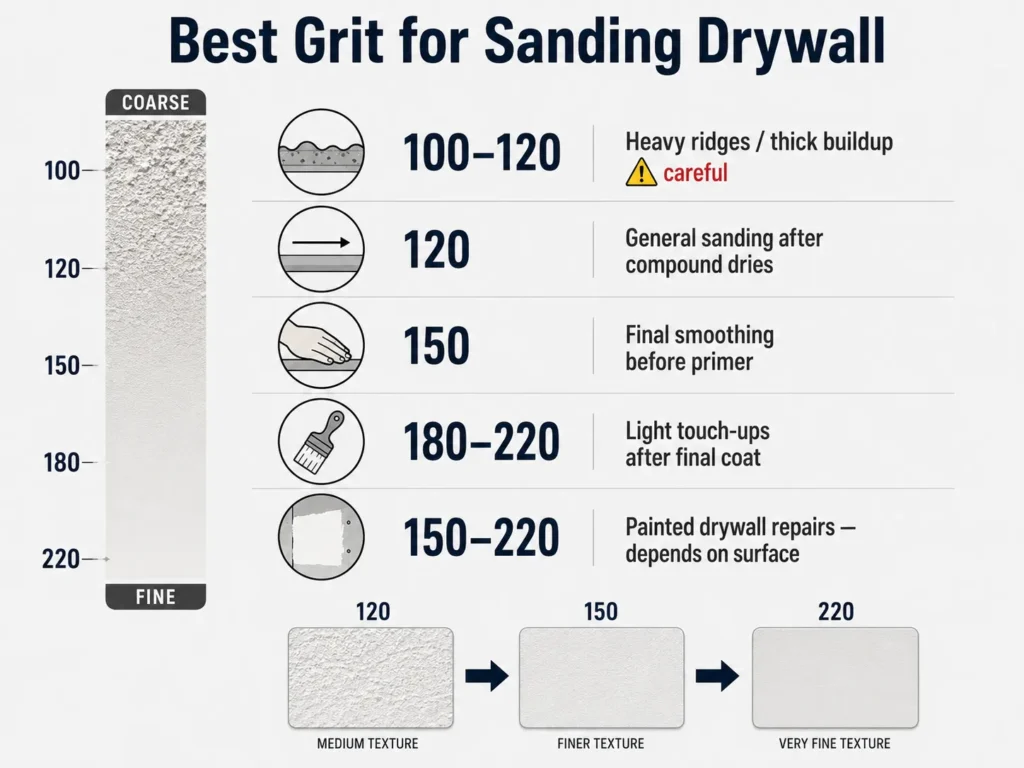
Quick Answer: Best Grit for Sanding Drywall
| Drywall Sanding Task | Best Grit |
| General sanding after joint compound dries | 120 grit |
| Final smoothing before primer | 150 grit |
| Light touch-ups after final coat | 180–220 grit |
| Heavy ridges or thick buildup | 100–120 grit carefully |
| Painted drywall repairs | 150–220 grit depending on surface |
Why 120 to 150 Grit Works Best for Most Drywall
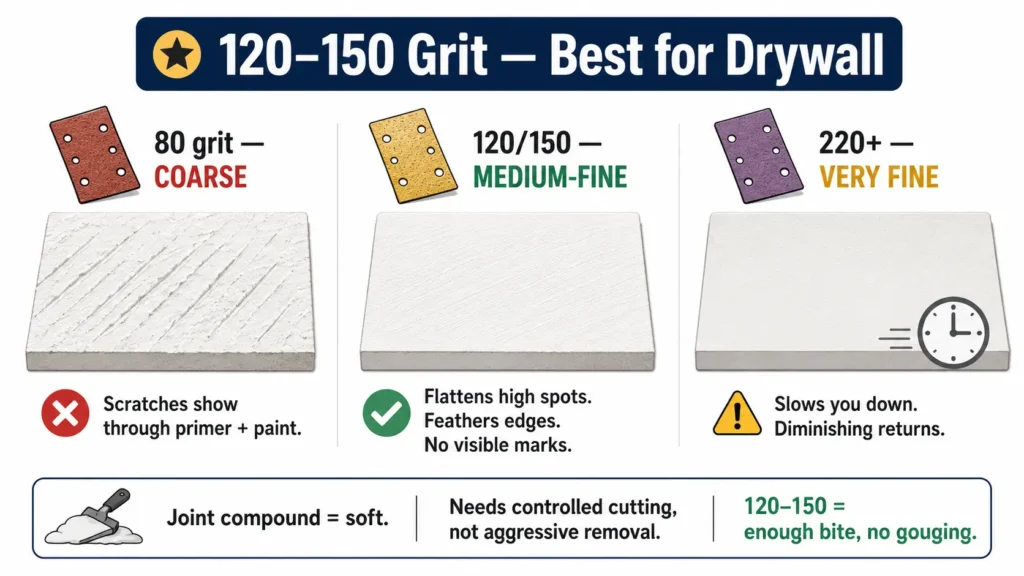
Joint compound is a soft material. It sands faster and more easily than wood, and that is exactly why most people reach for sandpaper that is too coarse. Coarser grit removes material quickly on the first pass, but it also leaves scratches deep enough to show through primer and paint.
The goal of drywall sanding is not aggressive material removal. You are flattening high spots, feathering compound edges, and smoothing transitions so the surface reads as one flat plane once painted. That job calls for controlled cutting, not fast cutting.
The visual impact of that work becomes obvious when comparing skim coat before and after transformations on finished walls
At 120 grit, you get enough bite to level dried compound without gouging the surface. At 150 grit, you get a cleaner finish that is ready for primer without visible sanding marks. Both sit in the range where the paper or screen does the work at light pressure, which is how drywall sanding should go.
Going finer than 150 grit for routine work tends to slow you down without improving the result much. Going coarser than 120 grit for routine work increases the chance of damage.
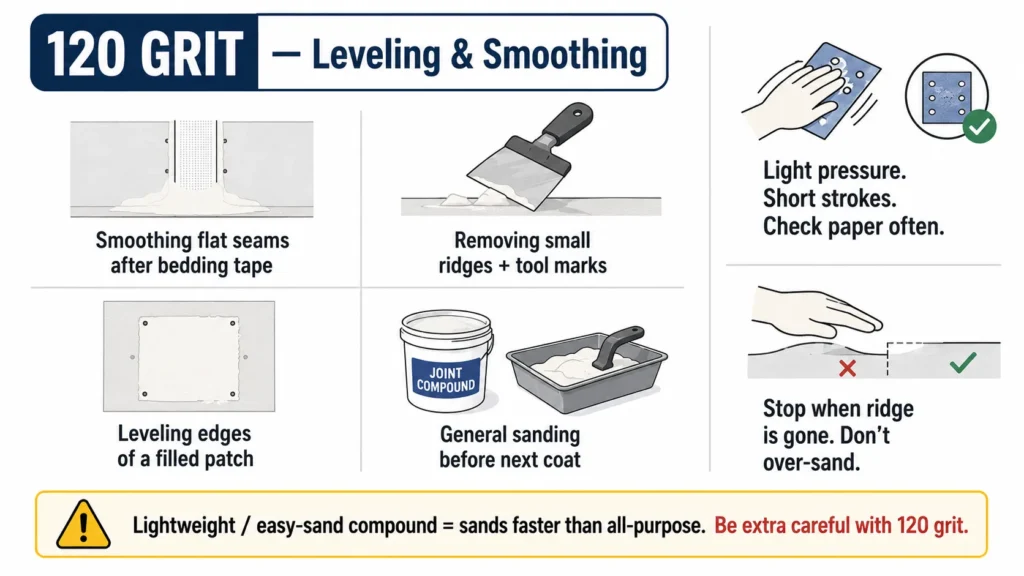
When to Use 120 Grit
120 grit is the right choice when you need to level dried compound after the first or second coat. This includes:
- Smoothing flat seams after bedding tape
- Removing small ridges or tool marks left by the knife
- Leveling the edges of a filled patch
- General sanding of all-purpose compound before the next coat
Use light, consistent pressure. Drywall compound builds up and clogs sandpaper quickly, so work in short strokes and check your paper often. Stop sanding as soon as the edge feathers flat and you can no longer feel a ridge with your hand. Continuing past that point just removes good material and risks cutting into the paper face of the panel.
If you are using lightweight or easy-sand compound, be especially careful with 120 grit. These compounds are formulated to sand faster than all-purpose mud, and they will sand down faster than you expect.
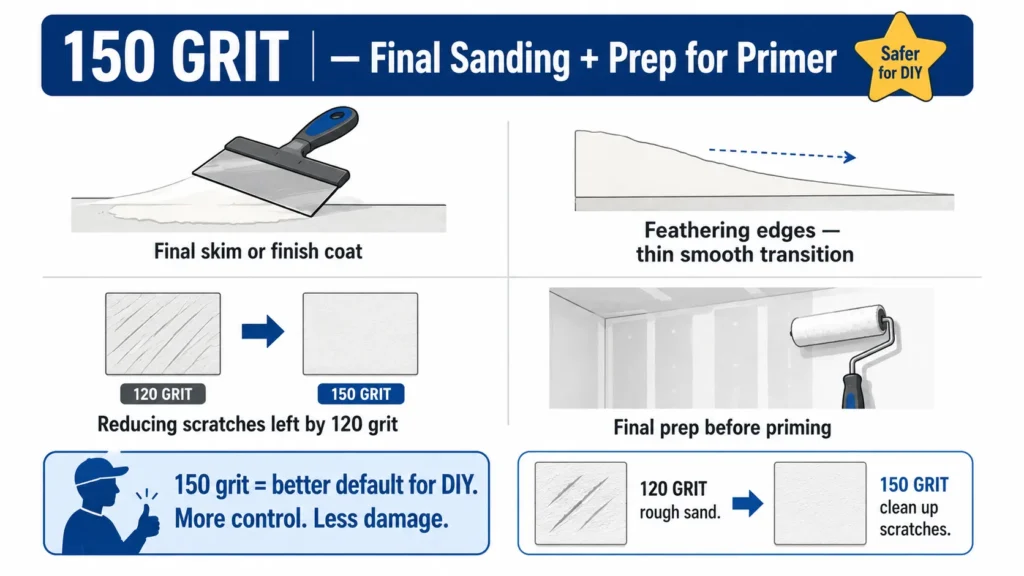
When to Use 150 Grit
150 grit is the safer choice for final coat sanding and anything that goes directly before primer. Use it for:
- Sanding the final skim or finish coat
- Feathering compound edges to a thin, smooth transition
- Reducing visible scratches left by 120 grit
- General final prep on walls and ceilings before priming
For DIYers without a lot of drywall finishing experience, 150 grit is the better default. It gives you more control than 120 grit, it is less likely to cause damage, and the slightly finer finish is better suited for the stage where the surface needs to be close to done.
If you used 120 grit for intermediate sanding and the surface still has minor scratches, a pass with 150 grit will clean those up before you apply primer.
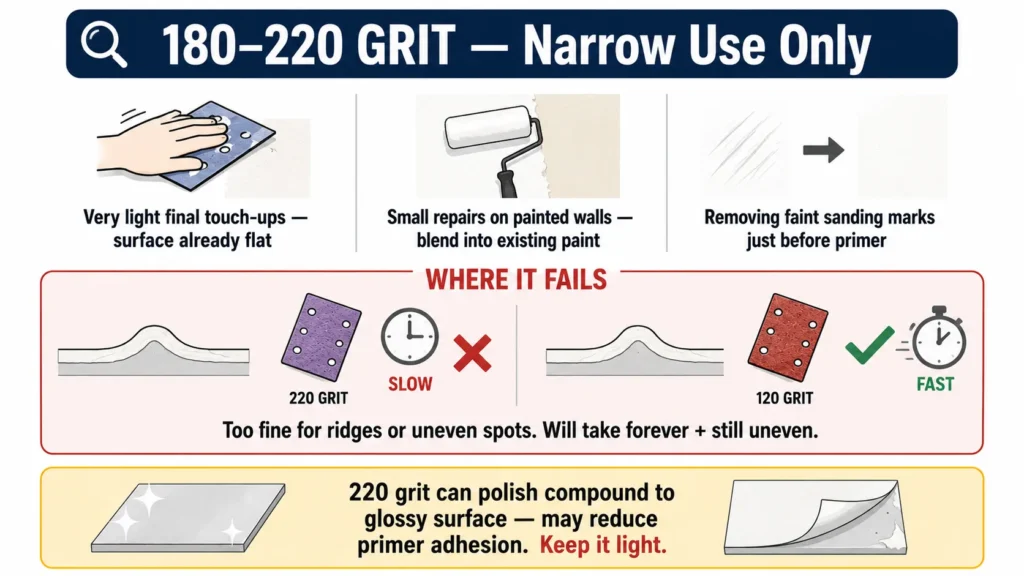
Should You Use 180 or 220 Grit on Drywall?
There is a place for 180 and 220 grit in drywall work, but it is narrower than most people assume.
Use 180 to 220 grit for:
- Very light final touch-ups where the surface already feels flat and smooth
- Small repairs on painted walls where you are blending into existing paint
- Removing faint sanding marks just before primer
Where it falls short: these grits are too fine to efficiently flatten actual ridges or level compound edges. If you try to use 220 grit on a surface that still has raised seams or uneven spots, it will take a long time and still leave you with an uneven result. Finer grit does not mean better results on drywall. It means slower cutting on a material that already cuts easily.
220 grit also polishes compound to a slightly glossy surface in some cases, which can actually affect how primer bonds to it. If you are using very fine grit for a final pass, keep it light and make sure you still get good primer adhesion.
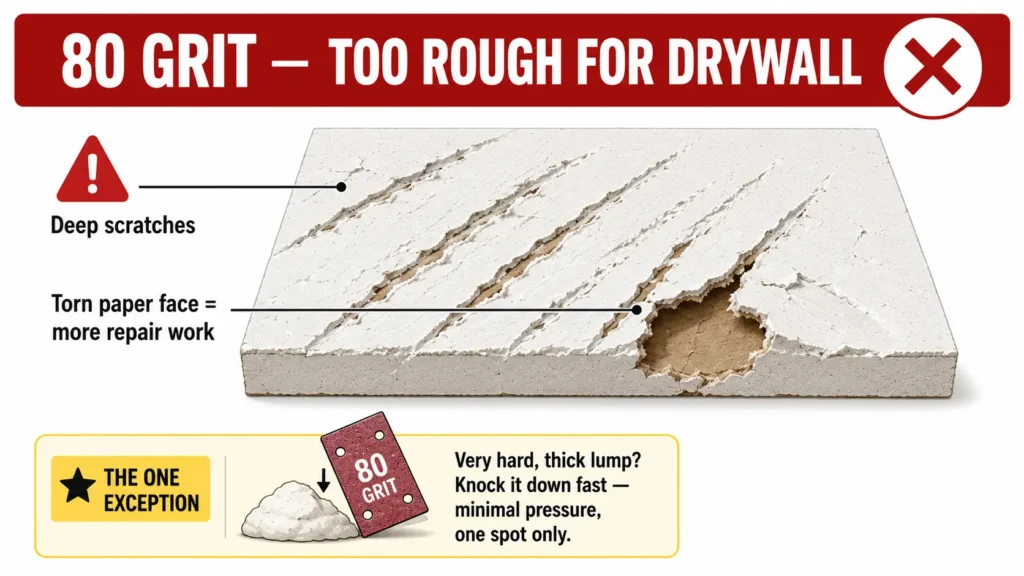
Is 80 Grit Too Rough for Drywall?
Yes, in almost every situation.
80 grit leaves scratches deep enough that they require additional compound to fill. It can tear the paper face of the drywall panel if you sand through the compound and hit the board itself. Once that paper face is damaged, you have created more repair work than you started with.
The only time 80 grit is worth reaching for is when you have a very hard, thick lump of dried compound that needs to be knocked down fast. Even then, use it with minimal pressure on just that spot, then switch to 120 grit immediately after to clean up the scratch marks it leaves behind.
For standard wall finishing and patching, skip 80 grit entirely.
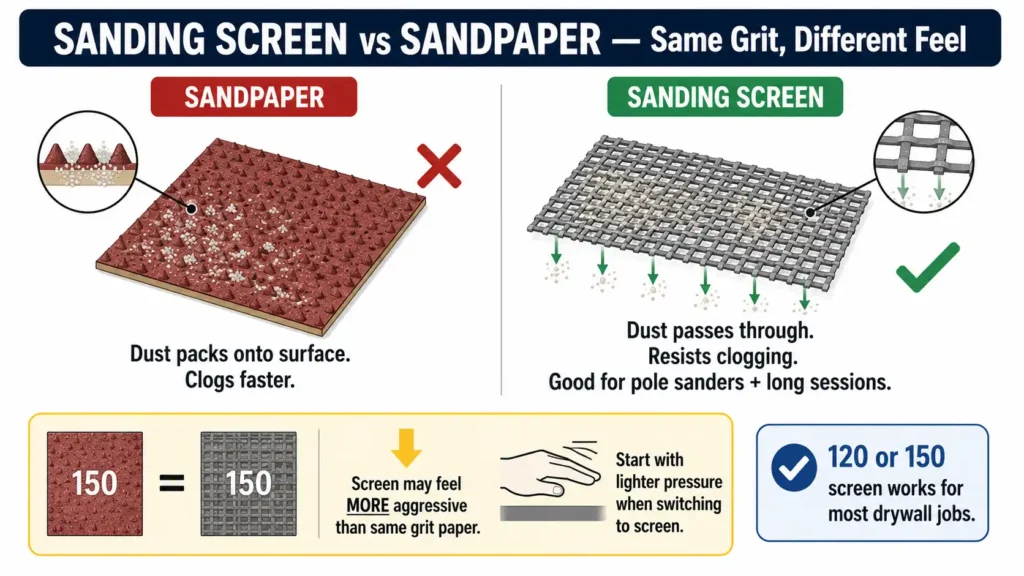
Sandpaper vs Sanding Screen: Does Grit Change?
Sanding screens and sandpaper are rated with the same grit numbers, but they cut a little differently. Screens resist clogging better because the mesh structure allows dust to pass through rather than pack onto the abrasive surface. That makes them practical for longer sessions and pole sanders.
The same grit number on a screen may feel slightly more aggressive than on paper, so if you are switching between the two, start with lighter pressure until you get a sense of how the screen cuts on your specific compound. For most drywall work, 120 or 150 grit screen is common and works well. The essential drywall tools list covers pole sanders and sanding blocks worth having on hand for different stages of finishing.
What Grit for Sanding Drywall Patches?
Patches require a slightly more considered approach because you are blending into a finished surface, not just flattening a new installation.
- Small nail hole or shallow patch: 150 grit is usually sufficient from start to finish
- Raised patch edge that sits above the surrounding wall: Start with 120 grit to bring down the high edge, then finish with 150 grit
- Painted wall repair: Use 180 to 220 grit for the final blend so you are not cutting through the surrounding paint finish
- Larger patch with multiple coats of compound: Follow the same progression as new drywall, 120 grit between coats and 150 grit before priming
One thing to watch on patches: the paper face of the surrounding drywall is right there, and it is easy to sand through it while you are focused on the patch edge. Keep your sanding focused on the compound itself.

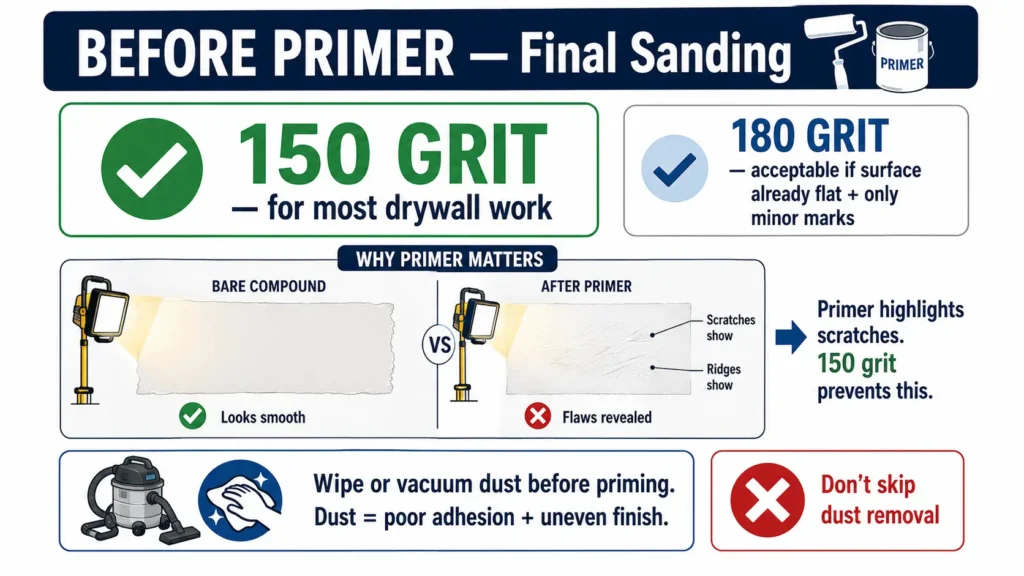
What Grit Before Primer?
Use 150 grit before primer for most drywall work. If the surface already feels consistently flat and you are only dealing with minor sanding marks, 180 grit is acceptable for a final light pass.
Primer is unforgiving. It tends to highlight sanding scratches, ridges, and uneven surfaces more than bare compound does. A surface that looks acceptable under work lighting can show every scratch once primer goes on. Finishing with 150 grit gives you a clean enough surface without the risk of leaving deep grooves that primer will make visible.
After sanding, wipe or vacuum the dust before priming. Sanding dust left on the wall creates a barrier between the compound and primer that can cause adhesion problems or an uneven finish.
Common Grit Mistakes to Avoid
A few patterns come up repeatedly on drywall finishing jobs:
- Starting with too coarse a grit because it seems faster. It usually creates more repair work.
- Sanding before the compound is fully dry. Wet compound tears instead of sanding cleanly. Wait for it to turn completely white and feel hard to the touch.
- Trying to sand out bad knife work. If the compound was applied poorly, another thin coat is almost always better than trying to sand it flat. Good knife technique reduces sanding significantly. A quality taping knife makes a real difference in how much sanding you need to do.
- Over-sanding the paper face. Once you cut through the compound and into the drywall paper, you get a fuzzy, raised surface that does not accept primer well and requires repair.
- Using 220 grit too early in the process because it feels safer. Fine grit on heavy compound buildup just takes longer and does not flatten the surface properly.
The type of compound you are using also affects how it sands. Lightweight compounds sand faster and require less pressure. All-purpose compound is denser and handles slightly more aggressive sanding. For more on how compound types differ, the types of joint compound guide explains the tradeoffs.
Final Recommendation
If you are buying sandpaper for a drywall job and want to keep it simple, get 150 grit. It works for most finishing stages and is the safest choice for DIYers who want to avoid damaging the surface.
For a better setup, keep 120 grit for leveling compound between coats and 150 grit for final smoothing before primer. Add 180 or 220 grit only if you are doing painted wall repairs or very light final touch-ups.
Leave the 80 grit on the shelf for other projects.

Elena Hart is the founder and lead writer of Better Home Pro. She writes about drywall, home repair, and practical DIY home improvement topics, focusing on clear, useful information that helps homeowners make better decisions. Her work combines firsthand experience, manufacturer documentation, industry resources, and careful research to create content that is accurate, practical, and easy to understand. Through Better Home Pro, Elena aims to simplify complex home improvement topics and provide guidance that is genuinely helpful to homeowners and DIYers.


No Comments